User Guide for Mac
Page 4
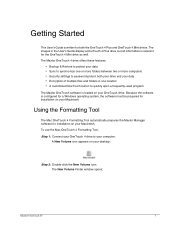
...; Encryption of multiple files and folders in the User's Guide display a OneTouch 4 Plus drive, but all information is relevant for installation on your Macintosh, To use the Mac OneTouch 4 Formatting Tool, Step 1: Connect your OneTouch 4 drive to quickly open a frequently-used program The Maxtor OneTouch software is loaded on your Macintosh. Getting Started This User's Guide is...
...; Encryption of multiple files and folders in the User's Guide display a OneTouch 4 Plus drive, but all information is relevant for installation on your Macintosh, To use the Mac OneTouch 4 Formatting Tool, Step 1: Connect your OneTouch 4 drive to quickly open a frequently-used program The Maxtor OneTouch software is loaded on your Macintosh. Getting Started This User's Guide is...

User Guide for Mac
Page 5
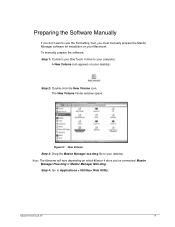
The remainder of what the Formatting tool does, click Format to format your OneTouch 4 drive for a Macintosh. Figure 1: New Volume The New Volume Finder window contains the Mac OneTouch 4 Plus Formatting tool. Here's what you 've read the description of the software preparation is dismounted and reformatted: Maxtor OneTouch IV 2 The Mac OneTouch 4 Plus Formatter window opens: Figure 2: Mac OneTouch 4 Formatter Step 4: After you see: • The New Volume drive is automatic. Step 3: Double-click the Mac OneTouch 4 Plus (or Mac OneTouch 4 Mini) icon.
The remainder of what the Formatting tool does, click Format to format your OneTouch 4 drive for a Macintosh. Figure 1: New Volume The New Volume Finder window contains the Mac OneTouch 4 Plus Formatting tool. Here's what you 've read the description of the software preparation is dismounted and reformatted: Maxtor OneTouch IV 2 The Mac OneTouch 4 Plus Formatter window opens: Figure 2: Mac OneTouch 4 Formatter Step 4: After you see: • The New Volume drive is automatic. Step 3: Double-click the Mac OneTouch 4 Plus (or Mac OneTouch 4 Mini) icon.

User Guide for Mac
Page 6
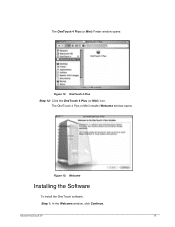
Figure 3: Formatting In Progress • When formatting is complete, the OneTouch icon refreshes to display the name of the drive: • The OneTouch 4 Plus.dmg file appears on your desktop: • The dmg file automatically creates a OneTouch 4 Plus installer: • The OneTouch 4 Plus installer Welcome window opens Figure 4: Welcome Maxtor OneTouch IV 3
Figure 3: Formatting In Progress • When formatting is complete, the OneTouch icon refreshes to display the name of the drive: • The OneTouch 4 Plus.dmg file appears on your desktop: • The dmg file automatically creates a OneTouch 4 Plus installer: • The OneTouch 4 Plus installer Welcome window opens Figure 4: Welcome Maxtor OneTouch IV 3
User Guide for Mac
Page 7
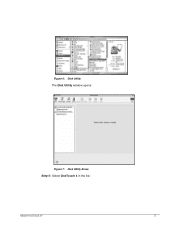
... the Maxtor Manager software for installation on your desktop. Step 4: Go to your Macintosh. Preparing the Software Manually If you don't want to use the Formatting Tool, you 've connected: Maxtor Manager Plus.dmg or Maxtor Manager Mini.dmg. To manually prepare the software, Step 1: Connect your OneTouch 4 drive to Applications > Utilities> Disk Utility: Maxtor OneTouch IV...
... the Maxtor Manager software for installation on your desktop. Step 4: Go to your Macintosh. Preparing the Software Manually If you don't want to use the Formatting Tool, you 've connected: Maxtor Manager Plus.dmg or Maxtor Manager Mini.dmg. To manually prepare the software, Step 1: Connect your OneTouch 4 drive to Applications > Utilities> Disk Utility: Maxtor OneTouch IV...
User Guide for Mac
Page 8
Figure 6: Disk Utility The Disk Utility window opens: Figure 7: Disk Utility Erase Step 5: Select OneTouch 4 in the list: Maxtor OneTouch IV 5
Figure 6: Disk Utility The Disk Utility window opens: Figure 7: Disk Utility Erase Step 5: Select OneTouch 4 in the list: Maxtor OneTouch IV 5
User Guide for Mac
Page 11
Maxtor OneTouch IV 8 The OneTouch 4 Plus or Mini Installer Welcome window opens Figure 13: Welcome Installing the Software To install the OneTouch software, Step 1: In the Welcome window, click Continue. The OneTouch 4 Plus (or Mini) Finder window opens: Figure 12: OneTouch 4 Plus Step 12: Click the OneTouch 4 Plus (or Mini) icon.
Maxtor OneTouch IV 8 The OneTouch 4 Plus or Mini Installer Welcome window opens Figure 13: Welcome Installing the Software To install the OneTouch software, Step 1: In the Welcome window, click Continue. The OneTouch 4 Plus (or Mini) Finder window opens: Figure 12: OneTouch 4 Plus Step 12: Click the OneTouch 4 Plus (or Mini) icon.

User Guide for Mac
Page 12
A sheet requires your agreement to continue the installation: Maxtor OneTouch IV 9 The Read Me window opens: Figure 14: Read Me Step 2: When you've read the information, click Continue. The Software License Agreement window opens: Figure 15: Software License Agreement Step 3: Click Continue.
A sheet requires your agreement to continue the installation: Maxtor OneTouch IV 9 The Read Me window opens: Figure 14: Read Me Step 2: When you've read the information, click Continue. The Software License Agreement window opens: Figure 15: Software License Agreement Step 3: Click Continue.

User Guide for Mac
Page 13
The Select a Destination window opens: Figure 17: Select a Destination Step 5: If it's not already selected, select your Macintosh hard drive and click Continue. Note: The OneTouch 4 software can be installed only on the boot volume. The Installation Type window opens: Maxtor OneTouch IV 10 Figure 16: License Agreement sheet Step 4: Click Agree in the sheet to continue the installation.
The Select a Destination window opens: Figure 17: Select a Destination Step 5: If it's not already selected, select your Macintosh hard drive and click Continue. Note: The OneTouch 4 software can be installed only on the boot volume. The Installation Type window opens: Maxtor OneTouch IV 10 Figure 16: License Agreement sheet Step 4: Click Agree in the sheet to continue the installation.

User Guide for Mac
Page 15
When your computer has restarted, a Maxtor Manager icon appears on your computer and complete the installation. Figure 20: Installing OneTouch 4 Plus When the installation is complete, a Restart window opens: Figure 21: Restart Step 8: Click Restart to restart your desktop: Maxtor OneTouch IV 12
When your computer has restarted, a Maxtor Manager icon appears on your computer and complete the installation. Figure 20: Installing OneTouch 4 Plus When the installation is complete, a Restart window opens: Figure 21: Restart Step 8: Click Restart to restart your desktop: Maxtor OneTouch IV 12

User Guide for Mac
Page 16
Step 9: Double-click the Maxtor Manager icon to open the Maxtor Manager application: Figure 22: Maxtor Manager Application You're ready to use your Maxtor OneTouch 4 drive. 072407 Maxtor OneTouch IV 13
Step 9: Double-click the Maxtor Manager icon to open the Maxtor Manager application: Figure 22: Maxtor Manager Application You're ready to use your Maxtor OneTouch 4 drive. 072407 Maxtor OneTouch IV 13
User Guide for Mac
Page 18
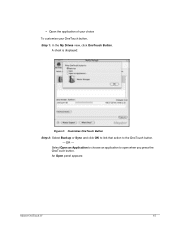
A sheet is displayed: Figure 2: Customize OneTouch Button Step 2: Select Backup or Sync and click OK to link that action to open when you press the OneTouch button. • Open the application of your choice To customize your OneTouch button, Step 1: In the My Drives view, click OneTouch Button. OR - Select Open an Application to choose an application to the OneTouch button. - An Open panel appears: Maxtor OneTouch IV 15
A sheet is displayed: Figure 2: Customize OneTouch Button Step 2: Select Backup or Sync and click OK to link that action to open when you press the OneTouch button. • Open the application of your choice To customize your OneTouch button, Step 1: In the My Drives view, click OneTouch Button. OR - Select Open an Application to choose an application to the OneTouch button. - An Open panel appears: Maxtor OneTouch IV 15

User Guide for Mac
Page 19
You can now open the selected application by pressing the OneTouch button. Maxtor OneTouch IV 16 Application Selected Step 4: Click OK. Figure 3: Applications Menu Step 3: Select the application to be associated with the OneTouch button and click Open. The application you've chosen now appears in the sheet: Figure 4: Customize OneTouch Button -
You can now open the selected application by pressing the OneTouch button. Maxtor OneTouch IV 16 Application Selected Step 4: Click OK. Figure 3: Applications Menu Step 3: Select the application to be associated with the OneTouch button and click Open. The application you've chosen now appears in the sheet: Figure 4: Customize OneTouch Button -
User Guide for Mac
Page 24
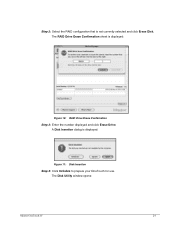
The RAID Drive Erase Confirmation sheet is displayed: Figure 11: Disk Insertion Step 4: Click Initialize to prepare your OneTouch for use. A Disk Insertion dialog is displayed: Figure 10: RAID Drive Erase Confirmation Step 3: Enter the number displayed and click Erase Drive. The Disk Utility window opens: Maxtor OneTouch IV 21 Step 2: Select the RAID configuration that is not currently selected and click Erase Disk.
The RAID Drive Erase Confirmation sheet is displayed: Figure 11: Disk Insertion Step 4: Click Initialize to prepare your OneTouch for use. A Disk Insertion dialog is displayed: Figure 10: RAID Drive Erase Confirmation Step 3: Enter the number displayed and click Erase Drive. The Disk Utility window opens: Maxtor OneTouch IV 21 Step 2: Select the RAID configuration that is not currently selected and click Erase Disk.

User Guide for Mac
Page 27
Step 10: Close the Disk Utility. The My Drives view opens: Maxtor OneTouch IV 24 Step 11: Click the Maxtor Manager desktop icon. Figure 15: Erase Disk Warning Step 9: Click Erase in the Erase Disk sheet. Your OneTouch 4 drive is dismounted and then remounts with the name you entered.
Step 10: Close the Disk Utility. The My Drives view opens: Maxtor OneTouch IV 24 Step 11: Click the Maxtor Manager desktop icon. Figure 15: Erase Disk Warning Step 9: Click Erase in the Erase Disk sheet. Your OneTouch 4 drive is dismounted and then remounts with the name you entered.
User Guide for Mac
Page 29
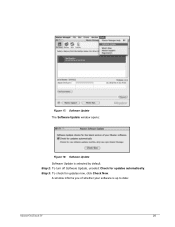
Step 2: To turn off Software Update, unselect Check for updates now, click Check Now. A window informs you of whether your software is selected by default. Step 3: To check for updates automatically. Figure 17: Software Update The Software Update window opens: Figure 18: Software Update Software Update is up to date: Maxtor OneTouch IV 26
Step 2: To turn off Software Update, unselect Check for updates now, click Check Now. A window informs you of whether your software is selected by default. Step 3: To check for updates automatically. Figure 17: Software Update The Software Update window opens: Figure 18: Software Update Software Update is up to date: Maxtor OneTouch IV 26

User Guide for Mac
Page 32
If this is your first time opening the Backup Plans view, a sheet describes Simple Backup: Figure 2: Simple Backup Welcome Maxtor OneTouch IV 29 Figure 1: Backup View Simple Backup appears in the Backup Plans list.
If this is your first time opening the Backup Plans view, a sheet describes Simple Backup: Figure 2: Simple Backup Welcome Maxtor OneTouch IV 29 Figure 1: Backup View Simple Backup appears in the Backup Plans list.

User Guide for Mac
Page 39
An Open panel is displayed: Figure 12: Maxtor Manager Panel Maxtor OneTouch IV 36 Figure 11: Backup Folder Options Step 9: Click the plus sign (+) below the Folders tab view to browse to a folder to back up.
An Open panel is displayed: Figure 12: Maxtor Manager Panel Maxtor OneTouch IV 36 Figure 11: Backup Folder Options Step 9: Click the plus sign (+) below the Folders tab view to browse to a folder to back up.

User Guide for Mac
Page 40
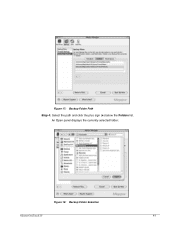
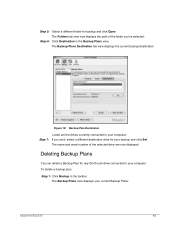
Step 10: Select a folder for backup and click Open. The Folders tab view now displays the path of the folder you've selected: Figure 13: Backup Folder Path Step 11: Click Destination in the Backup Plans view. The Backup Plans Destination tab view is displayed: Maxtor OneTouch IV 37
Step 10: Select a folder for backup and click Open. The Folders tab view now displays the path of the folder you've selected: Figure 13: Backup Folder Path Step 11: Click Destination in the Backup Plans view. The Backup Plans Destination tab view is displayed: Maxtor OneTouch IV 37
User Guide for Mac
Page 44
Figure 17: Backup Folder Path Step 4: Select the path and click the plus sign (+) below the Folders list. An Open panel displays the currently selected folder: Figure 18: Backup Folder Selection Maxtor OneTouch IV 41
Figure 17: Backup Folder Path Step 4: Select the path and click the plus sign (+) below the Folders list. An Open panel displays the currently selected folder: Figure 18: Backup Folder Selection Maxtor OneTouch IV 41
User Guide for Mac
Page 45
... connected to your computer. The name and serial number of the folder you wish, select a different destination drive for your current Backup Plans: Maxtor OneTouch IV 42 Step 7: If you 've selected: Step 6: Click Destination in the toolbar. The Backup Plans Destination tab view displays the current ... plan, Step 1: Click Backup in the Backup Plans view. Deleting Backup Plans You can delete a Backup Plan for backup and click Open. Step 5: Select a different folder for any OneTouch drive connected to your computer. The Backup Plans view displays your backup and click Set.
... connected to your computer. The name and serial number of the folder you wish, select a different destination drive for your current Backup Plans: Maxtor OneTouch IV 42 Step 7: If you 've selected: Step 6: Click Destination in the toolbar. The Backup Plans Destination tab view displays the current ... plan, Step 1: Click Backup in the Backup Plans view. Deleting Backup Plans You can delete a Backup Plan for backup and click Open. Step 5: Select a different folder for any OneTouch drive connected to your computer. The Backup Plans view displays your backup and click Set.


