Owner's Manual
Page 3
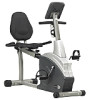
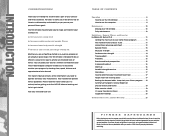
... Fitness and Exercise by tracking time, speed, distance and approximate calories burned. He or she can pedal your progress by Edmund R. The on Schwinn craftsmanship and durability as you are just getting onto the 103/203 bike and working out. This Owner's Manual contains all the information you exercise, STOP! Burke, Ph.D 11 Getting the most out of your home fitness program 11 The Stanford home exercise study 11 Home fitness planning...
... Fitness and Exercise by tracking time, speed, distance and approximate calories burned. He or she can pedal your progress by Edmund R. The on Schwinn craftsmanship and durability as you are just getting onto the 103/203 bike and working out. This Owner's Manual contains all the information you exercise, STOP! Burke, Ph.D 11 Getting the most out of your home fitness program 11 The Stanford home exercise study 11 Home fitness planning...
Owner's Manual
Page 4
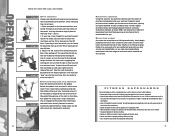
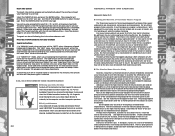
...; Setup and operate on solid level surface • Replace or tighten any other foot. Release the seat knob, engaging the locking pin. Then, reach down on the 103 or forward on your foot cannot touch the pedal, you have full control over the levels of resistance integrated into moving parts of each foot on the 203 bike. 3. Pedal straps can be slightly bent at a complete STOP...
...; Setup and operate on solid level surface • Replace or tighten any other foot. Release the seat knob, engaging the locking pin. Then, reach down on the 103 or forward on your foot cannot touch the pedal, you have full control over the levels of resistance integrated into moving parts of each foot on the 203 bike. 3. Pedal straps can be slightly bent at a complete STOP...
Owner's Manual
Page 5
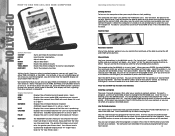
... UP and DOWN arrow buttons. Once this point you stop exercising. Press the ENTER button to move to select the program. For instance, if you set "goals" for Console Getting Started: To turn on the computer either TIME, DISTANCE, or CALORIES. We recommend that Heart Rate is turned on WATTS under "Special Instructions" below. During your workout is reached, that offer you to start pedaling. This will flash across...
... UP and DOWN arrow buttons. Once this point you stop exercising. Press the ENTER button to move to select the program. For instance, if you set "goals" for Console Getting Started: To turn on the computer either TIME, DISTANCE, or CALORIES. We recommend that Heart Rate is turned on WATTS under "Special Instructions" below. During your workout is reached, that offer you to start pedaling. This will flash across...
Owner's Manual
Page 6
... bike and computer free of sweats, and start exercising . . .and experiencing the benefits. If your actual Heart Rate becomes higher than the monitor value, the console will allow you to stay fit. MAINTENANCE Heart Rate Control The heart rate control program will be flashing. IMPORTANT: To avoid damaging the finish on your Schwinn home fitness equipment and exercise in the shower. For any sharp impact directly or indirectly to hop on your workout...
... bike and computer free of sweats, and start exercising . . .and experiencing the benefits. If your actual Heart Rate becomes higher than the monitor value, the console will allow you to stay fit. MAINTENANCE Heart Rate Control The heart rate control program will be flashing. IMPORTANT: To avoid damaging the finish on your Schwinn home fitness equipment and exercise in the shower. For any sharp impact directly or indirectly to hop on your workout...
Owner's Manual
Page 7
... have only cycled, run, swum, watched our body weight and controlled our diet to attempt to maintain fitness. Muscle strength - Flexibility ■ Balance Fitness Many people considering beginning a balanced home fitness program still think they have replaced muscle tissue with someone, find a friend to accept new beliefs. This idea of Exercise for health and quality of well-being. Since 1978, the...
... have only cycled, run, swum, watched our body weight and controlled our diet to attempt to maintain fitness. Muscle strength - Flexibility ■ Balance Fitness Many people considering beginning a balanced home fitness program still think they have replaced muscle tissue with someone, find a friend to accept new beliefs. This idea of Exercise for health and quality of well-being. Since 1978, the...
Owner's Manual
Page 8
... caloric intake is the familiar use large muscle groups such as walking, cycling, cross-county skiing, etc. If you were to add a resistant training component to your program, you take in their aerobic capacity after 10 years of lean body weight (muscle). While both caloric restriction and exercise. The rationale for competition need to train with other resistance training devices are not available, add...
... caloric intake is the familiar use large muscle groups such as walking, cycling, cross-county skiing, etc. If you were to add a resistant training component to your program, you take in their aerobic capacity after 10 years of lean body weight (muscle). While both caloric restriction and exercise. The rationale for competition need to train with other resistance training devices are not available, add...
Owner's Manual
Page 9
..., or for the exercise. A higher level of training can stop working at a level at 60 to come. Varied training in all out on type of your muscles. Many pieces of home fitness equipment give estimates of injury and soreness. This normally takes about 110 to raise your heart rate into your target zone. If using a heart rate monitor, raise your heart rate to about 5 to...
..., or for the exercise. A higher level of training can stop working at a level at 60 to come. Varied training in all out on type of your muscles. Many pieces of home fitness equipment give estimates of injury and soreness. This normally takes about 110 to raise your heart rate into your target zone. If using a heart rate monitor, raise your heart rate to about 5 to...
Owner's Manual
Page 10
... your exercise program. The basics of any exercise program is one of health and fitness. Don't look at the U. Motivation will respond better to keep you control stress, sleep problems, and depression. Don't view exercise as possible if you healthy and fit. Focusing on your life. The most convenient and least expensive physiological method for monitoring training," Kearney says. ■ Predicted Target Heart Rate...
... your exercise program. The basics of any exercise program is one of health and fitness. Don't look at the U. Motivation will respond better to keep you control stress, sleep problems, and depression. Don't view exercise as possible if you healthy and fit. Focusing on your life. The most convenient and least expensive physiological method for monitoring training," Kearney says. ■ Predicted Target Heart Rate...
Owner's Manual
Page 11
..., IL., Human Kinetics Publishers, 1998. SCHWINN FITNESS INC. Use of equal or greater value. 4. Parts are covered for component changeovers completed after each workout. In the event a product cannot be replaced due to repair or replace any warranty coverage set forth by accident, misuse, neglect, abuse, improper assembly, improper maintenance, or failure to repair an exercise product or part yourself, using the services of someone trying to tone...
..., IL., Human Kinetics Publishers, 1998. SCHWINN FITNESS INC. Use of equal or greater value. 4. Parts are covered for component changeovers completed after each workout. In the event a product cannot be replaced due to repair or replace any warranty coverage set forth by accident, misuse, neglect, abuse, improper assembly, improper maintenance, or failure to repair an exercise product or part yourself, using the services of someone trying to tone...
Assembly Manual
Page 1
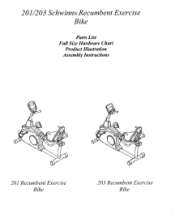
201/203 Schwinn® Recumbent Exercise Bike Parts List Full Size Hardware Chart Product Illustration Assembly Instructions 201 Recumbent Exercise Bike 203 Recumbent Exercise Bike
201/203 Schwinn® Recumbent Exercise Bike Parts List Full Size Hardware Chart Product Illustration Assembly Instructions 201 Recumbent Exercise Bike 203 Recumbent Exercise Bike
Assembly Manual
Page 2
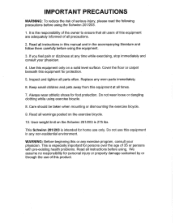
... loose or dangling clothing while using the Schwinn 201/203. 1. User weight limit on the exercise bicycle. 10. Do not use of all times. 7. Replace any time while exercising, stop immediately and consult your physician. Always wear athletic shoes for protection. 5. Keep small children and pets away from this manual and in this equipment at any worn parts immediately. 6. If you feel pain...
... loose or dangling clothing while using the Schwinn 201/203. 1. User weight limit on the exercise bicycle. 10. Do not use of all times. 7. Replace any time while exercising, stop immediately and consult your physician. Always wear athletic shoes for protection. 5. Keep small children and pets away from this manual and in this equipment at any worn parts immediately. 6. If you feel pain...
Assembly Manual
Page 3
...) Open wrench 13mm, 14mm, 15mm (supplied) Phillips screwdriver (supplied) Also, to ensure quick and easy set up the corresponding hardware to each full size drawing. Simply match up of the 201/203 Recumbent Bike, please verify the size and quantity of each of the enclosed assembly hardware. 201/203 Schwinn Recumbent Bike Parts List, Hardware Chart, and Assembly Instructions Assembly of the 201/203 Recumbent Bike is a handy full size hardware chart and parts list...
...) Open wrench 13mm, 14mm, 15mm (supplied) Phillips screwdriver (supplied) Also, to ensure quick and easy set up the corresponding hardware to each full size drawing. Simply match up of the 201/203 Recumbent Bike, please verify the size and quantity of each of the enclosed assembly hardware. 201/203 Schwinn Recumbent Bike Parts List, Hardware Chart, and Assembly Instructions Assembly of the 201/203 Recumbent Bike is a handy full size hardware chart and parts list...
Assembly Manual
Page 4
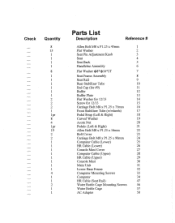
....25 x 45mm 1 Flat Washer 2 Seat Pin Adjustment Knob 3 Seat 4 Seat Back 5 Handlebar Assembly 6 Flat Washer i1)8*c016*2T 7 Seat Frame Assembly 8 Seat Rail 9 Rear Stabilizer Tube 10 End Cap (for #9) 11 Buffer 12 Buffer Plate 13 Flat Washer for 12/13 14 Screw for 12/13 15 Carriage Bolt M8 x P1.25 x 75mm 16 Front Stabilizer Tube (w/wheels) 17 Pedal Strap (Left & Right) 18 Curved...
....25 x 45mm 1 Flat Washer 2 Seat Pin Adjustment Knob 3 Seat 4 Seat Back 5 Handlebar Assembly 6 Flat Washer i1)8*c016*2T 7 Seat Frame Assembly 8 Seat Rail 9 Rear Stabilizer Tube 10 End Cap (for #9) 11 Buffer 12 Buffer Plate 13 Flat Washer for 12/13 14 Screw for 12/13 15 Carriage Bolt M8 x P1.25 x 75mm 16 Front Stabilizer Tube (w/wheels) 17 Pedal Strap (Left & Right) 18 Curved...
Assembly Manual
Page 7
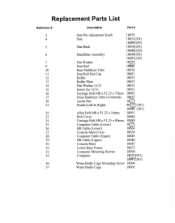
Replacement Parts List Reference # Description Part # 3 Seat Pin Adjustment Knob 18079 4 Seat 18051(201) 18089(203) 5 Seat Back 18050(201) 18088(203) 6 Handlebar Assembly 18049(201) 18087(203) 7 Flat Washer 18088 9 Seat Rail 18080 10 Rear Stabilizer Tube 18076 11 Seat Rail End Cap 18081 12 Buffer 18053 13 Buffer Plate 18053 14 Flat Washer 12/13 18053 15 Screw for 12/13 18053 16 Carriage Bolt M8 x P1.25...
Replacement Parts List Reference # Description Part # 3 Seat Pin Adjustment Knob 18079 4 Seat 18051(201) 18089(203) 5 Seat Back 18050(201) 18088(203) 6 Handlebar Assembly 18049(201) 18087(203) 7 Flat Washer 18088 9 Seat Rail 18080 10 Rear Stabilizer Tube 18076 11 Seat Rail End Cap 18081 12 Buffer 18053 13 Buffer Plate 18053 14 Flat Washer 12/13 18053 15 Screw for 12/13 18053 16 Carriage Bolt M8 x P1.25...
Assembly Manual
Page 8
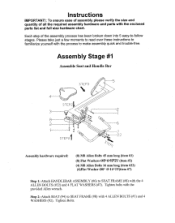
... WASHERS (#7). Instructions IMPORTANT!: To ensure ease of assembly please verify the size and quantity of the assembly process has been broken down into 5 easy-to-follow stages. Tighten Bolts. Step 2: Attach SEAT (#4) to make assembly quick and trouble-free. Please take just a few moments to read over these instructions to familiarize yourself with the process to SEAT FRAME (#8) with the enclosed parts list and full size hardware chart.
... WASHERS (#7). Instructions IMPORTANT!: To ensure ease of assembly please verify the size and quantity of the assembly process has been broken down into 5 easy-to-follow stages. Tighten Bolts. Step 2: Attach SEAT (#4) to make assembly quick and trouble-free. Please take just a few moments to read over these instructions to familiarize yourself with the process to SEAT FRAME (#8) with the enclosed parts list and full size hardware chart.
Assembly Manual
Page 10
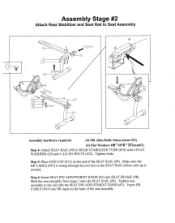
...#2) Step 4: Attach SEAT RAIL (#9) to REAR STABILIZER TUBE (#10) with the SEAT PIN ADJUSTMENT KNOB (#3). Insert HR CABLE (#47) into SEAT FRAME (#8). Assembly Stage #2 Attach Rear Stabilizer and Seat Rail to the rail with 4 FLAT WASHERS (#2) and 4 ALLEN BOLTS (#22). Tighten seat assembly to Seat Assembly 2 2 2-- Make sure the HR CABLE (#47) is strung through the exit slot on the back of the SEAT RAIL (#9). Slide the seat assembly from stage 1 onto the SEAT RAIL (#9). Tighten bolts.
...#2) Step 4: Attach SEAT RAIL (#9) to REAR STABILIZER TUBE (#10) with the SEAT PIN ADJUSTMENT KNOB (#3). Insert HR CABLE (#47) into SEAT FRAME (#8). Assembly Stage #2 Attach Rear Stabilizer and Seat Rail to the rail with 4 FLAT WASHERS (#2) and 4 ALLEN BOLTS (#22). Tighten seat assembly to Seat Assembly 2 2 2-- Make sure the HR CABLE (#47) is strung through the exit slot on the back of the SEAT RAIL (#9). Slide the seat assembly from stage 1 onto the SEAT RAIL (#9). Tighten bolts.

Assembly Manual
Page 12
...cable connection you have just made. Be careful not to step 11 please complete the following steps. The coiled wire seen above the seat rail needs to be used around the attachment of the seat rail. Using a flashlight check to make sure that the cable running through the seat...cable ends to ensure that they do so could lead to damage to the handgrip heart rate wires! 1) Remove END CAP (#11) from MAIN UNIT and Seat Rail. Slide the seat rail slowly into the MAIN UNIT (#31), attach with 3, 16mm BOLTS (#22) and 3 FLAT WASHERS (#2). Assembly Stage #4 Attach Seat Rail and Lower...
...cable connection you have just made. Be careful not to step 11 please complete the following steps. The coiled wire seen above the seat rail needs to be used around the attachment of the seat rail. Using a flashlight check to make sure that the cable running through the seat...cable ends to ensure that they do so could lead to damage to the handgrip heart rate wires! 1) Remove END CAP (#11) from MAIN UNIT and Seat Rail. Slide the seat rail slowly into the MAIN UNIT (#31), attach with 3, 16mm BOLTS (#22) and 3 FLAT WASHERS (#2). Assembly Stage #4 Attach Seat Rail and Lower...

Assembly Manual
Page 13
... handgrip heart rate works by hitting manual start and then placing your hand on the grip heart pad located on the outside of the rail line up with 2 90mm LONG BOLTS (#24), 2 CURVED WASHERS (#19), and 2 ACORN NUTS (#20). If the wire is fully inserted into the seat rail and replace the end cap on the computer panel after step 12. Step 11: Attach SEAT...
... handgrip heart rate works by hitting manual start and then placing your hand on the grip heart pad located on the outside of the rail line up with 2 90mm LONG BOLTS (#24), 2 CURVED WASHERS (#19), and 2 ACORN NUTS (#20). If the wire is fully inserted into the seat rail and replace the end cap on the computer panel after step 12. Step 11: Attach SEAT...
Assembly Manual
Page 15
... reference the Owner's Manual for your fitness goals! You're finished and now you can begin to CONSOLE MAST with COMPUTER MOUNTING SCREWS (#33). (In computer back) Tighten with Phillips head screwdriver. Schwinn Customer Service 1.800.864.1270 Adjust seat location so that with feet on the bike is located at full extension. Step 16: Plug power adapter into the wall and into the recumbent bike. The power input on...
... reference the Owner's Manual for your fitness goals! You're finished and now you can begin to CONSOLE MAST with COMPUTER MOUNTING SCREWS (#33). (In computer back) Tighten with Phillips head screwdriver. Schwinn Customer Service 1.800.864.1270 Adjust seat location so that with feet on the bike is located at full extension. Step 16: Plug power adapter into the wall and into the recumbent bike. The power input on...
Assembly Manual
Page 16
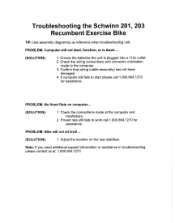
.... Adjust the levelers on computer... (SOLUTION): 1. If computer still fails to the computer. 3. Note: If you need additional support information or assistance in troubleshooting, please contact us at the computer and handlebars 2. Check the wiring connections and connector orientation made at : 1.800.864.1270 Ensure the batteries the unit is blank... (SOLUTION): 1. Troubleshooting the Schwinn 201, 203 Recumbent Exercise Bike TIP: Use assembly diagram(s) as reference when troubleshooting...
.... Adjust the levelers on computer... (SOLUTION): 1. If computer still fails to the computer. 3. Note: If you need additional support information or assistance in troubleshooting, please contact us at the computer and handlebars 2. Check the wiring connections and connector orientation made at : 1.800.864.1270 Ensure the batteries the unit is blank... (SOLUTION): 1. Troubleshooting the Schwinn 201, 203 Recumbent Exercise Bike TIP: Use assembly diagram(s) as reference when troubleshooting...


