
Owner's Manual
Page 5
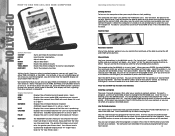
HOW TO USE THE 103/203 BIKE COMPUTER Button Functions ST/STOP ENTER UP DOWN RESET TOTAL RESET RECOVERY ...session. To select a user profiles use the UP and DOWN arrows to "F6" (low fitness level.) Operating Instructions for MANUAL is to set a DISTANCE or CALORIE goal, just continue to start your workout is producing CALORIES Displays ... to move to set a "goal". The second option for Console Getting Started: To turn on WATTS under "Special Instructions" below. To select a program, use the UP and DOWN arrow. Control Panel Resistance Control At any button or start...
HOW TO USE THE 103/203 BIKE COMPUTER Button Functions ST/STOP ENTER UP DOWN RESET TOTAL RESET RECOVERY ...session. To select a user profiles use the UP and DOWN arrows to "F6" (low fitness level.) Operating Instructions for MANUAL is to set a DISTANCE or CALORIE goal, just continue to start your workout is producing CALORIES Displays ... to move to set a "goal". The second option for Console Getting Started: To turn on WATTS under "Special Instructions" below. To select a program, use the UP and DOWN arrow. Control Panel Resistance Control At any button or start...
Owner's Manual
Page 6
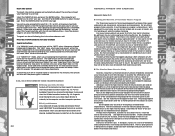
...for those in the university group-based program. No getting excessive moisture on your Schwinn home fitness equipment and exercise in the low intensity group achieving similar results as any...Rate is received. 103/203 RECUMBENT BIKE MAINTENANCE FIG.19 ■ Moving your 103/203 bike Carefully lift the horizontal rear floor support to move and steer the 103 bike to another location (Fig....your air-conditioned room. With the individuals in the comfort and security of following the instructions above as individuals who reported for five minutes, the console will turn off: If ...
...for those in the university group-based program. No getting excessive moisture on your Schwinn home fitness equipment and exercise in the low intensity group achieving similar results as any...Rate is received. 103/203 RECUMBENT BIKE MAINTENANCE FIG.19 ■ Moving your 103/203 bike Carefully lift the horizontal rear floor support to move and steer the 103 bike to another location (Fig....your air-conditioned room. With the individuals in the comfort and security of following the instructions above as individuals who reported for five minutes, the console will turn off: If ...
Owner's Manual
Page 11
... of law or otherwise, including, but on a stationary bike is the goal of equal value. Book illustrates how to set forth by the use a replacement part not supplied by Schwinn, Schwinn shall not be found at Schwinn's election, to the repayment of an amount of the ...purchase price of implied warranties or incidental or consequential damages, so the preceding limitations and exclusions may not apply to follow instructions or warnings in question. Anderson...
... of law or otherwise, including, but on a stationary bike is the goal of equal value. Book illustrates how to set forth by the use a replacement part not supplied by Schwinn, Schwinn shall not be found at Schwinn's election, to the repayment of an amount of the ...purchase price of implied warranties or incidental or consequential damages, so the preceding limitations and exclusions may not apply to follow instructions or warnings in question. Anderson...
Assembly Manual
Page 1
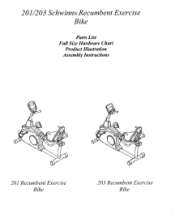
201/203 Schwinn® Recumbent Exercise Bike Parts List Full Size Hardware Chart Product Illustration Assembly Instructions 201 Recumbent Exercise Bike 203 Recumbent Exercise Bike
201/203 Schwinn® Recumbent Exercise Bike Parts List Full Size Hardware Chart Product Illustration Assembly Instructions 201 Recumbent Exercise Bike 203 Recumbent Exercise Bike
Assembly Manual
Page 2
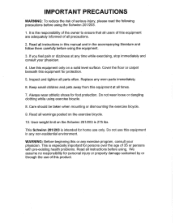
... is intended for home use this equipment only on a solid level surface. Read all instructions before using exercise bicycle. 8. Inspect and tighten all warnings posted on the Schwinn 201/203 is the responsibility of the owner to ensure that all times. 7. Use this equipment ...in the accompanying literature and follow them carefully before using the Schwinn 201/203. 1. Replace any time while exercising, stop immediately and consult your physician. Care should be taken when mounting or dismounting the ...
... is intended for home use this equipment only on a solid level surface. Read all instructions before using exercise bicycle. 8. Inspect and tighten all warnings posted on the Schwinn 201/203 is the responsibility of the owner to ensure that all times. 7. Use this equipment ...in the accompanying literature and follow them carefully before using the Schwinn 201/203. 1. Replace any time while exercising, stop immediately and consult your physician. Care should be taken when mounting or dismounting the ...
Assembly Manual
Page 3
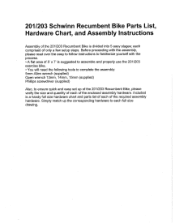
201/203 Schwinn Recumbent Bike Parts List, Hardware Chart, and Assembly Instructions Assembly of the enclosed assembly hardware. Simply match up the corresponding hardware to ensure quick and easy set up of the 201/203 Recumbent Bike, please verify the size and quantity of each of only a few setup steps. Before...with the assembly, please read over the easy to follow instructions to familiarize yourself with the process. • A flat area of 5' x 7' is a handy full size hardware chart and parts list of each of the 201/203 Recumbent Bike is divided into 5 easy stages; each full size ...
201/203 Schwinn Recumbent Bike Parts List, Hardware Chart, and Assembly Instructions Assembly of the enclosed assembly hardware. Simply match up the corresponding hardware to ensure quick and easy set up of the 201/203 Recumbent Bike, please verify the size and quantity of each of only a few setup steps. Before...with the assembly, please read over the easy to follow instructions to familiarize yourself with the process. • A flat area of 5' x 7' is a handy full size hardware chart and parts list of each of the 201/203 Recumbent Bike is divided into 5 easy stages; each full size ...
Assembly Manual
Page 8
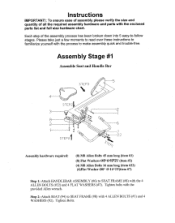
Tighten Bolts. Tighten bolts with the process to make assembly quick and trouble-free. Please take just a few moments to read over these instructions to familiarize yourself with the provided Allen wrench. Assembly Stage #1 Assemble Seat and Handle Bar 5 STEPS C 4 STEP2 3 8 2 1 STEP2 2 1 AI Assembly... hardware chart. Each step of all the required assembly hardware and parts with the 4 ALLEN BOLTS (#22) and 4 FLAT WASHERS (#7). Instructions IMPORTANT!: To ensure ease of assembly please verify the size and quantity of the assembly process has been broken down into 5 easy-to-...
Tighten Bolts. Tighten bolts with the process to make assembly quick and trouble-free. Please take just a few moments to read over these instructions to familiarize yourself with the provided Allen wrench. Assembly Stage #1 Assemble Seat and Handle Bar 5 STEPS C 4 STEP2 3 8 2 1 STEP2 2 1 AI Assembly... hardware chart. Each step of all the required assembly hardware and parts with the 4 ALLEN BOLTS (#22) and 4 FLAT WASHERS (#7). Instructions IMPORTANT!: To ensure ease of assembly please verify the size and quantity of the assembly process has been broken down into 5 easy-to-...
