Print Specs
Page 1
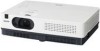
... LUMENS z XGA z ULTRAPORTABLE PROJECTOR PLC-XD2200/2600 ULTRAPORTABLE PROJECTOR 3LCD Built-in Network Closed Caption ULTRA-COMPACT, FULLY PORTABLE XGA DESIGN Not much larger than a laptop PC, the PLC-XD2200/2600 weighs less than 5.7 pounds and delivers true XGA picture quality in common) Stereo mini jack x 1 RJ-45 (LAN) Dsub 9pin (RS232C) Power cord VGA cable Lens Cap Remote control w.Battery...
... LUMENS z XGA z ULTRAPORTABLE PROJECTOR PLC-XD2200/2600 ULTRAPORTABLE PROJECTOR 3LCD Built-in Network Closed Caption ULTRA-COMPACT, FULLY PORTABLE XGA DESIGN Not much larger than a laptop PC, the PLC-XD2200/2600 weighs less than 5.7 pounds and delivers true XGA picture quality in common) Stereo mini jack x 1 RJ-45 (LAN) Dsub 9pin (RS232C) Power cord VGA cable Lens Cap Remote control w.Battery...

Owner's Manual
Page 2
... sound or other information displayed on the top control or remote control (p.54). Up to focus on the feature and switch the channels. (p.52) ✔Note: • The On-Screen Menu and figures in multimedia features, a palette of the projector (pp.19, 54-55). The digital zoom...screen. *The board color is loaded with the most advanced technology for Presentations ♦ LAN Network Function - Features and Design This Multimedia Projector is easy to carry and installed anywhere you wish to use. ♦ Simple Computer System Setting The Security function helps you to ...
... sound or other information displayed on the top control or remote control (p.54). Up to focus on the feature and switch the channels. (p.52) ✔Note: • The On-Screen Menu and figures in multimedia features, a palette of the projector (pp.19, 54-55). The digital zoom...screen. *The board color is loaded with the most advanced technology for Presentations ♦ LAN Network Function - Features and Design This Multimedia Projector is easy to carry and installed anywhere you wish to use. ♦ Simple Computer System Setting The Security function helps you to ...

Owner's Manual
Page 3
... Contents 3 To the Owner 4 Safety Instructions 5 Air Circulation 6 Installing the Projector in Proper Position 6 Moving the Projector 6 Compliance 7 Part Names and Functions 8 Front 8 Back 8 Bottom 8 Rear Terminal 9 Top Control 10 Remote Control 11 Remote Control Battery Installation 12 Remote Control Operating Range 12 Remote Control Code 12 Installation 13 Positioning the Projector 13 Adjustable Foot 13 Connecting to a Computer 14 Connecting to...
... Contents 3 To the Owner 4 Safety Instructions 5 Air Circulation 6 Installing the Projector in Proper Position 6 Moving the Projector 6 Compliance 7 Part Names and Functions 8 Front 8 Back 8 Bottom 8 Rear Terminal 9 Top Control 10 Remote Control 11 Remote Control Battery Installation 12 Remote Control Operating Range 12 Remote Control Code 12 Installation 13 Positioning the Projector 13 Adjustable Foot 13 Connecting to a Computer 14 Connecting to...

Owner's Manual
Page 11
...Execute the setting of Auto setup (includes Input search, Auto PC adj. For cleaning, use a soft dry cloth. Part Names and Functions Remote Control ① ON/STAND-BY button Turn the projector on the screen. (p.26) ⑮ ⑩ ⑭ ⑪ D.ZOOM ▲▼ buttons Zoom in the Digital zoom +/- ...function. (pp.26, 51) ⑯ LAMP button Select a lamp mode. (pp.25, 53) ⑰ INFO. Do not bend, drop or expose the remote control to moisture or heat. - Do not apply benzene, thinner, spray, or any chemical material. 11 Select an item or adjust the value in the On...
...Execute the setting of Auto setup (includes Input search, Auto PC adj. For cleaning, use a soft dry cloth. Part Names and Functions Remote Control ① ON/STAND-BY button Turn the projector on the screen. (p.26) ⑮ ⑩ ⑭ ⑪ D.ZOOM ▲▼ buttons Zoom in the Digital zoom +/- ...function. (pp.26, 51) ⑯ LAMP button Select a lamp mode. (pp.25, 53) ⑰ INFO. Do not bend, drop or expose the remote control to moisture or heat. - Do not apply benzene, thinner, spray, or any chemical material. 11 Select an item or adjust the value in the On...

Owner's Manual
Page 12
... explosion if battery is about 16.4'(5 m) and 60 degrees in compartment. See "Remote control" in the Setting Menu on the remote control, carefully wipe the case clean and install new batteries. ● Risk of the projector. 16.4' (5 m) 30° 30° Remote control Remote Control Code The 2 different remote control codes (Code 1-Code 2) are operated at the same time. Two AAA...
... explosion if battery is about 16.4'(5 m) and 60 degrees in compartment. See "Remote control" in the Setting Menu on the remote control, carefully wipe the case clean and install new batteries. ● Risk of the projector. 16.4' (5 m) 30° 30° Remote control Remote Control Code The 2 different remote control codes (Code 1-Code 2) are operated at the same time. Two AAA...

Owner's Manual
Page 18
...53) appear on the screen. 5 If there is no signal input when start to On2, the input signal will be displayed on the remote control. If the projector is selected in the Display function, the preparation display will not be shown on the screen (p.45). • When the Input Search ... 53 for Lamp control status.) ✔Note: The Filter warning and Lamp replacement icons may appear on the screen depending on the next page. 16 The preparation display will disappear after 30 seconds. The POWER indicator lights green and the cooling fans start on the projector, or the current...
...53) appear on the screen. 5 If there is no signal input when start to On2, the input signal will be displayed on the remote control. If the projector is selected in the Display function, the preparation display will not be shown on the screen (p.45). • When the Input Search ... 53 for Lamp control status.) ✔Note: The Filter warning and Lamp replacement icons may appear on the screen depending on the next page. 16 The preparation display will disappear after 30 seconds. The POWER indicator lights green and the cooling fans start on the projector, or the current...

Owner's Manual
Page 20
... the fans are still running speed of fans' quietness and speed. DO NOT OPERATE THE PROJECTOR CONTINUOUSLY WITHOUT REST. Basic Operation Turning Off the Projector 1 Press the ON/STAND-BY button on the top control or on the remote control, and Power off processing for fan cooling is completed, compared with the time the AC...
... the fans are still running speed of fans' quietness and speed. DO NOT OPERATE THE PROJECTOR CONTINUOUSLY WITHOUT REST. Basic Operation Turning Off the Projector 1 Press the ON/STAND-BY button on the top control or on the remote control, and Power off processing for fan cooling is completed, compared with the time the AC...

Owner's Manual
Page 21
... The currently set or access the selected item. The menus have a hierarchical structure, with a main menu that is highlighted in orange.) MENU button Remote Control 3 Use the Point ▲▼ buttons to select the desired submenu item and press the SELECT button to the submenu. Press the MENU button to...the MENU button on the top control or the remote control to display the On-Screen Menu. 2 Use the Point ▲▼ buttons to exit the On-Screen Menu. MENU button 5 Press the Point ◄ button to return to Operate the On-Screen Menu The projector can be adjusted or set ...
... The currently set or access the selected item. The menus have a hierarchical structure, with a main menu that is highlighted in orange.) MENU button Remote Control 3 Use the Point ▲▼ buttons to select the desired submenu item and press the SELECT button to the submenu. Press the MENU button to...the MENU button on the top control or the remote control to display the On-Screen Menu. 2 Use the Point ▲▼ buttons to exit the On-Screen Menu. MENU button 5 Press the Point ◄ button to return to Operate the On-Screen Menu The projector can be adjusted or set ...

Owner's Manual
Page 22
...). ④ Image adjust For computer source, used to set the projector's operating configurations (pp.43-57). ⑧ Information Display the input source information: Input , H-sync freq., V-sync freq., Screen, Language, Lamp status, Lamp counter , Power management, Key lock, PIN code lock and Remote control (p.58). ⑨ Network See the owner's manual of each...
...). ④ Image adjust For computer source, used to set the projector's operating configurations (pp.43-57). ⑧ Information Display the input source information: Input , H-sync freq., V-sync freq., Screen, Language, Lamp status, Lamp counter , Power management, Key lock, PIN code lock and Remote control (p.58). ⑨ Network See the owner's manual of each...

Owner's Manual
Page 23
... Keystone Correction If a projected picture still has keystone distortion after pressing the AUTO SETUP button on the top control or the AUTO SET button on the remote control, correct the image manually as follows: KEYSTONE button Press the KEYSTONE button on the input signal. 23 The... disappears at the maximum correction. • If you press the KEYSTONE button on the remote control. Basic Operation Zoom Ring Focus Ring Auto Setup Function Auto setup function is limited depending on the remote control. and Auto Keystone functions) in the Setting menu (p.45). • Fine sync, ...
... Keystone Correction If a projected picture still has keystone distortion after pressing the AUTO SETUP button on the top control or the AUTO SET button on the remote control, correct the image manually as follows: KEYSTONE button Press the KEYSTONE button on the input signal. 23 The... disappears at the maximum correction. • If you press the KEYSTONE button on the remote control. Basic Operation Zoom Ring Focus Ring Auto Setup Function Auto setup function is limited depending on the remote control. and Auto Keystone functions) in the Setting menu (p.45). • Fine sync, ...

Owner's Manual
Page 24
... of the volume. press the Point ◄ button to temporarily turn the sound back on the screen for the AUDIO OUT jack. Remote Control Menu Operation 1 Press the MENU button to switch the mute function On/ Off. Mute Press the SELECT button to display the On-...Volume Dialog Box VOLUME+ button MUTE button VOLUME- Basic Operation Sound Adjustment Direct Operation Volume Press the VOLUME+/- buttons on the top control or on the remote control to select Sound. buttons. Volume Press the Point ► button to select Off or press the VOLUME +/- The dialog box disappears...
... of the volume. press the Point ◄ button to temporarily turn the sound back on the screen for the AUDIO OUT jack. Remote Control Menu Operation 1 Press the MENU button to switch the mute function On/ Off. Mute Press the SELECT button to display the On-...Volume Dialog Box VOLUME+ button MUTE button VOLUME- Basic Operation Sound Adjustment Direct Operation Volume Press the VOLUME+/- buttons on the top control or on the remote control to select Sound. buttons. Volume Press the Point ► button to select Off or press the VOLUME +/- The dialog box disappears...

Owner's Manual
Page 25
...status, Lamp counter, Power management, Keylock, PIN code lock and Remote control (p.58). LAMP button Press the LAMP button on the remote control to select the lamp mode for changing the brightness on the remote control to the Digital zoom +/- Fig.1 VIDEO button FREEZE button D.... Operation Remote Control Operation Using the remote control for details. See pages 27, 36-37 for some frequently used operations is advisable. Remote Control COMPUTER 1/2 buttons S-VIDEO button FREEZE button Press the FREEZE button on the remote control to freeze the picture on the remote control to enter...
...status, Lamp counter, Power management, Keylock, PIN code lock and Remote control (p.58). LAMP button Press the LAMP button on the remote control to select the lamp mode for changing the brightness on the remote control to the Digital zoom +/- Fig.1 VIDEO button FREEZE button D.... Operation Remote Control Operation Using the remote control for details. See pages 27, 36-37 for some frequently used operations is advisable. Remote Control COMPUTER 1/2 buttons S-VIDEO button FREEZE button Press the FREEZE button on the remote control to freeze the picture on the remote control to enter...

Owner's Manual
Page 26
.... See pages 32, 39 for the P-timer function. To stop the count time, press the P-TIMER button. IMAGE button Press the IMAGE button on the remote control to normal, press the NO SHOW button again or press any other buttons. 26 Basic Operation NO SHOW button Press the NO SHOW button on... the remote control to release the No Show function, the mute function can not be operated at the same time. No show disappears after 4 seconds. To restore ...
.... See pages 32, 39 for the P-timer function. To stop the count time, press the P-TIMER button. IMAGE button Press the IMAGE button on the remote control to normal, press the NO SHOW button again or press any other buttons. 26 Basic Operation NO SHOW button Press the NO SHOW button on... the remote control to release the No Show function, the mute function can not be operated at the same time. No show disappears after 4 seconds. To restore ...

Owner's Manual
Page 27
Remote Control COMPUTER 1 button Computer 1(RGB) Computer 1(Scart) COMPUTER 2 button Computer 2 (RGB) Input Menu Menu Operation 1 Press the MENU button to On1 or On2 in the Auto ... Input Input Source Selection (RGB: Computer 1/Computer 2) Direct Operation Choose either Computer 1(RGB) or Computer 2(RGB) by pressing the COMPUTER 1 or COMPUTER 2 button on the remote control. Use the Point ▲▼ buttons to select Input and then press the Point ► or the SELECT button. 2 Use the Point ▲▼ buttons...
Remote Control COMPUTER 1 button Computer 1(RGB) Computer 1(Scart) COMPUTER 2 button Computer 2 (RGB) Input Menu Menu Operation 1 Press the MENU button to On1 or On2 in the Auto ... Input Input Source Selection (RGB: Computer 1/Computer 2) Direct Operation Choose either Computer 1(RGB) or Computer 2(RGB) by pressing the COMPUTER 1 or COMPUTER 2 button on the remote control. Use the Point ▲▼ buttons to select Input and then press the Point ► or the SELECT button. 2 Use the Point ▲▼ buttons...

Owner's Manual
Page 32
... halftone for graphics. Remote Control IMAGE button Menu Operation 1 Press the MENU button to the wall color from the preset four colors. Image select Menu Standard Normal picture mode preset on a blackboard. This mode helps enhance the image projected on the projector. Computer Input Image...▲▼ buttons to select the desired item and then press the SELECT button. Blackboard (Green) For the image projected on the remote control. This Image memory is mainly effective on a green colored board, not truly effective on a white screen by pressing the IMAGE button on...
... halftone for graphics. Remote Control IMAGE button Menu Operation 1 Press the MENU button to the wall color from the preset four colors. Image select Menu Standard Normal picture mode preset on a blackboard. This mode helps enhance the image projected on the projector. Computer Input Image...▲▼ buttons to select the desired item and then press the SELECT button. Blackboard (Green) For the image projected on the remote control. This Image memory is mainly effective on a green colored board, not truly effective on a white screen by pressing the IMAGE button on...

Owner's Manual
Page 35
... depending on the screen, you can work only when the image is selected for Scale H/V and Position H/V is selected, the Digital zoom - Remote Control POINT buttons SELECT button D.ZOOM + button D.ZOOM - H&V When set automatically . • The adjustable range for the screen size. •...Vertical screen position. Computer Input Custom adj. When Custom is selected, the saved scale or position is automatically modified based on the remote control. Reset Reset the all the inputs. The Scale V appears dimmed and becomes unavailable. For zooming in the PC System Menu ...
... depending on the screen, you can work only when the image is selected for Scale H/V and Position H/V is selected, the Digital zoom - Remote Control POINT buttons SELECT button D.ZOOM + button D.ZOOM - H&V When set automatically . • The adjustable range for the screen size. •...Vertical screen position. Computer Input Custom adj. When Custom is selected, the saved scale or position is automatically modified based on the remote control. Reset Reset the all the inputs. The Scale V appears dimmed and becomes unavailable. For zooming in the PC System Menu ...

Owner's Manual
Page 36
.... Video Input Input Source Selection (Video, S-video) Direct Operation Choose Video or S-video by pressing the VIDEO or the SVIDEO button on the remote control. Before using these buttons, correct input source should be searched automatically (p.44). Use the Point ▲▼ buttons to select Input and then press...button. And then press the Point ► button to access the submenu items. Use the Point ▲▼ buttons to select Computer 1. Remote Control VIDEO button Video S-VIDEO button S-video Menu Operation 1 Press the MENU button to display the On-Screen Menu.
.... Video Input Input Source Selection (Video, S-video) Direct Operation Choose Video or S-video by pressing the VIDEO or the SVIDEO button on the remote control. Before using these buttons, correct input source should be searched automatically (p.44). Use the Point ▲▼ buttons to select Input and then press...button. And then press the Point ► button to access the submenu items. Use the Point ▲▼ buttons to select Computer 1. Remote Control VIDEO button Video S-VIDEO button S-video Menu Operation 1 Press the MENU button to display the On-Screen Menu.

Owner's Manual
Page 37
... 21-pin) Direct Operation Choose Computer 1(Component) or Computer 1(Scart) by pressing the COMPONENT or the COMPUTER 1 button on the remote control. S-video 37 RGB (Scart) When the input source is coming from video equipment connected to the COMPUTER IN 1/S-VIDEO IN/COMPONENT ...IN terminal with a Component-VGA Cable, select Component. Remote Control COMPUTER 1 button Computer 1(RGB) Computer 1(Scart) COMPONENT button Computer 1(Component) Menu Operation 1 Press the MENU button to On1 or...
... 21-pin) Direct Operation Choose Computer 1(Component) or Computer 1(Scart) by pressing the COMPONENT or the COMPUTER 1 button on the remote control. S-video 37 RGB (Scart) When the input source is coming from video equipment connected to the COMPUTER IN 1/S-VIDEO IN/COMPONENT ...IN terminal with a Component-VGA Cable, select Component. Remote Control COMPUTER 1 button Computer 1(RGB) Computer 1(Scart) COMPONENT button Computer 1(Component) Menu Operation 1 Press the MENU button to On1 or...

Owner's Manual
Page 39
... button Dynamic For viewing pictures in the Image Adjust Menu (see pages 40-41). Blackboard (Green) For the image projected on the remote control. Image Mode Selection Direct Operation Select the desired image mode among Dynamic, Standard, Cinema, Blackboard (Green), Colorboard, Image 1, Image 2,...enhance the image projected on the projector. Image 1-4 For viewing with fine tone. This Image memory is mainly effective on a green colored board, not truly effective on a white screen by pressing the IMAGE button on a blackboard. Remote Control Menu Operation 1 Press the MENU...
... button Dynamic For viewing pictures in the Image Adjust Menu (see pages 40-41). Blackboard (Green) For the image projected on the remote control. Image Mode Selection Direct Operation Select the desired image mode among Dynamic, Standard, Cinema, Blackboard (Green), Colorboard, Image 1, Image 2,...enhance the image projected on the projector. Image 1-4 For viewing with fine tone. This Image memory is mainly effective on a green colored board, not truly effective on a white screen by pressing the IMAGE button on a blackboard. Remote Control Menu Operation 1 Press the MENU...

Owner's Manual
Page 44
.../STAND-BY button on the top control or the remote control. - When pressing the AUTO SETUP button on the top control. - When turning on the projector by pressing the AUTO SETUP button on the top control or the AUTO SET button on the remote control. When pressing the AUTO SETUP button... ON/STAND-BY button is pressed, Input search will stop and go back to the projector's tilt. When pressing the AUTO SET button on the remote control. - When pressing the AUTO SET button on the remote control. Off Disables Auto PC Adjustment. Manual . . . If the COMPUTER 1/2 button or...
.../STAND-BY button on the top control or the remote control. - When pressing the AUTO SETUP button on the top control. - When turning on the projector by pressing the AUTO SETUP button on the top control or the AUTO SET button on the remote control. When pressing the AUTO SETUP button... ON/STAND-BY button is pressed, Input search will stop and go back to the projector's tilt. When pressing the AUTO SET button on the remote control. - When pressing the AUTO SET button on the remote control. Off Disables Auto PC Adjustment. Manual . . . If the COMPUTER 1/2 button or...


