
Owners Manual
Page 1
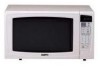
SAVE THESE INSTRUCTIONS If you follow the instructions, your microwave oven. INSTRUCTION MANUAL AND COOKING GUIDE EM-S9515W Microwave Oven Read these instructions carefully before using your oven will provide you with many years of good service.
SAVE THESE INSTRUCTIONS If you follow the instructions, your microwave oven. INSTRUCTION MANUAL AND COOKING GUIDE EM-S9515W Microwave Oven Read these instructions carefully before using your oven will provide you with many years of good service.

Owners Manual
Page 2
... or repaired by anyone except properly qualified service personnel. SPECIFICATIONS Model: Power Source: Power Consumption: Maximum Output: Oven Capacity: Turntable Diameter: Outside Dimensions: (w x h x d) Weight: EM-S9515W AC 120V, 60Hz 1500W 1100W 1.4 Cu. Wash hands after handling. 2 It is particularly important that the oven door close properly and that there is no damage to change without notice. It is damaged. PRECAUTIONS TO AVOID POSSIBLE EXPOSURE TO EXCESSIVE MICROWAVE...
... or repaired by anyone except properly qualified service personnel. SPECIFICATIONS Model: Power Source: Power Consumption: Maximum Output: Oven Capacity: Turntable Diameter: Outside Dimensions: (w x h x d) Weight: EM-S9515W AC 120V, 60Hz 1500W 1100W 1.4 Cu. Wash hands after handling. 2 It is particularly important that the oven door close properly and that there is no damage to change without notice. It is damaged. PRECAUTIONS TO AVOID POSSIBLE EXPOSURE TO EXCESSIVE MICROWAVE...

Owners Manual
Page 3
... TABLE OF CONTENTS SAFETY ■ Proper and Safe Use of Your Oven 4 ■ Important Safety Instructions 5 ■ Grounding Instructions 6 ■ Utensils 6-7 SETTING UP YOUR OVEN ■ Names of Oven Parts and Accessories 8 ■ Turntable Installation 8 ■ Installation 9 OPERATION ■ Control Panel and Features 10 ■ Setting Clock 11 ■ Child Lock-Out 11 ■ Time Cooking 12 ■ Power Level Setting Guide 12 ■ Multistage Cooking 13 ■ More/Less 13 ■ Direct Access Cooking 14-16 ■ Weight Defrost...
... TABLE OF CONTENTS SAFETY ■ Proper and Safe Use of Your Oven 4 ■ Important Safety Instructions 5 ■ Grounding Instructions 6 ■ Utensils 6-7 SETTING UP YOUR OVEN ■ Names of Oven Parts and Accessories 8 ■ Turntable Installation 8 ■ Installation 9 OPERATION ■ Control Panel and Features 10 ■ Setting Clock 11 ■ Child Lock-Out 11 ■ Time Cooking 12 ■ Power Level Setting Guide 12 ■ Multistage Cooking 13 ■ More/Less 13 ■ Direct Access Cooking 14-16 ■ Weight Defrost...
Owners Manual
Page 4
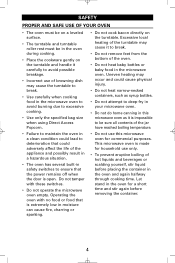
... remove feet from the bottom of the appliance and possibly result in a hazardous situation. • The oven has several built-in the oven during cooking. • Place the cookware gently on the turntable. Operating the oven with these switches. • Do not operate the microwave oven empty. This microwave oven is made for commercial purposes. Uneven heating may cause the turntable to break. • Use carefully when cooking food in the microwave oven...
... remove feet from the bottom of the appliance and possibly result in a hazardous situation. • The oven has several built-in the oven during cooking. • Place the cookware gently on the turntable. Operating the oven with these switches. • Do not operate the microwave oven empty. This microwave oven is made for commercial purposes. Uneven heating may cause the turntable to break. • Use carefully when cooking food in the microwave oven...

Owners Manual
Page 5
... the fuse or circuit breaker panel. Some products such as described in mind the following : WARNING - When cleaning door and oven surfaces that meet when door is necessary to heat or cook food. Do not operate this oven. 10. b. See "GROUNDING INSTRUCTIONS" on the oven. 12. Do not cover or block any appliance, close supervision is closed glass jars may turn on by qualified service technicians. Do not use...
... the fuse or circuit breaker panel. Some products such as described in mind the following : WARNING - When cleaning door and oven surfaces that meet when door is necessary to heat or cook food. Do not operate this oven. 10. b. See "GROUNDING INSTRUCTIONS" on the oven. 12. Do not cover or block any appliance, close supervision is closed glass jars may turn on by qualified service technicians. Do not use...
Owners Manual
Page 6
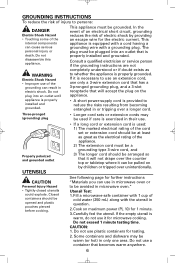
... hot) in electric shock. See following page for further instructions "Materials you can result in only one area. Cook on maximum power (PL 10) for microwave cooking. Some containers and dishware may be used : 1) The marked electrical rating of the cord set or extension cord should be at least as great as to whether the appliance is properly installed and grounded. Do not use...
... hot) in electric shock. See following page for further instructions "Materials you can result in only one area. Cook on maximum power (PL 10) for microwave cooking. Some containers and dishware may be used : 1) The marked electrical rating of the cord set or extension cord should be at least as great as to whether the appliance is properly installed and grounded. Do not use...
Owners Manual
Page 7
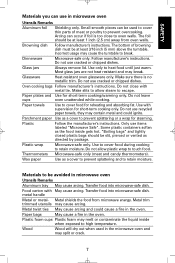
... or crack. 7 Only use in the oven. Wax paper Use as the food inside when exposed to cover food for short-term cooking only. Plastic foam cups Plastic foam may cause the turntable to escape. Arcing can occur if foil is no metallic trim. Glass jars Always remove lid. Paper plates and Use for steaming. Do not leave cups oven unattended while cooking. Do not allow...
... or crack. 7 Only use in the oven. Wax paper Use as the food inside when exposed to cover food for short-term cooking only. Plastic foam cups Plastic foam may cause the turntable to escape. Arcing can occur if foil is no metallic trim. Glass jars Always remove lid. Paper plates and Use for steaming. Do not leave cups oven unattended while cooking. Do not allow...

Owners Manual
Page 8
... following accessories: 1 Turntable 1 Turntable roller rest 1 Instruction Manual Door Safety Locks Shuts off oven power if door is securely locked in the diagram. Touch START to open door. • When you open the door during cooking process, the cooking stops but the program will not be used during operation. TURNTABLE INSTALLATION 1. The turntable should never be restricted. • Both turntable and roller rest must always be canceled. Make sure the turntable hub is opened during cooking. • All food and containers...
... following accessories: 1 Turntable 1 Turntable roller rest 1 Instruction Manual Door Safety Locks Shuts off oven power if door is securely locked in the diagram. Touch START to open door. • When you open the door during cooking process, the cooking stops but the program will not be used during operation. TURNTABLE INSTALLATION 1. The turntable should never be restricted. • Both turntable and roller rest must always be canceled. Make sure the turntable hub is opened during cooking. • All food and containers...

Owners Manual
Page 9
... of microwave oven may cause interference to protect the magnetron. One side must be void. 9 WARNING: Do not install oven over a heat source, the oven could be damaged and the warranty would be open space for countertop installation. Select a level surface that your microwave oven is required between the oven and any adjacent wall. This oven is covered with a protective film, remove the film. 2. Operation of the oven. 3" 3" • • 3" OPEN Blocking...
... of microwave oven may cause interference to protect the magnetron. One side must be void. 9 WARNING: Do not install oven over a heat source, the oven could be damaged and the warranty would be open space for countertop installation. Select a level surface that your microwave oven is required between the oven and any adjacent wall. This oven is covered with a protective film, remove the film. 2. Operation of the oven. 3" 3" • • 3" OPEN Blocking...
Owners Manual
Page 10
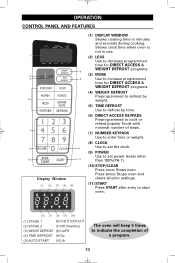
... DEFROST Use to defrost by time. (6) DIRECT ACCESS KEYPADS Preprogrammed to cook or reheat popular foods with minimal number of steps. (7) NUMBER KEYPADS Use to enter time or weight. (8) CLOCK Use to set the clock. (9) POWER Use to set power levels other than 100%(PH 1). (10) STOP/CLEAR Press once: Stops oven Press twice: Stops oven and clears all prior settings. (11) START Press START after entry to start oven. (6) (7) (8) (9) (10) (1) STAGE 1 (6) CHILD LOCK-OUT (2) STAGE 2 (7) NO (Number) (3) WEIGHT DEFROST (8) CUPS (4) TIME DEFROST (9) Oz (5) AUTO START (10) lb The oven will beep...
... DEFROST Use to defrost by time. (6) DIRECT ACCESS KEYPADS Preprogrammed to cook or reheat popular foods with minimal number of steps. (7) NUMBER KEYPADS Use to enter time or weight. (8) CLOCK Use to set the clock. (9) POWER Use to set power levels other than 100%(PH 1). (10) STOP/CLEAR Press once: Stops oven Press twice: Stops oven and clears all prior settings. (11) START Press START after entry to start oven. (6) (7) (8) (9) (10) (1) STAGE 1 (6) CHILD LOCK-OUT (2) STAGE 2 (7) NO (Number) (3) WEIGHT DEFROST (8) CUPS (4) TIME DEFROST (9) Oz (5) AUTO START (10) lb The oven will beep...

Owners Manual
Page 11
... use by opening the door. 2. Keypad STOP/CLEAR STOPPING THE OVEN WHILE IN OPERATION 1. You must press 3 numbers to stop the oven by pressing STOP/CLEAR once or by children. The feature locks the operation of 2 day. Example: To set : Step Procedure Press STOP/CLEAR 5 times. Keypad STOP/CLEAR To cancel: Step Procedure Press STOP/CLEAR 5 times. The display will show the time and the LOCK indicator will sound. Press CLOCK. You can stop the oven...
... use by opening the door. 2. Keypad STOP/CLEAR STOPPING THE OVEN WHILE IN OPERATION 1. You must press 3 numbers to stop the oven by pressing STOP/CLEAR once or by children. The feature locks the operation of 2 day. Example: To set : Step Procedure Press STOP/CLEAR 5 times. Keypad STOP/CLEAR To cancel: Step Procedure Press STOP/CLEAR 5 times. The display will show the time and the LOCK indicator will sound. Press CLOCK. You can stop the oven...

Owners Manual
Page 12
Example: To cook at 80% power level for 20 minutes: Step Procedure Keypad 1 Enter cooking time in liquid or slow-cooking dishes. POWER LEVEL SETTING GUIDE 100% • Cooking poultry, vegetables, 40% • Cooking less tender cuts of casseroles, stews, sauces. • Manual defrosting. 80% • Reheating precooked or (PL 8) prepared food quickly. • Cooking fish. 20% • Softening chocolate. (PL 2) • Clarifying butter. • Heating breads, rolls, pancakes, tacos...
Example: To cook at 80% power level for 20 minutes: Step Procedure Keypad 1 Enter cooking time in liquid or slow-cooking dishes. POWER LEVEL SETTING GUIDE 100% • Cooking poultry, vegetables, 40% • Cooking less tender cuts of casseroles, stews, sauces. • Manual defrosting. 80% • Reheating precooked or (PL 8) prepared food quickly. • Cooking fish. 20% • Softening chocolate. (PL 2) • Clarifying butter. • Heating breads, rolls, pancakes, tacos...
Owners Manual
Page 13
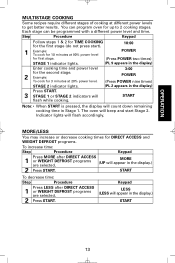
... cooking times for DIRECT ACCESS and WEIGHT DEFROST programs. To increase time: Step Procedure Keypad 1 Press MORE after DIRECT ACCESS 1 or WEIGHT DEFROST programs are selected. START To decrease time: Step Procedure Press LESS after DIRECT ACCESS or WEIGHT DEFROST programs are selected. 2 Press START. POWER (Press POWER two times) STAGE 1 indicator lights. (PL 9 appears in the display) Enter cooking time and power level for the second stage. 2 Example: To cook for 3 minutes at 20% power level. 3:00 POWER (Press POWER nine times...
... cooking times for DIRECT ACCESS and WEIGHT DEFROST programs. To increase time: Step Procedure Keypad 1 Press MORE after DIRECT ACCESS 1 or WEIGHT DEFROST programs are selected. START To decrease time: Step Procedure Press LESS after DIRECT ACCESS or WEIGHT DEFROST programs are selected. 2 Press START. POWER (Press POWER two times) STAGE 1 indicator lights. (PL 9 appears in the display) Enter cooking time and power level for the second stage. 2 Example: To cook for 3 minutes at 20% power level. 3:00 POWER (Press POWER nine times...

Owners Manual
Page 16
... a fork. Room Muffin Place muffin on paper towel or paper plates. Let stand, covered, for easy defrosting. START Note:• If a weight is entered that is not within the ranges listed in chart above for cooking frozen pizza. Weight must be hot. Do not leave the oven unattended when popping popcorn. Follow package instructions for each food category. 2.5 2 Examples: 0.5 To defrost 2 1/2 lbs, enter 2 5 (display will show 0.5).
... a fork. Room Muffin Place muffin on paper towel or paper plates. Let stand, covered, for easy defrosting. START Note:• If a weight is entered that is not within the ranges listed in chart above for cooking frozen pizza. Weight must be hot. Do not leave the oven unattended when popping popcorn. Follow package instructions for each food category. 2.5 2 Examples: 0.5 To defrost 2 1/2 lbs, enter 2 5 (display will show 0.5).

Owners Manual
Page 18
... . Guide to vent steam. Moisture, Sugar and Fat Food high in a circular pattern, with denser, thicker items at room temperature. Covering: Most foods will likely call for even cooking in the oven. Shape and Size Cut food into the food. An excess amount of the dish. Microwave Cooking Techniques Arranging: Arrange food in moisture, sugar or fat cook faster. For warming, heating, and defrosting, nothing compares. Reheating: Cooked food...
... . Guide to vent steam. Moisture, Sugar and Fat Food high in a circular pattern, with denser, thicker items at room temperature. Covering: Most foods will likely call for even cooking in the oven. Shape and Size Cut food into the food. An excess amount of the dish. Microwave Cooking Techniques Arranging: Arrange food in moisture, sugar or fat cook faster. For warming, heating, and defrosting, nothing compares. Reheating: Cooked food...

Owners Manual
Page 19
...; Use microwave-safe microwave oven were used . Overcooked foods. • Cooking time, power level • Use correct cooking is not suitable. cookware only. • Cooking time, power level • Use correct cooking is not suitable. MAINTENANCE TROUBLESHOOTING Check your problem by using the chart below and try again. • Check instructions. Unevenly cooked foods. • Materials to be avoided in . • Door is open. • Wrong operation is operated when • Do not operate with wet cavity. time, power level. • Food is...
...; Use microwave-safe microwave oven were used . Overcooked foods. • Cooking time, power level • Use correct cooking is not suitable. cookware only. • Cooking time, power level • Use correct cooking is not suitable. MAINTENANCE TROUBLESHOOTING Check your problem by using the chart below and try again. • Check instructions. Unevenly cooked foods. • Materials to be avoided in . • Door is open. • Wrong operation is operated when • Do not operate with wet cavity. time, power level. • Food is...

Owners Manual
Page 20
... you open the oven door or touch STOP/CLEAR, the food will be several reasons why the oven light will not glow? Excessive oil splatters on a weekly basis, more often if needed. Be careful not to clear any entries that might have been entered accidentally while cleaning the panel. 20 The clicking noise can be free of the air exhaust vent? The microcomputer will then reset...
... you open the oven door or touch STOP/CLEAR, the food will be several reasons why the oven light will not glow? Excessive oil splatters on a weekly basis, more often if needed. Be careful not to clear any entries that might have been entered accidentally while cleaning the panel. 20 The clicking noise can be free of the air exhaust vent? The microcomputer will then reset...
Owners Manual
Page 21
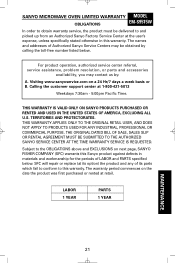
... ON SANYO PRODUCTS PURCHASED OR RENTED AND USED IN THE UNITED STATES OF AMERICA, EXCLUDING ALL U.S. SFC will repair or replace (at the user's expense, unless specifically stated otherwise in materials and workmanship for the periods of Authorized Sanyo Service Centers may contact us by calling the toll-free number listed below . For product operation, authorized service center referral, service assistance, problem resolution, or parts and...
... ON SANYO PRODUCTS PURCHASED OR RENTED AND USED IN THE UNITED STATES OF AMERICA, EXCLUDING ALL U.S. SFC will repair or replace (at the user's expense, unless specifically stated otherwise in materials and workmanship for the periods of Authorized Sanyo Service Centers may contact us by calling the toll-free number listed below . For product operation, authorized service center referral, service assistance, problem resolution, or parts and...

Owners Manual
Page 22
... THIS WARRANTY. This warranty does not apply to uncrating, setup, installation, removal of product for it any product whose serial number has been altered, defaced or removed. SANYO MICROWAVE OVEN LIMITED WARRANTY (cont.) EXCLUSIONS This warranty does not cover (A) the adjustment of customer-operated controls as explained in lieu of all other expressed warranties and SFC does not assume or authorize any party to assume for repair, or...
... THIS WARRANTY. This warranty does not apply to uncrating, setup, installation, removal of product for it any product whose serial number has been altered, defaced or removed. SANYO MICROWAVE OVEN LIMITED WARRANTY (cont.) EXCLUSIONS This warranty does not cover (A) the adjustment of customer-operated controls as explained in lieu of all other expressed warranties and SFC does not assume or authorize any party to assume for repair, or...
Owners Manual
Page 36
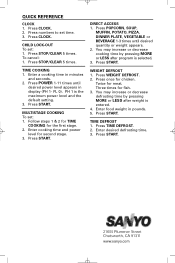
... PLATE, VEGETABLE or BEVERAGE 1-3 times until desired power level appears in display (PH 1- Three times for meat. Press CLOCK. 2. To cancel: 1. MULTISTAGE COOKING To set : 1. You may increase or decrease defrosting time by pressing MORE or LESS after weight is entered. 4. WEIGHT DEFROST 1. Twice for fish. 3. CHILD LOCK-OUT To set : 1. Press POWER 1-11 times until desired quantity or weight appears. 2. Press WEIGHT DEFROST. 2. Press START. www.sanyo.com Press numbers to set time. 3. Press START. PL 0). Enter cooking time...
... PLATE, VEGETABLE or BEVERAGE 1-3 times until desired power level appears in display (PH 1- Three times for meat. Press CLOCK. 2. To cancel: 1. MULTISTAGE COOKING To set : 1. You may increase or decrease defrosting time by pressing MORE or LESS after weight is entered. 4. WEIGHT DEFROST 1. Twice for fish. 3. CHILD LOCK-OUT To set : 1. Press POWER 1-11 times until desired quantity or weight appears. 2. Press WEIGHT DEFROST. 2. Press START. www.sanyo.com Press numbers to set time. 3. Press START. PL 0). Enter cooking time...


