Owners Manual
Page 1
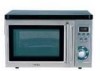
SAVE THESE INSTRUCTIONS If you with many years of good service. 25941_EM_Z2100GS manual.qxd 7/7/05 8:32 AM Page 1 INSTRUCTION MANUAL AND COOKING GUIDE EM-Z2100GS Microwave Oven Read these instructions carefully before using your oven will provide you follow the instructions, your microwave oven.
SAVE THESE INSTRUCTIONS If you with many years of good service. 25941_EM_Z2100GS manual.qxd 7/7/05 8:32 AM Page 1 INSTRUCTION MANUAL AND COOKING GUIDE EM-Z2100GS Microwave Oven Read these instructions carefully before using your oven will provide you follow the instructions, your microwave oven.
Owners Manual
Page 2
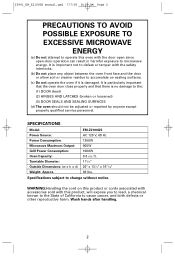
...DOOR (bent) (2) HINGES AND LATCHES (broken or loosened) (3) DOOR SEALS AND SEALING SURFACES (d) The oven should not be adjusted or repaired by anyone except properly qualified service personnel. EM-Z2100GS AC 120 V, 60 Hz 1350W 900W 1000W 0.8 cu. WARNING:Handling the cord on sealing surfaces. ...(c) Do not operate the oven if it is damaged. ft. 113/16" 20" x 131/4" x 1611/16" 38 lbs. Wash hands after handling. 2 SPECIFICATIONS Model: Power Source: Power Consumption: Microwave...
...DOOR (bent) (2) HINGES AND LATCHES (broken or loosened) (3) DOOR SEALS AND SEALING SURFACES (d) The oven should not be adjusted or repaired by anyone except properly qualified service personnel. EM-Z2100GS AC 120 V, 60 Hz 1350W 900W 1000W 0.8 cu. WARNING:Handling the cord on sealing surfaces. ...(c) Do not operate the oven if it is damaged. ft. 113/16" 20" x 131/4" x 1611/16" 38 lbs. Wash hands after handling. 2 SPECIFICATIONS Model: Power Source: Power Consumption: Microwave...
Owners Manual
Page 3
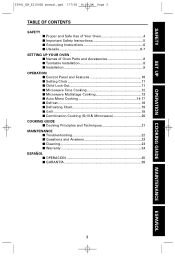
... Utensils 6-7 SETTING UP YOUR OVEN ■ Names of Oven Parts and Accessories 8 ■ Turntable Installation 8 ■ Installation 9 OPERATION ■ Control Panel and Features 10 ■ Setting Clock 11 ■ Child Lock-Out 11 ■ Microwave Time Cooking 12 ■ Microwave Multistage Cooking 13 ■... Cooking 14-17 ■ Defrost 18 ■ Defrosting Chart 19 ■ Grill 19 ■ Combination Cooking (Grill & Microwave 20 COOKING GUIDE ■ Cooking Principles and Techniques 21 MAINTENANCE ■ Troubleshooting 22 ■ Questions and Answers 23 ■...
... Utensils 6-7 SETTING UP YOUR OVEN ■ Names of Oven Parts and Accessories 8 ■ Turntable Installation 8 ■ Installation 9 OPERATION ■ Control Panel and Features 10 ■ Setting Clock 11 ■ Child Lock-Out 11 ■ Microwave Time Cooking 12 ■ Microwave Multistage Cooking 13 ■... Cooking 14-17 ■ Defrost 18 ■ Defrosting Chart 19 ■ Grill 19 ■ Combination Cooking (Grill & Microwave 20 COOKING GUIDE ■ Cooking Principles and Techniques 21 MAINTENANCE ■ Troubleshooting 22 ■ Questions and Answers 23 ■...

Owners Manual
Page 4
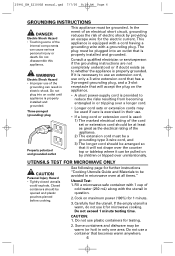
...• Incorrect use of the turntable may cause it to ensure that is impossible to stand in the oven for a short time, stirring again before placing the container in the microwave oven. Excessive local heating of browning dish may cause the turntable to break. • Use only the specified... Do not heat narrow-necked containers, such as syrup bottles. • Do not attempt to deep-fry in your microwave oven. • Do not do home canning in this microwave oven for household use only. • Liquids, such as it is extremely low in moisture can overheat beyond their boiling ...
...• Incorrect use of the turntable may cause it to ensure that is impossible to stand in the oven for a short time, stirring again before placing the container in the microwave oven. Excessive local heating of browning dish may cause the turntable to break. • Use only the specified... Do not heat narrow-necked containers, such as syrup bottles. • Do not attempt to deep-fry in your microwave oven. • Do not do home canning in this microwave oven for household use only. • Liquids, such as it is extremely low in moisture can overheat beyond their boiling ...
Owners Manual
Page 5
...for examination, repair or adjustment. 10. Do not use as described in a wet basement, or near water - Keep cord away from the microwave oven is not always present. 25941_EM_Z2100GS manual.qxd 7/7/05 8:32 AM Page 5 SAFETY IMPORTANT SAFETY INSTRUCTIONS When using the appliance. 2. Read and follow...following: WARNING - When cleaning surface of fire in water. 13. See "GROUNDING INSTRUCTIONS" found on this appliance only in the microwave oven for storage purposes. Connect only to heat, cook, or dry food. THIS COULD RESULT IN VERY HOT LIQUIDS SUDDENLY BOILING OVER WHEN...
...for examination, repair or adjustment. 10. Do not use as described in a wet basement, or near water - Keep cord away from the microwave oven is not always present. 25941_EM_Z2100GS manual.qxd 7/7/05 8:32 AM Page 5 SAFETY IMPORTANT SAFETY INSTRUCTIONS When using the appliance. 2. Read and follow...following: WARNING - When cleaning surface of fire in water. 13. See "GROUNDING INSTRUCTIONS" found on this appliance only in the microwave oven for storage purposes. Connect only to heat, cook, or dry food. THIS COULD RESULT IN VERY HOT LIQUIDS SUDDENLY BOILING OVER WHEN...
Owners Manual
Page 6
...utensil is used: 1) The marked electrical rating of the cord set or extension cord should be pulled on maximum power (100%) for microwave cooking. Do not use it can be opened and plastic pouches pierced before cooking. 25941_EM_Z2100GS manual.qxd 7/7/05 8:32 AM Page 6 ...) plug Properly polarized and grounded outlet This appliance must be a grounding-type 3-wire cord, and 3) The longer cord should be avoided in microwave oven at all times." Carefully feel the utensil. Do not disassemble this appliance. WARNING Electric Shock Hazard • Improper use a container that it...
...utensil is used: 1) The marked electrical rating of the cord set or extension cord should be pulled on maximum power (100%) for microwave cooking. Do not use it can be opened and plastic pouches pierced before cooking. 25941_EM_Z2100GS manual.qxd 7/7/05 8:32 AM Page 6 ...) plug Properly polarized and grounded outlet This appliance must be a grounding-type 3-wire cord, and 3) The longer cord should be avoided in microwave oven at all times." Carefully feel the utensil. Do not disassemble this appliance. WARNING Electric Shock Hazard • Improper use a container that it...
Owners Manual
Page 7
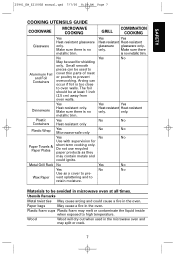
.... Metal Grill Rack No Yes No Yes No No Use as they may contain metals and could cause a fire in microwave oven at least 1 inch (2.5 cm) away from oven walls. Plastic foam cups Plastic foam may split or crack. 7 only. 25941_EM_Z2100GS manual.qxd 7/7/05 8:32 AM Page ... glassware only. Materials to pre- Arcing can be at all times. The foil should be used in the oven. Paper bags May cause a fire in the microwave oven and may melt or contaminate the liquid inside when exposed to retain moisture. Do not use recycled paper products ...
.... Metal Grill Rack No Yes No Yes No No Use as they may contain metals and could cause a fire in microwave oven at least 1 inch (2.5 cm) away from oven walls. Plastic foam cups Plastic foam may split or crack. 7 only. 25941_EM_Z2100GS manual.qxd 7/7/05 8:32 AM Page ... glassware only. Materials to pre- Arcing can be at all times. The foil should be used in the oven. Paper bags May cause a fire in the microwave oven and may melt or contaminate the liquid inside when exposed to retain moisture. Do not use recycled paper products ...
Owners Manual
Page 9
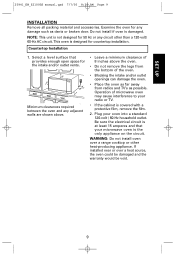
...50 Hz or any adjacent walls are shown above. • Leave a minimum clearance of 8 inches above the oven. • Do not remove the legs from the bottom of microwave oven may cause interference to your radio or TV. • If the cabinet is the only appliance on the circuit.... 120-volt/ 60-Hz AC circuit. WARNING: Do not install oven over a heat source, the oven could be damaged and the warranty would be void. 9 Minimum clearances required between the oven and any circuit other heat-producing appliance. Plug your microwave oven is covered with a protective film, remove the film. 2. SET...
...50 Hz or any adjacent walls are shown above. • Leave a minimum clearance of 8 inches above the oven. • Do not remove the legs from the bottom of microwave oven may cause interference to your radio or TV. • If the cabinet is the only appliance on the circuit.... 120-volt/ 60-Hz AC circuit. WARNING: Do not install oven over a heat source, the oven could be damaged and the warranty would be void. 9 Minimum clearances required between the oven and any circuit other heat-producing appliance. Plug your microwave oven is covered with a protective film, remove the film. 2. SET...
Owners Manual
Page 10
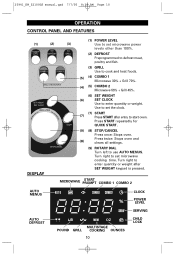
... weight after entry to enter quantity or weight. Turn right to use AUTO MENUS. Press twice: Stops oven and (8) clears all settings. Turn right to set microwave power levels other than 100%. (2) DEFROST Preprogrammed to defrost meat, poultry and fish. (3) GRILL Use ...to cook and heat foods. (5) (4) COMBO 1 Microwave 30% + Grill 70%. (4) (5) COMBO 2 Microwave 55% + Grill 45%. (6) SET WEIGHT (6) SET CLOCK Use to start oven. MICROWAVE START PROMPT COMBO 1 COMBO 2 AUTO MENUS CLOCK POWER LEVEL SERVING AUTO DEFROST MULTISTAGE POUND GRILL...
... weight after entry to enter quantity or weight. Turn right to use AUTO MENUS. Press twice: Stops oven and (8) clears all settings. Turn right to set microwave power levels other than 100%. (2) DEFROST Preprogrammed to defrost meat, poultry and fish. (3) GRILL Use ...to cook and heat foods. (5) (4) COMBO 1 Microwave 30% + Grill 70%. (4) (5) COMBO 2 Microwave 55% + Grill 45%. (6) SET WEIGHT (6) SET CLOCK Use to start oven. MICROWAVE START PROMPT COMBO 1 COMBO 2 AUTO MENUS CLOCK POWER LEVEL SERVING AUTO DEFROST MULTISTAGE POUND GRILL...
Owners Manual
Page 12
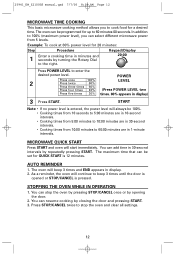
... 7/7/05 8:32 AM Page 12 MICROWAVE TIME COOKING This basic microwave cooking method allows you can select different microwave power from 10:00 minutes to 60:00 minutes are in 1-minute intervals. MICROWAVE QUICK START Press START and oven will continue to stop the oven by pressing STOP/CANCEL once or ...times from 10 seconds to 5:00 minutes are in 30-second intervals by opening the door. 2. AUTO REMINDER 1. STOPPING THE OVEN WHILE IN OPERATION 1. The oven can resume cooking by turning the Rotary Dial to the right. 20:00 Press POWER LEVEL to cook food for QUICK START is...
... 7/7/05 8:32 AM Page 12 MICROWAVE TIME COOKING This basic microwave cooking method allows you can select different microwave power from 10:00 minutes to 60:00 minutes are in 1-minute intervals. MICROWAVE QUICK START Press START and oven will continue to stop the oven by pressing STOP/CANCEL once or ...times from 10 seconds to 5:00 minutes are in 30-second intervals by opening the door. 2. AUTO REMINDER 1. STOPPING THE OVEN WHILE IN OPERATION 1. The oven can resume cooking by turning the Rotary Dial to the right. 20:00 Press POWER LEVEL to cook food for QUICK START is...
Owners Manual
Page 13
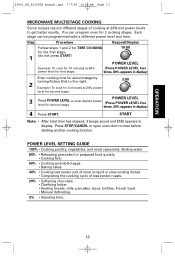
...tacos, tortillas, French toast. • Manual defrosting. 0% • Standing time. 13 OPERATION 25941_EM_Z2100GS manual.qxd 7/7/05 8:32 AM Page 13 MICROWAVE MULTISTAGE COOKING Some recipes require different stages of cooking at 20% power level for second stage. 3:00 POWER LEVEL 3 Press POWER LEVEL to ... in liquid or slow-cooking dishes. • Completing the cooking cycle of meat in display) 4 Press START. Each stage can program oven for 2 cooking stages. You can be programmed with a different power level and time. START Note: • After total time has elapsed...
...tacos, tortillas, French toast. • Manual defrosting. 0% • Standing time. 13 OPERATION 25941_EM_Z2100GS manual.qxd 7/7/05 8:32 AM Page 13 MICROWAVE MULTISTAGE COOKING Some recipes require different stages of cooking at 20% power level for second stage. 3:00 POWER LEVEL 3 Press POWER LEVEL to ... in liquid or slow-cooking dishes. • Completing the cooking cycle of meat in display) 4 Press START. Each stage can program oven for 2 cooking stages. You can be programmed with a different power level and time. START Note: • After total time has elapsed...
Owners Manual
Page 20
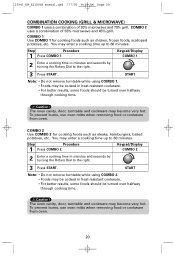
... chicken, frozen foods, scalloped potatoes, etc. To prevent burns, use oven mitts when removing food or cookware from oven. You may become very hot. Step Procedure 1 Press COMBO 2. COMBO 2 uses a combination of 30% microwave and 70% grill. Keypad/Display COMBO 1 2 Enter a cooking time... in minutes and seconds by turning the Rotary Dial to the right. 3 Press START. Caution! The oven cavity, door, turntable and cookware may enter a cooking time...
... chicken, frozen foods, scalloped potatoes, etc. To prevent burns, use oven mitts when removing food or cookware from oven. You may become very hot. Step Procedure 1 Press COMBO 2. COMBO 2 uses a combination of 30% microwave and 70% grill. Keypad/Display COMBO 1 2 Enter a cooking time... in minutes and seconds by turning the Rotary Dial to the right. 3 Press START. Caution! The oven cavity, door, turntable and cookware may enter a cooking time...
Owners Manual
Page 21
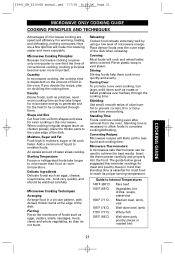
..., snails, sausages, livers, clams and whole vegetables, so they take longer to prevent corners, thin or bony areas from the oven. Keep in the oven. Guide to achieve the best results. Microwave Thermometers: A microwave-safe thermometer can be used to Internal Temperatures 140˚F (60˚C) Rare beef 150˚F (66˚C) Vegetables, hot...
..., snails, sausages, livers, clams and whole vegetables, so they take longer to prevent corners, thin or bony areas from the oven. Keep in the oven. Guide to achieve the best results. Microwave Thermometers: A microwave-safe thermometer can be used to Internal Temperatures 140˚F (60˚C) Rare beef 150˚F (66˚C) Vegetables, hot...
Owners Manual
Page 22
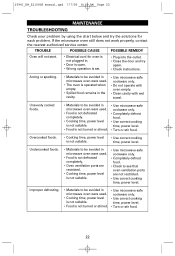
... • Use correct cooking time, power level. Improper defrosting. • Materials to be avoided in microwave oven were used . • Food is not defrosted completely. • Oven ventilation ports are restricted. • Cooking time, power level is operated when empty. • Spilled ...time, power level. • Turn or stir food. Undercooked foods. • Materials to be avoided in microwave oven were used . • The oven is not suitable. • Use microwave-safe cookware only. • Completely defrost food. • Check to be avoided in the cavity. •...
... • Use correct cooking time, power level. Improper defrosting. • Materials to be avoided in microwave oven were used . • Food is not defrosted completely. • Oven ventilation ports are restricted. • Cooking time, power level is operated when empty. • Spilled ...time, power level. • Turn or stir food. Undercooked foods. • Materials to be avoided in microwave oven were used . • The oven is not suitable. • Use microwave-safe cookware only. • Completely defrost food. • Check to be avoided in the cavity. •...
Owners Manual
Page 23
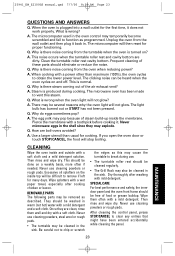
... oil splatters on and off. REMOVABLE PARTS The following parts may be removed as this may be difficult to vent this steam. A. Q. The microwave oven has been made to remove if left for proper functioning. There may cause the turntable to obtain the lower power level. Why do eggs sometimes...rough pads. • The turntable may also be cleaned in the shell since they are clean, rinse them often with a soft cloth. Never microwave eggs in the sink. Never use . • The turntable roller rest should be cleaned regularly. • The Grill Rack may be cleaned in ...
... oil splatters on and off. REMOVABLE PARTS The following parts may be removed as this may be difficult to vent this steam. A. Q. The microwave oven has been made to remove if left for proper functioning. There may cause the turntable to obtain the lower power level. Why do eggs sometimes...rough pads. • The turntable may also be cleaned in the shell since they are clean, rinse them often with a soft cloth. Never microwave eggs in the sink. Never use . • The turntable roller rest should be cleaned regularly. • The Grill Rack may be cleaned in ...
Owners Manual
Page 24
... SANYO MICROWAVE OVEN LIMITED WARRANTY MODEL OBLIGATIONS EM-Z2100GS In order to obtain warranty service, the product must be obtained by calling the toll-free number listed below. THE ORIGINAL DATED BILL OF SALE, SALES SLIP OR RENTAL AGREEMENT MUST BE SUBMITTED TO THE AUTHORIZED SANYO... 1- 800 - 421- 5013 Weekdays 8:00 AM - 5:00 PM Pacific Time For accessories and/or parts not available from an Authorized Sanyo Factory Service Center at retail. For product operation, authorized service center referral, service assistance or problem resolution, call PARTS ORDER INFORMATION 1 -...
... SANYO MICROWAVE OVEN LIMITED WARRANTY MODEL OBLIGATIONS EM-Z2100GS In order to obtain warranty service, the product must be obtained by calling the toll-free number listed below. THE ORIGINAL DATED BILL OF SALE, SALES SLIP OR RENTAL AGREEMENT MUST BE SUBMITTED TO THE AUTHORIZED SANYO... 1- 800 - 421- 5013 Weekdays 8:00 AM - 5:00 PM Pacific Time For accessories and/or parts not available from an Authorized Sanyo Factory Service Center at retail. For product operation, authorized service center referral, service assistance or problem resolution, call PARTS ORDER INFORMATION 1 -...
Owners Manual
Page 40
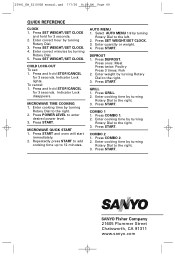
... 1. Press and hold STOP/CANCEL for 3 seconds. Enter cooking time by turning Rotary Dial. 5. MICROWAVE QUICK START 1. Enter quantity or weight. 4. DEFROST 1. Press START. Press COMBO 2. 2. Enter ...minutes by turning Rotary Dial to the right. 3. Press SET WEIGHT/SET CLOCK. Press START and oven will start immediately. 2. Press SET WEIGHT/SET CLOCK. 3. Press DEFROST. Press START. GRILL 1. ...the right. 3. COMBO 2 1. Press START. 21605 Plummer Street Chatsworth, CA 91311 www.sanyo.com Press and hold STOP/CANCEL for 3 seconds. 2. Repeatedly press START to add cooking...
... 1. Press and hold STOP/CANCEL for 3 seconds. Enter cooking time by turning Rotary Dial. 5. MICROWAVE QUICK START 1. Enter quantity or weight. 4. DEFROST 1. Press START. Press COMBO 2. 2. Enter ...minutes by turning Rotary Dial to the right. 3. Press SET WEIGHT/SET CLOCK. Press START and oven will start immediately. 2. Press SET WEIGHT/SET CLOCK. 3. Press DEFROST. Press START. GRILL 1. ...the right. 3. COMBO 2 1. Press START. 21605 Plummer Street Chatsworth, CA 91311 www.sanyo.com Press and hold STOP/CANCEL for 3 seconds. 2. Repeatedly press START to add cooking...


