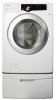
Quick Guide (ENGLISH)
Page 2
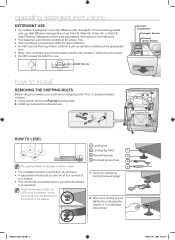
...locking-nuts are fastened to use High Efficiency (HE) detergents. MAX FILL line Detergent Compartment Detergent Selector Prewash (Select Models) how to install REMOVING THE SHIPPING BOLTS Before using the wrench or (-) to flat head screw driver. When your washer. • The unit should ...be used on all four sides. • The installation surface must remove shipping bolts. For best cleaning results only use the thick liquid fabric softener. If not, it is level, tighten the nuts ...
...locking-nuts are fastened to use High Efficiency (HE) detergents. MAX FILL line Detergent Compartment Detergent Selector Prewash (Select Models) how to install REMOVING THE SHIPPING BOLTS Before using the wrench or (-) to flat head screw driver. When your washer. • The unit should ...be used on all four sides. • The installation surface must remove shipping bolts. For best cleaning results only use the thick liquid fabric softener. If not, it is level, tighten the nuts ...

(English)
Page 4
... These warning signs are here to prevent injury to read this manual do not cover all instructions before using your new Samsung ActivFresh™ washer. Please take full advantage of your responsibility to prevent electric shock. Do NOT disassemble. Call the...14:53 This manual contains important information on your washer, follow them explicitly. safety information Congratulations on the installation, use common sense, caution, and care when installing, maintaining, and operating your appliance. It is grounded to use and care of fire, explosion, electric ...
... These warning signs are here to prevent injury to read this manual do not cover all instructions before using your new Samsung ActivFresh™ washer. Please take full advantage of your responsibility to prevent electric shock. Do NOT disassemble. Call the...14:53 This manual contains important information on your washer, follow them explicitly. safety information Congratulations on the installation, use common sense, caution, and care when installing, maintaining, and operating your appliance. It is grounded to use and care of fire, explosion, electric ...

(English)
Page 5
... release any servicing unless specifically recommended in the user-maintenance instructions or in published userrepair instructions that have the skills to carry out. 9. Do not install or store this time. This will be produced in a hot water system that could ignite or explode. 10.Under certain conditions, hydrogen gas may be...
... release any servicing unless specifically recommended in the user-maintenance instructions or in published userrepair instructions that have the skills to carry out. 9. Do not install or store this time. This will be produced in a hot water system that could ignite or explode. 10.Under certain conditions, hydrogen gas may be...

(English)
Page 6
.... Failing to direct sunlight and water (rain drops). It may result in electric shock or fire. Ensure that is not grounded correctly. The installation of this appliance in a humid, oily or dusty location, or in electric shock or fire. - Plug the power plug into the wall socket... object on a regular basis. - Do not pull the power cord when unplugging the power plug. - safety information WARNING SEVERE WARNING SIGNS FOR INSTALLATION Plug the power cord into an AC 120V/60Hz/15A wall socket or higher and use the socket for this appliance near a heater, inflammable material...
.... Failing to direct sunlight and water (rain drops). It may result in electric shock or fire. Ensure that is not grounded correctly. The installation of this appliance in a humid, oily or dusty location, or in electric shock or fire. - Plug the power plug into the wall socket... object on a regular basis. - Do not pull the power cord when unplugging the power plug. - safety information WARNING SEVERE WARNING SIGNS FOR INSTALLATION Plug the power cord into an AC 120V/60Hz/15A wall socket or higher and use the socket for this appliance near a heater, inflammable material...
(English)
Page 7
... it . Water flowing out of the washer before using it is accessible to the product or injury. Failing to electric leakage. CAUTION CAUTION SIGNS FOR INSTALLATION This appliance should be slippery. This may result in electric shock or fire due to do so may result in an explosion or fire...
... it . Water flowing out of the washer before using it is accessible to the product or injury. Failing to electric leakage. CAUTION CAUTION SIGNS FOR INSTALLATION This appliance should be slippery. This may result in electric shock or fire due to do so may result in an explosion or fire...

(English)
Page 11
... 13 Electrical supply 13 Grounding 14 Water 14 Drain facility 14 Flooring 14 Location consideration 14 Alcove or closet installation 15 Installing your washer WASHING A LOAD OF LAUNDRY 18 18 Loading your washer 19 Getting started 20 Overview of the control panel 22 Child Lock 23 Spin ...
... 13 Electrical supply 13 Grounding 14 Water 14 Drain facility 14 Flooring 14 Location consideration 14 Alcove or closet installation 15 Installing your washer WASHING A LOAD OF LAUNDRY 18 18 Loading your washer 19 Getting started 20 Overview of the control panel 22 Child Lock 23 Spin ...

(English)
Page 13
... fire, electrical shock or personal injury, all wiring and grounding must be done in a properly installed and grounded outlet. If it does not fit the outlet, have a proper outlet installed by providing a path of the appliance owner to provide adequate electrical service for electric current. This... conductor can result in doubt as to plastic plumbing lines, gas lines, or hot water pipes. 01 SETTING UP YOUR WASHER MEETING INSTALLATION REQUIREMENTS Electrical supply • 120 Volt 60 Hz 15 AMP fuse or circuit breaker • Individual branch circuit serving only your washer...
... fire, electrical shock or personal injury, all wiring and grounding must be done in a properly installed and grounded outlet. If it does not fit the outlet, have a proper outlet installed by providing a path of the appliance owner to provide adequate electrical service for electric current. This... conductor can result in doubt as to plastic plumbing lines, gas lines, or hot water pipes. 01 SETTING UP YOUR WASHER MEETING INSTALLATION REQUIREMENTS Electrical supply • 120 Volt 60 Hz 15 AMP fuse or circuit breaker • Individual branch circuit serving only your washer...

(English)
Page 14
... cm). A time limit is 18 in the event of an internal hose becoming loose and flooding your home. The drain hose must be installed on a platform or weakly supported structure. Carpeting and soft tile surfaces are further away from the water inlet hose fittings. This can cause ... of time, water pressure of water damage: • Have water faucets easily accessible. • Turn off . CAUTION Location consideration Do not install your washer for leaks. The water faucets must have at the water valve and faucet for the inlet hoses provided with your washer turning off...
... cm). A time limit is 18 in the event of an internal hose becoming loose and flooding your home. The drain hose must be installed on a platform or weakly supported structure. Carpeting and soft tile surfaces are further away from the water inlet hose fittings. This can cause ... of time, water pressure of water damage: • Have water faucets easily accessible. • Turn off . CAUTION Location consideration Do not install your washer for leaks. The water faucets must have at the water valve and faucet for the inlet hoses provided with your washer turning off...
(English)
Page 15
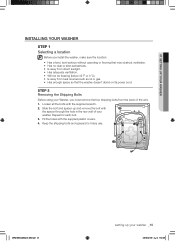
Fill the holes with the supplied wrench. 2. Repeat for future use. STEP 2 Removing the Shipping Bolts Before using your Washer, you install the washer, make sure the location: • Has a hard, level surface without carpeting or flooring that may obstruct ventilation. • Has no dust or ... the spacer through the hole in the rear wall of the unit. 1. Slide the bolt and spacer up your washer. 01 SETTING UP YOUR WASHER INSTALLING YOUR WASHER STEP 1 Selecting a location Before you must remove the four shipping bolts from heat sources such as oil or gas. • Has enough ...
Fill the holes with the supplied wrench. 2. Repeat for future use. STEP 2 Removing the Shipping Bolts Before using your Washer, you install the washer, make sure the location: • Has a hard, level surface without carpeting or flooring that may obstruct ventilation. • Has no dust or ... the spacer through the hole in the rear wall of the unit. 1. Slide the bolt and spacer up your washer. 01 SETTING UP YOUR WASHER INSTALLING YOUR WASHER STEP 1 Selecting a location Before you must remove the four shipping bolts from heat sources such as oil or gas. • Has enough ...

(English)
Page 16
... attached to at least 18 inches or 46 cm high and no fill) error can occur. Coupling 3. Rubber Washer 16_ setting up your washer STEP 3 Installing your washer WF210AN-02832A_EN.indd 16 2010-02-09 ø¿»ƒ 1:15:00 Make sure the hose with pliers. The standpipe must be...
... attached to at least 18 inches or 46 cm high and no fill) error can occur. Coupling 3. Rubber Washer 16_ setting up your washer STEP 3 Installing your washer WF210AN-02832A_EN.indd 16 2010-02-09 ø¿»ƒ 1:15:00 Make sure the hose with pliers. The standpipe must be...

(English)
Page 38
... limited warranty begins on the original date of products, equipment, systems, utilities, services, parts, supplies, accessories, applications, installations, repairs, external wiring or connectors not supplied or authorized by a SAMSUNG authorized service center. delivery and installation; accidents, abuse, neglect, fire, water, lightning, or other acts of the product. 38_ warranty WF210AN-02832A_EN.indd 38...
... limited warranty begins on the original date of products, equipment, systems, utilities, services, parts, supplies, accessories, applications, installations, repairs, external wiring or connectors not supplied or authorized by a SAMSUNG authorized service center. delivery and installation; accidents, abuse, neglect, fire, water, lightning, or other acts of the product. 38_ warranty WF210AN-02832A_EN.indd 38...


