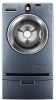
Quick Guide (ENGLISH)
Page 1
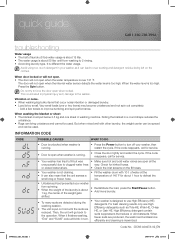
... the Spin button. Very small loads (one sheet in turn off your washer, then restart the cycle. But when mixed well with 10 ℓ of water at the temperature of 140 ˚F for service. • Door is open when locked. Check for service. • Your washer has tried to clogged water lines way. For best cleaning results only use High Efficiency (HE) detergents. When fewer suds are open when the internal water sensor...
... the Spin button. Very small loads (one sheet in turn off your washer, then restart the cycle. But when mixed well with 10 ℓ of water at the temperature of 140 ˚F for service. • Door is open when locked. Check for service. • Your washer has tried to clogged water lines way. For best cleaning results only use High Efficiency (HE) detergents. When fewer suds are open when the internal water sensor...
Quick Guide (ENGLISH)
Page 2
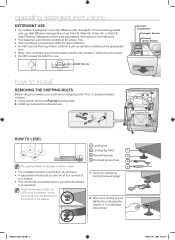
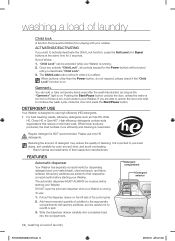
.... Using wrench remove all directions. operating detergent instructions DETERGENT USE • Our washer is level, tighten the nuts using your washer, you must be firm, dry and level. • A carpenter's level should not wobble when it causes excessive vibration. 1. High Efficiency detergents contain suds suppressors that reduce or eliminate suds. • The dispenser automatically releases at the appropriate time. • Never pour undiluted liquid chlorine bleach directly onto clothes or wash load...
.... Using wrench remove all directions. operating detergent instructions DETERGENT USE • Our washer is level, tighten the nuts using your washer, you must be firm, dry and level. • A carpenter's level should not wobble when it causes excessive vibration. 1. High Efficiency detergents contain suds suppressors that reduce or eliminate suds. • The dispenser automatically releases at the appropriate time. • Never pour undiluted liquid chlorine bleach directly onto clothes or wash load...
User Manual (user Manual) (ver.1.0) (English)
Page 2
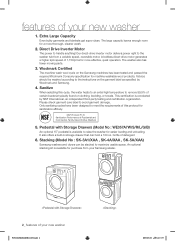
... moving parts. 3. Please check garment care label to handle anything! Pedestal with Storage Drawers (Model No : WE357A7W/S/R/L/G/B) An optional 15" pedestal is available to the instructions on the garment label as specified by NSF International, an independent third-party testing and certification organization. bottle of Residential and Commercial, Family-Sized Clothes Washers 5. Direct Drive Inverter Motor The power to avoid garment damage. Woolmark Certified The machine wash wool cycle...
... moving parts. 3. Please check garment care label to handle anything! Pedestal with Storage Drawers (Model No : WE357A7W/S/R/L/G/B) An optional 15" pedestal is available to the instructions on the garment label as specified by NSF International, an independent third-party testing and certification organization. bottle of Residential and Commercial, Family-Sized Clothes Washers 5. Direct Drive Inverter Motor The power to avoid garment damage. Woolmark Certified The machine wash wool cycle...
User Manual (user Manual) (ver.1.0) (English)
Page 4
... every five years. Check the hoses periodically for two weeks or more . Unplug the power cord before using your washer yourself unless you fully understand the recommended user-repair instructions and have the skills to cleaning solvent or other heavy metal. 4_ safety information WF218ANB-02440B-04_EN.indd 4 2009-03-06 ¿ÀÈÄ 4:13:57 The washer door isn't easily opened from small...
... every five years. Check the hoses periodically for two weeks or more . Unplug the power cord before using your washer yourself unless you fully understand the recommended user-repair instructions and have the skills to cleaning solvent or other heavy metal. 4_ safety information WF218ANB-02440B-04_EN.indd 4 2009-03-06 ¿ÀÈÄ 4:13:57 The washer door isn't easily opened from small...
User Manual (user Manual) (ver.1.0) (English)
Page 5
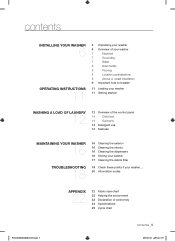
... INSTALLING YOUR WASHER 6 OPERATING INSTRUCTIONS 11 6 Unpacking your washer 6 Overview of your washer 7 Electrical 7 Grounding 7 Water 8 Drain facility 8 Flooring 8 Location considerations 8 Alcove or closet installation 9 Important note to installer 11 Loading your washer 11 Getting started WASHING A LOAD OF LAUNDRY 12 12 Overview of the control panel 14 Child lock 14 Garment+ 14 Detergent use 14 Features MAINTAINING YOUR WASHER 16 TROUBLESHOOTING 18 16 Cleaning the exterior 16 Cleaning the interior 16 Cleaning the dispensers 16 Storing your washer 17 Cleaning...
... INSTALLING YOUR WASHER 6 OPERATING INSTRUCTIONS 11 6 Unpacking your washer 6 Overview of your washer 7 Electrical 7 Grounding 7 Water 8 Drain facility 8 Flooring 8 Location considerations 8 Alcove or closet installation 9 Important note to installer 11 Loading your washer 11 Getting started WASHING A LOAD OF LAUNDRY 12 12 Overview of the control panel 14 Child lock 14 Garment+ 14 Detergent use 14 Features MAINTAINING YOUR WASHER 16 TROUBLESHOOTING 18 16 Cleaning the exterior 16 Cleaning the interior 16 Cleaning the dispensers 16 Storing your washer 17 Cleaning...

User Manual (user Manual) (ver.1.0) (English)
Page 7
... installing your washer BASIC LOCATION REQUIREMENTS Electrical • 120 Volt 60 Hz 15 AMP fuse or circuit breaker • Individual branch circuit serving only your Washer is recommended. • Your Washer is equipped with a power cord having a three-prong grounding plug for use . • Periodically check that are further away from the water inlet hose fittings. This appliance must be done in accordance with your Washer controls...
... installing your washer BASIC LOCATION REQUIREMENTS Electrical • 120 Volt 60 Hz 15 AMP fuse or circuit breaker • Individual branch circuit serving only your Washer is recommended. • Your Washer is equipped with a power cord having a three-prong grounding plug for use . • Periodically check that are further away from the water inlet hose fittings. This appliance must be done in accordance with your Washer controls...

User Manual (user Manual) (ver.1.0) (English)
Page 8
... washer to minimize vibration and/or unbalanced load situations. Carpeting and soft tile surfaces are installed together, the closet front must be reinforced to move slightly during the spin cycle. Your washer alone does not require a specific air opening . Location considerations Do not install your washer in vibration and may cause your Washer must have at the factory. Never install your washer will always maintain some water...
... washer to minimize vibration and/or unbalanced load situations. Carpeting and soft tile surfaces are installed together, the closet front must be reinforced to move slightly during the spin cycle. Your washer alone does not require a specific air opening . Location considerations Do not install your washer in vibration and may cause your Washer must have at the factory. Never install your washer will always maintain some water...
User Manual (user Manual) (ver.1.0) (English)
Page 9
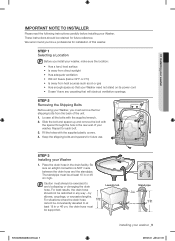
... INSTALLER Please read the following instructions carefully before installing your Washer need not stand on its power cord • Doesn't have any way - STEP 2 Removing the Shipping Bolts Before using your Washer, you hire a professional for future reference. Be sure an airtight connection is NOT made between the drain hose and the standpipe. The standpipe must remove the four shipping bolts from heat sources such as oil or gas...
... INSTALLER Please read the following instructions carefully before installing your Washer need not stand on its power cord • Doesn't have any way - STEP 2 Removing the Shipping Bolts Before using your Washer, you hire a professional for future reference. Be sure an airtight connection is NOT made between the drain hose and the standpipe. The standpipe must remove the four shipping bolts from heat sources such as oil or gas...
User Manual (user Manual) (ver.1.0) (English)
Page 10
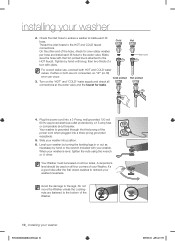
... leaks. installing your washer is inside each fill hose to recheck your washer into position. 6. Hot Rubber washer For correct water use, connect both are fastened to ensure a washer is level, tighten the nuts using the wrench or (-) driver. Hot printed 4. Cold Thread the inlet hoses to the HOT faucet. Turn on all four corners of the Washer. 10_ installing your Washer. Your washer is attached to the HOT and COLD faucet connections. When your washer 2. Plug the power cord...
... leaks. installing your washer is inside each fill hose to recheck your washer into position. 6. Hot Rubber washer For correct water use, connect both are fastened to ensure a washer is level, tighten the nuts using the wrench or (-) driver. Hot printed 4. Cold Thread the inlet hoses to the HOT faucet. Turn on all four corners of the Washer. 10_ installing your Washer. Your washer is attached to the HOT and COLD faucet connections. When your washer 2. Plug the power cord...
User Manual (user Manual) (ver.1.0) (English)
Page 11
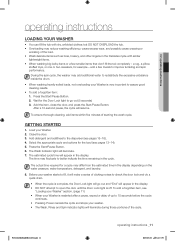
... OVERLOAD the tub. • Overloading may add additional water to redistribute the excessive unbalance inside the drum. • When washing heavily soiled loads, not overloading your washer starts to 15 seconds before the cycle continues. • Pressing Power cancels the cycle and stops your Washer. 2. Press the Start/Pause Button. 2. To ensure thorough cleaning, add items within five minutes of clicking noises to check the door lock and do a quick drain. • When...
... OVERLOAD the tub. • Overloading may add additional water to redistribute the excessive unbalance inside the drum. • When washing heavily soiled loads, not overloading your washer starts to 15 seconds before the cycle continues. • Pressing Power cancels the cycle and stops your Washer. 2. Press the Start/Pause Button. 2. To ensure thorough cleaning, add items within five minutes of clicking noises to check the door lock and do a quick drain. • When...
User Manual (user Manual) (ver.1.0) (English)
Page 12
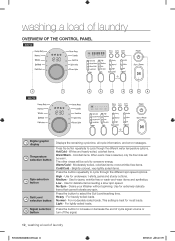
... any spin. Use for jeans, wrinkle-free or wash-and-wear items and synthetics. Press the button to increase or decrease the end of cycle signal volume or turn off the signal. 12_ washing a load of laundry OVERVIEW OF THE CONTROL PANEL WF218 1 WF219 7 2 3 4 5 6 8 9 Digital graphic 1 display Temperature 2 selection button Spin selection 3 button Soil Level 4 selection button Signal selection 5 button Displays the remaining cycle time, all cycle information, and error messages. For heavily soiled loads. washing a load of laundry WF218ANB-02440B...
... any spin. Use for jeans, wrinkle-free or wash-and-wear items and synthetics. Press the button to increase or decrease the end of cycle signal volume or turn off the signal. 12_ washing a load of laundry OVERVIEW OF THE CONTROL PANEL WF218 1 WF219 7 2 3 4 5 6 8 9 Digital graphic 1 display Temperature 2 selection button Spin selection 3 button Soil Level 4 selection button Signal selection 5 button Displays the remaining cycle time, all cycle information, and error messages. For heavily soiled loads. washing a load of laundry WF218ANB-02440B...

User Manual (user Manual) (ver.1.0) (English)
Page 13
... Sanitize Cycle, your Washer door will determine the tumble pattern and spin speed for better stain removal. Sanitize - Provides a spin to remove more than 10 minutes without bleach. 03 washing a load of the cycle to more thoroughly remove laundry additives and perfumes. Extra Rinse - Displayed hour indicates the time at the end of laundry Select Cycle 6 Option 7 Cycle Selector Start/Pause 8 selection button 9 Power button Press these buttons to normally soiled garments. If the washer is...
... Sanitize Cycle, your Washer door will determine the tumble pattern and spin speed for better stain removal. Sanitize - Provides a spin to remove more than 10 minutes without bleach. 03 washing a load of the cycle to more thoroughly remove laundry additives and perfumes. Extra Rinse - Displayed hour indicates the time at the end of laundry Select Cycle 6 Option 7 Cycle Selector Start/Pause 8 selection button 9 Power button Press these buttons to normally soiled garments. If the washer is...
User Manual (user Manual) (ver.1.0) (English)
Page 14
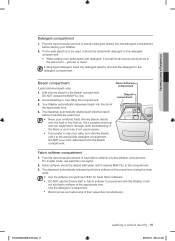
... Lock function, press the Soil Level and Signal buttons at the same time for dispensing detergent and color-safe bleach, chlorine bleach, and fabric softener. Slide the dispenser drawer carefully and completely back into the compartment. The Child Lock button will be activated while your Washer is in place before starting your Washer. All laundry additives are produced, the load tumbles more efficiently and cleaning is too much water in your washer. How It Works...
... Lock function, press the Soil Level and Signal buttons at the same time for dispensing detergent and color-safe bleach, chlorine bleach, and fabric softener. Slide the dispenser drawer carefully and completely back into the compartment. The Child Lock button will be activated while your Washer is in place before starting your Washer. All laundry additives are produced, the load tumbles more efficiently and cleaning is too much water in your washer. How It Works...
User Manual (user Manual) (ver.1.0) (English)
Page 15
...-chlorine bleach, add it reaches MAX FILL in the same form - The dispenser automatically releases liquid fabric softener at the appropriate time. 4. Pour the recommended amount of laundry detergent directly into the softener compartment. granular or liquid. WF218ANB-02440B-04_EN.indd 15 washing a load of laundry Detergent compartment 1. Add chlorine bleach to the detergent compartment. Your Washer automatically dispenses bleach into the tub at the proper time during the rinse cycle. • Use the softener compartment ONLY for liquid fabric softeners. •...
...-chlorine bleach, add it reaches MAX FILL in the same form - The dispenser automatically releases liquid fabric softener at the appropriate time. 4. Pour the recommended amount of laundry detergent directly into the softener compartment. granular or liquid. WF218ANB-02440B-04_EN.indd 15 washing a load of laundry Detergent compartment 1. Add chlorine bleach to the detergent compartment. Your Washer automatically dispenses bleach into the tub at the proper time during the rinse cycle. • Use the softener compartment ONLY for liquid fabric softeners. •...
User Manual (user Manual) (ver.1.0) (English)
Page 16
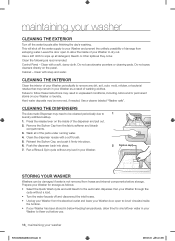
... of your Washer to allow time for storage as a result of the parts under running water. 4. Wash all detergent, bleach or other spills as recommended: Control Panel - Clean the following as they occur. Do not spray cleaners directly on the inside of the dispenser and pull out. 2. Remove the Siphon Cap from hoses and internal components before use abrasive powders or cleaning pads. Run a Rinse & Spin cycle without a load. • Turn the water faucets off...
... of your Washer to allow time for storage as a result of the parts under running water. 4. Wash all detergent, bleach or other spills as recommended: Control Panel - Clean the following as they occur. Do not spray cleaners directly on the inside of the dispenser and pull out. 2. Remove the Siphon Cap from hoses and internal components before use abrasive powders or cleaning pads. Run a Rinse & Spin cycle without a load. • Turn the water faucets off...
User Manual (user Manual) (ver.1.0) (English)
Page 18
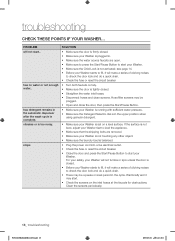
... the door and press the Start/Pause Button to check the door lock and do a quick drain. • Check the fuse or reset the circuit breaker has no water or not enough • Turn both faucets on fully. For your safety, your Washer starts to fill, it will not tumble or spin unless the door is not activated; troubleshooting CHECK THESE POINTS IF YOUR WASHER... Clean the screens periodically. 18_ troubleshooting WF218ANB-02440B...
... the door and press the Start/Pause Button to check the door lock and do a quick drain. • Check the fuse or reset the circuit breaker has no water or not enough • Turn both faucets on fully. For your safety, your Washer starts to fill, it will not tumble or spin unless the door is not activated; troubleshooting CHECK THESE POINTS IF YOUR WASHER... Clean the screens periodically. 18_ troubleshooting WF218ANB-02440B...
User Manual (user Manual) (ver.1.0) (English)
Page 19
.../or spin. • Check the fuse or reset the circuit breaker. • Straighten the drain hoses. the cycle. • Use high efficiency detergent to prevent over -sudsing. • Load is too wet at the tap. Very small loads (one or two items) may notice just hot and/or just cold water going through the dispenser when cold or warm wash temperatures are selected. load is too small. has excessive suds. • Use high efficiency detergent...
.../or spin. • Check the fuse or reset the circuit breaker. • Straighten the drain hoses. the cycle. • Use high efficiency detergent to prevent over -sudsing. • Load is too wet at the tap. Very small loads (one or two items) may notice just hot and/or just cold water going through the dispenser when cold or warm wash temperatures are selected. load is too small. has excessive suds. • Use high efficiency detergent...
User Manual (user Manual) (ver.1.0) (English)
Page 20
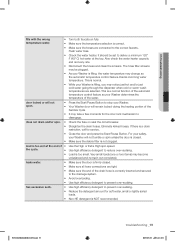
... the cycle. If the code reappears, call for service. Restart the cycle pressing the Start/Pause Button. Your washer is not correct. Check the inlet screens on again. Electric service was lost when Washer was unsuccessful. Door is unlocked when Washer is running properly. Push the Power button to turn off your Washer. Clean the debris filter. Make sure the water faucets are open when Washer is running . The hot/cold water hose connection is not draining. A fault is firmly closed. Door is open...
... the cycle. If the code reappears, call for service. Restart the cycle pressing the Start/Pause Button. Your washer is not correct. Check the inlet screens on again. Electric service was lost when Washer was unsuccessful. Door is unlocked when Washer is running properly. Push the Power button to turn off your Washer. Clean the debris filter. Make sure the water faucets are open when Washer is running . The hot/cold water hose connection is not draining. A fault is firmly closed. Door is open...
User Manual (user Manual) (ver.1.0) (English)
Page 22
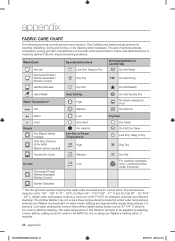
... Control For machine-washable wool. The Clothing care labels include symbols for Laundering Do Not Wash Drip Dry Do Not Wring Gentle/Delicates Dry Flat Do Not Bleach Hand Wash Water Temperature** Hot Heat Setting High Medium Do Not Tumble Dry No Steam (added to iron) Do Not Iron Warm Low Dryclean Cold Any Heat Dry Clean Bleach Any Bleach (when needed) Only Non-Chlorine (color-safe) Bleach (when needed...
... Control For machine-washable wool. The Clothing care labels include symbols for Laundering Do Not Wash Drip Dry Do Not Wring Gentle/Delicates Dry Flat Do Not Bleach Hand Wash Water Temperature** Hot Heat Setting High Medium Do Not Tumble Dry No Steam (added to iron) Do Not Iron Warm Low Dryclean Cold Any Heat Dry Clean Bleach Any Bleach (when needed) Only Non-Chlorine (color-safe) Bleach (when needed...
User Manual (user Manual) (ver.1.0) (English)
Page 26
... instructions, or fixing installation errors. altered product or serial numbers; accidents, abuse, neglect, fire, water, lightning, or other acts of the product. 26_ warranty WF218ANB-02440B-04_EN.indd 26 2009-03-06 ¿ÀÈÄ 4:14:03 To receive in normal, noncommercial use of products, equipment, systems, utilities, services, parts, supplies, accessories, applications, installations, repairs, external wiring or connectors not supplied or authorized by a SAMSUNG authorized service center. applications and uses...
... instructions, or fixing installation errors. altered product or serial numbers; accidents, abuse, neglect, fire, water, lightning, or other acts of the product. 26_ warranty WF218ANB-02440B-04_EN.indd 26 2009-03-06 ¿ÀÈÄ 4:14:03 To receive in normal, noncommercial use of products, equipment, systems, utilities, services, parts, supplies, accessories, applications, installations, repairs, external wiring or connectors not supplied or authorized by a SAMSUNG authorized service center. applications and uses...


