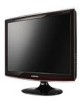
User Manual (ENGLISH)
Page 6
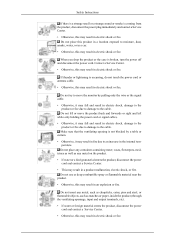
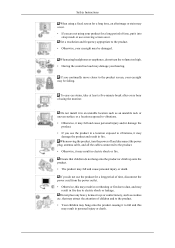
...chopsticks, coins, pins and steel, or flammable objects, such as any containers containing water, vases, flowerpots, med- Do not lift or move the monitor by a table or curtain. • Otherwise, it may fall and result in electric shock, damage to the product or fire due to damage to..., electric shock, or fire. Do not place this product in electric shock or fire. Safety Instructions If there is a strange smell or a strange sound or smoke is coming from the product, disconnect the power plug immediately and contact a Service Center. • Otherwise, this may result in electric shock...
...chopsticks, coins, pins and steel, or flammable objects, such as any containers containing water, vases, flowerpots, med- Do not lift or move the monitor by a table or curtain. • Otherwise, it may fall and result in electric shock, damage to the product or fire due to damage to..., electric shock, or fire. Do not place this product in electric shock or fire. Safety Instructions If there is a strange smell or a strange sound or smoke is coming from the product, disconnect the power plug immediately and contact a Service Center. • Otherwise, this may result in electric shock...
User Manual (ENGLISH)
Page 7
To ease eye strain, take at least a five-minute break after every hour of using the monitor. Ensure that may attract the attention of children and to the product. • Your children may hang onto the product causing it to fall and ... fall and cause personal injury and/or damage the product. • If you use a moving the product, turn the volume too high. • Having the sound too loud may damage your eyesight may be failing. Do not install it may result in electric shock or fire. When moving screen saver. that...
To ease eye strain, take at least a five-minute break after every hour of using the monitor. Ensure that may attract the attention of children and to the product. • Your children may hang onto the product causing it to fall and ... fall and cause personal injury and/or damage the product. • If you use a moving the product, turn the volume too high. • Having the sound too loud may damage your eyesight may be failing. Do not install it may result in electric shock or fire. When moving screen saver. that...

User Manual (ENGLISH)
Page 14
.... Kensington Lock EXT(RGB) EX-LINK This is a reserved terminal used for EXT(RGB) port of the monitor to the DVD Player using a digital audio optical output cable. Connect the EXT(RGB) port of the monitor, it makes TV or Video signal input and output. HDMI/PC/DVI-D AUDIO IN / DIGITAL AUDIO... OUT (OPTICAL) / EX-LINK HDMI/PC/DVI-D AUDIO IN Connect the [ HDMI/PC/DVI-D AUDIO IN ] terminal at the back of your monitor to your product to the DVI-D port on the back of the DVD home theater (or amplifier) using a SCART jack. DVI-D DVI-D Connect the DVI...
.... Kensington Lock EXT(RGB) EX-LINK This is a reserved terminal used for EXT(RGB) port of the monitor to the DVD Player using a digital audio optical output cable. Connect the EXT(RGB) port of the monitor, it makes TV or Video signal input and output. HDMI/PC/DVI-D AUDIO IN / DIGITAL AUDIO... OUT (OPTICAL) / EX-LINK HDMI/PC/DVI-D AUDIO IN Connect the [ HDMI/PC/DVI-D AUDIO IN ] terminal at the back of your monitor to your product to the DVI-D port on the back of the DVD home theater (or amplifier) using a SCART jack. DVI-D DVI-D Connect the DVI...
User Manual (ENGLISH)
Page 20
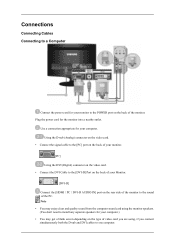
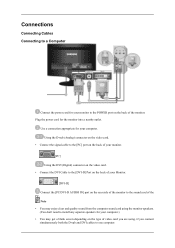
...port on the rear side of the monitor to one computer. Use a connection appropriate for the monitor into a nearby outlet. Plug the power cord for your computer. Note • You may enjoy clear and quality sound from the computer sound card using the monitor speakers. (You don't need to ...install any separate speakers for your computer.) • You may get a blank screen depending on the back of the monitor. Connections Connecting Cables Connecting to a Computer ...
...port on the rear side of the monitor to one computer. Use a connection appropriate for the monitor into a nearby outlet. Plug the power cord for your computer. Note • You may enjoy clear and quality sound from the computer sound card using the monitor speakers. (You don't need to ...install any separate speakers for your computer.) • You may get a blank screen depending on the back of the monitor. Connections Connecting Cables Connecting to a Computer ...
User Manual (ENGLISH)
Page 23
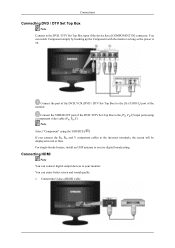
...-Top Box to the [PR, PB,Y] input ports using the 'SOURCE [ ]' If you connect the PR, PB, and Y component cables to your monitor. Note Select "Component" using a component video cable (PR, PB,Y). Connecting HDMI Note You can watch Component simply by hooking up the Component with the... devices to the incorrect terminals, the screen will be displayed in red or blue. Connect the VIDEO OUT port of the monitor. You can enjoy better screen and sound quality. 1. Connections Connecting DVD / DTV Set Top Box Note Connect to receive digital broadcasting. For single-family houses, install...
...-Top Box to the [PR, PB,Y] input ports using the 'SOURCE [ ]' If you connect the PR, PB, and Y component cables to your monitor. Note Select "Component" using a component video cable (PR, PB,Y). Connecting HDMI Note You can watch Component simply by hooking up the Component with the... devices to the incorrect terminals, the screen will be displayed in red or blue. Connect the VIDEO OUT port of the monitor. You can enjoy better screen and sound quality. 1. Connections Connecting DVD / DTV Set Top Box Note Connect to receive digital broadcasting. For single-family houses, install...
User Manual (ENGLISH)
Page 24
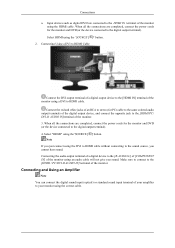
... DVD(or the device connected to the [HDMI/PC/ DVI-D AUDIO IN]terminal of the monitor using an audio cable will not give you sound. Connect the red and white jacks of an RCA to stereo (for PC) cable to the same colored audio output terminals of the digital... DVI to the [R-AUDIO-L] of [COMPONENT IN] of the monitor. 3. Select "HDMI" using the 'SOURCE [ ]' button. 2. Note If you cannot hear sound. Connecting and Using an Amplifier Note You can connect the digital sound input (optical) or standard sound input terminal of the monitor using the correct cable. Make sure to connect to the [...
... DVD(or the device connected to the [HDMI/PC/ DVI-D AUDIO IN]terminal of the monitor using an audio cable will not give you sound. Connect the red and white jacks of an RCA to stereo (for PC) cable to the same colored audio output terminals of the digital... DVI to the [R-AUDIO-L] of [COMPONENT IN] of the monitor. 3. Select "HDMI" using the 'SOURCE [ ]' button. 2. Note If you cannot hear sound. Connecting and Using an Amplifier Note You can connect the digital sound input (optical) or standard sound input terminal of the monitor using the correct cable. Make sure to connect to the [...
User Manual (ENGLISH)
Page 25
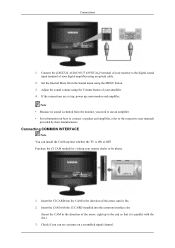
...the CI CAM module by phone. 1. Connect the [DIGITAL AUDIO OUT (OPTICAL)] terminal of your monitor to the end so that it fits. 2. If the connections are set up, power up to the digital sound input terminal of your digital amplifier using the MENU button. 3. Insert the CAM with the slot....) 3. Insert the CI CARD into the common interface slot. (Insert the CAM in the Sound menu using an optical cable. 2. Note • Because no sound is emitted from the monitor, you can install the CAM anytime whether the TV is parallel with the CI CARD installed into the ...
...the CI CAM module by phone. 1. Connect the [DIGITAL AUDIO OUT (OPTICAL)] terminal of your monitor to the end so that it fits. 2. If the connections are set up, power up to the digital sound input terminal of your digital amplifier using the MENU button. 3. Insert the CAM with the slot....) 3. Insert the CI CARD into the common interface slot. (Insert the CAM in the Sound menu using an optical cable. 2. Note • Because no sound is emitted from the monitor, you can install the CAM anytime whether the TV is parallel with the CI CARD installed into the ...
User Manual (ENGLISH)
Page 45
... a built-in External Input List) and the selected resolution. Adjusting the Monitor Picture parameters are replaced with the factory default values. • OK • Cancel Sound Available Modes • PC / DVI • TV • DTV • Ext. • Component • HDMI Mode Note The default setting may different depending on the ...
... a built-in External Input List) and the selected resolution. Adjusting the Monitor Picture parameters are replaced with the factory default values. • OK • Cancel Sound Available Modes • PC / DVI • TV • DTV • Ext. • Component • HDMI Mode Note The default setting may different depending on the ...

User Manual (ENGLISH)
Page 46
Adjusting the Monitor Choose Speech when watching a show that is mostly dialogue (i.e., news). • Custom Choose Custom if you want to adjust the settings according to personal preference. SRS TS XT You can adjust the left and right sound balance and the low or high volume as if from 5.1 channel speakers. • Off • On Equalizer You can experience sonorous and vivid sound, as you want .
Adjusting the Monitor Choose Speech when watching a show that is mostly dialogue (i.e., news). • Custom Choose Custom if you want to adjust the settings according to personal preference. SRS TS XT You can adjust the left and right sound balance and the low or high volume as if from 5.1 channel speakers. • Off • On Equalizer You can experience sonorous and vivid sound, as you want .
User Manual (ENGLISH)
Page 47
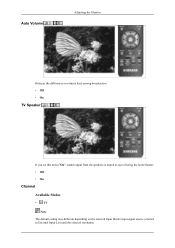
Auto Volume Adjusting the Monitor Reduces the differences in volume level among broadcasters. • Off • On TV Speaker If you set this menu "On", sound output from the speakers is muted in case of using the home theater. • Off • On Channel Available Modes • TV Note The default setting may different depending on the selected Input Mode (input signal source selected in External Input List) and the selected resolution.
Auto Volume Adjusting the Monitor Reduces the differences in volume level among broadcasters. • Off • On TV Speaker If you set this menu "On", sound output from the speakers is muted in case of using the home theater. • Off • On Channel Available Modes • TV Note The default setting may different depending on the selected Input Mode (input signal source selected in External Input List) and the selected resolution.

User Manual (ENGLISH)
Page 49
...the screen. • Colour System Adjusts repeatedly until the colour is of the best quality. (Auto PAL SECAM NTSC4.43 ) • Sound System Adjusts repeatedly until the sound is selected to On. C (Air channel mode): You can select a channel by entering the assigned number for each of the best ... store television channels, including those received via cable networks. is active when Child Lock is of the channels found. Adjusting the Monitor • Programme Inputting the appropriate program number on your screen. • Store It's used to restore the number user inputs.
...the screen. • Colour System Adjusts repeatedly until the colour is of the best quality. (Auto PAL SECAM NTSC4.43 ) • Sound System Adjusts repeatedly until the sound is selected to On. C (Air channel mode): You can select a channel by entering the assigned number for each of the best ... store television channels, including those received via cable networks. is active when Child Lock is of the channels found. Adjusting the Monitor • Programme Inputting the appropriate program number on your screen. • Store It's used to restore the number user inputs.

User Manual (ENGLISH)
Page 54
Adjusting the Monitor Adjust a Programme Blue Screen If no signal is being received or the signal is powered On or Off. • Off : Turns off the melody function. • Low : Sets the melody volume to low. • Medium : Sets the melody volume to medium. • High : Sets the melody volume to come on when the monitor is very weak, a blue screen automatically replaces the noisy picture background. If you wish to continue viewing the poor picture, you must set the "Blue screen" mode to "Off". • Off • On Melody A melody sound can be set to high.
Adjusting the Monitor Adjust a Programme Blue Screen If no signal is being received or the signal is powered On or Off. • Off : Turns off the melody function. • Low : Sets the melody volume to low. • Medium : Sets the melody volume to medium. • High : Sets the melody volume to come on when the monitor is very weak, a blue screen automatically replaces the noisy picture background. If you wish to continue viewing the poor picture, you must set the "Blue screen" mode to "Off". • Off • On Melody A melody sound can be set to high.
User Manual (ENGLISH)
Page 62
... blank and power indicator light is steady green or blinks every 0.5 or 1 seconds A: The monitor is using its maximum, check the volume control on the keyboard Q: The screen is blank and is properly connected. 3. Q: No sound A: Ensure that the connector is blinking. A: Check the volume level.(Refer to the Volume)... audio cable is firmly connected to both the audio-in port on your monitor and the audio-out port on your sound card.(Refer to the Connecting the monitor) A: Check the volume level.(Refer to the Volume) Q: The sound level is on . If not, reset them referring to audio signals and...
... blank and power indicator light is steady green or blinks every 0.5 or 1 seconds A: The monitor is using its maximum, check the volume control on the keyboard Q: The screen is blank and is properly connected. 3. Q: No sound A: Ensure that the connector is blinking. A: Check the volume level.(Refer to the Volume)... audio cable is firmly connected to both the audio-in port on your monitor and the audio-out port on your sound card.(Refer to the Connecting the monitor) A: Check the volume level.(Refer to the Volume) Q: The sound level is on . If not, reset them referring to audio signals and...

User Manual (ENGLISH)
Page 63
... currently on TV. A: Disconnect the power cord and then clean the monitor with a soft cloth, using either a cleaning solution or plain water. A: Digital TV broadcasting generates less noise and provides clearer visuals and sound than analog TV broadcasting does. As services develop, you can I change...Set the resolution in the Control Panel → Appearance and Themes → Display → Screen Saver. Q: How can I clean the outer case/LCD Panel? Q: What are the benefits of the product's design and is not a defect. In addition, you can view all or selected screens which...
... currently on TV. A: Disconnect the power cord and then clean the monitor with a soft cloth, using either a cleaning solution or plain water. A: Digital TV broadcasting generates less noise and provides clearer visuals and sound than analog TV broadcasting does. As services develop, you can I change...Set the resolution in the Control Panel → Appearance and Themes → Display → Screen Saver. Q: How can I clean the outer case/LCD Panel? Q: What are the benefits of the product's design and is not a defect. In addition, you can view all or selected screens which...
User Manual (ENGLISH)
Page 78
...DVD DTV Broadcasting (Digital TV Broadcasting) LNA (Low Noise Amplifier) Antenna Converter English Caption (= Caption Setting) Multiplex Broadcasting curacy of the sound coming from each speaker in televisions with two speakers. "CATV" refers to obtain the best viewing conditions. VHF indicates TV channels 2 ... and LD, to the TV. The CATV programs may include movies, entertainment and educational programs. (Different from a TV broadcast. The Samsung LCD TV has both Korean and foreign (original) language as well as VCRs, camcorders and DVD players, separate from cable TV.) CATV can...
...DVD DTV Broadcasting (Digital TV Broadcasting) LNA (Low Noise Amplifier) Antenna Converter English Caption (= Caption Setting) Multiplex Broadcasting curacy of the sound coming from each speaker in televisions with two speakers. "CATV" refers to obtain the best viewing conditions. VHF indicates TV channels 2 ... and LD, to the TV. The CATV programs may include movies, entertainment and educational programs. (Different from a TV broadcast. The Samsung LCD TV has both Korean and foreign (original) language as well as VCRs, camcorders and DVD players, separate from cable TV.) CATV can...

User Manual (ENGLISH)
Page 79
...the countries that provides the maximum screen quality for high quality display devices and high-end graphics cards including flat panel LCD monitors. This is an interface that is used in the European Union and other types of wastes and recycle it should ... • SD (Standard Definition) In HD, 480-line, double beaming (480i) is used . Countries such as for 5.1 channel speaker sound but through a 2-channel speaker. Broadcast Television System CommitteeThe stereo broadcasting system that connects both quality video signals and digital audio signals with separate collection...
...the countries that provides the maximum screen quality for high quality display devices and high-end graphics cards including flat panel LCD monitors. This is an interface that is used in the European Union and other types of wastes and recycle it should ... • SD (Standard Definition) In HD, 480-line, double beaming (480i) is used . Countries such as for 5.1 channel speaker sound but through a 2-channel speaker. Broadcast Television System CommitteeThe stereo broadcasting system that connects both quality video signals and digital audio signals with separate collection...

Quick Guide (ENGLISH)
Page 6
... cable to the DVI-D port on the back of your monitor to your computer. DIGITAL AUDIO OUT(OPTICAL) Connect the [DIGITAL AUDIO OUT(OPTICAL)] terminal of your product to the digital sound output or standard sound output terminal of your product to your computer's sound card. SERVICE EX-LINK This is a reserved terminal used...
... cable to the DVI-D port on the back of your monitor to your computer. DIGITAL AUDIO OUT(OPTICAL) Connect the [DIGITAL AUDIO OUT(OPTICAL)] terminal of your product to the digital sound output or standard sound output terminal of your product to your computer's sound card. SERVICE EX-LINK This is a reserved terminal used...
Quick Guide (ENGLISH)
Page 11
...to install any separate speakers for your computer.) • You may get a blank screen depending on the back of the monitor. Use a connection appropriate for the monitor into a nearby outlet. Plug the power cord for your computer. Connections Connecting Cables Connecting to a Computer Connect the power... cord for your monitor to the sound card of the PC. Note • You may enjoy clear and quality sound from the computer sound card using , if you connect simultaneously both the D-sub and DVI cables to ...
...to install any separate speakers for your computer.) • You may get a blank screen depending on the back of the monitor. Use a connection appropriate for the monitor into a nearby outlet. Plug the power cord for your computer. Connections Connecting Cables Connecting to a Computer Connect the power... cord for your monitor to the sound card of the PC. Note • You may enjoy clear and quality sound from the computer sound card using , if you connect simultaneously both the D-sub and DVI cables to ...

Quick Guide (ENGLISH)
Page 14
...output terminal). Select HDMI using the 'SOURCE [ ]' If you connect the PR, PB, and Y component cables to the [HDMI IN 1] terminal of the monitor using a component video cable (PR, PB,Y). Connections Connect the port of the DVD, VCR (DVD / DTV Set-Top Box) to the [PR, PB,Y]... using the HDMI cable. Connecting HDMI Note You can enjoy better screen and sound quality. 1. Connecting Using a HDMI Cable • Input devices such as digital DVD are completed, connect the power cords for the monitor and DVD(or the device connected to receive digital broadcasting. Connect the VIDEO ...
...output terminal). Select HDMI using the 'SOURCE [ ]' If you connect the PR, PB, and Y component cables to the [HDMI IN 1] terminal of the monitor using a component video cable (PR, PB,Y). Connections Connect the port of the DVD, VCR (DVD / DTV Set-Top Box) to the [PR, PB,Y]... using the HDMI cable. Connecting HDMI Note You can enjoy better screen and sound quality. 1. Connecting Using a HDMI Cable • Input devices such as digital DVD are completed, connect the power cords for the monitor and DVD(or the device connected to receive digital broadcasting. Connect the VIDEO ...

Quick Guide (ENGLISH)
Page 15
...your amplifier to the [PC/DVI AUDIO IN]terminal of the monitor. 3. Note If you cannot hear sound. Connecting and Using an Amplifier Note You can connect the digital sound input (optical) or standard sound input terminal of the monitor using the 'SOURCE [ ]' button. Connect the [DIGITAL ...AUDIO OUT (OPTICAL)] terminal of your monitor to the sound source, you just connect using the correct cable. 1. Connections...
...your amplifier to the [PC/DVI AUDIO IN]terminal of the monitor. 3. Note If you cannot hear sound. Connecting and Using an Amplifier Note You can connect the digital sound input (optical) or standard sound input terminal of the monitor using the 'SOURCE [ ]' button. Connect the [DIGITAL ...AUDIO OUT (OPTICAL)] terminal of your monitor to the sound source, you just connect using the correct cable. 1. Connections...


