
User Manual
Page 2
... by the warranty. 2 Burn-in is also known as described above for viewing. On PDP models that offer picture sizing features,use ,as well as a full screen picture. Cell Defect The plasma display panel consists of television formats used for all televisions. Be careful in the selection ... not covered by image retention. To avoid such image retention, refer to page 40 of this manual to fill the screen if your Samsung limited warranty. Additionally,viewing other stationary images and text such as stock market reports, video game displays,station logos,web sites or computer...
... by the warranty. 2 Burn-in is also known as described above for viewing. On PDP models that offer picture sizing features,use ,as well as a full screen picture. Cell Defect The plasma display panel consists of television formats used for all televisions. Be careful in the selection ... not covered by image retention. To avoid such image retention, refer to page 40 of this manual to fill the screen if your Samsung limited warranty. Additionally,viewing other stationary images and text such as stock market reports, video game displays,station logos,web sites or computer...

User Manual
Page 3
...Multi-Channel Sound (MTS)Soundtrack ......58 Using the Auto Volume 59 Setting the TruSurround XT 60 Listening to the Sound of the Sub(PIP) Picture (PC or DVI Mode)....61 Selecting the Internal Mute 62 Channel Control Fine Tuning Channels 64 LNA (Low Noise Amplifier 65 Connecting a PC... and Operation Connecting a PC 68 Adjusting the PC Screen 72 Changing the Position of the Image 73 Picture Quality Adjustment 74 Information 77 Time Setting Setting the Clock 80 Setting the Sleep Timer 81 Setting the Timers 82 Function Description Selecting a Menu...
...Multi-Channel Sound (MTS)Soundtrack ......58 Using the Auto Volume 59 Setting the TruSurround XT 60 Listening to the Sound of the Sub(PIP) Picture (PC or DVI Mode)....61 Selecting the Internal Mute 62 Channel Control Fine Tuning Channels 64 LNA (Low Noise Amplifier 65 Connecting a PC... and Operation Connecting a PC 68 Adjusting the PC Screen 72 Changing the Position of the Image 73 Picture Quality Adjustment 74 Information 77 Time Setting Setting the Clock 80 Setting the Sleep Timer 81 Setting the Timers 82 Function Description Selecting a Menu...

User Manual
Page 7
... button, ' ' appears along with selected mode (TV, VCR, CATV, DVD or STB) and remaining batteries on LCD. Ò P.MODE button Adjust the PDP picture by the Samsung remote control (ie., VCR, Cable, DVD players or STB). For example, to select channel 121, press "+100", then press "2" and "1." ˆ MUTE button ... to the previous channel. ı TV/VIDEO button Press to display all of the preset factory settings (or select your personal, customized picture settings.) Ú MODE button Selects a target device to exit the menu. ¿ Up/Down Left/Right buttons 8 Control the cursor in...
... button, ' ' appears along with selected mode (TV, VCR, CATV, DVD or STB) and remaining batteries on LCD. Ò P.MODE button Adjust the PDP picture by the Samsung remote control (ie., VCR, Cable, DVD players or STB). For example, to select channel 121, press "+100", then press "2" and "1." ˆ MUTE button ... to the previous channel. ı TV/VIDEO button Press to display all of the preset factory settings (or select your personal, customized picture settings.) Ú MODE button Selects a target device to exit the menu. ¿ Up/Down Left/Right buttons 8 Control the cursor in...

User Manual
Page 20
... on the PDP and the AUDIO OUT jacks on the DVD player. To Play DVD: 1. Connecting a DVD Player (480i, 480p) This PDP displays the optimum picture in 720p mode. Turn on your DVD owner's instructions. 21 Playing DVD PDP DVD Player Power Plug Video Cable Audio Cable How to select "COMPONENT1...
... on the PDP and the AUDIO OUT jacks on the DVD player. To Play DVD: 1. Connecting a DVD Player (480i, 480p) This PDP displays the optimum picture in 720p mode. Turn on your DVD owner's instructions. 21 Playing DVD PDP DVD Player Power Plug Video Cable Audio Cable How to select "COMPONENT1...

User Manual
Page 21
... to select "COMPONENT1", "COMPONENT2" or "DVI". 3. Turn on the DTV receiver. To Watch DTV: 1. Connecting a DTV Receiver (480p, 720p, 1080i) This PDP displays the optimum picture in 720p mode.
... to select "COMPONENT1", "COMPONENT2" or "DVI". 3. Turn on the DTV receiver. To Watch DTV: 1. Connecting a DTV Receiver (480p, 720p, 1080i) This PDP displays the optimum picture in 720p mode.

User Manual
Page 24
The PDP will display the Picture mode, Sound mode, MTS, Caption, and Clock. Displaying Status Information Press the INFO button on the remote control. Air 4 Mono V-Chip CC Picture Sound MTS Clock : Custom : Custom : Stereo : 12 : 00 am 25
The PDP will display the Picture mode, Sound mode, MTS, Caption, and Clock. Displaying Status Information Press the INFO button on the remote control. Air 4 Mono V-Chip CC Picture Sound MTS Clock : Custom : Custom : Stereo : 12 : 00 am 25
User Manual
Page 38
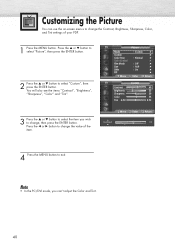
TV Picture Mode Custom Color Tone Color Control Film Mode Size DNIe PIP Move : Custom √ √ : Normal √ √ : Off...74 4 Press the MENU button to change the Contrast, Brightness, Sharpness, Color, and Tint settings of the item. Customizing the Picture You can 't adjust the Color and Tint. 40 Note • In the PC/DVI mode, you wish to change , ... of your PDP. 1 Press the MENU button. Press the ▲ or ▼ button to select "Picture", then press the ENTER button. 2 Press the ▲ or ▼ button to select "Custom", then press the ENTER button.
TV Picture Mode Custom Color Tone Color Control Film Mode Size DNIe PIP Move : Custom √ √ : Normal √ √ : Off...74 4 Press the MENU button to change the Contrast, Brightness, Sharpness, Color, and Tint settings of the item. Customizing the Picture You can 't adjust the Color and Tint. 40 Note • In the PC/DVI mode, you wish to change , ... of your PDP. 1 Press the MENU button. Press the ▲ or ▼ button to select "Picture", then press the ENTER button. 2 Press the ▲ or ▼ button to select "Custom", then press the ENTER button.

User Manual
Page 39
...√ : 16:9 √ : On √ √ Enter Return TV Picture Mode Custom Color Tone Color Control Film Mode Size DNIe PIP : CusDtoymnamic Standard : NormMaolvie : OffCustom : 16:9 : On Move Enter Return TV Picture Mode Custom Color Tone Color Control Film Mode Size DNIe PIP : CusDtoymnamic Standard : ... 2 Press the ENTER button to select "Mode". 3 Press the ▲ or ▼ button to select "Dynamic", "Standard", "Movie", "Custom" picture setting. • You can select "Custom", "Entertain", "Internet", or "Text" in PC/DVI mode. 4 Press the MENU button to adjust the...
...√ : 16:9 √ : On √ √ Enter Return TV Picture Mode Custom Color Tone Color Control Film Mode Size DNIe PIP : CusDtoymnamic Standard : NormMaolvie : OffCustom : 16:9 : On Move Enter Return TV Picture Mode Custom Color Tone Color Control Film Mode Size DNIe PIP : CusDtoymnamic Standard : ... 2 Press the ENTER button to select "Mode". 3 Press the ▲ or ▼ button to select "Dynamic", "Standard", "Movie", "Custom" picture setting. • You can select "Custom", "Entertain", "Internet", or "Text" in PC/DVI mode. 4 Press the MENU button to adjust the...

User Manual
Page 40
...Color Tone Color Control Film Mode Size DNIe PIP Move : Custom : NoCrmooal2l Cool1 : : 1O6fN:f9ormal : OnWarm1 Warm2 Enter Return TV Picture Mode Custom Color Tone Color Control Film Mode Size DNIe PIP Move : Custom : NoCrmooal2l Cool1 : : 1O6fN:f9ormal : OnWarm1 Warm2 Enter... Return 42 Selecting the Color Tone 1 Press the MENU button. Press the ▲ or ▼ button to select "Picture", then press the ENTER button. 2 Press the ▲ or ▼ button to select "Color Tone", then press the ENTER button. 3 Press the ▲...
...Color Tone Color Control Film Mode Size DNIe PIP Move : Custom : NoCrmooal2l Cool1 : : 1O6fN:f9ormal : OnWarm1 Warm2 Enter Return TV Picture Mode Custom Color Tone Color Control Film Mode Size DNIe PIP Move : Custom : NoCrmooal2l Cool1 : : 1O6fN:f9ormal : OnWarm1 Warm2 Enter... Return 42 Selecting the Color Tone 1 Press the MENU button. Press the ▲ or ▼ button to select "Picture", then press the ENTER button. 2 Press the ▲ or ▼ button to select "Color Tone", then press the ENTER button. 3 Press the ▲...
User Manual
Page 41
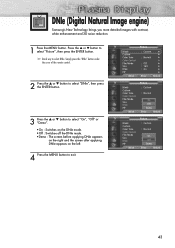
...Film Mode Size DNIe PIP : Custom : Normal : Off On : 16:9 : On Off Demo Move Enter Return 43 DNIe (Digital Natural Image engine) Samsung's New Technology brings you more detailed images with contrast, white enhancement and 3D noise reduction. 1 Press the MENU button. Press the ▲ or ▼... button to select "Picture", then press the ENTER button. ➤ Quick way to select DNIe: Simply press the "DNIe" button under the cover of the remote control. 2...
...Film Mode Size DNIe PIP : Custom : Normal : Off On : 16:9 : On Off Demo Move Enter Return 43 DNIe (Digital Natural Image engine) Samsung's New Technology brings you more detailed images with contrast, white enhancement and 3D noise reduction. 1 Press the MENU button. Press the ▲ or ▼... button to select "Picture", then press the ENTER button. ➤ Quick way to select DNIe: Simply press the "DNIe" button under the cover of the remote control. 2...

User Manual
Page 42
...Mode Size DNIe PIP Move : Custom √ √ : Normal √ √ : Off √ : 16:9 √ : On √ √ Enter Return TV Picture Mode : Custom √ Custom √ Color Tone : Normal √ Color Control √ Film Mode : Off √ Size : 16:9 √ DNIe : On √... : Just press the "ASPECT" button on the remote control. 1 Press the MENU button. Press the ▲ or ▼ button to select "Picture", then press the ENTER button. 2 Press the ▲ or ▼ button to select "Size", then press the ENTER button. 3 Press the ...
...Mode Size DNIe PIP Move : Custom √ √ : Normal √ √ : Off √ : 16:9 √ : On √ √ Enter Return TV Picture Mode : Custom √ Custom √ Color Tone : Normal √ Color Control √ Film Mode : Off √ Size : 16:9 √ DNIe : On √... : Just press the "ASPECT" button on the remote control. 1 Press the MENU button. Press the ▲ or ▼ button to select "Picture", then press the ENTER button. 2 Press the ▲ or ▼ button to select "Size", then press the ENTER button. 3 Press the ...
User Manual
Page 43
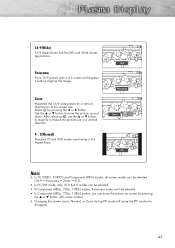
... screen by pressing the œ or √ button. Use the ▲ or ▼ button to magnify or reduce the picture size in a vertical direction) to disappear. 45 Select by pressing the ▲ or ▼ button. (All screen modes) • Changing the screen size to Normal..., or Zoom during PIP mode will cause the PIP window to fit the screen size. Zoom Magnifies the 16:9 wide picture (in a vertical direction. 4 : 3(Normal) Standard TV and VCR screen size having a 4:3 Aspect Ratio. 16:9 Panorama Zoom 4:3 Notes • In TV, VIDEO, S-VIDEO and Component ...
... screen by pressing the œ or √ button. Use the ▲ or ▼ button to magnify or reduce the picture size in a vertical direction) to disappear. 45 Select by pressing the ▲ or ▼ button. (All screen modes) • Changing the screen size to Normal..., or Zoom during PIP mode will cause the PIP window to fit the screen size. Zoom Magnifies the 16:9 wide picture (in a vertical direction. 4 : 3(Normal) Standard TV and VCR screen size having a 4:3 Aspect Ratio. 16:9 Panorama Zoom 4:3 Notes • In TV, VIDEO, S-VIDEO and Component ...

User Manual
Page 44
Freezing the Picture Still Press the STILL button on the remote control to cancel. 46 Press again to freeze a moving picture.
Freezing the Picture Still Press the STILL button on the remote control to cancel. 46 Press again to freeze a moving picture.

User Manual
Page 45
... O AV 1 AV 2 O O X O O X O O O O O O O O O O O O O O O : PIP and Swap Operate X : PIP doesn't Operate AV 3 S-Video 1 S-Video 2 Component 1 Component 2 PC DVI O O O O O O O O O O O O O O O O O O O O O X O O O O O O O X O O O O O O O X O O O O O O O X X X X O O O X X X X O O O X X X X O O O X X X X 47 Press the ▲ or ▼ button to select "Picture", then press the ENTER button. ➤ Quick way to access the PIP mode: Just press the "PIP" button on the remote control. 2 Press the ▲...
... O AV 1 AV 2 O O X O O X O O O O O O O O O O O O O O O : PIP and Swap Operate X : PIP doesn't Operate AV 3 S-Video 1 S-Video 2 Component 1 Component 2 PC DVI O O O O O O O O O O O O O O O O O O O O O X O O O O O O O X O O O O O O O X O O O O O O O X X X X O O O X X X X O O O X X X X O O O X X X X 47 Press the ▲ or ▼ button to select "Picture", then press the ENTER button. ➤ Quick way to access the PIP mode: Just press the "PIP" button on the remote control. 2 Press the ▲...

User Manual
Page 46
Selecting an External Signal You can use PIP to exit. Press the ▲ or ▼ button to select "Picture", then press the ENTER button. 2 Press the ▲ or ▼ button to select "PIP", then press the ENTER button. 3 Press the ▲ or ▼ button ... cycle through all of the main screen to Wide 48 screen. The signal from an external source, such as a VCR. 1 Press the MENU button. TV Picture Mode Custom Color Tone Color Control Film Mode Size DNIe PIP Move : Custom √ √ : Normal √ √ : Off √ : 16:9 √ : On √ √...
Selecting an External Signal You can use PIP to exit. Press the ▲ or ▼ button to select "Picture", then press the ENTER button. 2 Press the ▲ or ▼ button to select "PIP", then press the ENTER button. 3 Press the ▲ or ▼ button ... cycle through all of the main screen to Wide 48 screen. The signal from an external source, such as a VCR. 1 Press the MENU button. TV Picture Mode Custom Color Tone Color Control Film Mode Size DNIe PIP Move : Custom √ √ : Normal √ √ : Off √ : 16:9 √ : On √ √...

User Manual
Page 47
TV Picture Mode Custom Color Tone Color Control Film Mode Size DNIe PIP Move : Custom √ √ : Normal √ √ : Off √ : 16:9 √ : On √ √ ... Source Swap Size Position Air/CATV Channel Sound Select Move : On : TV : : : Air :4 : Main Enter Return 49 Press the ▲ or ▼ button to select "Picture", then press the ENTER button. ➤ Quick way to exit. Swapping the Contents of the remote control. 2 Press the ▲ or ▼ button to select...
TV Picture Mode Custom Color Tone Color Control Film Mode Size DNIe PIP Move : Custom √ √ : Normal √ √ : Off √ : 16:9 √ : On √ √ ... Source Swap Size Position Air/CATV Channel Sound Select Move : On : TV : : : Air :4 : Main Enter Return 49 Press the ▲ or ▼ button to select "Picture", then press the ENTER button. ➤ Quick way to exit. Swapping the Contents of the remote control. 2 Press the ▲ or ▼ button to select...

User Manual
Page 48
TV Picture Mode Custom Color Tone Color Control Film Mode Size DNIe PIP Move : Custom √ √ : Normal √ √ : Off √ : 16:9 √ : On √ √ ... Source Swap Size Position Air/CATV Channel Sound Select Move : On : TV : : : Air :4 : Main Enter Return 50 Press the ▲ or ▼ button to select "Picture", then press the ENTER button. ➤ Quick way to access PIP size: Just press the "SIZE" button under the cover of the PIP Window 1 Press...
TV Picture Mode Custom Color Tone Color Control Film Mode Size DNIe PIP Move : Custom √ √ : Normal √ √ : Off √ : 16:9 √ : On √ √ ... Source Swap Size Position Air/CATV Channel Sound Select Move : On : TV : : : Air :4 : Main Enter Return 50 Press the ▲ or ▼ button to select "Picture", then press the ENTER button. ➤ Quick way to access PIP size: Just press the "SIZE" button under the cover of the PIP Window 1 Press...

User Manual
Page 49
Press the ▲ or ▼ button to select "Picture", then press the ENTER button. 2 Press the ▲ or ▼ button to select "PIP", then press the ENTER button. 3 Press the ▲ or ▼ button ... button. 4 Press the ▲ or ▼ button to select PIP position you want, then press the ENTER button. 5 Press the MENU button to exit. TV Picture Mode : Custom √ Custom √ Color Tone : Normal √ Color Control √ Film Mode : Off √ Size : 16:9 √ DNIe : On √ PIP √ Move...
Press the ▲ or ▼ button to select "Picture", then press the ENTER button. 2 Press the ▲ or ▼ button to select "PIP", then press the ENTER button. 3 Press the ▲ or ▼ button ... button. 4 Press the ▲ or ▼ button to select PIP position you want, then press the ENTER button. 5 Press the MENU button to exit. TV Picture Mode : Custom √ Custom √ Color Tone : Normal √ Color Control √ Film Mode : Off √ Size : 16:9 √ DNIe : On √ PIP √ Move...

User Manual
Page 50
Press the ▲ or ▼ button to select "Picture", then press the ENTER button. 2 Press the ▲ or ▼ button to select "PIP", then press the ENTER button. 3 Press the ▲ or ▼ button ... menu. If a Cable TV system is providing the signal, press the ▲ or ▼ button until the appropriate type of PIP picture separately from the main picture. 1 Press the MENU button. TV Picture Mode : Custom √ Custom √ Color Tone : Normal √ Color Control √ Film Mode : Off √ Size : 16:9 √ DNIe...
Press the ▲ or ▼ button to select "Picture", then press the ENTER button. 2 Press the ▲ or ▼ button to select "PIP", then press the ENTER button. 3 Press the ▲ or ▼ button ... menu. If a Cable TV system is providing the signal, press the ▲ or ▼ button until the appropriate type of PIP picture separately from the main picture. 1 Press the MENU button. TV Picture Mode : Custom √ Custom √ Color Tone : Normal √ Color Control √ Film Mode : Off √ Size : 16:9 √ DNIe...

User Manual
Page 51
TV Picture Mode Custom Color Tone Color Control Film Mode Size DNIe PIP Move : Custom √ √ : Normal √ √ : Off √ : 16:9 √ : On √ √ ... Size Position Air/CATV Channel Sound Select Move : On : TV : : : Air ▲ : 4 1▲1 : Main Enter Return 53 Press the ▲ or ▼ button to select "Picture", then press the ENTER button. ➤ Quick way to change the PIP channel: Just press the "CH " or "CH " button under the cover of the...
TV Picture Mode Custom Color Tone Color Control Film Mode Size DNIe PIP Move : Custom √ √ : Normal √ √ : Off √ : 16:9 √ : On √ √ ... Size Position Air/CATV Channel Sound Select Move : On : TV : : : Air ▲ : 4 1▲1 : Main Enter Return 53 Press the ▲ or ▼ button to select "Picture", then press the ENTER button. ➤ Quick way to change the PIP channel: Just press the "CH " or "CH " button under the cover of the...


