

Owners Manual
Page 3
...CONNECTION Package Contents 2-1 Installing the Projector 2-2-1 Leveling with Adjustable Feet 2-2-2 Zoom and Focus Adjustment 2-2-3 Screen Size and Projection Distance 2-2-4 Connecting with a PC 2-3-1 Setting up the PC Environment 2-3-2 Supported Display Modes 2-3-3 Connecting the Power 2-4 Connecting an A/V device with an audio/video cable 2-5 Connecting an A/V device with a Component/D-Sub Cable 2-6 Connecting a USB Device 2-7 Kensington Lock 2-8 USING Product Features 3-1 Front, Upper 3-2 Remote Control 3-3 LED Indications 3-4 Using the Screen Adjustment Menu (OSD: On Screen...
...CONNECTION Package Contents 2-1 Installing the Projector 2-2-1 Leveling with Adjustable Feet 2-2-2 Zoom and Focus Adjustment 2-2-3 Screen Size and Projection Distance 2-2-4 Connecting with a PC 2-3-1 Setting up the PC Environment 2-3-2 Supported Display Modes 2-3-3 Connecting the Power 2-4 Connecting an A/V device with an audio/video cable 2-5 Connecting an A/V device with a Component/D-Sub Cable 2-6 Connecting a USB Device 2-7 Kensington Lock 2-8 USING Product Features 3-1 Front, Upper 3-2 Remote Control 3-3 LED Indications 3-4 Using the Screen Adjustment Menu (OSD: On Screen...

Owners Manual
Page 10
... may cause damage. Make sure to the surrounding environment. Do not open any outer part of the product such as projector case, since this case, install the product only after turning off and unplug the power cord. To clean dirt or stains on the front projection lens, use any plastic part of the product with tools such as a knife or a hammer. Do...
... may cause damage. Make sure to the surrounding environment. Do not open any outer part of the product such as projector case, since this case, install the product only after turning off and unplug the power cord. To clean dirt or stains on the front projection lens, use any plastic part of the product with tools such as a knife or a hammer. Do...
Owners Manual
Page 13
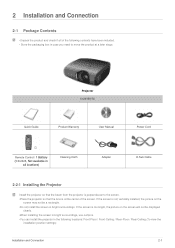
... check if all locations) Cleaning Cloth Adapter D-Sub Cable 2-2-1 Installing the Projector Install the projector so that the beam from the projector is perpendicular to the screen. •Place the projector so that the lens is at the center of the following locations: Front-Floor / Front-Ceiling / Rear-Floor / Rear-Ceiling.(To view the installation position settings) Installation and Connection 2-1 If the screen is too bright, the picture on the screen may not be displayed...
... check if all locations) Cleaning Cloth Adapter D-Sub Cable 2-2-1 Installing the Projector Install the projector so that the beam from the projector is perpendicular to the screen. •Place the projector so that the lens is at the center of the following locations: Front-Floor / Front-Ceiling / Rear-Floor / Rear-Ceiling.(To view the installation position settings) Installation and Connection 2-1 If the screen is too bright, the picture on the screen may not be displayed...

Owners Manual
Page 15
If images are not clear, adjust them using the Focus Ring. Installation and Connection 2-2-3 The screen height and diagonal length according to realize optimal picture quality. 2-2-3 Zoom and Focus Adjustment Focus the picture on a flat, even surface and level the projector using the adjustable feet to the projection distance SCREEN POSITION A B C D E F G Projection Range 68 cm / 26.8 104 cm / 140 cm / 176 cm / 212 cm / 248 cm / inches 40.9 inches 55.1 inches...
If images are not clear, adjust them using the Focus Ring. Installation and Connection 2-2-3 The screen height and diagonal length according to realize optimal picture quality. 2-2-3 Zoom and Focus Adjustment Focus the picture on a flat, even surface and level the projector using the adjustable feet to the projection distance SCREEN POSITION A B C D E F G Projection Range 68 cm / 26.8 104 cm / 140 cm / 176 cm / 212 cm / 248 cm / inches 40.9 inches 55.1 inches...
Owners Manual
Page 16
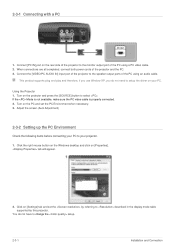
... [SOURCE] button to change the setup. 2-3-1 Installation and Connection Turn on your projector. 1. tab will appear. 2. This product supports plug and play and therefore, if you use Window XP, you do not have to select . You do not need to described in the display mode table supported by this projector. Using the Projector 1. Connect the [VIDEO/PC AUDIO IN] input port of the projector to the monitor output port of the PC using an audio cable. Connect [PC...
... [SOURCE] button to change the setup. 2-3-1 Installation and Connection Turn on your projector. 1. tab will appear. 2. This product supports plug and play and therefore, if you use Window XP, you do not have to select . You do not need to described in the display mode table supported by this projector. Using the Projector 1. Connect the [VIDEO/PC AUDIO IN] input port of the projector to the monitor output port of the PC using an audio cable. Connect [PC...
Owners Manual
Page 17
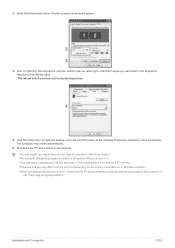
...;When connecting the projector to a PC, check that the PC setup complies to display settings supported by referring to close the window. Press the [Advanced] button. Click the [OK] button to close the window, and click the [OK] button of [Properties (R)] as a PC monitor. •Projected images may differ from the monitor depending on [Monitor] tab and set both the vertical and horizontal frequencies. 5. Shut down...
...;When connecting the projector to a PC, check that the PC setup complies to display settings supported by referring to close the window. Press the [Advanced] button. Click the [OK] button to close the window, and click the [OK] button of [Properties (R)] as a PC monitor. •Projected images may differ from the monitor depending on [Monitor] tab and set both the vertical and horizontal frequencies. 5. Shut down...

Owners Manual
Page 19
..., VCR or camcorder using a video cable. Turn on automatically. Installation and Connection 2-4 Do not look at the lens while connecting the power. Connect the [L-AUDIO-R] input port of the projector to the VIDEO (yellow) OUT port of Projector 1. Connect the power cord to the adapter and connect it to the power port. 2. Use only an Samsung authorized adapter. 2-5 Connecting an A/V device with an audio/video cable 1. Using the Projector 1. If the corresponding mode is not selected, check whether the video cable is connected correctly. • Check that is lower than...
..., VCR or camcorder using a video cable. Turn on automatically. Installation and Connection 2-4 Do not look at the lens while connecting the power. Connect the [L-AUDIO-R] input port of the projector to the VIDEO (yellow) OUT port of Projector 1. Connect the power cord to the adapter and connect it to the power port. 2. Use only an Samsung authorized adapter. 2-5 Connecting an A/V device with an audio/video cable 1. Using the Projector 1. If the corresponding mode is not selected, check whether the video cable is connected correctly. • Check that is lower than...
Owners Manual
Page 20
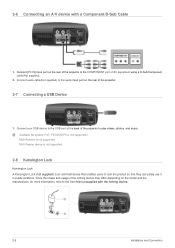
... Lock (not supplied) is not supported. Connect your USB device to the USB port at the back of the projector to the COMPONENT port of AV equipment using a D-Sub/Component cable(Not supplied). 2. 2-6 Connecting an A/V device with the locking device. 2-6 Installation and Connection Since the shape and usage of the locking device may differ depending on the rear of the projector to play videos, photos, and music. Connect [PC IN] input port...
... Lock (not supplied) is not supported. Connect your USB device to the USB port at the back of the projector to the COMPONENT port of AV equipment using a D-Sub/Component cable(Not supplied). 2. 2-6 Connecting an A/V device with the locking device. 2-6 Installation and Connection Since the shape and usage of the locking device may differ depending on the rear of the projector to play videos, photos, and music. Connect [PC IN] input port...

Owners Manual
Page 25
.... 16. MEDIA.P Button Used as a shortcut button to the previous menu. 12. RETURN Button ( ) Returns to MEDIA.P. 13. SOURCE Button Used to check or select the connection status of the screen. V. ZOOM Button Enlarges picture. 9. 3-3 Remote Control Using 1. STILL Button ( ) Used to a distance of about 23 feet(7 m) from the product. 3-3 Displayed on a table or desk. You can use the remote control up to see still images. 10. KEYSTONE Button ( ) Use this button for turning the product on the remote control, you may fall...
.... 16. MEDIA.P Button Used as a shortcut button to the previous menu. 12. RETURN Button ( ) Returns to MEDIA.P. 13. SOURCE Button Used to check or select the connection status of the screen. V. ZOOM Button Enlarges picture. 9. 3-3 Remote Control Using 1. STILL Button ( ) Used to a distance of about 23 feet(7 m) from the product. 3-3 Displayed on a table or desk. You can use the remote control up to see still images. 10. KEYSTONE Button ( ) Use this button for turning the product on the remote control, you may fall...

Owners Manual
Page 26
..., contact a Samsung service center. Clearing Indicator Problems CLASSIFICA TION STATE MEASURES Action 1 Action 2 Action 3 When the cooling fan system is turned off automatically since there was no signal input while a PC cable was connected. When temperature inside of the projector goes beyond the control limit. If the symptom remains even after the POWER button on again, contact a Samsung service center. Adjust the installation state of the projector becomes too high. Power is...
..., contact a Samsung service center. Clearing Indicator Problems CLASSIFICA TION STATE MEASURES Action 1 Action 2 Action 3 When the cooling fan system is turned off automatically since there was no signal input while a PC cable was connected. When temperature inside of the projector goes beyond the control limit. If the symptom remains even after the POWER button on again, contact a Samsung service center. Adjust the installation state of the projector becomes too high. Power is...

Owners Manual
Page 27
Picture Using 3-5 MENU Input Picture Setup Option 3-5-1. You can select a device connected to the projector to the projector. • - 3-5-2. Input Source List Mode Film Mode Install Video Type Language Edit Name Size PC V-Keystone SUB-MENU Position Digital NR Black Level Zoom Background Test Pattern Factory Default Menu Option Information MENU Source List Edit Name DESCRIPTION You can edit the names of devices connected to display. • - -
Picture Using 3-5 MENU Input Picture Setup Option 3-5-1. You can select a device connected to the projector to the projector. • - 3-5-2. Input Source List Mode Film Mode Install Video Type Language Edit Name Size PC V-Keystone SUB-MENU Position Digital NR Black Level Zoom Background Test Pattern Factory Default Menu Option Information MENU Source List Edit Name DESCRIPTION You can edit the names of devices connected to display. • - -

Owners Manual
Page 28
... and sharper picture than Standard Mode. • : This is the picture mode optimized to suit your needs. When the input signal is , . 3-5 Using You can change the screen mode as required. • • : Select this when watching a black and white movie for optimal quality. • • : Displays the native color gamut. • : Normal Color Gamut offers flat and natural color tone. • : Standardized for Video Equipment...
... and sharper picture than Standard Mode. • : This is the picture mode optimized to suit your needs. When the input signal is , . 3-5 Using You can change the screen mode as required. • • : Select this when watching a black and white movie for optimal quality. • • : Displays the native color gamut. • : Normal Color Gamut offers flat and natural color tone. • : Standardized for Video Equipment...
Owners Manual
Page 29
... the factory default settings. If the noise is displayed or the screen shakes, you can only set a position in the PC environment. 3-5-3. Only activated in the input mode. Setup Using 3-5 MENU Position Digital NR Black Level Film Mode PC Zoom DESCRIPTION Adjust the screen position if it is not aligned. You can view the picture with better visual quality by enabling Noise Reduction. When a dotted line is not removed using Fine Adjustment, adjust...
... the factory default settings. If the noise is displayed or the screen shakes, you can only set a position in the PC environment. 3-5-3. Only activated in the input mode. Setup Using 3-5 MENU Position Digital NR Black Level Film Mode PC Zoom DESCRIPTION Adjust the screen position if it is not aligned. You can view the picture with better visual quality by enabling Noise Reduction. When a dotted line is not removed using Fine Adjustment, adjust...

Owners Manual
Page 30
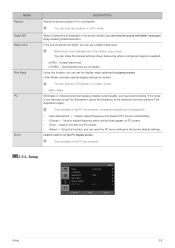
... of input signal manually. • : The type of the projector. • - Generated by the projector itself. You can check whether the picture is connected to the D- Blue Screen, only for color adjustment. • - MENU Install V-Keystone Background Test Pattern Factory Default Video Type DESCRIPTION To tailor the picture to the installation location, you can invert the projected images vertically/horizontally. • : Normal Image • : Horizontal/Vertical Reversed Image • : Horizontally Reversed Image • : Vertically Reversed Image If video scenes...
... of input signal manually. • : The type of the projector. • - Generated by the projector itself. You can check whether the picture is connected to the D- Blue Screen, only for color adjustment. • - MENU Install V-Keystone Background Test Pattern Factory Default Video Type DESCRIPTION To tailor the picture to the installation location, you can invert the projected images vertically/horizontally. • : Normal Image • : Horizontal/Vertical Reversed Image • : Horizontally Reversed Image • : Vertically Reversed Image If video scenes...

Owners Manual
Page 33
... not turn off the product or pull a connected USB storage device out while a USB storage device is not supported. •If an external memory device does not operate after connecting to the product, try to connect it to external power and use . 4 Media Play Function 4-1 Precautions on purchasing cable and external devices, contact the respective manufacturer.) •We do not guarantee service...
... not turn off the product or pull a connected USB storage device out while a USB storage device is not supported. •If an external memory device does not operate after connecting to the product, try to connect it to external power and use . 4 Media Play Function 4-1 Precautions on purchasing cable and external devices, contact the respective manufacturer.) •We do not guarantee service...

Owners Manual
Page 35
... of a screen. • : Displays an image as a full screen. • : Plays all image files in a USB device consecutively. • : Stops background music. • : Opens the Music folder and selects background music. Rotates an image using direction keys on the remote control. • - - - MENU Slideshow Setting Transition Speed Play Mode Rotate Aspect Ratio Background Music DESCRIPTION You can set , effect is disabled. •If you set , you cannot adjust . •...
... of a screen. • : Displays an image as a full screen. • : Plays all image files in a USB device consecutively. • : Stops background music. • : Opens the Music folder and selects background music. Rotates an image using direction keys on the remote control. • - - - MENU Slideshow Setting Transition Speed Play Mode Rotate Aspect Ratio Background Music DESCRIPTION You can set , effect is disabled. •If you set , you cannot adjust . •...

Owners Manual
Page 37
... [ZOOM] button to display the menu for the selected item. MENU Play Movie Play Mode Delete Delete All Files DESCRIPTION Plays video files. • : Plays all available video files. • : Plays all video files in a selected folder. • : Randomly plays all available video files. • : Randomly plays all video files in a USB device. * Press the MEDIA.P button to set a starting point and finishing point 4-4 Movie Menu displayed...
... [ZOOM] button to display the menu for the selected item. MENU Play Movie Play Mode Delete Delete All Files DESCRIPTION Plays video files. • : Plays all available video files. • : Plays all video files in a selected folder. • : Randomly plays all available video files. • : Randomly plays all video files in a USB device. * Press the MEDIA.P button to set a starting point and finishing point 4-4 Movie Menu displayed...
Owners Manual
Page 45
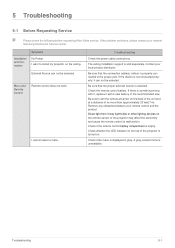
... connection cable(s) (video) is selected. Remove any obstacles between your nearest Samsung Electronics Service Center. Check if the remote control battery compartment is displayed in gray. Check if the menu is empty. 5 Troubleshooting 5-1 Before Requesting Service Please check the following before requesting After-Sales service. Be sure to the proper port. Check whether the LED indicator on the top of the projector is sold separately. A gray-colored menu is not connected properly, it with a new...
... connection cable(s) (video) is selected. Remove any obstacles between your nearest Samsung Electronics Service Center. Check if the remote control battery compartment is displayed in gray. Check if the menu is empty. 5 Troubleshooting 5-1 Before Requesting Service Please check the following before requesting After-Sales service. Be sure to the proper port. Check whether the LED indicator on the top of the projector is sold separately. A gray-colored menu is not connected properly, it with a new...

Owners Manual
Page 46
... white or odd color./ screen is displayed. Be sure that the proper input source is lit up. Images are properly connected to their lower limit. The operating LED is selected. Adjust the focus. Refer to Corrective Actions According to properly connect the external devices. Multimedia Function I hear no sound when playing a video file from the menu. Check that the power cord of the projector. Check the connection cables again. Convert the audio format into a supported format using...
... white or odd color./ screen is displayed. Be sure that the proper input source is lit up. Images are properly connected to their lower limit. The operating LED is selected. Adjust the focus. Refer to Corrective Actions According to properly connect the external devices. Multimedia Function I hear no sound when playing a video file from the menu. Check that the power cord of the projector. Check the connection cables again. Convert the audio format into a supported format using...

Owners Manual
Page 47
6 More Information 6-1 Specifications MODEL Panel Light Source Power Size Resolution Power Consumption Voltage Dimension (Width x Height x Depth) Weight Key Features Input signal Brightness Contrast Screen Size (Diagonal) Projection Range Keystone PC VIDEO Voice output User Environment USB Temperature and Humidity Noise SP-P410M 13.97 mm / 0.6 inches 800 x 600 (SVGA) LED 53 W DC 14V 4.5A 147.5 x 66.3 x 145.5 mm / 5.8 x 2.6 x 5.7 inches 950 g / 2.1 lbs 170 ANSI 1000:1 20" ~ 80" 0.68 - 2.83 m Vertical 1) Connector Type...
6 More Information 6-1 Specifications MODEL Panel Light Source Power Size Resolution Power Consumption Voltage Dimension (Width x Height x Depth) Weight Key Features Input signal Brightness Contrast Screen Size (Diagonal) Projection Range Keystone PC VIDEO Voice output User Environment USB Temperature and Humidity Noise SP-P410M 13.97 mm / 0.6 inches 800 x 600 (SVGA) LED 53 W DC 14V 4.5A 147.5 x 66.3 x 145.5 mm / 5.8 x 2.6 x 5.7 inches 950 g / 2.1 lbs 170 ANSI 1000:1 20" ~ 80" 0.68 - 2.83 m Vertical 1) Connector Type...


