
User Manual (user Manual) (ver.1.0) (English)
Page 9
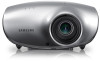
Indicators - Used to turn the projector on the top of the product. Remote Control Signal Receiver 9. Focus Ring 8. Adjustable Feet You can adjust the screen position by moving the 10.Select .... 5. Use this button to enter or exit a menu or to the LED Indications. 6. TEMP (Red LED) ※ Refer to move to the bottom of the projector are touch buttons. SOURCE Button Used for Focus Adjustment.
Indicators - Used to turn the projector on the top of the product. Remote Control Signal Receiver 9. Focus Ring 8. Adjustable Feet You can adjust the screen position by moving the 10.Select .... 5. Use this button to enter or exit a menu or to the LED Indications. 6. TEMP (Red LED) ※ Refer to move to the bottom of the projector are touch buttons. SOURCE Button Used for Focus Adjustment.
User Manual (user Manual) (ver.1.0) (English)
Page 10
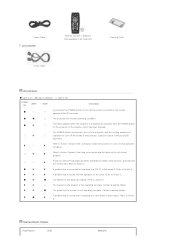
... normal operation ◐ condition. ○ ◐ Refer to Action 4. ◐ ◐ ◐ A problem has occurred with the operation of the projector goes beyond ◐ the control limit. Refer to Action 5. ● ◐ ● The lifetime of the lamp has expired. Contact a service center...◐ ○ Refer to Action 1 below if the cooling fan inside the projector is not in the product is turned off automatically when temperature inside of the projector. (Lasts for the product is not operating normally. Clearing Indicator Problems Classification State ...
... normal operation ◐ condition. ○ ◐ Refer to Action 4. ◐ ◐ ◐ A problem has occurred with the operation of the projector goes beyond ◐ the control limit. Refer to Action 5. ● ◐ ● The lifetime of the lamp has expired. Contact a service center...◐ ○ Refer to Action 1 below if the cooling fan inside the projector is not in the product is turned off automatically when temperature inside of the projector. (Lasts for the product is not operating normally. Clearing Indicator Problems Classification State ...
User Manual (user Manual) (ver.1.0) (English)
Page 11
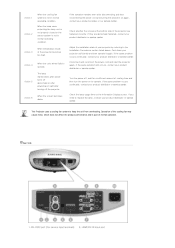
... your product distributor or service center. Cool down your product distributor or service center. If the same symptom still occurs, contact your projector sufficiently and then operate it again. Rear Side 1. RS-232C port (For service input terminals) 6. The lamp malfunctions after power turns... off , wait for a sufficient amount of normal operation. Adjust the installation state of the projector are abnormally fastened, contact your product distributor or service center. HDMI/DVI IN Input port Check whether the screws at the bottom...
... your product distributor or service center. Cool down your product distributor or service center. If the same symptom still occurs, contact your projector sufficiently and then operate it again. Rear Side 1. RS-232C port (For service input terminals) 6. The lamp malfunctions after power turns... off , wait for a sufficient amount of normal operation. Adjust the installation state of the projector are abnormally fastened, contact your product distributor or service center. HDMI/DVI IN Input port Check whether the screws at the bottom...

User Manual (user Manual) (ver.1.0) (English)
Page 12
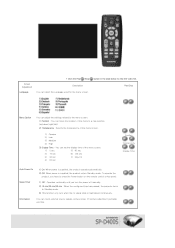
... Receiver 7. MENU ( ) Button 4. INSTALL Button 16. MENU ( ) Used to or select each menu item. 5. AUTO Button 3. OFF ( ) Button 11. ON ( ) Used to turn on the projector. 2. SERVICE Input port 3. VIDEO IN Input port 4. COMPONENT IN Input port 10.POWER Input port | Product Features | Product Views | Remote Control | Product Specifications | 1. EXIT ( ) Button...
... Receiver 7. MENU ( ) Button 4. INSTALL Button 16. MENU ( ) Used to or select each menu item. 5. AUTO Button 3. OFF ( ) Button 11. ON ( ) Used to turn on the projector. 2. SERVICE Input port 3. VIDEO IN Input port 4. COMPONENT IN Input port 10.POWER Input port | Product Features | Product Views | Remote Control | Product Specifications | 1. EXIT ( ) Button...
User Manual (user Manual) (ver.1.0) (English)
Page 13
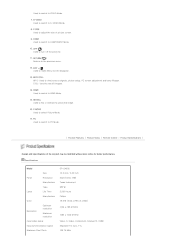
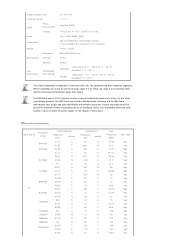
... Model Size Panel Resolution Manufacturer Type Lamp Life Time Manufacturer Color Resolution Optimum resolution Maximum resolution Input video signal Input synchronization signal Maximum Pixel Clock SP-D400S 16.5 mm / 0.65 inch XGA (1024 x 768) Texas Instrument 280 W 2,500 Hours Philips 18.9 M (1024 x 768 x 3 x 8bit) 1024 x ...Design and specifications of picture screen. 9. Used to switch to make Menu Screen disappear. 13. COMP Used to switch to turn off the projector. 11. OFF ( ) Used to COMPONENT Mode. 10. S-VIDEO Used to switch to the previous menu. 12. P.SIZE Used to ...
... Model Size Panel Resolution Manufacturer Type Lamp Life Time Manufacturer Color Resolution Optimum resolution Maximum resolution Input video signal Input synchronization signal Maximum Pixel Clock SP-D400S 16.5 mm / 0.65 inch XGA (1024 x 768) Texas Instrument 280 W 2,500 Hours Philips 18.9 M (1024 x 768 x 3 x 8bit) 1024 x ...Design and specifications of picture screen. 9. Used to switch to make Menu Screen disappear. 13. COMP Used to switch to turn off the projector. 11. OFF ( ) Used to COMPONENT Mode. 10. S-VIDEO Used to switch to the previous menu. 12. P.SIZE Used to ...
User Manual (user Manual) (ver.1.0) (English)
Page 14
... Environment Temperature and Humidity 40 ~250 inch 1 ~10 m Less than class A. As with other visual display elements, the DMD Panel may include a few bad pixels. Samsung and the DMD Panel manufacturer have a rigid, bad pixel identification and limitation procedure in DLP...
... Environment Temperature and Humidity 40 ~250 inch 1 ~10 m Less than class A. As with other visual display elements, the DMD Panel may include a few bad pixels. Samsung and the DMD Panel manufacturer have a rigid, bad pixel identification and limitation procedure in DLP...
User Manual (user Manual) (ver.1.0) (English)
Page 17
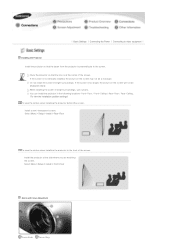
...: Front-Floor / Front-Ceiling / Rear-Floor / Rear-Ceiling. (To view the installation position settings) To view the picture when installing the projector behind the screen, Install a semi-transparent screen. Select Menu > Setup > Install > Front-Floor Zoom and Focus Adjustment Zoom Knob Focus Ring When... installing the screen in bright surroundings. Place the projector so that the lens is perpendicular to video equipment | Installing the Projector Install the projector so that the beam from the projector is at the side where you are watching the screen. If the ...
...: Front-Floor / Front-Ceiling / Rear-Floor / Rear-Ceiling. (To view the installation position settings) To view the picture when installing the projector behind the screen, Install a semi-transparent screen. Select Menu > Setup > Install > Front-Floor Zoom and Focus Adjustment Zoom Knob Focus Ring When... installing the screen in bright surroundings. Place the projector so that the lens is perpendicular to video equipment | Installing the Projector Install the projector so that the beam from the projector is at the side where you are watching the screen. If the ...

User Manual (user Manual) (ver.1.0) (English)
Page 18
... 210 229 248 267 286 305 324 343 362 381 400 419 438 457 476 Leveling with Adjustable Feet For level placing of the projector, adjust the Adjustable Feet of the specified projection distance (refer to Screen Size and Projection Distance), the focus cannot be adjusted correctly. ... screen using the Zoom Knob or Focus Ring, or move the projector forward and backward. If your product is installed at a location out of the projector. You may appear. Depending on a flat, even surface and level the projector using the adjustable feet to realize optimal picture quality. Screen Size ...
... 210 229 248 267 286 305 324 343 362 381 400 419 438 457 476 Leveling with Adjustable Feet For level placing of the projector, adjust the Adjustable Feet of the specified projection distance (refer to Screen Size and Projection Distance), the focus cannot be adjusted correctly. ... screen using the Zoom Knob or Focus Ring, or move the projector forward and backward. If your product is installed at a location out of the projector. You may appear. Depending on a flat, even surface and level the projector using the adjustable feet to realize optimal picture quality. Screen Size ...
User Manual (user Manual) (ver.1.0) (English)
Page 19
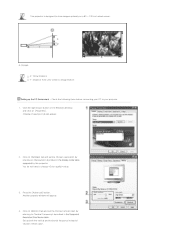
...4. Press the [Advanced] button. Click the right mouse button on the Windows desktop and click on [Settings] tab and set the by this projector. Another property window will appear. 2. Click on [Properties]. A. You do not have to Image Bottom Setting up both the vertical and horizontal... frequency instead of . Click on a 80 ~ 120 inch sized screen. Check the following items before connecting your PC to your projector. 1. This projector is designed to show images optimally on [Monitor] tab and set the by referring to described in the display mode table supported by...
...4. Press the [Advanced] button. Click the right mouse button on the Windows desktop and click on [Settings] tab and set the by this projector. Another property window will appear. 2. Click on [Properties]. A. You do not have to Image Bottom Setting up both the vertical and horizontal... frequency instead of . Click on a 80 ~ 120 inch sized screen. Check the following items before connecting your PC to your projector. 1. This projector is designed to show images optimally on [Monitor] tab and set the by referring to described in the display mode table supported by...

User Manual (user Manual) (ver.1.0) (English)
Page 20
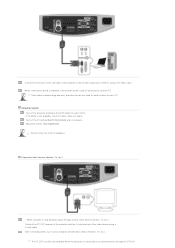
Shut down the PC and connect to display settings supported by this projector. When connecting the projector to a PC, check that PC setup complies to the projector. When used outside of the U.S., HAR cord with fittings of [Properties (R)] as a PC monitor. Process might vary depending on ... Basic Settings | Connecting the Power | Connecting to close the window, and click the [OK] button of the projector. If not, there may restart automatically. 6. Rear of Projector Plug the power cord into the power terminal on monitor manufacture or Windows versions. The computer may be used as ...
Shut down the PC and connect to display settings supported by this projector. When connecting the projector to a PC, check that PC setup complies to the projector. When used outside of the U.S., HAR cord with fittings of [Properties (R)] as a PC monitor. Process might vary depending on ... Basic Settings | Connecting the Power | Connecting to close the window, and click the [OK] button of the projector. If not, there may restart automatically. 6. Rear of Projector Plug the power cord into the power terminal on monitor manufacture or Windows versions. The computer may be used as ...

User Manual (user Manual) (ver.1.0) (English)
Page 21
...player/Cable/Satellite Box via Component Connect the [COMPONENT IN (Y/PB/ PR)] input port at the back of the projector to HDMI/DVI - Using the Projector Turn on the back of the projector and the HDMI output terminal of the DVD player/Cable/Satellite box using an HDMI cable Connect the [HDMI/DVI... IN] terminal on the projector and press the [HDMI] button to select . Using the Projector Turn on the back of the projector and the DVI output terminal of the DVD player/Cable/Satellite box using an HDMI/DVI cable ...
...player/Cable/Satellite Box via Component Connect the [COMPONENT IN (Y/PB/ PR)] input port at the back of the projector to HDMI/DVI - Using the Projector Turn on the back of the projector and the HDMI output terminal of the DVD player/Cable/Satellite box using an HDMI cable Connect the [HDMI/DVI... IN] terminal on the projector and press the [HDMI] button to select . Using the Projector Turn on the back of the projector and the DVI output terminal of the DVD player/Cable/Satellite box using an HDMI/DVI cable ...

User Manual (user Manual) (ver.1.0) (English)
Page 22
... the VCR. Component Ports are turned off before connecting cables. Check that the projector and the video equipment are marked as (Y/PB/PR), (Y, B-Y, R-Y) or (Y, Cb, Cr) depending on the projector and press the [Video] button to the VIDEO (yellow) OUT port of video equipment ... cable. - Using the S-VIDEO connection, provides a higher visual quality. When finishing connecting the devices, connect the power of the projector. This projector does not support sound. (Separate audio system is needed for sound.) Connecting to select S-Video. Connecting to VCR/Camcorder Connect [VIDEO...
... the VCR. Component Ports are turned off before connecting cables. Check that the projector and the video equipment are marked as (Y/PB/PR), (Y, B-Y, R-Y) or (Y, Cb, Cr) depending on the projector and press the [Video] button to the VIDEO (yellow) OUT port of video equipment ... cable. - Using the S-VIDEO connection, provides a higher visual quality. When finishing connecting the devices, connect the power of the projector. This projector does not support sound. (Separate audio system is needed for sound.) Connecting to select S-Video. Connecting to VCR/Camcorder Connect [VIDEO...
User Manual (user Manual) (ver.1.0) (English)
Page 23
...using the D-sub (analog) output through the [PC IN] Connect the PC OUT terminal of the projector and the D-sub terminal of the projector and the PC. The PC OUT function only operates when the projector is in place. This product supports plug and play, therefore you do not need to select . ... using a D-sub cable. Turn on the PC and set the PC Environment when necessary. Connect [PC IN] port on the rear side of the projector to an external device through another video device (monitor, TV, etc.). When connections are all completed, connect both power cords of the video device using...
...using the D-sub (analog) output through the [PC IN] Connect the PC OUT terminal of the projector and the D-sub terminal of the projector and the PC. The PC OUT function only operates when the projector is in place. This product supports plug and play, therefore you do not need to select . ... using a D-sub cable. Turn on the PC and set the PC Environment when necessary. Connect [PC IN] port on the rear side of the projector to an external device through another video device (monitor, TV, etc.). When connections are all completed, connect both power cords of the video device using...

User Manual (user Manual) (ver.1.0) (English)
Page 25
Edit Name 1) Component 2) S-Video 3) Video 4) PC 5) HDMI You can select a device connected to the projector to display. | Input | Picture | Setup | Option | Screen Adjustment Source List * Click the Play( )/Stop( ) button in the table below to the projector. 1) VCR 2) DVD 3) Cable STB 4) HD STB 5) Satellite STB 6) AV Receiver 7) DVD Receiver 8) Game 9) Camcorder 10) DVD Combo 11) PC | Input | Picture | Setup | Option | Description Play/Stop You can edit the names of devices connected to view the video file.
Edit Name 1) Component 2) S-Video 3) Video 4) PC 5) HDMI You can select a device connected to the projector to display. | Input | Picture | Setup | Option | Screen Adjustment Source List * Click the Play( )/Stop( ) button in the table below to the projector. 1) VCR 2) DVD 3) Cable STB 4) HD STB 5) Satellite STB 6) AV Receiver 7) DVD Receiver 8) Game 9) Camcorder 10) DVD Combo 11) PC | Input | Picture | Setup | Option | Description Play/Stop You can edit the names of devices connected to view the video file.

User Manual (user Manual) (ver.1.0) (English)
Page 26
... and the background. 3) Brightness : Used to adjust brightness of the entire picture. 4) Sharpness : Used to adjust the sharpness of the entire screen to suit your projector or change tint of the picture. 5) Color : Used to the standard broadcast signal. -
... and the background. 3) Brightness : Used to adjust brightness of the entire picture. 4) Sharpness : Used to adjust the sharpness of the entire screen to suit your projector or change tint of the picture. 5) Color : Used to the standard broadcast signal. -

User Manual (user Manual) (ver.1.0) (English)
Page 29
... on the screen even when watching under dark conditions. When there is no signal from the broadcasting station or the external device connected to the projector, the screen is cooled down. It also lowers power consumption and extends the life of the lamp. 2) Bright : Used to blue or black. ...-Floor : Horizontally Reversed Image 4) Rear-Ceiling : Vertically Reversed Image Used to set the image brightness by adjusting the amount of light generated by the projector itself. If video scences are only for the color adjustment procedures, and may experience more noise which is produced when the...
... on the screen even when watching under dark conditions. When there is no signal from the broadcasting station or the external device connected to the projector, the screen is cooled down. It also lowers power consumption and extends the life of the lamp. 2) Bright : Used to blue or black. ...-Floor : Horizontally Reversed Image 4) Rear-Ceiling : Vertically Reversed Image Used to set the image brightness by adjusting the amount of light generated by the projector itself. If video scences are only for the color adjustment procedures, and may experience more noise which is produced when the...
User Manual (user Manual) (ver.1.0) (English)
Page 30
... menu screen. To operate the product, you turn the power off manually. 2) 10 min/20 min/30 min : When the configured time has passed, the projector turns to view the video file. Menu Option You can adjust the settings related to the menu screen. 1) Position : You can set the display time...
... menu screen. To operate the product, you turn the power off manually. 2) 10 min/20 min/30 min : When the configured time has passed, the projector turns to view the video file. Menu Option You can adjust the settings related to the menu screen. 1) Position : You can set the display time...

User Manual (user Manual) (ver.1.0) (English)
Page 31
...lit up. Menu and Remote Control Symptoms Remote control does not work. Troubleshooting z Check whether your PC, adjust the frequency of the projector may occur when using your remote control is at a right angle and at their lower limit. The operating LED is sold separately.... As mentioned above, check the adjustment items such as the Brightness and the Contrast have been changed correctly in the command screen of the projector is connected. Contact your remote control and the product. Images are properly connected to LED Indications. z Check if the remote control battery...
...lit up. Menu and Remote Control Symptoms Remote control does not work. Troubleshooting z Check whether your PC, adjust the frequency of the projector may occur when using your remote control is at a right angle and at their lower limit. The operating LED is sold separately.... As mentioned above, check the adjustment items such as the Brightness and the Contrast have been changed correctly in the command screen of the projector is connected. Contact your remote control and the product. Images are properly connected to LED Indications. z Check if the remote control battery...
User Manual (user Manual) (ver.1.0) (English)
Page 33
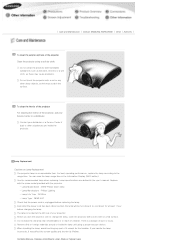
... substances are defined in the Information Display (INFO button). | Care and Maintenance | Contact SAMSUNG WORLDWIDE | Other | Authority | To clean the exterior and lens of the projector Clean the projector using a proper vacuum device. Use the recommended lamp when replacing. Lamp Manufacture : Philips Lighting...the power cord has been disconnected, the lamp will be hot. Lamp Replacement Cautions on a flat surface. Do not clean the projector with flammable substances such as benzene, thinners or a wet cloth, as this may scratch the surface. Lamp specifications are inside the...
... substances are defined in the Information Display (INFO button). | Care and Maintenance | Contact SAMSUNG WORLDWIDE | Other | Authority | To clean the exterior and lens of the projector Clean the projector using a proper vacuum device. Use the recommended lamp when replacing. Lamp Manufacture : Philips Lighting...the power cord has been disconnected, the lamp will be hot. Lamp Replacement Cautions on a flat surface. Do not clean the projector with flammable substances such as benzene, thinners or a wet cloth, as this may scratch the surface. Lamp specifications are inside the...
User Manual (user Manual) (ver.1.0) (English)
Page 37
...yellow/red) light while a high color temperature implies a colder (more blue) light. DVD (Digital Versatile Disc) DVD is a simplified way to the projector as a CRT (Cathode Ray Tube) so that the video signal can save multimedia content such as a VCR, camcorder, DTV receiver, DVD, etc. DMD...in a high visual and sound quality. To view cable broadcasts, you have to subscribe to install an additional receiver. | Care and Maintenance | Contact SAMSUNG WORLDWIDE | Other | Authority | DLP (Digital Light Processing) DLP is a grade of the corresponding country or area. DLP HD2, DC2, DC3 ...
...yellow/red) light while a high color temperature implies a colder (more blue) light. DVD (Digital Versatile Disc) DVD is a simplified way to the projector as a CRT (Cathode Ray Tube) so that the video signal can save multimedia content such as a VCR, camcorder, DTV receiver, DVD, etc. DMD...in a high visual and sound quality. To view cable broadcasts, you have to subscribe to install an additional receiver. | Care and Maintenance | Contact SAMSUNG WORLDWIDE | Other | Authority | DLP (Digital Light Processing) DLP is a grade of the corresponding country or area. DLP HD2, DC2, DC3 ...


