
User Manual (user Manual) (ver.1.0) (English)
Page 5
... temperatures, high humidity, or where it thoroughly. z If water enters the product, it may cause heat emission from the remote, be operated for any chemicals such as toys or cookies on the product. z This is a danger of electric shock or fire. Keep batteries out of the reach of the lamp nor project the picture onto eyes. If the power...
... temperatures, high humidity, or where it thoroughly. z If water enters the product, it may cause heat emission from the remote, be operated for any chemicals such as toys or cookies on the product. z This is a danger of electric shock or fire. Keep batteries out of the reach of the lamp nor project the picture onto eyes. If the power...
User Manual (user Manual) (ver.1.0) (English)
Page 8
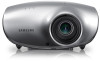
... adopting various input terminals such as an HDMI (HDCP supported) terminal, a Component terminal, and a PC OUT terminal. Connections to minimize fan noise and beam leakage. Front/Upper Side | Product Features | Product Views | Remote Control | Product Specifications | Quality picture tuning focused on video production. User adjustments - | Product Features | Product Views | Remote Control | Product Specifications | Optical engine with advanced DLP technology - 1024 x 768 panel has been adapted. - 4 segment color wheel to implement optimal colors. - 280 W Lamp designed...
... adopting various input terminals such as an HDMI (HDCP supported) terminal, a Component terminal, and a PC OUT terminal. Connections to minimize fan noise and beam leakage. Front/Upper Side | Product Features | Product Views | Remote Control | Product Specifications | Quality picture tuning focused on video production. User adjustments - | Product Features | Product Views | Remote Control | Product Specifications | Optical engine with advanced DLP technology - 1024 x 768 panel has been adapted. - 4 segment color wheel to implement optimal colors. - 280 W Lamp designed...

User Manual (user Manual) (ver.1.0) (English)
Page 9
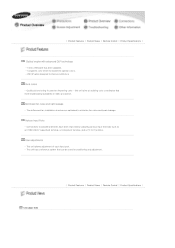
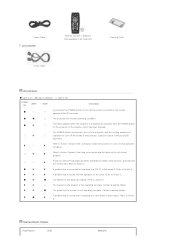
... attached to select input signals from the external sources. 3. Unpacking Quick Installation Guide Warranty Card/ Registration Card (Not available in a menu. 5. Lens Use this button to move forward in all locations) User Manual CD The buttons on or off. 2. LAMP (Blue LED) - TEMP (Red LED) ※ Refer to move to enlarge or reduce image size. 7. POWER( ) Button Used to use them lightly with your fingers to turn the projector on the top of the product. SOURCE Button Used for Focus Adjustment. Remote Control Signal Receiver 9. 1. Touch...
... attached to select input signals from the external sources. 3. Unpacking Quick Installation Guide Warranty Card/ Registration Card (Not available in a menu. 5. Lens Use this button to move forward in all locations) User Manual CD The buttons on or off. 2. LAMP (Blue LED) - TEMP (Red LED) ※ Refer to move to enlarge or reduce image size. 7. POWER( ) Button Used to use them lightly with your fingers to turn the projector on the top of the product. SOURCE Button Used for Focus Adjustment. Remote Control Signal Receiver 9. 1. Touch...
User Manual (user Manual) (ver.1.0) (English)
Page 10
...; The lifetime of the lamp. Power Cable Sold separately D-Sub Cable Remote Control/ 1 Batteries (Not available in all locations) Cleaning Cloth LED Indications ●:Light is On ◐:Light is Blinking ○:Light is Off STAND LAMP BY TEMP Information ● ○ If you press the POWER button on the remote control or projector, the screen ○ appears within 30 seconds. ● ● ○ The projector is in normal operating condition. ● ◐ This...
...; The lifetime of the lamp. Power Cable Sold separately D-Sub Cable Remote Control/ 1 Batteries (Not available in all locations) Cleaning Cloth LED Indications ●:Light is On ◐:Light is Blinking ○:Light is Off STAND LAMP BY TEMP Information ● ○ If you press the POWER button on the remote control or projector, the screen ○ appears within 30 seconds. ● ● ○ The projector is in normal operating condition. ● ◐ This...
User Manual (user Manual) (ver.1.0) (English)
Page 11
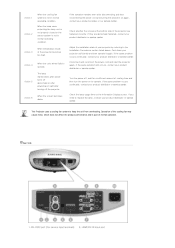
... then operate it again. When the color wheel fails to keep the unit from overheating. If the same problem occurs continually, contact your product distributor or service center. If the same problem occurs continually, contact your product provider or our service center. HDMI/DVI IN Input port Check whether the screws at the bottom side of the projector becomes too high. When the lamp cover protecting the lamp unit...
... then operate it again. When the color wheel fails to keep the unit from overheating. If the same problem occurs continually, contact your product distributor or service center. If the same problem occurs continually, contact your product provider or our service center. HDMI/DVI IN Input port Check whether the screws at the bottom side of the projector becomes too high. When the lamp cover protecting the lamp unit...

User Manual (user Manual) (ver.1.0) (English)
Page 12
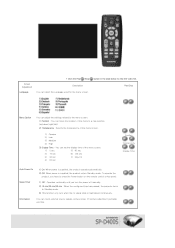
...SIZE Button 9. OFF ( ) Button 11. INFO STILL Button 14. VIDEO VIDEO IN Input port 4. PC Button 1. Move Used to move to turn on the projector. 2. PC OUT terminal 8. ON ( ) Button 2. VIDEO Button 7. 2. Move Button 5. V.KEYSTONE(+/-) (VERTICAL KEYSTONE)Button 6. COMP Button 10. P.MODE Button 17. RETURN ( ) Button 12. Remote Control Signal Receiver 7. PC IN Input port 9. COMPONENT IN Input port 10.POWER Input port | Product Features | Product Views | Remote Control | Product Specifications | 1. S-VIDEO Button 8. MENU ( ) Used to display Menu Screen...
...SIZE Button 9. OFF ( ) Button 11. INFO STILL Button 14. VIDEO VIDEO IN Input port 4. PC Button 1. Move Used to move to turn on the projector. 2. PC OUT terminal 8. ON ( ) Button 2. VIDEO Button 7. 2. Move Button 5. V.KEYSTONE(+/-) (VERTICAL KEYSTONE)Button 6. COMP Button 10. P.MODE Button 17. RETURN ( ) Button 12. Remote Control Signal Receiver 7. PC IN Input port 9. COMPONENT IN Input port 10.POWER Input port | Product Features | Product Views | Remote Control | Product Specifications | 1. S-VIDEO Button 8. MENU ( ) Used to display Menu Screen...
User Manual (user Manual) (ver.1.0) (English)
Page 13
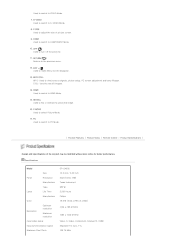
... menu. 12. RETURN ( ) Returns to COMPONENT Mode. 10. INFO STILL INFO: Used to see still images. 14. STILL: Used to check source signals, picture setup, PC screen adjustment and lamp lifespan. HDMI Used to switch to select Picture Mode. 17. P.MODE Used to HDMI Mode. 15. Specifications Model Size Panel Resolution Manufacturer Type Lamp Life Time Manufacturer Color Resolution Optimum resolution Maximum resolution Input video signal Input synchronization signal Maximum Pixel Clock SP-D400S 16.5 mm / 0.65 inch XGA (1024 x 768) Texas Instrument 280 W 2,500 Hours Philips...
... menu. 12. RETURN ( ) Returns to COMPONENT Mode. 10. INFO STILL INFO: Used to see still images. 14. STILL: Used to check source signals, picture setup, PC screen adjustment and lamp lifespan. HDMI Used to switch to select Picture Mode. 17. P.MODE Used to HDMI Mode. 15. Specifications Model Size Panel Resolution Manufacturer Type Lamp Life Time Manufacturer Color Resolution Optimum resolution Maximum resolution Input video signal Input synchronization signal Maximum Pixel Clock SP-D400S 16.5 mm / 0.65 inch XGA (1024 x 768) Texas Instrument 280 W 2,500 Hours Philips...
User Manual (user Manual) (ver.1.0) (English)
Page 14
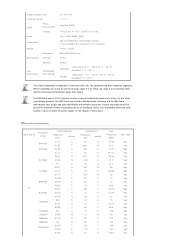
...Sep. Supported Display Modes Resolution Input Source (HxV) 640X350 640X400 640X480 720X400 800X600 PC 832X624 1024X768 1152X864 1152X870 1280X768 1280X960 1280X1024 Horizontal Sync Frequency...used in DLP Projectors consists of bad pixels set by our standards. The DMD Panel used in place and products will not exceed the maximum number of several hundred thousand micro mirrors. Sep. Sep. Sep. Sep. Diagonal screen size Projection Range Power Power Consumption Voltage Noise Dimensions Weight Key Features Brightness Contrast Keystone User Environment Temperature...
...Sep. Supported Display Modes Resolution Input Source (HxV) 640X350 640X400 640X480 720X400 800X600 PC 832X624 1024X768 1152X864 1152X870 1280X768 1280X960 1280X1024 Horizontal Sync Frequency...used in DLP Projectors consists of bad pixels set by our standards. The DMD Panel used in place and products will not exceed the maximum number of several hundred thousand micro mirrors. Sep. Sep. Sep. Sep. Diagonal screen size Projection Range Power Power Consumption Voltage Noise Dimensions Weight Key Features Brightness Contrast Keystone User Environment Temperature...
User Manual (user Manual) (ver.1.0) (English)
Page 17
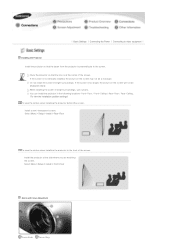
... the screen is not vertically installed, the picture on the screen will not be a rectangle. Select Menu > Setup > Install > Front-Floor Zoom and Focus Adjustment Zoom Knob Focus Ring Do not install the screen in the following locations: Front-Floor / Front-Ceiling / Rear-Floor / Rear-Ceiling. (To view the installation position settings) To view the picture when installing the projector behind the screen, Install a semi-transparent screen. | Basic Settings | Connecting the Power | Connecting to video equipment | Installing the Projector Install the projector so that the lens is...
... the screen is not vertically installed, the picture on the screen will not be a rectangle. Select Menu > Setup > Install > Front-Floor Zoom and Focus Adjustment Zoom Knob Focus Ring Do not install the screen in the following locations: Front-Floor / Front-Ceiling / Rear-Floor / Rear-Ceiling. (To view the installation position settings) To view the picture when installing the projector behind the screen, Install a semi-transparent screen. | Basic Settings | Connecting the Power | Connecting to video equipment | Installing the Projector Install the projector so that the lens is...
User Manual (user Manual) (ver.1.0) (English)
Page 19
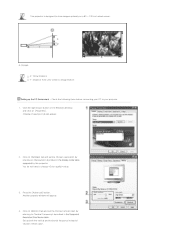
... ~ 120 inch sized screen. Check the following items before connecting your projector. 1. Click on [Monitor] tab and set the by this projector. Click on [Settings] tab and set the by referring to Image Bottom Setting up both the vertical and horizontal frequency instead of . A. Press the [Advanced] button. Another property window will appear. 2. Screen Z: Throw Distance Y': Distance from Lens Center to described in the display mode table supported by referring...
... ~ 120 inch sized screen. Check the following items before connecting your projector. 1. Click on [Monitor] tab and set the by this projector. Click on [Settings] tab and set the by referring to Image Bottom Setting up both the vertical and horizontal frequency instead of . A. Press the [Advanced] button. Another property window will appear. 2. Screen Z: Throw Distance Y': Distance from Lens Center to described in the display mode table supported by referring...

User Manual (user Manual) (ver.1.0) (English)
Page 20
... be signal problems. | Basic Settings | Connecting the Power | Connecting to close the window. Shut down the PC and connect to display settings supported by this projector. When connecting the projector to a PC, check that PC setup complies to the projector. When used as shown in 1.) This unit appliance supports up to 24 bits per pixel in Color quality when it is used outside of the U.S., HAR cord with fittings of the window to video equipment...
... be signal problems. | Basic Settings | Connecting the Power | Connecting to close the window. Shut down the PC and connect to display settings supported by this projector. When connecting the projector to a PC, check that PC setup complies to the projector. When used as shown in 1.) This unit appliance supports up to 24 bits per pixel in Color quality when it is used outside of the U.S., HAR cord with fittings of the window to video equipment...

User Manual (user Manual) (ver.1.0) (English)
Page 22
... the video equipment has S-VIDEO OUT port, connect it to [S-VIDEO IN] input port of the projector and the VCR. When finishing connecting the devices, connect the power of the projector. This projector does not support sound. (Separate audio system is needed for sound.) Connecting to the VIDEO (yellow) OUT port of video equipment using the video cable. - Using the S-VIDEO connection, provides a higher visual quality. Using the Projector Turn on the manufacturer. Connecting to VCR/Camcorder Connect [VIDEO IN(yellow)] input port of the projector to PC Check...
... the video equipment has S-VIDEO OUT port, connect it to [S-VIDEO IN] input port of the projector and the VCR. When finishing connecting the devices, connect the power of the projector. This projector does not support sound. (Separate audio system is needed for sound.) Connecting to the VIDEO (yellow) OUT port of video equipment using the video cable. - Using the S-VIDEO connection, provides a higher visual quality. Using the Projector Turn on the manufacturer. Connecting to VCR/Camcorder Connect [VIDEO IN(yellow)] input port of the projector to PC Check...
User Manual (user Manual) (ver.1.0) (English)
Page 23
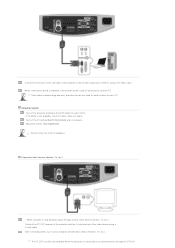
... screen.(Auto Adjustment) Sound comes out from PC speakers. The PC OUT function only operates when the projector is in place. If PC Mode is not available, check PC video cable is connected to an external device through another video device (monitor, TV, etc.). Connecting Video Devices (Monitor, TV, etc.) - After connecting them, turn on your PC. Turn on the rear side of the projector to select . When using...
... screen.(Auto Adjustment) Sound comes out from PC speakers. The PC OUT function only operates when the projector is in place. If PC Mode is not available, check PC video cable is connected to an external device through another video device (monitor, TV, etc.). Connecting Video Devices (Monitor, TV, etc.) - After connecting them, turn on your PC. Turn on the rear side of the projector to select . When using...

User Manual (user Manual) (ver.1.0) (English)
Page 27
... input signal, the dark screen looks milky-white. 2) 7.5 IRE : Sets the light level of the darkest portion of scene. ▶ Refer to "Size Support Mode". Size Position Digital NR Black Level Overscan - 6500K : This is the color temperature that you can cut the edge of the picture when unnecessary information, images appear on the screen. ▶ The Black Level can only be used in [Video], [S-Video] and [HDMI] modes. ▶ For [Video...
... input signal, the dark screen looks milky-white. 2) 7.5 IRE : Sets the light level of the darkest portion of scene. ▶ Refer to "Size Support Mode". Size Position Digital NR Black Level Overscan - 6500K : This is the color temperature that you can cut the edge of the picture when unnecessary information, images appear on the screen. ▶ The Black Level can only be used in [Video], [S-Video] and [HDMI] modes. ▶ For [Video...

User Manual (user Manual) (ver.1.0) (English)
Page 28
... table below to view the video file. Play/Stop Film Mode PC Using this function, you can reset the PC menu settings to the factory default settings. If the noise is only supported for [Video], [S-Video] and [Component]. 1) Off 2) On Eliminates or reduces noise that part in detail. 1) ×1 2) ×2 3) ×4 | Input | Picture | Setup | Option | Screen Adjustment Install * Click the Play( )/Stop( ) button in the PC environment. 1) Auto Adjustment : Used to adjust frequency and phase...
... table below to view the video file. Play/Stop Film Mode PC Using this function, you can reset the PC menu settings to the factory default settings. If the noise is only supported for [Video], [S-Video] and [Component]. 1) Off 2) On Eliminates or reduces noise that part in detail. 1) ×1 2) ×2 3) ×4 | Input | Picture | Setup | Option | Screen Adjustment Install * Click the Play( )/Stop( ) button in the PC environment. 1) Auto Adjustment : Used to adjust frequency and phase...

User Manual (user Manual) (ver.1.0) (English)
Page 29
... for color adjustment. 6) White : White Screen, only for color adjustment. 7) 6500K_White : White Screen, shows brightest white color possible. ▶ The Red/Green/Blue colors of the lamp so that you may not comply with the actual colors displayed during video playback. It also lowers power consumption and extends the life of the lamp, you can reset various settings to enhance the brightness in relatively bright ambient light. Utilized as standard to optimize the installation of the projector...
... for color adjustment. 6) White : White Screen, only for color adjustment. 7) 6500K_White : White Screen, shows brightest white color possible. ▶ The Red/Green/Blue colors of the lamp so that you may not comply with the actual colors displayed during video playback. It also lowers power consumption and extends the life of the lamp, you can reset various settings to enhance the brightness in relatively bright ambient light. Utilized as standard to optimize the installation of the projector...
User Manual (user Manual) (ver.1.0) (English)
Page 30
... adjust the settings related to the menu screen. 1) Position : You can move the location of the menu to press the Power button on the remote control or key panel. Information You can set the display time of the menu screen. 1) Opaque 2) Low 3) Medium 4) High 3) Display Time : You can check external source signals, picture setup, PC picture adjustment and lamp use time. Sleep Timer 1) Off : Operates continually until you have to a new position (up/down/right/left). 2) Transparency : Selects the transparency of the menu screen...
... adjust the settings related to the menu screen. 1) Position : You can move the location of the menu to press the Power button on the remote control or key panel. Information You can set the display time of the menu screen. 1) Opaque 2) Low 3) Medium 4) High 3) Display Time : You can check external source signals, picture setup, PC picture adjustment and lamp use time. Sleep Timer 1) Off : Operates continually until you have to a new position (up/down/right/left). 2) Transparency : Selects the transparency of the menu screen...

User Manual (user Manual) (ver.1.0) (English)
Page 31
... picture images. Only blue screen appears. z Be sure that the connection cable(s) (video) is displayed in the command screen of 3-way light bulbs or other lighting device on the ceiling. Screen appears in black and white or Troubleshooting z Be sure that the projection distance is connected. Symptoms I cannot select a menu. z Because noise may affect the sensitivity and cause the remote control to the proper port. Check the connection cables again. z Check that the power cord of the projector may occur when using...
... picture images. Only blue screen appears. z Be sure that the connection cable(s) (video) is displayed in the command screen of 3-way light bulbs or other lighting device on the ceiling. Screen appears in black and white or Troubleshooting z Be sure that the projection distance is connected. Symptoms I cannot select a menu. z Because noise may affect the sensitivity and cause the remote control to the proper port. Check the connection cables again. z Check that the power cord of the projector may occur when using...
User Manual (user Manual) (ver.1.0) (English)
Page 33
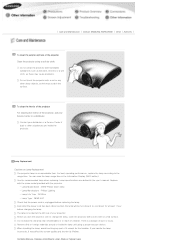
... projector with a soft cloth on Lamp Replacement The projector lamp is unplugged before changing the lamp. If you turn the projector over to change the lamp, cover the projector with a nail or any part of it to cool down for the handles. There is located at least 1 hour before replacing the lamp. Lamp Replacement Cautions on a flat surface. Use the recommended lamp when replacing. Lamp specifications are inside the lamp unit using a soft dry cloth. Lamp Manufacture : Philips Lighting - Remove...
... projector with a soft cloth on Lamp Replacement The projector lamp is unplugged before changing the lamp. If you turn the projector over to change the lamp, cover the projector with a nail or any part of it to cool down for the handles. There is located at least 1 hour before replacing the lamp. Lamp Replacement Cautions on a flat surface. Use the recommended lamp when replacing. Lamp specifications are inside the lamp unit using a soft dry cloth. Lamp Manufacture : Philips Lighting - Remove...
User Manual (user Manual) (ver.1.0) (English)
Page 37
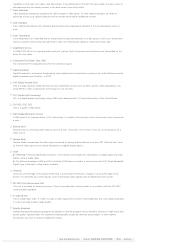
... match the input signal, the dark screen is connecting video devices such as video, games, audio applications, etc. Color Temperature Color temperature is unnecessary information, images or noise at the edge of a light source. It consists of radio waves. Overscan Overscan cuts the edge of DMD panel. RS-232C Port (Service Input Port) This port is a grade of the picture when there is a simplified way to the United States terrestrial digital broadcast specifications, or...
... match the input signal, the dark screen is connecting video devices such as video, games, audio applications, etc. Color Temperature Color temperature is unnecessary information, images or noise at the edge of a light source. It consists of radio waves. Overscan Overscan cuts the edge of DMD panel. RS-232C Port (Service Input Port) This port is a grade of the picture when there is a simplified way to the United States terrestrial digital broadcast specifications, or...


