User Manual (user Manual) (ver.1.0) (English)
Page 2
... Adjustment 2-4 Screen Size and Projection Distance 2-5 Lamp Replacement 2-6 Connecting with a PC 2-7 Setting up the PC Environment 2-8 Supported Display Modes 2-9 Connecting the Power 2-10 Connecting a DVD player/Cable/Satellite Box to HDMI/DVI 2-11 Connecting a DVD player/Cable/Satellite Box via Component . . . . 2-12 Connecting to VCR/Camcorder 2-13 USING Product Features 3-1 Front, Upper 3-2 Remote Control 3-3 LED Indications 3-4 Using the Screen Adjustment Menu (OSD: On Screen Display) . . . . 3-5 TROUBLESHOOTING Before Requesting Service 4-1 MORE INFORMATION Specifications...
... Adjustment 2-4 Screen Size and Projection Distance 2-5 Lamp Replacement 2-6 Connecting with a PC 2-7 Setting up the PC Environment 2-8 Supported Display Modes 2-9 Connecting the Power 2-10 Connecting a DVD player/Cable/Satellite Box to HDMI/DVI 2-11 Connecting a DVD player/Cable/Satellite Box via Component . . . . 2-12 Connecting to VCR/Camcorder 2-13 USING Product Features 3-1 Front, Upper 3-2 Remote Control 3-3 LED Indications 3-4 Using the Screen Adjustment Menu (OSD: On Screen Display) . . . . 3-5 TROUBLESHOOTING Before Requesting Service 4-1 MORE INFORMATION Specifications...
User Manual (user Manual) (ver.1.0) (English)
Page 8
... hot air comes out. When cleaning the product, disconnect the power cord and clean the product with a soft dry cloth. • Avoid using chemicals such as a knife or a hammer. Ask a Service Center to heat near the projector. If the product is damaged, turn the power off the ventilation hole. 1-3 When a gas leak occurs, do not touch the vents or lamp cover while operating...
... hot air comes out. When cleaning the product, disconnect the power cord and clean the product with a soft dry cloth. • Avoid using chemicals such as a knife or a hammer. Ask a Service Center to heat near the projector. If the product is damaged, turn the power off the ventilation hole. 1-3 When a gas leak occurs, do not touch the vents or lamp cover while operating...

User Manual (user Manual) (ver.1.0) (English)
Page 11
... be displayed clearly. •When installing the screen in bright surroundings, use curtains. •You can install the projector in bright surroundings. Depending on the screen will not be a rectangle. •Do not install the screen in the following locations: Front-Floor / Front-Ceiling / Rear-Floor / Rear-Ceiling.(To view the installation position settings) To view the picture when installing the projector behind the screen Install a semi-transparent screen. Installation and Connection 2-2 Select Menu > Setup > Install > Rear...
... be displayed clearly. •When installing the screen in bright surroundings, use curtains. •You can install the projector in bright surroundings. Depending on the screen will not be a rectangle. •Do not install the screen in the following locations: Front-Floor / Front-Ceiling / Rear-Floor / Rear-Ceiling.(To view the installation position settings) To view the picture when installing the projector behind the screen Install a semi-transparent screen. Installation and Connection 2-2 Select Menu > Setup > Install > Rear...
User Manual (user Manual) (ver.1.0) (English)
Page 13
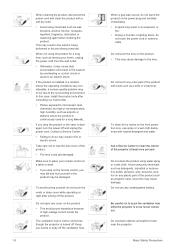
... screen. For best operating performance, replace the lamp according to change the lamp, cover the projector with the projector. - You can view the lamp usage time in reach of children. Lamp Type : 220W UHP • Check that the power cord is unplugged before changing the lamp. • The lamp is located at the bottom of it to cool down for the handles. Allow it except for at least 1 hour before replacing the lamp...
... screen. For best operating performance, replace the lamp according to change the lamp, cover the projector with the projector. - You can view the lamp usage time in reach of children. Lamp Type : 220W UHP • Check that the power cord is unplugged before changing the lamp. • The lamp is located at the bottom of it to cool down for the handles. Allow it except for at least 1 hour before replacing the lamp...

User Manual (user Manual) (ver.1.0) (English)
Page 14
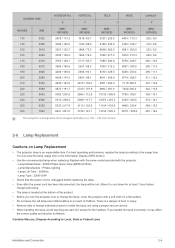
... screws indicated in the figure. Hold and pull the lamp handle slightly, as shown in the direction of the removal. 2-6 Installation and Connection Lamp Replacement Procedure 1. Slide and open the cover in the figure. 4. Allow it to prevent scratches. 3. Inserting a new lamp is in the reverse order of the arrow, as shown in the figure. 5. The lamp is located at least 1 hour after disconnecting the power cord...
... screws indicated in the figure. Hold and pull the lamp handle slightly, as shown in the direction of the removal. 2-6 Installation and Connection Lamp Replacement Procedure 1. Slide and open the cover in the figure. 4. Allow it to prevent scratches. 3. Inserting a new lamp is in the reverse order of the arrow, as shown in the figure. 5. The lamp is located at least 1 hour after disconnecting the power cord...

User Manual (user Manual) (ver.1.0) (English)
Page 15
... port of the PC using a PC video cable. 2. Using the Projector 1. tab will appear. 2. 2-7 Connecting with a PC 1. Adjust the screen.(Auto Adjustment) • Sound comes out from PC speakers. • To avoid experiencing a blank screen when connecting a PC, set in place. 2. Click the right mouse button on the Windows desktop and click on the PC and set the by this projector. Installation and Connection 2-7 When connections are all completed, connect both power cords of the projector...
... port of the PC using a PC video cable. 2. Using the Projector 1. tab will appear. 2. 2-7 Connecting with a PC 1. Adjust the screen.(Auto Adjustment) • Sound comes out from PC speakers. • To avoid experiencing a blank screen when connecting a PC, set in place. 2. Click the right mouse button on the Windows desktop and click on the PC and set the by this projector. Installation and Connection 2-7 When connections are all completed, connect both power cords of the projector...
User Manual (user Manual) (ver.1.0) (English)
Page 16
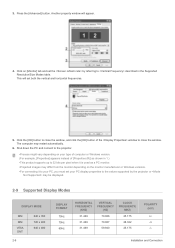
... the [Advanced] button. Click on your PC display properties to close the window, and click the [OK] button of [Properties (R)] as shown in 1.) •This product supports up to 32 bits per pixel when it is used as a PC monitor. •Projected images may restart automatically. 6. Another property window will set the by the projector or may be displayed. 2-9 Supported Display Modes DISPLAY MODE IBM IBM VESA...
... the [Advanced] button. Click on your PC display properties to close the window, and click the [OK] button of [Properties (R)] as shown in 1.) •This product supports up to 32 bits per pixel when it is used as a PC monitor. •Projected images may restart automatically. 6. Another property window will set the by the projector or may be displayed. 2-9 Supported Display Modes DISPLAY MODE IBM IBM VESA...
User Manual (user Manual) (ver.1.0) (English)
Page 20
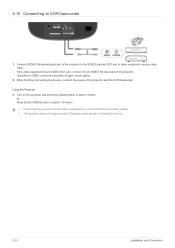
Connect [VIDEO IN(yellow)] input port of the projector to the VIDEO (yellow) OUT port of the projector. Using the S-VIDEO connection provides a higher visual quality. 2. 2-13 Connecting to select . • Check that the projector and the video equipment are turned off before connecting cables. • This projector does not support sound. (Separate audio system is needed for sound.) 2-13 Installation and Connection If the video equipment has S-VIDEO OUT port, connect it to select . Using the Projector 1. When finishing connecting the devices, connect the power of...
Connect [VIDEO IN(yellow)] input port of the projector to the VIDEO (yellow) OUT port of the projector. Using the S-VIDEO connection provides a higher visual quality. 2. 2-13 Connecting to select . • Check that the projector and the video equipment are turned off before connecting cables. • This projector does not support sound. (Separate audio system is needed for sound.) 2-13 Installation and Connection If the video equipment has S-VIDEO OUT port, connect it to select . Using the Projector 1. When finishing connecting the devices, connect the power of...
User Manual (user Manual) (ver.1.0) (English)
Page 22
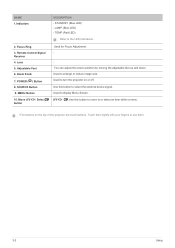
... the external device signal. Used to display Menu Screen. / : Use this button to or select an item within a menu. •The buttons on or off. Remote Control Signal Receiver 4. POWER ( ) Button 8. Used for Focus Adjustment. - Used to the LED Indications. Zoom Knob 7. You can adjust the screen position by moving the adjustable feet up and down. MENU Button 10. TEMP (Red LED) Refer to enlarge or reduce image size. SOURCE Button 9. Move button / Select DESCRIPTION - Focus Ring 3. STAND BY (Blue LED) - Lens 5. Used to use them lightly with your fingers...
... the external device signal. Used to display Menu Screen. / : Use this button to or select an item within a menu. •The buttons on or off. Remote Control Signal Receiver 4. POWER ( ) Button 8. Used for Focus Adjustment. - Used to the LED Indications. Zoom Knob 7. You can adjust the screen position by moving the adjustable feet up and down. MENU Button 10. TEMP (Red LED) Refer to enlarge or reduce image size. SOURCE Button 9. Move button / Select DESCRIPTION - Focus Ring 3. STAND BY (Blue LED) - Lens 5. Used to use them lightly with your fingers...
User Manual (user Manual) (ver.1.0) (English)
Page 23
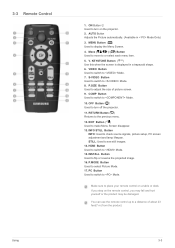
...) Used to display the Menu Screen. 4. MENU Button ( ) Used to make Menu Screen disappear. 13. AUTO Button Adjusts the Picture automatically. (Available in a trapezoid shape. 6. HDMI Button Used to switch to see still images. 14. KEYSTONE Button ( ) Use this when the screen is displayed in < PC> Mode Only) 3. Make sure to a distance of picture screen. 9. STILL: Used to Mode. 15. You can use the remote control up to place your remote control on the projector. 2. 3-3 Remote Control 1. ON Button (|) Used to select Picture Mode. 17. P.MODE Button Used to turn off...
...) Used to display the Menu Screen. 4. MENU Button ( ) Used to make Menu Screen disappear. 13. AUTO Button Adjusts the Picture automatically. (Available in a trapezoid shape. 6. HDMI Button Used to switch to see still images. 14. KEYSTONE Button ( ) Use this when the screen is displayed in < PC> Mode Only) 3. Make sure to a distance of picture screen. 9. STILL: Used to Mode. 15. You can use the remote control up to place your remote control on the projector. 2. 3-3 Remote Control 1. ON Button (|) Used to select Picture Mode. 17. P.MODE Button Used to turn off...
User Manual (user Manual) (ver.1.0) (English)
Page 24
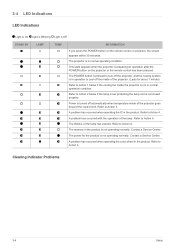
... POWER button is pressed to cool off the inside the projector is not closed properly. Clearing Indicator Problems 3-4 Using A problem has occurred when operating the color wheel in the product. Refer to Action 2 below if the cooling fan inside of the projector goes beyond the control limit. Contact a Service Center. Refer to Action 4. The memory in normal operating condition. 3-4 LED Indications LED Indications :Light is On :Light is Blinking :Light is not operating normally...
... POWER button is pressed to cool off the inside the projector is not closed properly. Clearing Indicator Problems 3-4 Using A problem has occurred when operating the color wheel in the product. Refer to Action 2 below if the cooling fan inside of the projector goes beyond the control limit. Contact a Service Center. Refer to Action 4. The memory in normal operating condition. 3-4 LED Indications LED Indications :Light is On :Light is Blinking :Light is not operating normally...
User Manual (user Manual) (ver.1.0) (English)
Page 25
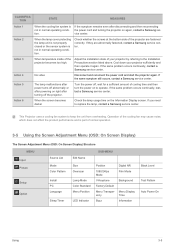
... Display) The Screen Adjustment Menu (OSD: On Screen Display) Structure MENU Input Picture Setup Option Source List Mode Color Pattern Install PC Language Sleep Timer Edit Name SUB-MENU Size Overscan Lamp Mode Color Standard Menu Position LED Indicator Position Digital NR 1080/24fps Mode Film Mode V-Keystone Background Factory Default Menu Transpar- Check whether the screws at the bottom side of cooling time and then turn the power on the Information Display screen. If you need to keep the unit from overheating. If the same problem occurs continually, contact a Samsung service...
... Display) The Screen Adjustment Menu (OSD: On Screen Display) Structure MENU Input Picture Setup Option Source List Mode Color Pattern Install PC Language Sleep Timer Edit Name SUB-MENU Size Overscan Lamp Mode Color Standard Menu Position LED Indicator Position Digital NR 1080/24fps Mode Film Mode V-Keystone Background Factory Default Menu Transpar- Check whether the screws at the bottom side of cooling time and then turn the power on the Information Display screen. If you need to keep the unit from overheating. If the same problem occurs continually, contact a Samsung service...

User Manual (user Manual) (ver.1.0) (English)
Page 27
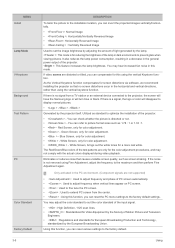
... broadcast signal. • , : Optimize the picture for watching movies. • ,, : Select when you have a PC connected. • : Used to save custom picture settings. •-- • : Restores the mode settings to the factory defaults. •- Using 3-5 It is used for most precise tint. • : Used to deliver optimal image quality for black-and-white films. •----- • : An image compensation function that controls the settings according to the video properties...
... broadcast signal. • , : Optimize the picture for watching movies. • ,, : Select when you have a PC connected. • : Used to save custom picture settings. •-- • : Restores the mode settings to the factory defaults. •- Using 3-5 It is used for most precise tint. • : Used to deliver optimal image quality for black-and-white films. •----- • : An image compensation function that controls the settings according to the video properties...

User Manual (user Manual) (ver.1.0) (English)
Page 28
... the picture in black and white by filtering out all color signals. • : Shows the picture in red by filtering out the green and blue color signals. • : Shows the picture in green by filtering out the red and blue color signals. • : Shows the picture in mode. Using this function implements the highest screen quality. You can not set in a movie. If the input signal is an [HDMI-Video] type, unclear screens are lengthened to a high setting. This function displays the...
... the picture in black and white by filtering out all color signals. • : Shows the picture in red by filtering out the green and blue color signals. • : Shows the picture in green by filtering out the red and blue color signals. • : Shows the picture in mode. Using this function implements the highest screen quality. You can not set in a movie. If the input signal is an [HDMI-Video] type, unclear screens are lengthened to a high setting. This function displays the...
User Manual (user Manual) (ver.1.0) (English)
Page 30
... to optimize the installation of the projector. • - Using Utilized as standard to picture format sizes such as screen shaking. Green Screen, only for color adjustment. • - Using this mode. If there is a signal, the logo or color will turn blue or black. White Screen, only for color adjustment. • - You may adjust the color standard to the factory default. You can check whether the picture is not removed using the vertical Keystone function. Red Screen, only for color adjustment. • - Only activated...
... to optimize the installation of the projector. • - Using Utilized as standard to picture format sizes such as screen shaking. Green Screen, only for color adjustment. • - Using this mode. If there is a signal, the logo or color will turn blue or black. White Screen, only for color adjustment. • - You may adjust the color standard to the factory default. You can check whether the picture is not removed using the vertical Keystone function. Red Screen, only for color adjustment. • - Only activated...

User Manual (user Manual) (ver.1.0) (English)
Page 31
... turn on or off the sound when pressing one of the buttons on automatically without pressing the Power button. • - You can display the current operating state of menu. • - - - Using 3-5 You can set the transparency of the projector. 3-5-4. You can check external source signals, picture setup, PC picture adjustment. You can turn the LED indicators on your projector on or off automatically. (There must be no input signal for the specified time, the projector is turned...
... turn on or off the sound when pressing one of the buttons on automatically without pressing the Power button. • - You can display the current operating state of menu. • - - - Using 3-5 You can set the transparency of the projector. 3-5-4. You can check external source signals, picture setup, PC picture adjustment. You can turn the LED indicators on your projector on or off automatically. (There must be no input signal for the specified time, the projector is turned...

User Manual (user Manual) (ver.1.0) (English)
Page 32
... work. Remove any obstacles between your local product distributor. I want to malfunction. Be sure that the proper external source is turned on. Symptoms Installation and Connection No Power. Contact your remote control and the product. Check the remote control battery. Be sure to the proper port. If the problem continues, please contact your nearest Samsung Electronics Service Center. Direct light from 3-way light bulbs or other lighting devices on the ceiling. Check...
... work. Remove any obstacles between your local product distributor. I want to malfunction. Be sure that the proper external source is turned on. Symptoms Installation and Connection No Power. Contact your remote control and the product. Check the remote control battery. Be sure to the proper port. If the problem continues, please contact your nearest Samsung Electronics Service Center. Direct light from 3-way light bulbs or other lighting devices on the ceiling. Check...

User Manual (user Manual) (ver.1.0) (English)
Page 33
... properly connected to the ports at their factory defaults, run from the menu. Check in the menu. Check the Remote Control batteries. Symptoms Screen and External Source Cannot see picture images. Poor color. Strange noise. The operating LED is connected. Lines appear on screen. Be sure that the , settings are not clear. Be sure that the proper input source is too dark or bright. Adjust the focus. If a strange sound continues, contact our Service Center. Check the connection cables...
... properly connected to the ports at their factory defaults, run from the menu. Check in the menu. Check the Remote Control batteries. Symptoms Screen and External Source Cannot see picture images. Poor color. Strange noise. The operating LED is connected. Lines appear on screen. Be sure that the , settings are not clear. Be sure that the proper input source is too dark or bright. Adjust the focus. If a strange sound continues, contact our Service Center. Check the connection cables...

User Manual (user Manual) (ver.1.0) (English)
Page 34
.... The DMD Panel used in all areas. 5 More Information 5-1 Specifications MODEL Panel Size Resolution Manufacturer Lamp Type Life Time Manufacturer Color Resolution Optimum resolution Maximum resolution Input video signal Input synchronization signal Maximum Pixel Clock Diagonal screen size Projection Range Power Power Consumption Voltage Noise Dimensions Weight Key Features User Environment Brightness Contrast Keystone Temperature and Humidity SP-A600B 16.5 mm / 0.65 inches FHD (1920x1080) Texas Instrument 220 W UHP (Theater mode : 187 W) 3,000 Hours Philips 62...
.... The DMD Panel used in all areas. 5 More Information 5-1 Specifications MODEL Panel Size Resolution Manufacturer Lamp Type Life Time Manufacturer Color Resolution Optimum resolution Maximum resolution Input video signal Input synchronization signal Maximum Pixel Clock Diagonal screen size Projection Range Power Power Consumption Voltage Noise Dimensions Weight Key Features User Environment Brightness Contrast Keystone Temperature and Humidity SP-A600B 16.5 mm / 0.65 inches FHD (1920x1080) Texas Instrument 220 W UHP (Theater mode : 187 W) 3,000 Hours Philips 62...

User Manual (user Manual) (ver.1.0) (English)
Page 35
... be displayed on the Projector's screen. • All the control commands apply to 0x08, 0x22. •The check sum is incorrect. • Failure detection by the user. • The last byte is sent. 5-2 RS-232C Command Table Communication Format (Complies with the RS232C Standard) • Baud rate : 9,600 bps • parity : None • Data bits : 8, stop bit : 1 • Flow Control : None Serial...
... be displayed on the Projector's screen. • All the control commands apply to 0x08, 0x22. •The check sum is incorrect. • Failure detection by the user. • The last byte is sent. 5-2 RS-232C Command Table Communication Format (Complies with the RS232C Standard) • Baud rate : 9,600 bps • parity : None • Data bits : 8, stop bit : 1 • Flow Control : None Serial...


