
User Guide
Page 3
... disconnection during the call nearby a microwave or Bluetooth products in use. The object may explode and cause fire due to the charging phones of the battery(metallic part). Use only the charger provided with the SMTW5100E phone. NOTE This paragraph contains supplementary information that must be read as neckless or coins...
... disconnection during the call nearby a microwave or Bluetooth products in use. The object may explode and cause fire due to the charging phones of the battery(metallic part). Use only the charger provided with the SMTW5100E phone. NOTE This paragraph contains supplementary information that must be read as neckless or coins...

User Guide
Page 4
...may not work properly. If a repair is needed, please contact where the phone was purchased or call the Service Center. Using the battery for the SMT-W5100E phone. Moisture in fluctuating temperature environments. Caution Do not use any chemical solvents like wax, benzene, alcohol, thinner, mosquito spray, ...phone can cause a fire and electric shocks. CAUTION Before execute the [MENU] X [8. Do not install the phone near the phone. The battery shall be deleted. Do not put instruments that contain water such as vases, cups, cosmetics, and medicines, or small metals near the phone...
...may not work properly. If a repair is needed, please contact where the phone was purchased or call the Service Center. Using the battery for the SMT-W5100E phone. Moisture in fluctuating temperature environments. Caution Do not use any chemical solvents like wax, benzene, alcohol, thinner, mosquito spray, ...phone can cause a fire and electric shocks. CAUTION Before execute the [MENU] X [8. Do not install the phone near the phone. The battery shall be deleted. Do not put instruments that contain water such as vases, cups, cosmetics, and medicines, or small metals near the phone...

User Guide
Page 5
CONTENTS Conventions/Symbols 1 Warning...1 Caution ...2 About This Guide 6 Overview of SMT-W5100E 6 Phone Layout ...6 Button Description...7 Icon (Display) Description ...8 Unpacking ...8 Installing the Battery 8 Removing the Battery 9 Charging the Battery 10 Checking the Battery Status 10 Low Battery Indication...10 To Turn the Power On 11 To Turn the Power Off 11 Making a Call ...11 Using the Dial Keypad...
CONTENTS Conventions/Symbols 1 Warning...1 Caution ...2 About This Guide 6 Overview of SMT-W5100E 6 Phone Layout ...6 Button Description...7 Icon (Display) Description ...8 Unpacking ...8 Installing the Battery 8 Removing the Battery 9 Charging the Battery 10 Checking the Battery Status 10 Low Battery Indication...10 To Turn the Power On 11 To Turn the Power Off 11 Making a Call ...11 Using the Dial Keypad...

User Guide
Page 10
Indicates that indicates an alarm is set as light only(silent). User Guide/ Quick & Installation Earphone SMT-W5100E Battery (standard type) Charger Quick & Installation Leather case for phone 8 Icon (Display) Description Button Names Features This indicates the ... is enabled. Indicates that the following items have to be charged immediately : insufficient Unpacking After purchasing the SMT-W5100E phone, you have been packed in the box. Indicates the battery charging level. : fully charged : sufficient : needs to check that the automatic key lock is set ...
Indicates that indicates an alarm is set as light only(silent). User Guide/ Quick & Installation Earphone SMT-W5100E Battery (standard type) Charger Quick & Installation Leather case for phone 8 Icon (Display) Description Button Names Features This indicates the ... is enabled. Indicates that the following items have to be charged immediately : insufficient Unpacking After purchasing the SMT-W5100E phone, you have been packed in the box. Indicates the battery charging level. : fully charged : sufficient : needs to check that the automatic key lock is set ...
User Guide
Page 11
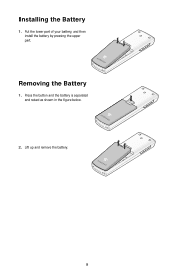
Installing the Battery 1. Press the button and the battery is separated and raised as shown in the figure below. 2. Lift up and remove the battery. 9 Removing the Battery 1. Put the lower part of your battery, and then install the battery by pressing the upper part.
Installing the Battery 1. Press the button and the battery is separated and raised as shown in the figure below. 2. Lift up and remove the battery. 9 Removing the Battery 1. Put the lower part of your battery, and then install the battery by pressing the upper part.
User Guide
Page 12
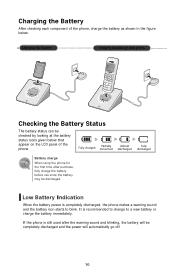
...power will automatically go off. 10 Low Battery Indication When the battery power is recommended to change to blink. Charging the Battery After checking each component of the phone, charge the battery as shown in the figure below that ...battery icon starts to a new battery or charge the battery immediately. If the phone is still used after purchase, fully charge the battery before use since the battery may be checked by looking at the battery status icons given below . • Charging the battery • Charging the battery with phone Checking the Battery Status The battery...
...power will automatically go off. 10 Low Battery Indication When the battery power is recommended to change to blink. Charging the Battery After checking each component of the phone, charge the battery as shown in the figure below that ...battery icon starts to a new battery or charge the battery immediately. If the phone is still used after purchase, fully charge the battery before use since the battery may be checked by looking at the battery status icons given below . • Charging the battery • Charging the battery with phone Checking the Battery Status The battery...

User Guide
Page 53
... the charging phones of the charger. - If the yellow light continues to flash, clean the charging phones of the battery. TROUBLESHOOTING Possible problems and troubleshooting steps for your Authorized Samsung Reseller. Recharge the battery and turn the phone on . - The lamp on screen and calls cannot be registered on again. Voices echo during...
... the charging phones of the charger. - If the yellow light continues to flash, clean the charging phones of the battery. TROUBLESHOOTING Possible problems and troubleshooting steps for your Authorized Samsung Reseller. Recharge the battery and turn the phone on . - The lamp on screen and calls cannot be registered on again. Voices echo during...

User Guide
Page 54
...Phone registration failure. - Take the battery out and insert it again, and turn the phone on and reregister the phone. - Calls are still disconnected frequently, contact the Samsung Electronics service center. If the problem continues, contact the Samsung Electronics service center. 52 Move to ...another area since the frequency is not solved, contact the Samsung service center. Check if the power of the system...
...Phone registration failure. - Take the battery out and insert it again, and turn the phone on and reregister the phone. - Calls are still disconnected frequently, contact the Samsung Electronics service center. If the problem continues, contact the Samsung Electronics service center. 52 Move to ...another area since the frequency is not solved, contact the Samsung service center. Check if the power of the system...

User Guide
Page 55
Items Model Name Frequency Size(mm) Operating Temperature Operating Humidity Weight Battery Charge Time Battery Duration Specification SMT-W5100E 2400~2483.5 MHz 46(width) × 138.4(length) × 18(height) 0~45˚C 0~90% 106.5 g (3.75 oz) 3.5 Hour(Li-Ion) Call duration: 4 Hours Standby duration: 40 Hours 53 ANNEX Product Specifications The specifications of the SMT-W5100E are as follows.
Items Model Name Frequency Size(mm) Operating Temperature Operating Humidity Weight Battery Charge Time Battery Duration Specification SMT-W5100E 2400~2483.5 MHz 46(width) × 138.4(length) × 18(height) 0~45˚C 0~90% 106.5 g (3.75 oz) 3.5 Hour(Li-Ion) Call duration: 4 Hours Standby duration: 40 Hours 53 ANNEX Product Specifications The specifications of the SMT-W5100E are as follows.