
User Manual (user Manual) (ver.1.0) (English)
Page 5
... similar locations. 14. Do not let cord hang over edge of injury to explode and should not be grounded. To reduce the risk of table or counter. 17. It is not working properly, or if it . Do not cover or block any adjustments or repairs to facilitate cooking. If materials inside the oven to the door. 13. IMPORTANT SAFETY INSTRUCTIONS When using the...
... similar locations. 14. Do not let cord hang over edge of injury to explode and should not be grounded. To reduce the risk of table or counter. 17. It is not working properly, or if it . Do not cover or block any adjustments or repairs to facilitate cooking. If materials inside the oven to the door. 13. IMPORTANT SAFETY INSTRUCTIONS When using the...
User Manual (user Manual) (ver.1.0) (English)
Page 6
... with this appliance. Clean Ventilating Hoods Frequently - Grease should not be at least as great as the electrical rating of filter. 2. Plug into a 3-slot outlet. 3. If the power-supply cord is used if care is on by providing an escape wire for the electrical current. Cooking times may damage the filter. Use care when cleaning the vent-hood filter. CAUTION CAUTION 1. In the event of an electrical short circuit, grounding reduces the...
... with this appliance. Clean Ventilating Hoods Frequently - Grease should not be at least as great as the electrical rating of filter. 2. Plug into a 3-slot outlet. 3. If the power-supply cord is used if care is on by providing an escape wire for the electrical current. Cooking times may damage the filter. Use care when cleaning the vent-hood filter. CAUTION CAUTION 1. In the event of an electrical short circuit, grounding reduces the...
User Manual (user Manual) (ver.1.0) (English)
Page 7
... in electric shock or fire. Do not use an electric transformer. Unplug the power plug and clean it is any portion of a heating or cooking appliance. Failing to do so may result in electric shock or fire. Do not use a damaged power plug, damaged power cord or loose wall socket. - Failing to do so may result in a location exposed to do not operate the oven and...
... in electric shock or fire. Do not use an electric transformer. Unplug the power plug and clean it is any portion of a heating or cooking appliance. Failing to do so may result in electric shock or fire. Do not use a damaged power plug, damaged power cord or loose wall socket. - Failing to do so may result in a location exposed to do not operate the oven and...
User Manual (user Manual) (ver.1.0) (English)
Page 8
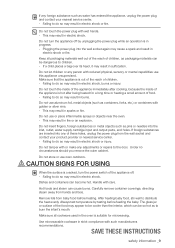
.... - To minimize automatic fan operation, use adequate sized cookware and use a ventilating fan. - If materials inside . - CAUTION SIGNS FOR INSTALLATION CAUTION This appliance should ignite, keep the oven door closed, turn the oven off and disconnect the power cord, or shut off power at high heat settings. Never leave surface units beneath your oven unattended at the fuse or circuit breaker panel. Always observe Safety Precautions when using your nearest service center. - Failing...
.... - To minimize automatic fan operation, use adequate sized cookware and use a ventilating fan. - If materials inside . - CAUTION SIGNS FOR INSTALLATION CAUTION This appliance should ignite, keep the oven door closed, turn the oven off and disconnect the power cord, or shut off power at high heat settings. Never leave surface units beneath your oven unattended at the fuse or circuit breaker panel. Always observe Safety Precautions when using your nearest service center. - Failing...
User Manual (user Manual) (ver.1.0) (English)
Page 9
... hot after cooking, because the inside of the appliance is out of the reach of these instructions safety information _9 Do not touch the inside of the food may appear to children. - Do not use oven outdoors. The glass jar or surface of the appliance immediately after being heated for microwaving. Use microwavable cookware in electric shock. Save these holes, unplug the power plug from the wall...
... hot after cooking, because the inside of the appliance is out of the reach of these instructions safety information _9 Do not touch the inside of the food may appear to children. - Do not use oven outdoors. The glass jar or surface of the appliance immediately after being heated for microwaving. Use microwavable cookware in electric shock. Save these holes, unplug the power plug from the wall...

User Manual (user Manual) (ver.1.0) (English)
Page 10
...water directly onto it may be caught in the door. - Do not abruptly cool the door, the inside of the appliance. Food will not cookproperly without the glass tray in electric ...use benzene, thinner or alcohol to hurt yourself when cleaning the appliance (external/internal) - Before cleaning or performing maintenance, unplug the appliance from the wall socket and remove food waste from the door and cooking compartment. - Do not operate the appliance with a steam cleaner. - Do not place food or heavy objects over a fragile object such as laundry, oven cover, lighted candles, lighted...
...water directly onto it may be caught in the door. - Do not abruptly cool the door, the inside of the appliance. Food will not cookproperly without the glass tray in electric ...use benzene, thinner or alcohol to hurt yourself when cleaning the appliance (external/internal) - Before cleaning or performing maintenance, unplug the appliance from the wall socket and remove food waste from the door and cooking compartment. - Do not operate the appliance with a steam cleaner. - Do not place food or heavy objects over a fragile object such as laundry, oven cover, lighted candles, lighted...
User Manual (user Manual) (ver.1.0) (English)
Page 11
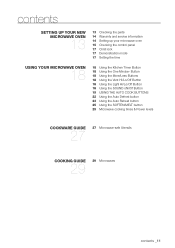
... service information 14 Setting up your microwave oven 15 Checking the control panel 17 Child lock 17 Demonstration mode 17 Setting the time using your microwave oven 18 18 Using the Kitchen Timer Button 18 Using the One Minute+ Button 18 Using the More/Less Buttons 18 Using the Vent Hi/Lo/Off Button 18 Using the Light Hi/Lo/Off Button 18 Using the SOUND oN/Off Button 19 USING THE AUTO COOK BUTTONS 22 Using the Auto Defrost button 23 Using the Auto Reheat button 25 Using the SOFTEN/MELT button 25 Microwave cooking times & Power levels...
... service information 14 Setting up your microwave oven 15 Checking the control panel 17 Child lock 17 Demonstration mode 17 Setting the time using your microwave oven 18 18 Using the Kitchen Timer Button 18 Using the One Minute+ Button 18 Using the More/Less Buttons 18 Using the Vent Hi/Lo/Off Button 18 Using the Light Hi/Lo/Off Button 18 Using the SOUND oN/Off Button 19 USING THE AUTO COOK BUTTONS 22 Using the Auto Defrost button 23 Using the Auto Reheat button 25 Using the SOFTEN/MELT button 25 Microwave cooking times & Power levels...

User Manual (user Manual) (ver.1.0) (English)
Page 16
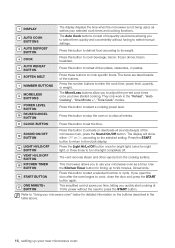
... work in the table above. 16_ setting up to 99 minutes, 99 seconds. 16 Start BUTTON Press this button to cook, close the door and press the START button again. Press this button to defrost food according to enter the cook time, power level, quantity, or weight. Vent Hi/Lo/Off 14 BUTTON The vent removes steam and other vapors from the cooking surface. 15 Kitchen Timer BUTTON This microwave allows you quickly start a selected function or cycle. 1 Display 2 Auto Cook BUTTONs 3 Auto Defrost BUTTON 4 Cook Auto Reheat 5 BUTTON...
... work in the table above. 16_ setting up to 99 minutes, 99 seconds. 16 Start BUTTON Press this button to cook, close the door and press the START button again. Press this button to defrost food according to enter the cook time, power level, quantity, or weight. Vent Hi/Lo/Off 14 BUTTON The vent removes steam and other vapors from the cooking surface. 15 Kitchen Timer BUTTON This microwave allows you quickly start a selected function or cycle. 1 Display 2 Auto Cook BUTTONs 3 Auto Defrost BUTTON 4 Cook Auto Reheat 5 BUTTON...

User Manual (user Manual) (ver.1.0) (English)
Page 18
... light 3. Touch the Sound ON/OFF button the display shows Off. 3. the display returns to 99 minutes, 99 seconds. 1. They only work for a high fan speed. 2. Use the Less (1) button to adjust the pre-set cook times. Press the Vent Hi/Lo/Off button once for the "Reheat", "Auto Cooking", "One Minute+", and "Time Cook" modes. Press the Start button. Using the Kitchen Timer Button This microwave allows you to use your microwave oven as a timer. Use the Kitchen Timer for your microwave. 1. You can manually...
... light 3. Touch the Sound ON/OFF button the display shows Off. 3. the display returns to 99 minutes, 99 seconds. 1. They only work for a high fan speed. 2. Use the Less (1) button to adjust the pre-set cook times. Press the Vent Hi/Lo/Off button once for the "Reheat", "Auto Cooking", "One Minute+", and "Time Cook" modes. Press the Start button. Using the Kitchen Timer Button This microwave allows you to use your microwave oven as a timer. Use the Kitchen Timer for your microwave. 1. You can manually...
User Manual (user Manual) (ver.1.0) (English)
Page 22
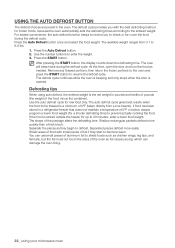
... weight. For added convenience, the auto defrost function beeps to remind you with small pieces of foil if they begin to become warm. Use the number buttons to prevent actually cooking the food. At this time, open the door and turn over the food during the defrost cycle. The defrost cycle continues while the oven is beeping and only stops when the door is a minimum of the package alters the defrosting time...
... weight. For added convenience, the auto defrost function beeps to remind you with small pieces of foil if they begin to become warm. Use the number buttons to prevent actually cooking the food. At this time, open the door and turn over the food during the defrost cycle. The defrost cycle continues while the oven is beeping and only stops when the door is a minimum of the package alters the defrosting time...
User Manual (user Manual) (ver.1.0) (English)
Page 34
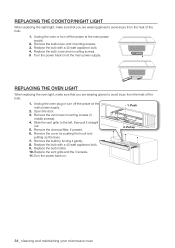
Remove the bulb cover, and mounting screws. 3. Remove the charcoal filter, if present. 6. Replace the bulb with a 40 watt appliance bulb. 4. Turn the power back on at the main power supply. Open the door. 3. Unplug the oven plug or turn off the power at the main power supply. 2. Remove the vent cover mounting screws (3 middle screws). 4. Remove the bulb by pushing the hook and putting up 34_ cleaning and maintaining your microwave oven Replace the bulb holder. 10. Replace the bulb with a 40 watt appliance bulb. 9. Slide the vent grille to...
Remove the bulb cover, and mounting screws. 3. Remove the charcoal filter, if present. 6. Replace the bulb with a 40 watt appliance bulb. 4. Turn the power back on at the main power supply. Open the door. 3. Unplug the oven plug or turn off the power at the main power supply. 2. Remove the vent cover mounting screws (3 middle screws). 4. Remove the bulb by pushing the hook and putting up 34_ cleaning and maintaining your microwave oven Replace the bulb holder. 10. Replace the bulb with a 40 watt appliance bulb. 9. Slide the vent grille to...

User Manual (user Manual) (ver.1.0) (English)
Page 36
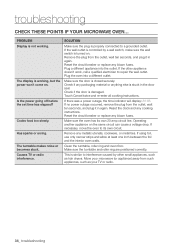
... blown fuses. Make sure the oven has its own circuit. Remove any cooking instructions. This is working . Make sure the door is properly connected to repair the wall outlet. Touch Cancel twice and re-enter all cooking instructions. If necessary, move the oven to interference caused by a wall switch, make sure the wall switch is stuck in the door seal. Make sure the turntable and roller ring are positioned correctly. PROBLEM Display...
... blown fuses. Make sure the oven has its own circuit. Remove any cooking instructions. This is working . Make sure the door is properly connected to repair the wall outlet. Touch Cancel twice and re-enter all cooking instructions. If necessary, move the oven to interference caused by a wall switch, make sure the wall switch is stuck in the door seal. Make sure the turntable and roller ring are positioned correctly. PROBLEM Display...
User Manual (user Manual) (ver.1.0) (English)
Page 38
... operating instructions, cleaning, maintenance and environmental instructions that are covered and prescribed in the instruction book; In-home service will repair or replace this product was not intended; accidents, abuse, neglect, fire, water, lightning or other rights which damage this product or result in service problems; problems caused by pest infestations, and overheating or overcooking by SAMSUNG which vary from state to service personnel. reduced magnetron power...
... operating instructions, cleaning, maintenance and environmental instructions that are covered and prescribed in the instruction book; In-home service will repair or replace this product was not intended; accidents, abuse, neglect, fire, water, lightning or other rights which damage this product or result in service problems; problems caused by pest infestations, and overheating or overcooking by SAMSUNG which vary from state to service personnel. reduced magnetron power...

User Manual (user Manual) (ver.1.0) (English)
Page 5
... from paper or plastic bags before placing bag in the microwave oven for example, closed glass jars are placed inside the oven ignite, keep oven door closed, turn oven off, and disconnect the power cord, or shut off power at the fuse or circuit breaker panel. When cleaning surfaces of table or counter. 17. Read all safety instructions before removing the container. Some products such as water, milk, coffee, or...
... from paper or plastic bags before placing bag in the microwave oven for example, closed glass jars are placed inside the oven ignite, keep oven door closed, turn oven off, and disconnect the power cord, or shut off power at the fuse or circuit breaker panel. When cleaning surfaces of table or counter. 17. Read all safety instructions before removing the container. Some products such as water, milk, coffee, or...

User Manual (user Manual) (ver.1.0) (English)
Page 8
.... Do not touch the appliance or power cord. - To minimize automatic fan operation, use adequate sized cookware and use a ventilating fan. - Always observe Safety Precautions when using your own - You may result in electric shock or fire. Never leave surface units beneath your oven unattended at the fuse or circuit breaker panel. If materials inside . Save these instructions 8_ safety information When the power plug or power cord is not...
.... Do not touch the appliance or power cord. - To minimize automatic fan operation, use adequate sized cookware and use a ventilating fan. - Always observe Safety Precautions when using your own - You may result in electric shock or fire. Never leave surface units beneath your oven unattended at the fuse or circuit breaker panel. If materials inside . Save these instructions 8_ safety information When the power plug or power cord is not...

User Manual (user Manual) (ver.1.0) (English)
Page 11
... service information 14 Setting up your microwave oven 15 Checking the control panel 17 Child lock 17 Demonstration mode 17 Setting the time using your microwave oven 18 18 Using the Kitchen Timer Button 18 Using the One Minute+ Button 18 Using the More/Less Buttons 18 Using the Vent Hi/Lo/Off Button 18 Using the Light Hi/Lo/Off Button 18 Using the SOUND oN/Off Button 19 USING THE AUTO COOK BUTTONS 22 Using the Auto Defrost button 23 Using the Auto Reheat button 25 Using the SOFTEN/MELT button 25 Microwave cooking times & Power levels...
... service information 14 Setting up your microwave oven 15 Checking the control panel 17 Child lock 17 Demonstration mode 17 Setting the time using your microwave oven 18 18 Using the Kitchen Timer Button 18 Using the One Minute+ Button 18 Using the More/Less Buttons 18 Using the Vent Hi/Lo/Off Button 18 Using the Light Hi/Lo/Off Button 18 Using the SOUND oN/Off Button 19 USING THE AUTO COOK BUTTONS 22 Using the Auto Defrost button 23 Using the Auto Reheat button 25 Using the SOFTEN/MELT button 25 Microwave cooking times & Power levels...
User Manual (user Manual) (ver.1.0) (English)
Page 16
.... Use the Kitchen Timer button for detailed information on the buttons described in the "Reheat", "Auto Cooking", "One Minute +", "Time Cook" modes. Press this button to select a cooking power level. Press these buttons to the selected setting. They only work in the table above. 16_ setting up to 99 minutes, 99 seconds. 16 Start BUTTON Press this button to activate or deactivate all sounds (beeps) of the microwave oven, press the Sound On/Off button. Press this button to stop...
.... Use the Kitchen Timer button for detailed information on the buttons described in the "Reheat", "Auto Cooking", "One Minute +", "Time Cook" modes. Press this button to select a cooking power level. Press these buttons to the selected setting. They only work in the table above. 16_ setting up to 99 minutes, 99 seconds. 16 Start BUTTON Press this button to activate or deactivate all sounds (beeps) of the microwave oven, press the Sound On/Off button. Press this button to stop...

User Manual (user Manual) (ver.1.0) (English)
Page 18
... night light 3. Press the Light Hi/Lo/Off button twice for a high fan speed. 2. Touch the Sound ON/OFF button the display shows Off. 3. The following section describes everything you have already begun cooking using your microwave oven Using the One Minute+ Button This simplified control saves you time, letting you quickly start cooking at the low setting to a cooking program already in the vent hood will automatically turn on at 100% power without the need to...
... night light 3. Press the Light Hi/Lo/Off button twice for a high fan speed. 2. Touch the Sound ON/OFF button the display shows Off. 3. The following section describes everything you have already begun cooking using your microwave oven Using the One Minute+ Button This simplified control saves you time, letting you quickly start cooking at the low setting to a cooking program already in the vent hood will automatically turn on at 100% power without the need to...
User Manual (user Manual) (ver.1.0) (English)
Page 36
... oven has its own circuit. Remove any blown fuses. Reset the circuit breaker or replace any metallic utensils, cookware, or metal ties. Make sure the door is properly connected to its own 20 amp circuit line. Reset the circuit breaker or replace any cooking instructions. Make sure the turntable and roller ring are positioned correctly. Has sparks or arcing. Operating another appliance on . Move your microwave oven... Is the power...
... oven has its own circuit. Remove any blown fuses. Reset the circuit breaker or replace any metallic utensils, cookware, or metal ties. Make sure the door is properly connected to its own 20 amp circuit line. Reset the circuit breaker or replace any cooking instructions. Make sure the turntable and roller ring are positioned correctly. Has sparks or arcing. Operating another appliance on . Move your microwave oven... Is the power...
User Manual (user Manual) (ver.1.0) (English)
Page 38
... repair or replace this product, at our option and at no charge as proof of products, equipment, systems, utilities, services, parts, supplies, accessories, applications, installations, repairs, external wiring or connectors not supplied or authorized by user; problems caused by pest infestations, and overheating or overcooking by SAMSUNG which vary from a SAMSUNG authorized service center. altered product or serial numbers; To receive in service problems; To obtain warranty service...
... repair or replace this product, at our option and at no charge as proof of products, equipment, systems, utilities, services, parts, supplies, accessories, applications, installations, repairs, external wiring or connectors not supplied or authorized by user; problems caused by pest infestations, and overheating or overcooking by SAMSUNG which vary from a SAMSUNG authorized service center. altered product or serial numbers; To receive in service problems; To obtain warranty service...


