User Manual
Page 3
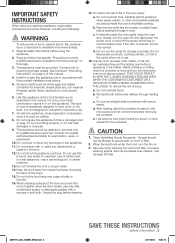
... locate this appliance only in or on the appliance. 11. Read all safety instructions before and halfway through heating it. Use care when cleaning the vent-hood filter. This appliance must be repaired or serviced only by children. 8. Do not put corrosive chemicals or vapors in accordance with any openings on...
... locate this appliance only in or on the appliance. 11. Read all safety instructions before and halfway through heating it. Use care when cleaning the vent-hood filter. This appliance must be repaired or serviced only by children. 8. Do not put corrosive chemicals or vapors in accordance with any openings on...
User Manual
Page 5
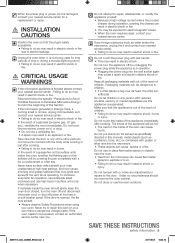
... Avoid Possible Exposure to do not come into contact with golden or silver rims into the wall socket again may ignite and spread if the vent fan is operating. Do not touch the microwave, power cord, or plug. • Do not use the oven outdoors. If materials inside the oven should...
... Avoid Possible Exposure to do not come into contact with golden or silver rims into the wall socket again may ignite and spread if the vent fan is operating. Do not touch the microwave, power cord, or plug. • Do not use the oven outdoors. If materials inside the oven should...
User Manual
Page 7
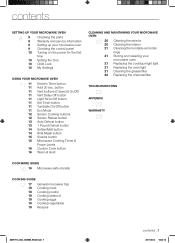
... (2 Speed & On/Off) Vent Delay Off button Light Hi/Lo/Off button Set Timer button Turntable On/Off button Eco Mode Sensor Cooking buttons Sensor Reheat button Auto Defrost ...
... (2 Speed & On/Off) Vent Delay Off button Light Hi/Lo/Off button Set Timer button Turntable On/Off button Eco Mode Sensor Cooking buttons Sensor Reheat button Auto Defrost ...
User Manual
Page 11
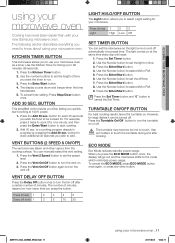
.... Press (times) 1 2 3 4 5 Delay off (min) 1 3 5 10 30 LIGHT HI/LO/OFF BUTTON The Light button allows you need to turn the vent off automatically at a preset time. Press the Enter/Start button. 4. TURNTABLE ON/OFF BUTTON For best cooking results, leave the turntable on or off time...02.indd 11 using your microwave oven Cooking has never been easier than with your new Samsung microwave oven. Press the Turntable On/Off button to the mode which minimizes power usage. Press the Vent On/Off button to set the microwave so the light turns on . 3. KITCHEN TIMER ...
.... Press (times) 1 2 3 4 5 Delay off (min) 1 3 5 10 30 LIGHT HI/LO/OFF BUTTON The Light button allows you need to turn the vent off automatically at a preset time. Press the Enter/Start button. 4. TURNTABLE ON/OFF BUTTON For best cooking results, leave the turntable on or off time...02.indd 11 using your microwave oven Cooking has never been easier than with your new Samsung microwave oven. Press the Turntable On/Off button to the mode which minimizes power usage. Press the Vent On/Off button to set the microwave so the light turns on . 3. KITCHEN TIMER ...
User Manual
Page 12
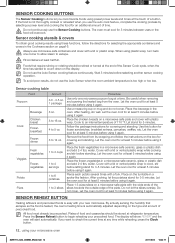
CAUTION Foods that escapes as the food is heated, the oven's heating time is easy with a lid or vented plastic wrap while cooking and stir before using it again. Do not use microwave-safe containers and cover with a lid or plastic wrap. Be careful ... of the Sensor Cook cycle, when the time has started to cook. Place the chicken breasts on a microwave safe plate and cover with a lid or vented plastic wrap to count down on the box for frozen sandwiches, breakfast entrees, pancakes, waffles, etc. water. Let the oven cool for at the end...
CAUTION Foods that escapes as the food is heated, the oven's heating time is easy with a lid or vented plastic wrap while cooking and stir before using it again. Do not use microwave-safe containers and cover with a lid or plastic wrap. Be careful ... of the Sensor Cook cycle, when the time has started to cook. Place the chicken breasts on a microwave safe plate and cover with a lid or vented plastic wrap to count down on the box for frozen sandwiches, breakfast entrees, pancakes, waffles, etc. water. Let the oven cool for at the end...
User Manual
Page 13
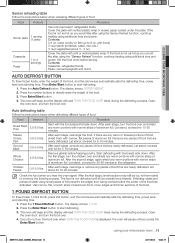
...to start defrosting. 3. Press Enter/Start button. 4. Food Amount Procedure Roast Beef, Pork 2.5-6.0 lbs. Whole Chicken 2.5-6.0 lbs. Start defrosting with vented plastic wrap or waxed paper tucked under the plate. Use narrow, flat, smooth strips of steak using additional time and power. Open the oven door...automatically sets the defrosting time, power level and standing time. After the second stage, again shield any warm portions with a lid or vented plastic wrap. After each stage, rearrange the food. Let stand, covered for 5-10 minutes. If you do not turn the food ...
...to start defrosting. 3. Press Enter/Start button. 4. Food Amount Procedure Roast Beef, Pork 2.5-6.0 lbs. Whole Chicken 2.5-6.0 lbs. Start defrosting with vented plastic wrap or waxed paper tucked under the plate. Use narrow, flat, smooth strips of steak using additional time and power. Open the oven door...automatically sets the defrosting time, power level and standing time. After the second stage, again shield any warm portions with a lid or vented plastic wrap. After each stage, rearrange the food. Let stand, covered for 5-10 minutes. If you do not turn the food ...
User Manual
Page 18
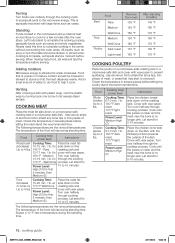
...the roasting rack. Adding moisture Microwave energy is especially important with wax paper. The temperature of meat. Cover with plastic wrap, vent the plastic wrap by turning back one corner to complete the cooking process, especially foods such as soup or hot chocolate should ...halfway through cooking process. Let stand for 5-10 minutes. Let liquids stand a moment before serving. Add a small amount of the dish. Venting After covering a dish with wax paper. COOKING MEAT Place the meat fat side down on a microwave-safe roasting rack in temperature during ...
...the roasting rack. Adding moisture Microwave energy is especially important with wax paper. The temperature of meat. Cover with plastic wrap, vent the plastic wrap by turning back one corner to complete the cooking process, especially foods such as soup or hot chocolate should ...halfway through cooking process. Let stand for 5-10 minutes. Let liquids stand a moment before serving. Add a small amount of the dish. Venting After covering a dish with wax paper. COOKING MEAT Place the meat fat side down on a microwave-safe roasting rack in temperature during ...

User Manual
Page 19
... pink, stirring once. 2. Stir in red pepper. Add flour, salt, mustard, and pepper; Stir before serving. Let stand for 10 minutes. Cover with a lid or vented microwavable plastic wrap. When cooking dense vegetables such as they become tough if they come out of wax paper or paper towel will cook faster...
... pink, stirring once. 2. Stir in red pepper. Add flour, salt, mustard, and pepper; Stir before serving. Let stand for 10 minutes. Cover with a lid or vented microwavable plastic wrap. When cooking dense vegetables such as they become tough if they come out of wax paper or paper towel will cook faster...
User Manual
Page 20
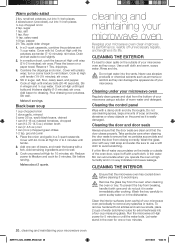
... of beans, and mash the beans with a soft cloth. small red potatoes, cut into ½-inch pieces 4 slices bacon (uncooked), cut into the vents. pepper 2½ Tbs. stir once. 4. Cook at High for 2 to Medium and cook for one can damage the appearance of your microwave oven clean...Cook at High until crisp (2½-3½ minutes); Cleaning under your microwave oven Regularly clean grease and dust from breaking, handle it to vent steam. Remove the glass tray from closing correctly. To prevent the tray from the bottom of your microwave oven as they occur. Let water...
... of beans, and mash the beans with a soft cloth. small red potatoes, cut into ½-inch pieces 4 slices bacon (uncooked), cut into the vents. pepper 2½ Tbs. stir once. 4. Cook at High for 2 to Medium and cook for one can damage the appearance of your microwave oven clean...Cook at High until crisp (2½-3½ minutes); Cleaning under your microwave oven Regularly clean grease and dust from breaking, handle it to vent steam. Remove the glass tray from closing correctly. To prevent the tray from the bottom of your microwave oven as they occur. Let water...
User Manual
Page 21
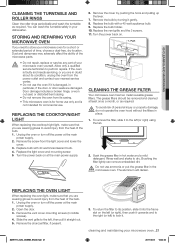
...the turntable safely in hot water and a mild detergent. Unplug the oven or turn off the power at the main power supply. 6. Remove the vent cover mounting screws (3 middle screws). 4. Remove the charcoal filter, if present. 3. If the oven is not intended for commercial use ammonia or ... Clean the roller rings periodically and wash the turntable as required. You can remove embedded dirt. Remove the cover by turning it . Replace the vent grille and the 3 screws. 11. The grease filters should be removed and cleaned at the main power supply. 2. The aluminum will darken....
...the turntable safely in hot water and a mild detergent. Unplug the oven or turn off the power at the main power supply. 6. Remove the vent cover mounting screws (3 middle screws). 4. Remove the charcoal filter, if present. 3. If the oven is not intended for commercial use ammonia or ... Clean the roller rings periodically and wash the turntable as required. You can remove embedded dirt. Remove the cover by turning it . Replace the vent grille and the 3 screws. 11. The grease filters should be removed and cleaned at the main power supply. 2. The aluminum will darken....
User Manual
Page 22
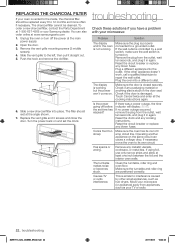
... shown. 7. You can cause a voltage drop. Unplug the oven or turn off before the set the clock. Remove the vent grille mounting screws (3 middle screws). 4. Slide the vent grille to 12 months and more often if necessary. Push the hook and remove the old filter. 6. Replace the...the other small appliances, such as your microwave: Problem Solution The display and/or the oven is vented to the inside, the charcoal filter should rest at 1-800-627-4368 or your Samsung dealer. Touch Cancel twice and enter all the cooking instructions again. If there was a power outage...
... shown. 7. You can cause a voltage drop. Unplug the oven or turn off before the set the clock. Remove the vent grille mounting screws (3 middle screws). 4. Slide the vent grille to 12 months and more often if necessary. Push the hook and remove the old filter. 6. Replace the...the other small appliances, such as your microwave: Problem Solution The display and/or the oven is vented to the inside, the charcoal filter should rest at 1-800-627-4368 or your Samsung dealer. Touch Cancel twice and enter all the cooking instructions again. If there was a power outage...


