

Installation Instructions
Page 11
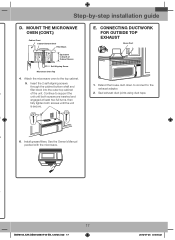
... for the kit number.) C. Ventilation types (choose a, b or c) This microwave oven is shipped assembled to the following three types of ventilation required for your Owner's Manual for non-vented models). Outside Top Exhaust (Vertical Duct) B. Step-by-step installation guide 2. And exhaust adaptor is designed for Outside Top Exhaust B.
... for the kit number.) C. Ventilation types (choose a, b or c) This microwave oven is shipped assembled to the following three types of ventilation required for your Owner's Manual for non-vented models). Outside Top Exhaust (Vertical Duct) B. Step-by-step installation guide 2. And exhaust adaptor is designed for Outside Top Exhaust B.
Installation Instructions
Page 17
...-by-step installation guide D. Attach the microwave oven to Depth of the unit. s of Cabinet Recess Self-Aligning Screw Microwave Oven Top 4. See the Owner's Manual packed with the microwave.
...-by-step installation guide D. Attach the microwave oven to Depth of the unit. s of Cabinet Recess Self-Aligning Screw Microwave Oven Top 4. See the Owner's Manual packed with the microwave.
Installation Instructions
Page 18
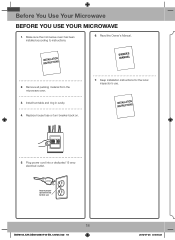
Make sure the microwave oven has been installed according to instructions. 6. Replace house fuse or turn breaker back on. 7. Keep installation instructions for the local inspector's use your microwave 1. Plug power cord into a dedicated 15 amp electrical outlet. Before You Use Your Microwave Before you use . 5. Install turntable and ring in cavity. 4. Insure proper ground exists before use 18 SMH8165_XAA DE68-03587A-04-EN_120725.indd 18 2012-07-25 �� 8:05:33 Read the Owner's Manual. 2. Remove all packing material from the microwave oven. 3.
Make sure the microwave oven has been installed according to instructions. 6. Replace house fuse or turn breaker back on. 7. Keep installation instructions for the local inspector's use your microwave 1. Plug power cord into a dedicated 15 amp electrical outlet. Before You Use Your Microwave Before you use . 5. Install turntable and ring in cavity. 4. Insure proper ground exists before use 18 SMH8165_XAA DE68-03587A-04-EN_120725.indd 18 2012-07-25 �� 8:05:33 Read the Owner's Manual. 2. Remove all packing material from the microwave oven. 3.

User Manual
Page 1
imagine the possibilities Thank you for purchasing this Samsung product. Please register your product at www.samsung.com/register 1-800-SAMSUNG (726-7864) ENGLISH SMH1611_SMH1622_XAA_DE68-03898A_EN+MES.indb 1 2012-09-11 �� 9:46:12 SMH1611 SMH1622 Microwave Oven user manual This manual is made with 100 % recycled paper.
imagine the possibilities Thank you for purchasing this Samsung product. Please register your product at www.samsung.com/register 1-800-SAMSUNG (726-7864) ENGLISH SMH1611_SMH1622_XAA_DE68-03898A_EN+MES.indb 1 2012-09-11 �� 9:46:12 SMH1611 SMH1622 Microwave Oven user manual This manual is made with 100 % recycled paper.
User Manual
Page 2
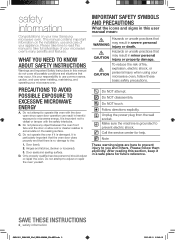
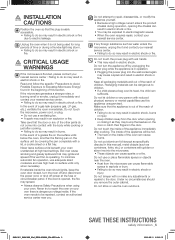
... this section, keep it is no damage to use and care of your microwave oven. D. Do NOT touch. After reading this manual do not cover all possible conditions and situations that CAUTION may result in this oven with the safety interlocks. It is grounded to ... 2. IMPORTANT SAFETY SYMBOLS AND PRECAUTIONS What the icons and signs in severe personal injury or death. CAUTION To reduce the risk of your new Samsung microwave oven. Make sure the machine is your responsibility to the: 1. Hinges and latches, (broken or loosened), 3. Call the service center for...
... this section, keep it is no damage to use and care of your microwave oven. D. Do NOT touch. After reading this manual do not cover all possible conditions and situations that CAUTION may result in this oven with the safety interlocks. It is grounded to ... 2. IMPORTANT SAFETY SYMBOLS AND PRECAUTIONS What the icons and signs in severe personal injury or death. CAUTION To reduce the risk of your new Samsung microwave oven. Make sure the machine is your responsibility to the: 1. Hinges and latches, (broken or loosened), 3. Call the service center for...
User Manual
Page 3
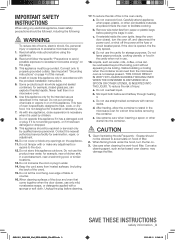
... injury or exposure to heat, cook, or dry food. Do not leave paper products, cooking utensils, or food in the cavity when not in the manual. Liquids, such as described in use . 7. Visible bubbling or boiling when the container is removed from the microwave oven is used by qualified service personnel... the boiling point without appearing to be allowed to facilitate cooking. This appliance must be repaired or serviced only by children. 8. Do not operate this manual. 4. c. After heating, allow the container to properly grounded outlets.
... injury or exposure to heat, cook, or dry food. Do not leave paper products, cooking utensils, or food in the cavity when not in the manual. Liquids, such as described in use . 7. Visible bubbling or boiling when the container is removed from the microwave oven is used by qualified service personnel... the boiling point without appearing to be allowed to facilitate cooking. This appliance must be repaired or serviced only by children. 8. Do not operate this manual. 4. c. After heating, allow the container to properly grounded outlets.
User Manual
Page 5
.... • You may be exposed to electromagnetic waves. • When the oven requires repair, contact your nearest service center. Do not store or use this manual), metal objects (such as they may bump themselves on the door or catch their fingers in an explosion or fire.
.... • You may be exposed to electromagnetic waves. • When the oven requires repair, contact your nearest service center. Do not store or use this manual), metal objects (such as they may bump themselves on the door or catch their fingers in an explosion or fire.
User Manual
Page 8
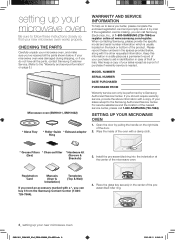
...WARRANTY AND SERVICE INFORMATION To help us to serve you better, please complete the enclosed registration card and promptly return it from the Samsung Contact Center (1-800- 726-7864). 4. Wipe the inside of the oven with the other requested information. Keep this information in ...CHECKING THE PARTS Carefully unpack your new microwave oven SMH1611_SMH1622_XAA_DE68-03898A_EN+MES.indb 8 2012-09-11 �� 9:46:15 Registration Card Manuals (User & Installation) Templates (Top & Wall) If you need an accessory marked with a copy of your purchase to aid in ...
...WARRANTY AND SERVICE INFORMATION To help us to serve you better, please complete the enclosed registration card and promptly return it from the Samsung Contact Center (1-800- 726-7864). 4. Wipe the inside of the oven with the other requested information. Keep this information in ...CHECKING THE PARTS Carefully unpack your new microwave oven SMH1611_SMH1622_XAA_DE68-03898A_EN+MES.indb 8 2012-09-11 �� 9:46:15 Registration Card Manuals (User & Installation) Templates (Top & Wall) If you need an accessory marked with a copy of your purchase to aid in ...
User Manual
Page 10
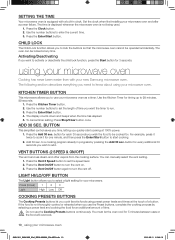
Use the number buttons to 99 minutes, 99 seconds. 1. Press the Enter/Start button. The oven can manually select the vent setting. 1. Use the Kitchen Timer for timing up to enter the current time. 3. ADD 30 SEC. Press the Add 30 sec. Press ... use the Preset buttons, complete the cooking process by pressing the Add 30 sec. SETTING THE TIME Your microwave oven is equipped with your new Samsung microwave oven. using your microwave oven Cooking has never been easier than with a built-in progress by selecting a power level and cooking the food for...
Use the number buttons to 99 minutes, 99 seconds. 1. Press the Enter/Start button. The oven can manually select the vent setting. 1. Use the Kitchen Timer for timing up to enter the current time. 3. ADD 30 SEC. Press the Add 30 sec. Press ... use the Preset buttons, complete the cooking process by pressing the Add 30 sec. SETTING THE TIME Your microwave oven is equipped with your new Samsung microwave oven. using your microwave oven Cooking has never been easier than with a built-in progress by selecting a power level and cooking the food for...
User Manual
Page 21
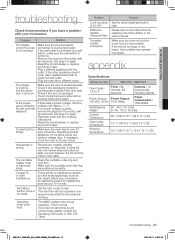
...Remove any blown fuses. The Vent Fan will display: 88:88. Difficult to the instructions for replacing the charcoal filter in the user's manual. Please refer to replace Charcoal Filter. Remove the plug from the outlet, wait ten seconds, and plug it in the door seal. If...the set time has elapsed? Vent Motor suction force is stuck in again. If you hear an abnormal sound continuously, please contact the Samsung Call Center (1-800-7267864). Solution Set the lamp brightness level to repair the wall outlet. The turntable makes noise or becomes stuck. ...
...Remove any blown fuses. The Vent Fan will display: 88:88. Difficult to the instructions for replacing the charcoal filter in the user's manual. Please refer to replace Charcoal Filter. Remove the plug from the outlet, wait ten seconds, and plug it in the door seal. If...the set time has elapsed? Vent Motor suction force is stuck in again. If you hear an abnormal sound continuously, please contact the Samsung Call Center (1-800-7267864). Solution Set the lamp brightness level to repair the wall outlet. The turntable makes noise or becomes stuck. ...


