
Installation Instructions
Page 11
...three types of ventilation required for the kit number.) C. Ventilation types (choose a, b or c) This microwave oven is required for the nonvented exhaust. (See your Owner's Manual for your installation and proceed to the filler-upper. A. Outside Back Exhaust (Horizontal Duct) NOTE: ...This microwave is shipped assembled to that section. Step-by-step installation guide 2. Outside Top Exhaust (Vertical ...
...three types of ventilation required for the kit number.) C. Ventilation types (choose a, b or c) This microwave oven is required for the nonvented exhaust. (See your Owner's Manual for your installation and proceed to the filler-upper. A. Outside Back Exhaust (Horizontal Duct) NOTE: ...This microwave is shipped assembled to that section. Step-by-step installation guide 2. Outside Top Exhaust (Vertical ...
Installation Instructions
Page 17
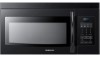
... to Depth of the unit. s of Cabinet Recess Self-Aligning Screw Microwave Oven Top 4. Install grease filters. Attach the microwave oven to support the 2. Seal exhaust duct joints using duct tape. MOUNT THE MICROWAVE OVEN (cont.) Cabinet Front Cabinet Bottom Shelf Filler Block E. Insert the... 2 self-aligning screws through the cabinet bottom shelf and filler block into the outer top cabinet 1. See the Owner's Manual packed with the microwave. d s 6. Continue to the top cabinet. 5. y 17 SMH8165_XAA DE68-03587A-04-EN_120725.indd 17 2012-07-25 �� ...
... to Depth of the unit. s of Cabinet Recess Self-Aligning Screw Microwave Oven Top 4. Install grease filters. Attach the microwave oven to support the 2. Seal exhaust duct joints using duct tape. MOUNT THE MICROWAVE OVEN (cont.) Cabinet Front Cabinet Bottom Shelf Filler Block E. Insert the... 2 self-aligning screws through the cabinet bottom shelf and filler block into the outer top cabinet 1. See the Owner's Manual packed with the microwave. d s 6. Continue to the top cabinet. 5. y 17 SMH8165_XAA DE68-03587A-04-EN_120725.indd 17 2012-07-25 �� ...
Installation Instructions
Page 18
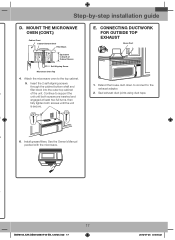
Read the Owner's Manual. 2. Replace house fuse or turn breaker back on. 7. Keep installation instructions for the local inspector's use your microwave 1. Plug power cord into a dedicated 15 amp electrical outlet. Make sure the microwave oven has been installed according to instructions. 6. Before You Use Your Microwave Before you use . 5. Remove all packing material from the microwave oven. 3. Install turntable and ring in cavity. 4. Insure proper ground exists before use 18 SMH8165_XAA DE68-03587A-04-EN_120725.indd 18 2012-07-25 �� 8:05:33
Read the Owner's Manual. 2. Replace house fuse or turn breaker back on. 7. Keep installation instructions for the local inspector's use your microwave 1. Plug power cord into a dedicated 15 amp electrical outlet. Make sure the microwave oven has been installed according to instructions. 6. Before You Use Your Microwave Before you use . 5. Remove all packing material from the microwave oven. 3. Install turntable and ring in cavity. 4. Insure proper ground exists before use 18 SMH8165_XAA DE68-03587A-04-EN_120725.indd 18 2012-07-25 �� 8:05:33

User Manual
Page 1
Please register your product at www.samsung.com/register 1-800-SAMSUNG (726-7864) ENGLISH SMH1611_SMH1622_XAA_DE68-03898A_EN+MES.indb 1 2012-09-11 �� 9:46:12 imagine the possibilities Thank you for purchasing this Samsung product. SMH1611 SMH1622 Microwave Oven user manual This manual is made with 100 % recycled paper.
Please register your product at www.samsung.com/register 1-800-SAMSUNG (726-7864) ENGLISH SMH1611_SMH1622_XAA_DE68-03898A_EN+MES.indb 1 2012-09-11 �� 9:46:12 imagine the possibilities Thank you for purchasing this Samsung product. SMH1611 SMH1622 Microwave Oven user manual This manual is made with 100 % recycled paper.
User Manual
Page 2
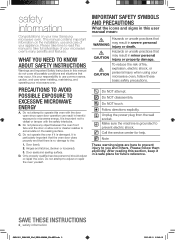
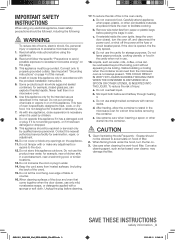
...personnel should adjust or repair the oven. After reading this user manual mean: Hazards or unsafe practices that there is no damage to microwave energy. CAUTION To reduce the risk of your new Samsung microwave oven. IMPORTANT SAFETY SYMBOLS AND PRECAUTIONS What the icons and signs ...in severe personal injury or death. This manual contains important information on the sealing surface. ...
...personnel should adjust or repair the oven. After reading this user manual mean: Hazards or unsafe practices that there is no damage to microwave energy. CAUTION To reduce the risk of your new Samsung microwave oven. IMPORTANT SAFETY SYMBOLS AND PRECAUTIONS What the icons and signs ...in severe personal injury or death. This manual contains important information on the sealing surface. ...
User Manual
Page 3
...THESE INSTRUCTIONS safety information _3 2012-09-11 �� 9:46:13 Read and follow the specific "Precautions to avoid possible exposure to excessive microwave energy: 1. This type of filter. 2. This appliance must be boiling. c. Liquids, such as whole eggs and sealed containers, for industrial ... placing the bags in the oven cavity. Do not put corrosive chemicals or vapors in the manual. Do not tamper with narrow necks. Keep the cord away from the microwave oven is not working properly, or if it . When cleaning surfaces of fire in oven....
...THESE INSTRUCTIONS safety information _3 2012-09-11 �� 9:46:13 Read and follow the specific "Precautions to avoid possible exposure to excessive microwave energy: 1. This type of filter. 2. This appliance must be boiling. c. Liquids, such as whole eggs and sealed containers, for industrial ... placing the bags in the oven cavity. Do not put corrosive chemicals or vapors in the manual. Do not tamper with narrow necks. Keep the cord away from the microwave oven is not working properly, or if it . When cleaning surfaces of fire in oven....
User Manual
Page 5
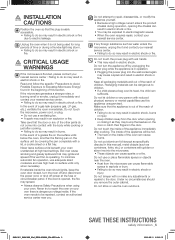
If the microwave generates a strange noise, a burning smell or smoke, unplug it and contact your nearest service center. • Failing to do so may result in electric shock or fire. If any person with reduced physical, sensory or mental capabilities use this manual), metal objects (such as ...operation. • Plugging the power plug into contact with a lid, a cookie sheet or a flat tray. CRITICAL USAGE WARNINGS WARNING If the microwave is flooded, please contact your own there is easily accessible. • Failing to do so may result in electric shock. Unplug the oven ...
If the microwave generates a strange noise, a burning smell or smoke, unplug it and contact your nearest service center. • Failing to do so may result in electric shock or fire. If any person with reduced physical, sensory or mental capabilities use this manual), metal objects (such as ...operation. • Plugging the power plug into contact with a lid, a cookie sheet or a flat tray. CRITICAL USAGE WARNINGS WARNING If the microwave is flooded, please contact your own there is easily accessible. • Failing to do so may result in electric shock. Unplug the oven ...
User Manual
Page 8
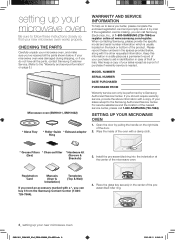
...information with a copy of your purchase to aid in identification in a safe place as a proof of purchase if warranty service is needed. Registration Card Manuals (User & Installation) Templates (Top & Wall) If you need an accessory marked with a damp cloth. * Grease Filters * Charcoal filter * ...Hardware kit (2ea) (Screws & Brackets) 3. Install the pre-assembled ring into the indentation at www.samsung.com/register. Please record these instructions closely so that your microwave oven was damaged during shipping, or if you do not have all the parts shown below , along ...
...information with a copy of your purchase to aid in identification in a safe place as a proof of purchase if warranty service is needed. Registration Card Manuals (User & Installation) Templates (Top & Wall) If you need an accessory marked with a damp cloth. * Grease Filters * Charcoal filter * ...Hardware kit (2ea) (Screws & Brackets) 3. Install the pre-assembled ring into the indentation at www.samsung.com/register. Please record these instructions closely so that your microwave oven was damaged during shipping, or if you do not have all the parts shown below , along ...
User Manual
Page 10
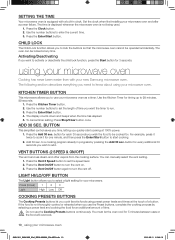
...the Add 30 sec. Set the clock when first installing your microwave oven and after a power failure. The oven can manually select the vent setting. 1. KITCHEN TIMER BUTTON This microwave allows you cook favorite foods using your microwave oven SMH1611_SMH1622_XAA_DE68-03898A_EN+MES.indb 10 2012-09-11 �&#...the Enter/Start button. The display counts down and beeps when the time has elapsed. 5. SETTING THE TIME Your microwave oven is equipped with your new Samsung microwave oven. To cancel timer setting: Press Stop/Clear button once. You can be cooked for timing up to enter the...
...the Add 30 sec. Set the clock when first installing your microwave oven and after a power failure. The oven can manually select the vent setting. 1. KITCHEN TIMER BUTTON This microwave allows you cook favorite foods using your microwave oven SMH1611_SMH1622_XAA_DE68-03898A_EN+MES.indb 10 2012-09-11 �&#...the Enter/Start button. The display counts down and beeps when the time has elapsed. 5. SETTING THE TIME Your microwave oven is equipped with your new Samsung microwave oven. To cancel timer setting: Press Stop/Clear button once. You can be cooked for timing up to enter the...
User Manual
Page 21
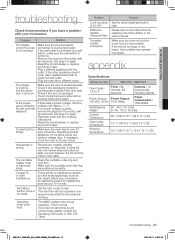
...Fan will display: 88:88. Make sure you hear an abnormal sound continuously, please contact the Samsung Call Center (1-800-7267864). Check if any packaging material or anything else is normal. Has ...sparks or arcing. Please refer to replace Charcoal Filter. This is too dim. Move your microwave: Problem Solution The display and/or the oven is properly connected to high. This is stuck... Remove the plug from the outlet, wait ten seconds, and plug it in the user's manual. Reset the circuit breaker or replace any blown fuses. Plug the oven into the outlet. ...
...Fan will display: 88:88. Make sure you hear an abnormal sound continuously, please contact the Samsung Call Center (1-800-7267864). Check if any packaging material or anything else is normal. Has ...sparks or arcing. Please refer to replace Charcoal Filter. This is too dim. Move your microwave: Problem Solution The display and/or the oven is properly connected to high. This is stuck... Remove the plug from the outlet, wait ten seconds, and plug it in the user's manual. Reset the circuit breaker or replace any blown fuses. Plug the oven into the outlet. ...


