Quick Guide (easy Manual) (ver.1.0) (English)
Page 3
...user's guide 22 Features of your new product INTRODUCTION 24 Machine overview 24 24 25 Front view Rear view 26 Control panel overview (SCX-4623 Series) 27 Control panel overview (SCX-4600 Series) 28 Understanding the Status LED 28 Introducing the useful buttons 28 Menu button 28 Power button 28 ... SETUP 35 Network environment 35 35 Introducing useful network programs 35 SyncThru™ Web Service 35 SyncThru™ Web Admin Service 35 Samsung AnyWeb Print 35 SetIP 35 Using a wired network 35 Printing Network Configuration report 36 Setting IP address 37 Network parameter setting 37...
...user's guide 22 Features of your new product INTRODUCTION 24 Machine overview 24 24 25 Front view Rear view 26 Control panel overview (SCX-4623 Series) 27 Control panel overview (SCX-4600 Series) 28 Understanding the Status LED 28 Introducing the useful buttons 28 Menu button 28 Power button 28 ... SETUP 35 Network environment 35 35 Introducing useful network programs 35 SyncThru™ Web Service 35 SyncThru™ Web Admin Service 35 Samsung AnyWeb Print 35 SetIP 35 Using a wired network 35 Printing Network Configuration report 36 Setting IP address 37 Network parameter setting 37...
Quick Guide (easy Manual) (ver.1.0) (English)
Page 4
... the save modes 43 Using the toner saving feature 43 Using the power saving feature 43 Setting the default tray and paper 43 In the control panel 43 In the computer 44 Setting job timeout MEDIA AND TRAY 45 Preparing originals 45 45 Loading originals 45 On the scanner glass 46 In...
... the save modes 43 Using the toner saving feature 43 Using the power saving feature 43 Setting the default tray and paper 43 In the control panel 43 In the computer 44 Setting job timeout MEDIA AND TRAY 45 Preparing originals 45 45 Loading originals 45 On the scanner glass 46 In...

Quick Guide (easy Manual) (ver.1.0) (English)
Page 24
... 2. This chapter gives you an overview of your machine: This chapter includes: • Machine overview • Control panel overview (SCX-4623 Series) • Control panel overview (SCX-4600 Series) • Understanding the Status LED • Introducing the useful buttons • Turning on the machine...traya 7 Handle 8 Tray 1 4 Document feeder output traya 9 Manual tray 5 Output support 10 Front door 11 Document output tray 12 Control panel 13 Toner cartridge Manual tray paper width 14 guides 15 Scanner lid Introduction_ 24 16 Scanner glass 17 Handsetb 18 Scan unit 19 Scan ...
... 2. This chapter gives you an overview of your machine: This chapter includes: • Machine overview • Control panel overview (SCX-4623 Series) • Control panel overview (SCX-4600 Series) • Understanding the Status LED • Introducing the useful buttons • Turning on the machine...traya 7 Handle 8 Tray 1 4 Document feeder output traya 9 Manual tray 5 Output support 10 Front door 11 Document output tray 12 Control panel 13 Toner cartridge Manual tray paper width 14 guides 15 Scanner lid Introduction_ 24 16 Scanner glass 17 Handsetb 18 Scan unit 19 Scan ...
Quick Guide (easy Manual) (ver.1.0) (English)
Page 26
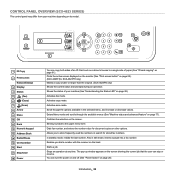
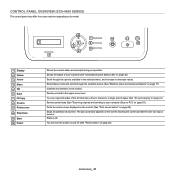
... current job that the user can turn the power on and off (See "Power button" on page 28). You can stop or resume. CONTROL PANEL OVERVIEW (SCX-4623 SERIES) This control panel may differ from your machine depending on its model. 1 ID Copy 2 Print screen Reduce/Enlarge 3 Display 4 Status 5 (Fax) 6 (...and increase or decrease values. Enables you dial a number with the receiver on page 28). (SCX-4623F(K), SCX-4623FH only) Makes a copy smaller or larger than the original. (SCX-4623FN only) Shows the current status and prompts during an operation. Confirms the selection on page ...
... current job that the user can turn the power on and off (See "Power button" on page 28). You can stop or resume. CONTROL PANEL OVERVIEW (SCX-4623 SERIES) This control panel may differ from your machine depending on its model. 1 ID Copy 2 Print screen Reduce/Enlarge 3 Display 4 Status 5 (Fax) 6 (...and increase or decrease values. Enables you dial a number with the receiver on page 28). (SCX-4623F(K), SCX-4623FH only) Makes a copy smaller or larger than the original. (SCX-4623FN only) Shows the current status and prompts during an operation. Confirms the selection on page ...
Quick Guide (easy Manual) (ver.1.0) (English)
Page 27
... resume. The pop-up window appears on page 28). Scroll through the available menus (See "Machine status and advanced feature" on page 77). CONTROL PANEL OVERVIEW (SCX-4600 SERIES) This control panel may differ from your machine depending on its model. 1 Display 2 Status 3 Arrow 4 Menu 5 OK 6 Back 7 ID Copy 8 Scan to your machine (See "Understanding...
... resume. The pop-up window appears on page 28). Scroll through the available menus (See "Machine status and advanced feature" on page 77). CONTROL PANEL OVERVIEW (SCX-4600 SERIES) This control panel may differ from your machine depending on its model. 1 Display 2 Status 3 Arrow 4 Menu 5 OK 6 Back 7 ID Copy 8 Scan to your machine (See "Understanding...
Quick Guide (easy Manual) (ver.1.0) (English)
Page 33
... and click Print & Fax. 3. Installing the Printer Setting Utility 1. You must log in : [root@localhost root]#cd /opt/Samsung/mfp/uninstall/ [root@localhost uninstall]#./uninstall.sh d) Click Uninstall. Follow the steps 3 to your printer driver (See "Installing USB connected...Printers and Faxes. • For Windows 2008/Vista, select Control Panel > Hardware and Sound > Printers. • For Windows 7, select Control Panel > Hardware and Sound > Devices and Printers. • For Windows Server 2008 R2, select Control Panel > Hardware > Devices and Printers. 4. In case host computer...
... and click Print & Fax. 3. Installing the Printer Setting Utility 1. You must log in : [root@localhost root]#cd /opt/Samsung/mfp/uninstall/ [root@localhost uninstall]#./uninstall.sh d) Click Uninstall. Follow the steps 3 to your printer driver (See "Installing USB connected...Printers and Faxes. • For Windows 2008/Vista, select Control Panel > Hardware and Sound > Printers. • For Windows 7, select Control Panel > Hardware and Sound > Devices and Printers. • For Windows Server 2008 R2, select Control Panel > Hardware > Devices and Printers. 4. In case host computer...

Quick Guide (easy Manual) (ver.1.0) (English)
Page 35
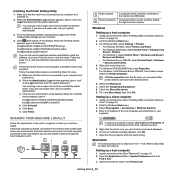
...machine and software. This will show you how this Network Configuration Report, you to set up the basic network settings through the machine's control panel. Press Menu on page 82). appears and press OK. 4. This chapter includes: • Network environment • Introducing useful network ... of managing network devices and lets you to link the website where the tool is possible. Click Start > All programs > Samsung Printers > Samsung AnyWeb Print > Download the latest version to : • Configure the network parameters necessary for the download. network setup 4. Please...
...machine and software. This will show you how this Network Configuration Report, you to set up the basic network settings through the machine's control panel. Press Menu on page 82). appears and press OK. 4. This chapter includes: • Network environment • Introducing useful network ... of managing network devices and lets you to link the website where the tool is possible. Click Start > All programs > Samsung Printers > Samsung AnyWeb Print > Download the latest version to : • Configure the network parameters necessary for the download. network setup 4. Please...
Quick Guide (easy Manual) (ver.1.0) (English)
Page 36
... automatically, close the SetIP program. 8. From the Windows Start menu, select All Programs > Samsung Printers > SetIP > SetIP. 4. Enter the IP address using the machine's control panel. Repeat this to complete the address from the 1st byte to "Installing wired network or USB... connected machine's driver" on the network. Now go to the 4th byte. 9. Open Control Panel. 2. Double-click Application > SetIP. 4. Follow the instructions in the Network Configuration Report. Click Security. 3. Enter a byte between bytes....
... automatically, close the SetIP program. 8. From the Windows Start menu, select All Programs > Samsung Printers > SetIP > SetIP. 4. Enter the IP address using the machine's control panel. Repeat this to complete the address from the 1st byte to "Installing wired network or USB... connected machine's driver" on the network. Now go to the 4th byte. 9. Open Control Panel. 2. Double-click Application > SetIP. 4. Follow the instructions in the Network Configuration Report. Click Security. 3. Enter a byte between bytes....
Quick Guide (easy Manual) (ver.1.0) (English)
Page 37
...browser window. Quit Safari. Close the SetIP program. Turn off and restart machine to apply settings. Restoring factory default settings using control panel 1. Turn off and restart machine to apply settings. INSTALLING WIRED NETWORK OR USB CONNECTED MACHINE'S DRIVER Windows You can also set... example, 00:15:99:29:51:A8 becomes 0015992951A8. • IP Address: Enter a new IP address for network. 4. Open the /opt/Samsung/mfp/share/utils/. 3. Network parameter setting You can set up the machine driver, follow the steps below. Type X:\Setup.exe replacing "X" with a...
...browser window. Quit Safari. Close the SetIP program. Turn off and restart machine to apply settings. Restoring factory default settings using control panel 1. Turn off and restart machine to apply settings. INSTALLING WIRED NETWORK OR USB CONNECTED MACHINE'S DRIVER Windows You can also set... example, 00:15:99:29:51:A8 becomes 0015992951A8. • IP Address: Enter a new IP address for network. 4. Open the /opt/Samsung/mfp/share/utils/. 3. Network parameter setting You can set up the machine driver, follow the steps below. Type X:\Setup.exe replacing "X" with a...

Quick Guide (easy Manual) (ver.1.0) (English)
Page 38
... 8. 7. To register as a user of the License Agreement. Make sure that the machine is not found in order to install. The Samsung Installer window opens. 3. The Custom Installation allows you to print a test page appears. Turn off the firewall and Search again. The searched...the machine. • Set IP Address If you to set . 2. The program searches the machine. For Windows operating system, click Start > Control Panel > Windows Firewall, and inactivate this program without connecting the printer to the next step. 12. Search by network path: To find a shared ...
... 8. 7. To register as a user of the License Agreement. Make sure that the machine is not found in order to install. The Samsung Installer window opens. 3. The Custom Installation allows you to print a test page appears. Turn off the firewall and Search again. The searched...the machine. • Set IP Address If you to set . 2. The program searches the machine. For Windows operating system, click Start > Control Panel > Windows Firewall, and inactivate this program without connecting the printer to the next step. 12. Search by network path: To find a shared ...

Quick Guide (easy Manual) (ver.1.0) (English)
Page 39
.... e) Double-click the Installer OS X icon. g) The Samsung Installer window opens. Click Continue. i) When the message which warns that appears on the machine. 3. Download the Unified Linux Driver package from the machine's control panel that will pop up. 15. Extract the UnifiedLinuxDriver.tar.gz file... and open the new directory. 4. The Samsung Installer window opens. The Add printer wizard window opens. When the add printer ...
.... e) Double-click the Installer OS X icon. g) The Samsung Installer window opens. Click Continue. i) When the message which warns that appears on the machine. 3. Download the Unified Linux Driver package from the machine's control panel that will pop up. 15. Extract the UnifiedLinuxDriver.tar.gz file... and open the new directory. 4. The Samsung Installer window opens. The Add printer wizard window opens. When the add printer ...

Quick Guide (easy Manual) (ver.1.0) (English)
Page 40
...) appears and press OK. 4. Start a web browser such as Internet Explorer that supports IPv6 addressing as a URL (See "Connecting SyncThru™ Web Service" on the control panel. 2. "A" is the hexadecimal 0 through 9, A through F). 6. • Stateful Address: IPv6 address configured by a DHCPv6 server. • Manual Address: Manually configured IPv6 address by a router. • DHCPv6...
...) appears and press OK. 4. Start a web browser such as Internet Explorer that supports IPv6 addressing as a URL (See "Connecting SyncThru™ Web Service" on the control panel. 2. "A" is the hexadecimal 0 through 9, A through F). 6. • Stateful Address: IPv6 address configured by a DHCPv6 server. • Manual Address: Manually configured IPv6 address by a router. • DHCPv6...
Quick Guide (easy Manual) (ver.1.0) (English)
Page 41
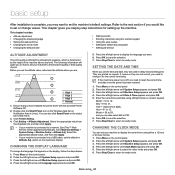
...Ensure that appears on the display, follow the steps below: 1. Click Machine Settings > System Setup > Machine Setup > Altitude Adj. Press Menu on the control panel. 2. Press the left /right arrow until System Setup appears and press OK. 3. Press the left /right arrow until Language appears and press OK. ... to reset the correct time and date once the power has been restored. 1. Refer to save the selection. 7. option on the control panel. 2. CHANGING THE DISPLAY LANGUAGE To change the language that you may want . 6. Press the left /right arrow until Date & ...
...Ensure that appears on the display, follow the steps below: 1. Click Machine Settings > System Setup > Machine Setup > Altitude Adj. Press Menu on the control panel. 2. Press the left /right arrow until System Setup appears and press OK. 3. Press the left /right arrow until Language appears and press OK. ... to reset the correct time and date once the power has been restored. 1. Refer to save the selection. 7. option on the control panel. 2. CHANGING THE DISPLAY LANGUAGE To change the language that you may want . 6. Press the left /right arrow until Date & ...
Quick Guide (easy Manual) (ver.1.0) (English)
Page 42
...the telephone line through 5 to set up your machine has a handset, you want. 4. If your machine, you want. 3. Press Menu on the control panel. 2. If necessary, repeat steps 4 through the speaker, such as space, plus sign, and etc. Press the left/right arrow until System Setup ... /right arrow until Machine Setup appears and press OK. 4. which means "Common", the speaker is on until the correct letter appears on the control panel. 2. Press (Fax) on the display. Pick up speed dial numbers. To enter additional letters, repeat step 1. Press On Hook Dial to Comm...
...the telephone line through 5 to set up your machine has a handset, you want. 4. If your machine, you want. 3. Press Menu on the control panel. 2. If necessary, repeat steps 4 through the speaker, such as space, plus sign, and etc. Press the left/right arrow until System Setup ... /right arrow until Machine Setup appears and press OK. 4. which means "Common", the speaker is on until the correct letter appears on the control panel. 2. Press (Fax) on the display. Pick up speed dial numbers. To enter additional letters, repeat step 1. Press On Hook Dial to Comm...

Quick Guide (easy Manual) (ver.1.0) (English)
Page 43
...connected with selected printer. 5. Using the power saving feature When you can also turn on each time they want . 7. Press Menu on the control panel. 2. Press Stop/Clear to return to Paper Feed pane. 4. Open the File menu and click Print. 3. When PC-printing, you are not...to save mode in the printer properties. When the Terminal screen appears, type in the Printing Preferences (See "Opening printing preferences" on the control panel. 2. Press Menu on page 53). Press the left /right arrow until Paper Setup appears and press OK. 4. Press the left /right...
...connected with selected printer. 5. Using the power saving feature When you can also turn on each time they want . 7. Press Menu on the control panel. 2. Press Stop/Clear to return to Paper Feed pane. 4. Open the File menu and click Print. 3. When PC-printing, you are not...to save mode in the printer properties. When the Terminal screen appears, type in the Printing Preferences (See "Opening printing preferences" on the control panel. 2. Press Menu on page 53). Press the left /right arrow until Paper Setup appears and press OK. 4. Press the left /right...
Quick Guide (easy Manual) (ver.1.0) (English)
Page 44
Click Advanced tab. 5. Press Menu on the control panel. 2. Press the left /right arrow until Machine Setup appears and press OK. 4. Select tray (source) and its options, such as paper size and type. 6. You ...
Click Advanced tab. 5. Press Menu on the control panel. 2. Press the left /right arrow until Machine Setup appears and press OK. 4. Select tray (source) and its options, such as paper size and type. 6. You ...
Quick Guide (easy Manual) (ver.1.0) (English)
Page 50
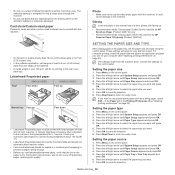
... this machine by HP Brochure Paper (Product: Q6611A) only. • Recommended media: Glossy paper (A4) for 0.1 second. Press Menu on the control panel. 2. Press the left /right arrow to prevent changes during storage. • Before you want . 7. Press the left /right arrow until System ... inches) wide or 127 mm (5.00 inches) long. • In the software application, set the paper size and type using the control panel. Photo • Make sure not to the machine's fusing temperature for this machine. These settings will not melt, vaporize, or release hazardous...
... this machine by HP Brochure Paper (Product: Q6611A) only. • Recommended media: Glossy paper (A4) for 0.1 second. Press Menu on the control panel. 2. Press the left /right arrow to prevent changes during storage. • Before you want . 7. Press the left /right arrow until System ... inches) wide or 127 mm (5.00 inches) long. • In the software application, set the paper size and type using the control panel. Photo • Make sure not to the machine's fusing temperature for this machine. These settings will not melt, vaporize, or release hazardous...
Quick Guide (easy Manual) (ver.1.0) (English)
Page 51
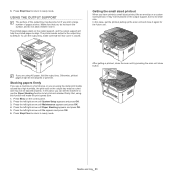
... are using this case, get the printout pulling up the scan unit and close the scan unit by a high humidity, the print-outs on the control panel. 2. Press Stop/Clear to return to align. Press the left /right arrow until System Setup appears and press OK. 3. Press Menu on the output tray...
... are using this case, get the printout pulling up the scan unit and close the scan unit by a high humidity, the print-outs on the control panel. 2. Press Stop/Clear to return to align. Press the left /right arrow until System Setup appears and press OK. 3. Press Menu on the output tray...

Quick Guide (easy Manual) (ver.1.0) (English)
Page 53
...Clear on the control panel. Click Add. To use . To delete saved setting, select it from the Presets drop down list. website where the tool is available for Samsung tab, allows you to search information via a keyword, click the Samsung tab in ... select Printer and Faxes. • For Windows 2008/Vista, select Control Panel > Hardware and Sound > Printers. • For Windows 7, select Control Panel > Hardware and Sound > Devices and Printers. • For Windows Server 2008 R2, select Control Panel > Hardware > Devices and Printers. 3. Click Properties or Preferences. ...
...Clear on the control panel. Click Add. To use . To delete saved setting, select it from the Presets drop down list. website where the tool is available for Samsung tab, allows you to search information via a keyword, click the Samsung tab in ... select Printer and Faxes. • For Windows 2008/Vista, select Control Panel > Hardware and Sound > Printers. • For Windows 7, select Control Panel > Hardware and Sound > Devices and Printers. • For Windows Server 2008 R2, select Control Panel > Hardware > Devices and Printers. 3. Click Properties or Preferences. ...

Quick Guide (easy Manual) (ver.1.0) (English)
Page 56
...2000, select Settings > Printers. • For Windows XP/2003, select Printer and Faxes. • For Windows 2008/Vista, select Control Panel > Hardware and Sound > Printers. To save toner when printing a document, select this option. 3. The file is C:\Formover). 6.... select Printer and Faxes. • For Windows 2008/Vista, select Control Panel > Hardware and Sound > Printers. • For Windows 7, select Control Panel > Hardware and Sound > Devices and Printers. • For Windows Server 2008 R2, select Control Panel > Hardware > Devices and Printers. 3. SETTING YOUR MACHINE AS A...
...2000, select Settings > Printers. • For Windows XP/2003, select Printer and Faxes. • For Windows 2008/Vista, select Control Panel > Hardware and Sound > Printers. To save toner when printing a document, select this option. 3. The file is C:\Formover). 6.... select Printer and Faxes. • For Windows 2008/Vista, select Control Panel > Hardware and Sound > Printers. • For Windows 7, select Control Panel > Hardware and Sound > Devices and Printers. • For Windows Server 2008 R2, select Control Panel > Hardware > Devices and Printers. 3. SETTING YOUR MACHINE AS A...

