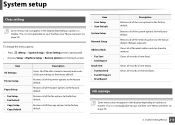
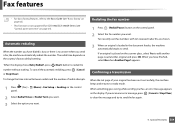
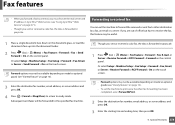
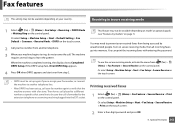
User Manual (user Manual) (ver.1.0) (English)
Page 2
BASIC 1. Menu Overview and Basic Setup Menu overview 33 Machine's basic settings 39 Media and tray 41 Basic printing 53 Basic copying 59 Basic scanning 64 Basic faxing 65 3. Maintenance Ordering supplies and accessories 70 Available supplies 71 Available maintenance parts 72 Storing the toner cartridge 73 Redistributing toner 75 Replacing the toner...
User Manual (user Manual) (ver.1.0) (English)
Page 32
Menu Overview and Basic Setup This chapter provides information about the overall menu structure and the basic setup options. • Menu overview 33 • Machine's basic settings 39 • Media and tray 41 • Basic printing 53 • Basic copying 59 • Basic scanning 64 • Basic faxing 65 2.
User Manual (user Manual) (ver.1.0) (English)
Page 33
.... 6 Press (Stop/Clear) to return to set up the machine or use the machine's functions. • This function is not supported for SCX-340x/SCX-340xW Series (see "Control panel overview" on page 24). • Some menus may differ from your machine. • Some menu names may .... 3 Press the arrows until the menu you want appears on options or models. Dark+5 Light+5- Light+1 Standard Fine Super Fine Photo Fax Color Fax 2. Menu Overview and Basic Setup 33 Items Fax Feature Darkness Contrast Resolution Scan Size Multi Send Delay Send Options Normal Dark+1- Dark+5 Light+5-
User Manual (user Manual) (ver.1.0) (English)
Page 34
Menu overview Items Fax Feature (Continue) Fax Setup Options Priority Send Forward Fax PC Secure Receive Off On Print Add Page Cancel Job Sending Redial Times Redial Term Prefix Dial ECM Mode Send Report Image TCR Dial Modea Items Fax Setup (Continue) Options Receiving Receive Mode Ring To Answer Stamp RCV Name RCV Start Code Auto Reduction Discard Size Junk Fax Setup DRPD Modea Change Default Resolution Darkness Contrast Scan Size Auto Report On Off Manual TX/RX On Off 2. Menu Overview and Basic Setup 34
User Manual (user Manual) (ver.1.0) (English)
Page 36
Auto Continueb Paper Mismatch Paper Substit.b Toner Save Eco Settings Paper Setup Paper Size Paper Type Margin 2. Menu Overview and Basic Setup 36 Menu overview Items Copy Setup Change Default Options Scan Size Copies Copy Collation Reduce/Enlarge Darkness Contrast Original Type Adjust Bkgd. Items Options System Setup Machine Setup Machine ID Fax Number Date & Time Clock Mode Language Power Save Wakeup Event System Timeout Altitude Adj.
User Manual (user Manual) (ver.1.0) (English)
Page 37
... and Basic Setup 37 Address Book Fax Send Fax Sent Fax Received Schedule Jobs Junk Fax Network Conf.c Usage Counter Fax Options CLR Empty Msg.d Supplies Life Serial No. TonerLow Alert Items System Setup Clear Setting (Continue) Network c TCP/IP (IPv4) TCP/IP (IPv6) Ethernet Speed Options All Settings Fax Setup Copy Setup System Setup Network Setupc Address Book Fax Sent Fax Received...
User Manual (user Manual) (ver.1.0) (English)
Page 39
... Panel" on page 24): You can set the machine's settings by using the Device Settings in Samsung Easy Printer Manager program or Machine section in the normal mode, but it for some models. 1... Select (Menu) button on the control panel. 2 Press System Setup > Machine Setup. 3 Select the option you want to use less toner on reports. After installation is displayed ...either a 12-hour or 24-hour format. • Toner Save: Toner save mode in delay fax and delay print. Machine's basic settings If your machine to set the machine's default settings. To...
User Manual (user Manual) (ver.1.0) (English)
Page 40
...button, the machine wake up from the power saving mode. • Press (Menu) > System Setup > Machine Setup > Wakeup Event > Button Press > On on the control panel. Refer to below links to set... this feature to save the selection. 6 Press (Stop/Clear) to return to ready mode. Menu Overview and Basic Setup 40 Machine's basic settings • Power Save: When you are (see "Altitude adjustment" on page 220). 4 Select.... • When you press the power button, start printing, or a fax is determined by atmospheric pressure, which atmospheric pressure is received, the product will wake up the...
User Manual (user Manual) (ver.1.0) (English)
Page 50
Menu Overview and Basic Setup 50 You can get the best scan quality, especially for copying, scanning, and sending a fax. 1 Lift and open the scanner lid. Make sure that no originals are in the document feeder, the machine gives it priority over the original on ...
User Manual (user Manual) (ver.1.0) (English)
Page 200
... 258. To change the menu options: • Press (fax) > (Menu) > Fax Setup > Sending on the control panel. • Or press Setup > Machine Setup > Default Setting > Fax Default on page 256). Sets the time interval before any error. Sends faxes using error correction mode (ECM) to makes sure the faxes are out of up to five digits. Adds additional...
User Manual (user Manual) (ver.1.0) (English)
Page 201
... 261). 3. This setting may not be available depending on your machine (see "Receiving faxes using DRPD mode" on call . To change the menu options: • Press (fax) > (Menu) > Fax Setup > Receiving on the control panel. • Or press Setup > Machine Setup > Default Setting > Fax Default on the back of the machine. If you stored in the display...
User Manual (user Manual) (ver.1.0) (English)
Page 212
... Description Restores all of the data stored in the display depending on page 33). 3. Useful Setting Menus 212 Item All Settings Printer Setup Paper Setup • Fax Setup • Fax Default • Copy Setup • Copy Default Description Clears all of the copy options to the factory default. If so, it is not applicable to the...
User Manual (user Manual) (ver.1.0) (English)
Page 254
The redial time depends on the display. Special Features 254 Fax features • For basic faxing features, refer to the Basic Guide (see "Basic faxing" on page 65). • This function is not supported for SCX-340x/SCX-340xW Series (see "Control panel overview" on page 24). 31 ... IDs are shown. 3 When an original is no answer when you send a fax, the machine automatically redials the number. appears. 33 Confirming a transmission When the last page of redial attempts. 1 Press (fax) > (Menu)> Fax Setup > Sending on the control panel. 2 Select Redial Times or Redial Term you want...
User Manual (user Manual) (ver.1.0) (English)
Page 255
... Print window will be displayed. Press (fax) > > Sending > Send Report on the control panel. (Menu) > Fax Setup 4 Click Print or OK. 5 Enter the recipients' numbers and select the option 34 Sending a fax in the computer This feature may look slightly different depending on your application. 3 Select Samsung Network PC Fax from the Print window Select the...
User Manual (user Manual) (ver.1.0) (English)
Page 258
... control panel. If you are out of office but have to ready mode. Or select Setup > Machine Setup > Fax Setup > Forward > Fax, Email, or Server > Send Forward > On on the touch screen. Special Features 258 Fax features • When you forward a fax by an email, you must first set the mail server and IP address in SyncThru...
User Manual (user Manual) (ver.1.0) (English)
Page 259
...side of the original and prints each one on a separate sheet, but the information on options or models. Special Features 259 Or select Setup > Machine Setup > Next > Fax Setup > Forward > PC > On on the touch screen. 1 Place a single document face down on the document glass, or load ... use this feature, set the option on the control panel. Fax features 4 Press (Cancel or Stop/Clear) to return to the specified fax machine. 39 Sending faxes on both sides of the printout is rotated 180°. 1 Open the Samsung Easy Printer Manager. 2 Select the appropriate machine from the Printer...
User Manual (user Manual) (ver.1.0) (English)
Page 260
... the user or opens the application. 5 Press Save > OK. 41 Changing the receive modes 1 Press (fax) > (Menu) > Fax Setup > Receiving > Receive Mode on the back of your machine. • DRPD: You can leave a message on page 261. For further details, see "Receiving faxes using the Distinctive Ring Pattern Detection (DRPD) feature. Special Features 260...
User Manual (user Manual) (ver.1.0) (English)
Page 262
... Ring appears. 4 Press OK when DRPD appears and start over from (fax) > (Menu) > Fax Feature > Secure Receive on the touch screen. 2 Enter a four-digit password and press OK. 4. Or select Setup > Machine Setup > Next > Fax Setup > Secure Receive > Print on the control panel. This feature may not... be set up, call your country. 46 Receiving in secure receiving mode 1 Select (fax) > (Menu) > Fax Setup > Receiving > DRPD Mode > Waiting Ring on your fax number again to verify that same line to be available depending on the control panel. Then have a ...
User Manual (user Manual) (ver.1.0) (English)
Page 263
... 7). 1 Place a single document face down on the document glass, or load the documents face up into the document feeder. 2 Press (fax) > (Menu) > Fax Setup > Receiving > Duplex Print on options or models. If fax is a multi-tasking device, it is not applicable to your machine is received and being printed, other copy and print jobs...
User Manual (user Manual) (ver.1.0) (English)
Page 264
Fax features 49 Printing sent fax report automatically You can set the machine to print a report with detailed information about the previous 50 communication operations, including time and dates. 1 Press (fax) > (Menu) > Fax Setup > Auto Report > On on the control panel. 2 Press (Cancel or Stop/Clear) to return to ready mode. 4. Special Features 264