
Quick Guide (easy Manual) (ver.1.0) (English)
Page 1
... on the left hand-side wall. SIDE BY SIDE REFRIGERATOR RS263B** RS265B** RS267B** RS264A** RS265L** RS267L** RS269L** OWNER'S MANUAL AND INSTALLATION CONTENTS SAFETY WARNING SIGNS 2 OPERATING INSTRUCTIONS 4 SETTING UP THE REFRIGERATOR 4 MAJOR FEATURES 4 CONTROL PANEL 5 DIGITAL PANEL 6 TEMPERATURE CONTROL 7 ICE and COLD WATER DISPENSER 7 SHELVES and BINS 8 FOOD STORAGE GUIDE 9 CoolSelect ZoneTM Drawer GUIDE 11 REMOVING THE FREEZER ACCESSORIES 13 REMOVING THE REFRIGERATOR ACCESSORIES 13 CLEANING THE ACCESSORIES 14 CHANGING THE INTERIOR LIGHT 15 WATER FILTER 16 DOORS ...16...
... on the left hand-side wall. SIDE BY SIDE REFRIGERATOR RS263B** RS265B** RS267B** RS264A** RS265L** RS267L** RS269L** OWNER'S MANUAL AND INSTALLATION CONTENTS SAFETY WARNING SIGNS 2 OPERATING INSTRUCTIONS 4 SETTING UP THE REFRIGERATOR 4 MAJOR FEATURES 4 CONTROL PANEL 5 DIGITAL PANEL 6 TEMPERATURE CONTROL 7 ICE and COLD WATER DISPENSER 7 SHELVES and BINS 8 FOOD STORAGE GUIDE 9 CoolSelect ZoneTM Drawer GUIDE 11 REMOVING THE FREEZER ACCESSORIES 13 REMOVING THE REFRIGERATOR ACCESSORIES 13 CLEANING THE ACCESSORIES 14 CHANGING THE INTERIOR LIGHT 15 WATER FILTER 16 DOORS ...16...
Quick Guide (easy Manual) (ver.1.0) (English)
Page 2
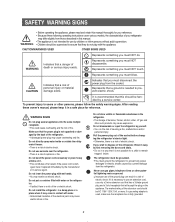
... before changing the refrigerator's interior light. • Otherwise, there is a risk of fire or electric shock. Never use gas pipes, telephone lines or other potential lightning rods as ground. • Improper use only a 3-wire extension cord that has a 3-blade ground plug and a 3-slot receptacle that a ground is recommended that you must be supervised to remain trapped inside or outside the refrigerator/ freezer. •...
... before changing the refrigerator's interior light. • Otherwise, there is a risk of fire or electric shock. Never use gas pipes, telephone lines or other potential lightning rods as ground. • Improper use only a 3-wire extension cord that has a 3-blade ground plug and a 3-slot receptacle that a ground is recommended that you must be supervised to remain trapped inside or outside the refrigerator/ freezer. •...
Quick Guide (easy Manual) (ver.1.0) (English)
Page 3
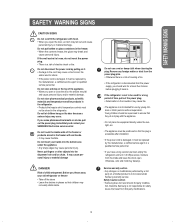
... electric shock. • If the power cord is not responsible for use a wet or damp cloth when cleaning the plug. If the refrigerator is not intended for safety issues that they do not insert the power plug. • There is damaged, it must be used for at least five minutes before plugging it off the doors • Leave the shelves in the freezer...
... electric shock. • If the power cord is not responsible for use a wet or damp cloth when cleaning the plug. If the refrigerator is not intended for safety issues that they do not insert the power plug. • There is damaged, it must be used for at least five minutes before plugging it off the doors • Leave the shelves in the freezer...
Quick Guide (easy Manual) (ver.1.0) (English)
Page 4
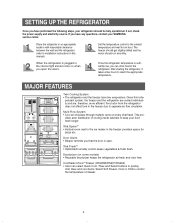
... manual) Set the temperature control to control the temperature of cooling inside cabinets to the ice maker in the refrigerator. The freezer should get slightly chilled and the motor should be fully operational. Door Alarm • Beeper reminds you that the door is plugged in the freezer due to reach the appropriate temperature. If you open . After starting the refrigerator, it takes a few hours to separate air flow circulation. This pro- When the refrigerator is open...
... manual) Set the temperature control to control the temperature of cooling inside cabinets to the ice maker in the refrigerator. The freezer should get slightly chilled and the motor should be fully operational. Door Alarm • Beeper reminds you that the door is plugged in the freezer due to reach the appropriate temperature. If you open . After starting the refrigerator, it takes a few hours to separate air flow circulation. This pro- When the refrigerator is open...
Quick Guide (easy Manual) (ver.1.0) (English)
Page 5
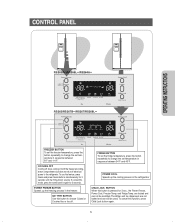
... Lock button again. 5 POWER COOL Speeds up the freezing process in the freezer. The Water and Ice dispensers are locked and can still be modified. COOLING OFF Cooling off stops cooling in both the freezer and refrigerator compartments but does not shut off . are not locked and can not be used. CONTROL PANEL OPERATING INSTRUCTIONS RS263B**/RS265L**/RS264A** RS265/RS267B**/RS267/RS269L** FREEZER BUTTON To set the freezer temperature, press the button repeatedly to change the set temperature in...
... Lock button again. 5 POWER COOL Speeds up the freezing process in the freezer. The Water and Ice dispensers are locked and can still be modified. COOLING OFF Cooling off stops cooling in both the freezer and refrigerator compartments but does not shut off . are not locked and can not be used. CONTROL PANEL OPERATING INSTRUCTIONS RS263B**/RS265L**/RS264A** RS265/RS267B**/RS267/RS269L** FREEZER BUTTON To set the freezer temperature, press the button repeatedly to change the set temperature in...
Quick Guide (easy Manual) (ver.1.0) (English)
Page 6
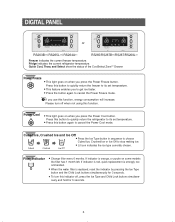
... the refrigerator to its set temperature. • Press this button again to cancel the Power Cool mode. If you to get ice faster. • Press the button again to stop making ice. • Lit icon indicates the ice type currently chosen. If indicator is replaced, reset the indicator by pressing the Ice Type button and the Child Lock buttons simultaneously for 5 seconds. 6 DIGITAL PANEL or RS263B**/ RS265L**/ RS264A** RS265/RS267B**/RS267/RS269L** Freezer indicates the current freezer temperature. Press...
... the refrigerator to its set temperature. • Press this button again to cancel the Power Cool mode. If you to get ice faster. • Press the button again to stop making ice. • Lit icon indicates the ice type currently chosen. If indicator is replaced, reset the indicator by pressing the Ice Type button and the Child Lock buttons simultaneously for 5 seconds. 6 DIGITAL PANEL or RS263B**/ RS265L**/ RS264A** RS265/RS267B**/RS267/RS269L** Freezer indicates the current freezer temperature. Press...
Quick Guide (easy Manual) (ver.1.0) (English)
Page 7
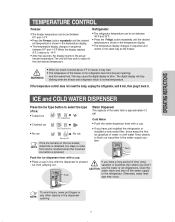
OPERATING INSTRUCTIONS TEMPERATURE CONTROL Freezer Refrigerator • The freezer temperature can be set between 46°F and 34°F. • Press the Fridge. button repeatedly until the desired temperature is approximately 0.3 gal. ICE and COLD WATER DISPENSER Press the Ice Type button to the refrigerator. Push Push the ice dispenser lever with a cup. • Place a cup in line with a cup. • If you won't CAUTION use the water or ice dispensers, close the water valve and shut off the water supply Push to...
OPERATING INSTRUCTIONS TEMPERATURE CONTROL Freezer Refrigerator • The freezer temperature can be set between 46°F and 34°F. • Press the Fridge. button repeatedly until the desired temperature is approximately 0.3 gal. ICE and COLD WATER DISPENSER Press the Ice Type button to the refrigerator. Push Push the ice dispenser lever with a cup. • Place a cup in line with a cup. • If you won't CAUTION use the water or ice dispensers, close the water valve and shut off the water supply Push to...
Quick Guide (easy Manual) (ver.1.0) (English)
Page 8
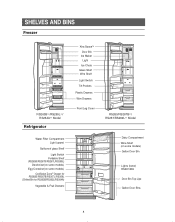
SHELVES AND BINS Freezer RS263B**/RS265L**/ RS264A** Model Refrigerator Water Filter Compartment Light (upper) Spill-proof glass Shelf Light Switch Foldable Shelf (RS265B/RS267B/RS267L/RS269L) Deodorizer(on some models) Egg Container(on some models) CoolSelect ZoneTM Drawer for RS265B/RS267B/RS267L/RS269L (Chilled Bin for RS263B/RS265L/RS264A) Vegetable & Fruit Drawers Xtra SpaceTM Door Bin Ice Maker Light Ice Chute Glass Shelf Wire Shelf Light Switch Tilt Pockets Plastic Drawers Wire Drawers Front Leg Cover RS265/RS267B**/ RS267/RS269L** Model Dairy Compartment Wine Shelf (on some...
SHELVES AND BINS Freezer RS263B**/RS265L**/ RS264A** Model Refrigerator Water Filter Compartment Light (upper) Spill-proof glass Shelf Light Switch Foldable Shelf (RS265B/RS267B/RS267L/RS269L) Deodorizer(on some models) Egg Container(on some models) CoolSelect ZoneTM Drawer for RS265B/RS267B/RS267L/RS269L (Chilled Bin for RS263B/RS265L/RS264A) Vegetable & Fruit Drawers Xtra SpaceTM Door Bin Ice Maker Light Ice Chute Glass Shelf Wire Shelf Light Switch Tilt Pockets Plastic Drawers Wire Drawers Front Leg Cover RS265/RS267B**/ RS267/RS269L** Model Dairy Compartment Wine Shelf (on some...
Quick Guide (easy Manual) (ver.1.0) (English)
Page 13
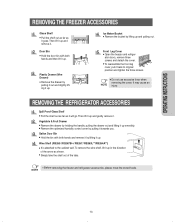
... not use excessive force when removing the cover. Door Bin • Hold the door bin with both hands and then lift it up . Plastic Drawer (Wire Drawer) • Remove the drawer by lifting it up . ator doors, remove three screws and detach the cover. • To reassemble the front leg cover, put it back to the cabinet wall. Then lift it up and remove it. OPERATING INSTRUCTIONS REMOVING THE FREEZER ACCESSORIES Glass Shelf...
... not use excessive force when removing the cover. Door Bin • Hold the door bin with both hands and then lift it up . Plastic Drawer (Wire Drawer) • Remove the drawer by lifting it up . ator doors, remove three screws and detach the cover. • To reassemble the front leg cover, put it back to the cabinet wall. Then lift it up and remove it. OPERATING INSTRUCTIONS REMOVING THE FREEZER ACCESSORIES Glass Shelf...
Quick Guide (easy Manual) (ver.1.0) (English)
Page 14
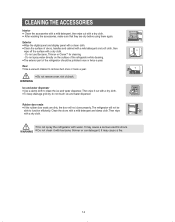
... the digital panel and display panel with a clean cloth. • Clean the surface of shock. Then wipe with a dry cloth. • Do not spray the refrigerator with a mild detergent and damp cloth. It may cause a serious electric shock. Clean the doors with water. Rear • Use a vacuum cleaner to remove dust once or twice a year. • Do not remove cover, risk of doors, handles and cabinet...
... the digital panel and display panel with a clean cloth. • Clean the surface of shock. Then wipe with a dry cloth. • Do not spray the refrigerator with a mild detergent and damp cloth. It may cause a serious electric shock. Clean the doors with water. Rear • Use a vacuum cleaner to remove dust once or twice a year. • Do not remove cover, risk of doors, handles and cabinet...

Quick Guide (easy Manual) (ver.1.0) (English)
Page 15
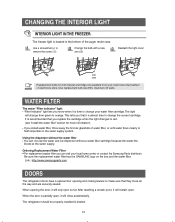
... clean and warm water for at least 4 hrs. WARNING INTERIOR LIGHT IN THE REFRIGERATOR . Use replacement bulb size E26, maximum 40 watts. Use replacement bulb size E17, maximum 30 watts. 15 NOTE • Keep children away from the power supply. OPERATING INSTRUCTIONS CLEANING THE ACCESSORIES Twin Deodorizer (on some models) • Remove the cover with a new the light cover hooks and push in the direction of the arrow. Upper Place a flat screwdriver under Change the bulb with a flat blade screw driver...
... clean and warm water for at least 4 hrs. WARNING INTERIOR LIGHT IN THE REFRIGERATOR . Use replacement bulb size E26, maximum 40 watts. Use replacement bulb size E17, maximum 30 watts. 15 NOTE • Keep children away from the power supply. OPERATING INSTRUCTIONS CLEANING THE ACCESSORIES Twin Deodorizer (on some models) • Remove the cover with a new the light cover hooks and push in the direction of the arrow. Upper Place a flat screwdriver under Change the bulb with a flat blade screw driver...
Quick Guide (easy Manual) (ver.1.0) (English)
Page 16
Change the bulb with a new one (➁) Reattach the light cover E26 40W NOTE Replacement bulbs for more information) • If you can not use the water and ice dispenser without the water filter • You can visit your local home improvement or electronics store. When the door is located in the water supply system. Use replacement bulb size E26, maximum 40 watts. Using the dispenser without a water filter cartridge because the water line blocks at the water supply. After reaching a certain...
Change the bulb with a new one (➁) Reattach the light cover E26 40W NOTE Replacement bulbs for more information) • If you can not use the water and ice dispenser without the water filter • You can visit your local home improvement or electronics store. When the door is located in the water supply system. Use replacement bulb size E26, maximum 40 watts. Using the dispenser without a water filter cartridge because the water line blocks at the water supply. After reaching a certain...
Quick Guide (easy Manual) (ver.1.0) (English)
Page 17
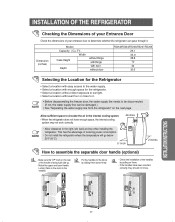
... internal cooling system may not work correctly. 4inches NOTE Allow clearance to the handles. Check the installation of the handles by sliding them . - Ft) Width Case Height Depth without Hinge with Hinge with door without door RS263/RS264/RS265/RS267/RS269 26.1 35.9 68.8 70 34 30.5 Selecting the Location for the Refrigerator • Select a location with easy access to the water supply. • Select a location...
... internal cooling system may not work correctly. 4inches NOTE Allow clearance to the handles. Check the installation of the handles by sliding them . - Ft) Width Case Height Depth without Hinge with Hinge with door without door RS263/RS264/RS265/RS267/RS269 26.1 35.9 68.8 70 34 30.5 Selecting the Location for the Refrigerator • Select a location with easy access to the water supply. • Select a location...
Quick Guide (easy Manual) (ver.1.0) (English)
Page 18
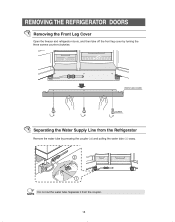
Do not cut the water tube. FRONT LEG COVER SCREW Separating the Water Supply Line from the coupler. NOTE 18 REMOVING THE REFRIGERATOR DOORS Removing the Front Leg Cover Open the freezer and refrigerator doors, and then take off the front leg cover by pressing the coupler (➁) and pulling the water tube (➀) away. Separate it from the Refrigerator Remove the water tube by turning the three screws counter-clockwise.
Do not cut the water tube. FRONT LEG COVER SCREW Separating the Water Supply Line from the coupler. NOTE 18 REMOVING THE REFRIGERATOR DOORS Removing the Front Leg Cover Open the freezer and refrigerator doors, and then take off the front leg cover by pressing the coupler (➁) and pulling the water tube (➀) away. Separate it from the Refrigerator Remove the water tube by turning the three screws counter-clockwise.
Quick Guide (easy Manual) (ver.1.0) (English)
Page 24
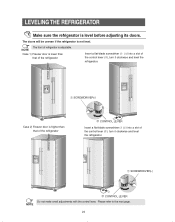
... HEIGHT ➀ SCREWDRIVER(-) NOTE ➁ CONTROL LEVER Do not make small adjustments with the control lever, Please refer to the next page. 24 The front of refrigerator is not level. LEVELING THE REFRIGERATOR Make sure the refrigerator is lower than that of the refrigerator Insert a flat-blade screwdriver (-) (➀) into a slot of the control lever (➁), turn it clockwise and level the refrigerator. NOTE Case 1) Freezer door is level...
... HEIGHT ➀ SCREWDRIVER(-) NOTE ➁ CONTROL LEVER Do not make small adjustments with the control lever, Please refer to the next page. 24 The front of refrigerator is not level. LEVELING THE REFRIGERATOR Make sure the refrigerator is lower than that of the refrigerator Insert a flat-blade screwdriver (-) (➀) into a slot of the control lever (➁), turn it clockwise and level the refrigerator. NOTE Case 1) Freezer door is level...
Quick Guide (easy Manual) (ver.1.0) (English)
Page 26
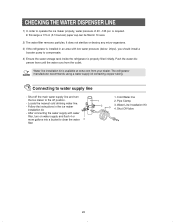
... water runs from your dealer. The refrigerator NOTE manufacturer recommends using a water supply kit containing copper tubing. Follow the instructions in 10 secs. 2) The water filter removes particles. Water Line Installation Kit 4. Locate the nearest cold drinking water line. - Connecting to clear the water filter 1. Shut Off Valve 26 CHECKING THE WATER DISPENSER LINE 1) In order to operate the ice maker properly, water pressure of 20 ~125 psi is installed in an area with water filter, turn the Ice maker to the off position. - Shut off the main water supply line and turn...
... water runs from your dealer. The refrigerator NOTE manufacturer recommends using a water supply kit containing copper tubing. Follow the instructions in 10 secs. 2) The water filter removes particles. Water Line Installation Kit 4. Locate the nearest cold drinking water line. - Connecting to clear the water filter 1. Shut Off Valve 26 CHECKING THE WATER DISPENSER LINE 1) In order to operate the ice maker properly, water pressure of 20 ~125 psi is installed in an area with water filter, turn the Ice maker to the off position. - Shut off the main water supply line and turn...
Quick Guide (easy Manual) (ver.1.0) (English)
Page 27
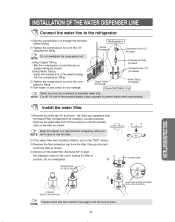
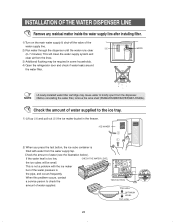
.... Using Plastic Tubing - Remove the water filter from the Water Filter Compartment by rotating it counterclockwise. Refrigerator Ferrule (Purchased) Compression Nut (1/4 (Provided) Do not overtighten the compression nut. Insert the molded end of the provided plastic tubing squarely to drinkable water only. INSTALLATION OF THE WATER DISPENSER LINE Connect the water line to align the indication mark on copper tubing as shown. SEPARATION OF RED CAP (A) COVER FILTER INSTALLATION INSTRUCTIONS STICKER (MONTH INDICATION) Please...
.... Using Plastic Tubing - Remove the water filter from the Water Filter Compartment by rotating it counterclockwise. Refrigerator Ferrule (Purchased) Compression Nut (1/4 (Provided) Do not overtighten the compression nut. Insert the molded end of the provided plastic tubing squarely to drinkable water only. INSTALLATION OF THE WATER DISPENSER LINE Connect the water line to align the indication mark on copper tubing as shown. SEPARATION OF RED CAP (A) COVER FILTER INSTALLATION INSTRUCTIONS STICKER (MONTH INDICATION) Please...
Quick Guide (easy Manual) (ver.1.0) (English)
Page 28
... WATER LEVEL the ice cubes will clean the water supply system and clear air from the lines. 3) Additional flushing may cause water to the ice tray. 1) Lift up (①) and pull out (➁) the ice maker bucket in the freezer. WATER • A newly-installed water filter cartridge may be small. Check the amount of the water pressure in some households. 4) Open the refrigerator door and check if water leaks around the water filter. ICE 2) Run water through the dispenser until the water runs...
... WATER LEVEL the ice cubes will clean the water supply system and clear air from the lines. 3) Additional flushing may cause water to the ice tray. 1) Lift up (①) and pull out (➁) the ice maker bucket in the freezer. WATER • A newly-installed water filter cartridge may be small. Check the amount of the water pressure in some households. 4) Open the refrigerator door and check if water leaks around the water filter. ICE 2) Run water through the dispenser until the water runs...
Quick Guide (easy Manual) (ver.1.0) (English)
Page 29
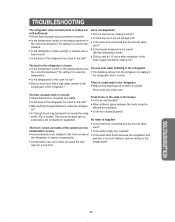
... not work at all or it does not Ice is not dispensed chill sufficiently • Did you stop the ice making ice? The food in the refrigerator • Wrap strong smelling food so that the power plug is properly connected. • Is the temperature control on the display panel set to prevent condensation. open ? Throw away any ice in the ice storage unit? • Is the water line connected and the shut-off valve...
... not work at all or it does not Ice is not dispensed chill sufficiently • Did you stop the ice making ice? The food in the refrigerator • Wrap strong smelling food so that the power plug is properly connected. • Is the temperature control on the display panel set to prevent condensation. open ? Throw away any ice in the ice storage unit? • Is the water line connected and the shut-off valve...
Quick Guide (easy Manual) (ver.1.0) (English)
Page 30
... to remove, repair and return the product. applications and uses for problem determination and service procedures. If during in-home service repair cannot be defective, at our option and at no charge as stipulated herein, with new or reconditioned parts during the warranty labor period subject to SAMSUNG. cosmetic damage or exterior finish; In-home service will repair or replace any part found to follow operating instructions, cleaning...
... to remove, repair and return the product. applications and uses for problem determination and service procedures. If during in-home service repair cannot be defective, at our option and at no charge as stipulated herein, with new or reconditioned parts during the warranty labor period subject to SAMSUNG. cosmetic damage or exterior finish; In-home service will repair or replace any part found to follow operating instructions, cleaning...


