
Quick Guide (easy Manual) (ver.1.0) (English)
Page 4
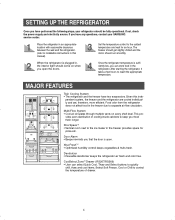
...shelf level. vides even distribution of drawer. 4 Food odor from the refrigerator does not affect food in the freezer provides space for an hour. Multi-Flow System • Cool air circulates through multiple vents on when you that the door is plugged in, the interior light should run ...smoothly. Xtra SpaceTM • Vertical room next to the ice maker in the freezer due to keep your SAMSUNG service center. Place the refigerator ...
...shelf level. vides even distribution of drawer. 4 Food odor from the refrigerator does not affect food in the freezer provides space for an hour. Multi-Flow System • Cool air circulates through multiple vents on when you that the door is plugged in, the interior light should run ...smoothly. Xtra SpaceTM • Vertical room next to the ice maker in the freezer due to keep your SAMSUNG service center. Place the refigerator ...
Quick Guide (easy Manual) (ver.1.0) (English)
Page 5
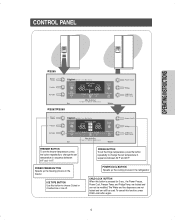
... Temp. The Water and Ice dispensers are locked and can still be modified. CONTROL PANEL OPERATING INSTRUCTIONS RS265 RS267/RS269 FREEZER BUTTON To set the freezer temperature, press the button repeatedly to change the set temperature in sequence between 34°F and 46°F. POWER FREEZE... BUTTON Speeds up the cooling process in the freezer. POWER COOL BUTTON Speeds up the freezing process in the refrigerator CHILD LOCK BUTTON When this button is pressed for 3 sec., the ...
... Temp. The Water and Ice dispensers are locked and can still be modified. CONTROL PANEL OPERATING INSTRUCTIONS RS265 RS267/RS269 FREEZER BUTTON To set the freezer temperature, press the button repeatedly to change the set temperature in sequence between 34°F and 46°F. POWER FREEZE... BUTTON Speeds up the cooling process in the freezer. POWER COOL BUTTON Speeds up the freezing process in the refrigerator CHILD LOCK BUTTON When this button is pressed for 3 sec., the ...

Quick Guide (easy Manual) (ver.1.0) (English)
Page 6
Fridge indicates the current refrigerator temperature. Press this button to quickly return the freezer to cancel the Power Cool mode. Please turn this button to quickly return the refrigerator to its set temperature. • Press this button again to its set temperature... to stop making ice. • Lit icon indicates the ice type currently chosen. Filter Indicator • Change filter every 6 months. Power Cool • This light goes on when you press the Power Cool button. Press this indicator off when not using this function, energy consumption will increase. Quick...
Fridge indicates the current refrigerator temperature. Press this button to quickly return the freezer to cancel the Power Cool mode. Please turn this button to quickly return the refrigerator to its set temperature. • Press this button again to its set temperature... to stop making ice. • Lit icon indicates the ice type currently chosen. Filter Indicator • Change filter every 6 months. Power Cool • This light goes on when you press the Power Cool button. Press this indicator off when not using this function, energy consumption will increase. Quick...
Quick Guide (easy Manual) (ver.1.0) (English)
Page 17
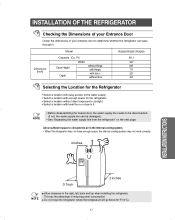
...it . Do not install the refrigerator where the temperature will go below 50°F(10°C). 17 NOTE • Before disassembling the freezer door, the water supply line needs to it . This has the advantage of your entrance door to the right, left, back ...and top when installing the refrigerator. Allow sufficient space to circulate the air in the internal cooling system. • When the refrigerator does not have enough space, the internal cooling system may not work correctly. 4 inches INSTALLATION INSTRUCTIONS 0.1inch 2 inches NOTE Allow clearance to determine...
...it . Do not install the refrigerator where the temperature will go below 50°F(10°C). 17 NOTE • Before disassembling the freezer door, the water supply line needs to it . This has the advantage of your entrance door to the right, left, back ...and top when installing the refrigerator. Allow sufficient space to circulate the air in the internal cooling system. • When the refrigerator does not have enough space, the internal cooling system may not work correctly. 4 inches INSTALLATION INSTRUCTIONS 0.1inch 2 inches NOTE Allow clearance to determine...


