

Quick Guide (easy Manual) (ver.1.0) (English)
Page 1
... REFRIGERATOR 4 MAJOR FEATURES 4 CONTROL PANEL 5 DIGITAL PANEL 6 TEMPERATURE CONTROL 7 ICE and COLD WATER DISPENSER 7 SHELVES and BINS 8 FOOD STORAGE GUIDE 9 CoolSelect ZoneTM Drawer GUIDE 11 REMOVING THE ...THE REFRIGERATOR ACCESSORIES 13 CLEANING THE ACCESSORIES 14 CHANGING THE INTERIOR LIGHT 15 WATER FILTER 16 DOORS ...16 INSTALLATION INSTRUCTIONS 17 INSTALLATION OF THE REFRIGERATOR 17...REFRIGERATOR 24 ADJUSTING THE CLEARANCE BETWEEN THE DOORS 25 CHECKING THE WATER DISPENSER LINE 26 INSTALLING THE WATER DISPENSER LINE 26 TROUBLESHOOTING 29 In the CANADA.for questions about...
... REFRIGERATOR 4 MAJOR FEATURES 4 CONTROL PANEL 5 DIGITAL PANEL 6 TEMPERATURE CONTROL 7 ICE and COLD WATER DISPENSER 7 SHELVES and BINS 8 FOOD STORAGE GUIDE 9 CoolSelect ZoneTM Drawer GUIDE 11 REMOVING THE ...THE REFRIGERATOR ACCESSORIES 13 CLEANING THE ACCESSORIES 14 CHANGING THE INTERIOR LIGHT 15 WATER FILTER 16 DOORS ...16 INSTALLATION INSTRUCTIONS 17 INSTALLATION OF THE REFRIGERATOR 17...REFRIGERATOR 24 ADJUSTING THE CLEARANCE BETWEEN THE DOORS 25 CHECKING THE WATER DISPENSER LINE 26 INSTALLING THE WATER DISPENSER LINE 26 TROUBLESHOOTING 29 In the CANADA.for questions about...
Quick Guide (easy Manual) (ver.1.0) (English)
Page 2
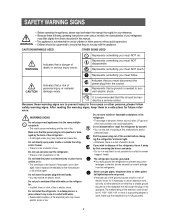
... cord that has a 3-blade ground plug and a 3-slot receptacle that you must follow safety warning signs. Do not put a container filled with water. • Deteriorated insulation of fire. Indicates that will accept the plug on the appliance. After reading the warning signs, keep them in a way...from the socket. Represents that the power plug is needed to use an extension cord, use by a service center. Do not directly spray water inside . If you must be handled by children or infirm persons without adult supervision. • Children should be AC 115V~120V, 10A...
... cord that has a 3-blade ground plug and a 3-slot receptacle that you must follow safety warning signs. Do not put a container filled with water. • Deteriorated insulation of fire. Indicates that will accept the plug on the appliance. After reading the warning signs, keep them in a way...from the socket. Represents that the power plug is needed to use an extension cord, use by a service center. Do not directly spray water inside . If you must be handled by children or infirm persons without adult supervision. • Children should be AC 115V~120V, 10A...
Quick Guide (easy Manual) (ver.1.0) (English)
Page 5
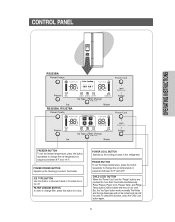
... BUTTON Speeds up the freezing process in the freezer. buttons will not be locked and can still be locked and they do not work. The Water and the Ice dispensers will be used. But, the "Ice Type" button works normally. To cancel this button to choose Cubed or Crushed Ice or...
... BUTTON Speeds up the freezing process in the freezer. buttons will not be locked and can still be locked and they do not work. The Water and the Ice dispensers will be used. But, the "Ice Type" button works normally. To cancel this button to choose Cubed or Crushed Ice or...
Quick Guide (easy Manual) (ver.1.0) (English)
Page 6
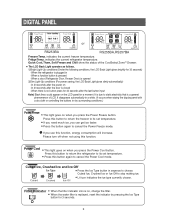
.... 6 Fridge Temp. If you press the Power Cool button. Filter Indicator • When the filter indicator icon is on, change the filter. • When the water filter is a general phenomenon of the CoolSelect ZoneTM Drawer. • The LCD Back Light operates as follows. 1)Bright Light-Up conditions (Under the following conditions...
.... 6 Fridge Temp. If you press the Power Cool button. Filter Indicator • When the filter indicator icon is on, change the filter. • When the water filter is a general phenomenon of the CoolSelect ZoneTM Drawer. • The LCD Back Light operates as follows. 1)Bright Light-Up conditions (Under the following conditions...
Quick Guide (easy Manual) (ver.1.0) (English)
Page 7
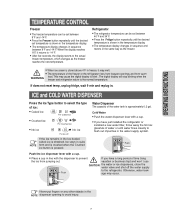
... Type button to select the type of ice: • Cubed ice • Crushed ice • No ice No ice Water Dispenser The capacity of water or until water flows cleanly to prevent If you have a long period of the freezer or the refrigerator rises from frequent openings and from jumping... out. Ice stays in the water supply system. Cold Water • Push the water dispenser lever with the dispenser to flush out impurities in cube Push NOTE form and is crushed when the Crushed ice button...
... Type button to select the type of ice: • Cubed ice • Crushed ice • No ice No ice Water Dispenser The capacity of water or until water flows cleanly to prevent If you have a long period of the freezer or the refrigerator rises from frequent openings and from jumping... out. Ice stays in the water supply system. Cold Water • Push the water dispenser lever with the dispenser to flush out impurities in cube Push NOTE form and is crushed when the Crushed ice button...
Quick Guide (easy Manual) (ver.1.0) (English)
Page 8
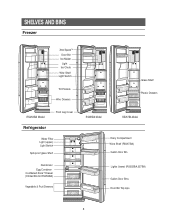
SHELVES AND BINS Freezer Xtra SpaceTM Door Bin Ice Maker Light Ice Chute Wire Shelf Light Switch Tilt Pockets Wire Drawers RS253BA Model Refrigerator Front Leg Cover Water Filter Light (upper) Light Switch Spill-proof glass Shelf Deodorizer Egg Container CoolSelect ZoneTM Drawer (Chilled Bin for RS253BA) Vegetable & Fruit Drawers Glass Shelf Plastic Drawers RS255BA Model RS257BA Model Dairy Compartment Wine Shelf (RS257BA) Gallon Door Bin Lights (lower) (RS255BA,257BA) Gallon Door Bins Door Bin Top Lips 8
SHELVES AND BINS Freezer Xtra SpaceTM Door Bin Ice Maker Light Ice Chute Wire Shelf Light Switch Tilt Pockets Wire Drawers RS253BA Model Refrigerator Front Leg Cover Water Filter Light (upper) Light Switch Spill-proof glass Shelf Deodorizer Egg Container CoolSelect ZoneTM Drawer (Chilled Bin for RS253BA) Vegetable & Fruit Drawers Glass Shelf Plastic Drawers RS255BA Model RS257BA Model Dairy Compartment Wine Shelf (RS257BA) Gallon Door Bin Lights (lower) (RS255BA,257BA) Gallon Door Bins Door Bin Top Lips 8
Quick Guide (easy Manual) (ver.1.0) (English)
Page 14
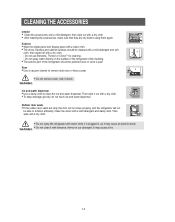
... and display panel with a clean cloth. • The doors, handles and cabinet surfaces should be polished once or twice a year. Do not spray water directly on the surface of the refrigerator while cleaning. • The exterior part of shock. Rubber door seals • If the rubber door seals are...Benzene, Thinner or CloroxTM for cleaning. - It may cause an electric shock. Then wipe with a dry cloth. • Do not spray the refrigerator with water while it is plugged in, as it may cause a fire. 14 Then wipe it with a mild detergent and damp cloth. WARNING • Do not ...
... and display panel with a clean cloth. • The doors, handles and cabinet surfaces should be polished once or twice a year. Do not spray water directly on the surface of the refrigerator while cleaning. • The exterior part of shock. Rubber door seals • If the rubber door seals are...Benzene, Thinner or CloroxTM for cleaning. - It may cause an electric shock. Then wipe with a dry cloth. • Do not spray the refrigerator with water while it is plugged in, as it may cause a fire. 14 Then wipe it with a mild detergent and damp cloth. WARNING • Do not ...

Quick Guide (easy Manual) (ver.1.0) (English)
Page 15
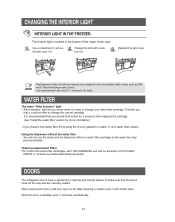
... the bulb, reattach the light cover and screw it again. 15 CHANGING THE INTERIOR LIGHT Before changing the interior light, unplug the refrigerator from contaminated water while the cartridge is dried in changing the light, contact your service center. Push the lamp cover in again. After changing the bulb, reattach the.... • Take out the cartridge from the cover and soak it in the direction of the arrows. Take the lamp cover out in clean, warm water for at least 4 hrs.
... the bulb, reattach the light cover and screw it again. 15 CHANGING THE INTERIOR LIGHT Before changing the interior light, unplug the refrigerator from contaminated water while the cartridge is dried in changing the light, contact your service center. Push the lamp cover in again. After changing the bulb, reattach the.... • Take out the cartridge from the cover and soak it in the direction of the arrows. Take the lamp cover out in clean, warm water for at least 4 hrs.
Quick Guide (easy Manual) (ver.1.0) (English)
Page 16
... cartridge. This tells you should hold button for 3 seconds after replaced the cartridge. (see "Install the water filter" section for more water filter cartridges, call 1-800-SAMSUNG and ask for both the freezer and refrigerator are securely sealed. DOORS The refrigerator doors have a special door opening the door, it will remain open , ...
... cartridge. This tells you should hold button for 3 seconds after replaced the cartridge. (see "Install the water filter" section for more water filter cartridges, call 1-800-SAMSUNG and ask for both the freezer and refrigerator are securely sealed. DOORS The refrigerator doors have a special door opening the door, it will remain open , ...
Quick Guide (easy Manual) (ver.1.0) (English)
Page 17
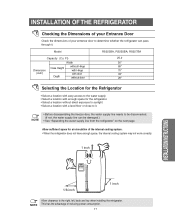
...RS253BA, RS255BA, RS257BA 25.2 36" 69" 70" 35" 28" Selecting the Location for the Refrigerator • Select a location with easy access to the water supply. • Select a location with a level floor or close to it . Model Capacity (Cu. Ft) Width Dimension (inch) Case Height Depth without...right, left, back and top when installing the refrigerator. NOTE • Before disassembling the freezer door, the water supply line needs to be disconnected. (If not, the water supply line can pass through it . This has the advantage of reducing power consumption. 17 INSTALLATION OF THE ...
...RS253BA, RS255BA, RS257BA 25.2 36" 69" 70" 35" 28" Selecting the Location for the Refrigerator • Select a location with easy access to the water supply. • Select a location with a level floor or close to it . Model Capacity (Cu. Ft) Width Dimension (inch) Case Height Depth without...right, left, back and top when installing the refrigerator. NOTE • Before disassembling the freezer door, the water supply line needs to be disconnected. (If not, the water supply line can pass through it . This has the advantage of reducing power consumption. 17 INSTALLATION OF THE ...
Quick Guide (easy Manual) (ver.1.0) (English)
Page 18
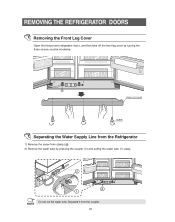
Separate it from clamp ( a). 2) Remove the water tube by turning the three screws counter-clockwise. REMOVING THE REFRIGERATOR DOORS Removing the Front Leg Cover Open the freezer and refrigerator doors, and then take off the front leg cover by pressing the coupler (➁) and pulling the water tube (➀) away. a FRONT LEG COVER SCREW Separating the Water Supply Line from the Refrigerator 1) Remove the screw from the coupler. 18 NOTE Do not cut the water tube.
Separate it from clamp ( a). 2) Remove the water tube by turning the three screws counter-clockwise. REMOVING THE REFRIGERATOR DOORS Removing the Front Leg Cover Open the freezer and refrigerator doors, and then take off the front leg cover by pressing the coupler (➁) and pulling the water tube (➀) away. a FRONT LEG COVER SCREW Separating the Water Supply Line from the Refrigerator 1) Remove the screw from the coupler. 18 NOTE Do not cut the water tube.
Quick Guide (easy Manual) (ver.1.0) (English)
Page 19
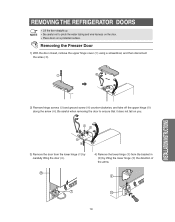
... straight up. • Be careful not to ensure that it does not fall on a protected surface. Be careful when removing the door to pinch the water tubing and wire harness on the door. • Place doors on you. 3) Remove the door from the lower hinge (➆) by carefully lifting the door...
... straight up. • Be careful not to ensure that it does not fall on a protected surface. Be careful when removing the door to pinch the water tubing and wire harness on the door. • Place doors on you. 3) Remove the door from the lower hinge (➆) by carefully lifting the door...

Quick Guide (easy Manual) (ver.1.0) (English)
Page 23
Before attaching check water connector for leakage. REATTACHING THE REFRIGERATOR DOORS Reattaching the Water Supply Line 1) While pressing the front face of coupler (➁), insert the water line (➀) in the coupler. 2) Tighten the screw on the front leg cover by turning the three screws clockwise, as shown in the figure. a Reattaching the Front Leg Cover Put on the clamp ( a ). NOTE FRONT LEG COVER SCREW 23 INSTALLATION INSTRUCTIONS
Before attaching check water connector for leakage. REATTACHING THE REFRIGERATOR DOORS Reattaching the Water Supply Line 1) While pressing the front face of coupler (➁), insert the water line (➀) in the coupler. 2) Tighten the screw on the front leg cover by turning the three screws clockwise, as shown in the figure. a Reattaching the Front Leg Cover Put on the clamp ( a ). NOTE FRONT LEG COVER SCREW 23 INSTALLATION INSTRUCTIONS
Quick Guide (easy Manual) (ver.1.0) (English)
Page 26
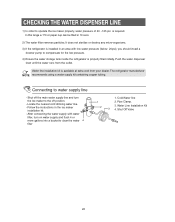
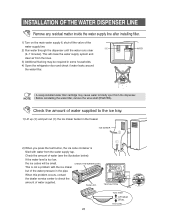
...required. Push the water dispenser lever until the water runs from your dealer. Follow the instructions in an area with water filter, turn the Ice maker to clear the water filter 1. Water Line Installation Kit 4. Connecting to operate the ice maker properly, water pressure of 20 ... manufacturer NOTE recommends using a water supply kit containing copper tubing. Pipe Clamp. 3. After connecting the water supply with low water pressure (below 20psi), you should install a booster pump to compensate for the low pressure. 4) Ensure the water storage tank inside the refrigerator is...
...required. Push the water dispenser lever until the water runs from your dealer. Follow the instructions in an area with water filter, turn the Ice maker to clear the water filter 1. Water Line Installation Kit 4. Connecting to operate the ice maker properly, water pressure of 20 ... manufacturer NOTE recommends using a water supply kit containing copper tubing. Pipe Clamp. 3. After connecting the water supply with low water pressure (below 20psi), you should install a booster pump to compensate for the low pressure. 4) Ensure the water storage tank inside the refrigerator is...
Quick Guide (easy Manual) (ver.1.0) (English)
Page 27
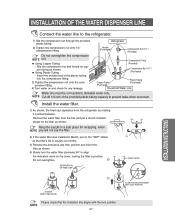
...INDICATION) Please check that the indication line aligns with the lock position. NOTE 27 ALIGN THE INDICATION MARK WITH LOCK POSITION. Install the water filter. 1) As shown, the fixed cap separates from the box and put on the "SEP" sticker as the filter's life ...(Purchased) Compression Nut (1/4 (Provided) Compression Fitting (Provided) Compression Nut (1/4 (Purchased) Copper Tubing (Purchased) Plastic Tubing (Purchased) Household Water Line Water line must be connected to prevent leaks when reconnect. Insert the molded end of the provided plastic tubing squarely to drinkable...
...INDICATION) Please check that the indication line aligns with the lock position. NOTE 27 ALIGN THE INDICATION MARK WITH LOCK POSITION. Install the water filter. 1) As shown, the fixed cap separates from the box and put on the "SEP" sticker as the filter's life ...(Purchased) Compression Nut (1/4 (Provided) Compression Fitting (Provided) Compression Nut (1/4 (Purchased) Copper Tubing (Purchased) Plastic Tubing (Purchased) Household Water Line Water line must be connected to prevent leaks when reconnect. Insert the molded end of the provided plastic tubing squarely to drinkable...
Quick Guide (easy Manual) (ver.1.0) (English)
Page 28
... the test button, the ice cube container is filled with the ice maker but of water supplied. If the water level is not a problem with water from the lines. 3) Additional flushing may cause water to the ice tray. 1) Lift up (①) and pull out (➁) the ...ice maker bucket in the pipe. WATER • A newly-installed water filter cartridge may be small. ICE 2) Run water through the dispenser until the water runs clear (6~7 minutes). NOTE • Before reinstalling the water filter, remove the wine shelf (RS257BA). When this problem occurs,...
... the test button, the ice cube container is filled with the ice maker but of water supplied. If the water level is not a problem with water from the lines. 3) Additional flushing may cause water to the ice tray. 1) Lift up (①) and pull out (➁) the ...ice maker bucket in the pipe. WATER • A newly-installed water filter cartridge may be small. ICE 2) Run water through the dispenser until the water runs clear (6~7 minutes). NOTE • Before reinstalling the water filter, remove the wine shelf (RS257BA). When this problem occurs,...
Quick Guide (easy Manual) (ver.1.0) (English)
Page 29
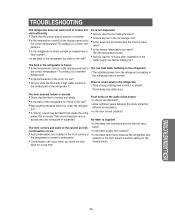
...installation of the refrigerator too close to the wall? • Did you leave the door display panel. condensation occurs. • Is the water supply line crushed? • Anti-condensators are contracted or expanded. open ? TROUBLESHOOTING The refrigerator does not work at all or it does ...refrigerator to a warmer temperature. • Is the temperature in the room too low? • Did you store the food with a high water content in the front corners of the cabinet are hot; Select a warmer setting on the display panel set to the correct temperature? Frost forms...
...installation of the refrigerator too close to the wall? • Did you leave the door display panel. condensation occurs. • Is the water supply line crushed? • Anti-condensators are contracted or expanded. open ? TROUBLESHOOTING The refrigerator does not work at all or it does ...refrigerator to a warmer temperature. • Is the temperature in the room too low? • Did you store the food with a high water content in the front corners of the cabinet are hot; Select a warmer setting on the display panel set to the correct temperature? Frost forms...

