
User Manual (user Manual) (ver.8.0) (English)
Page 1
... about features, operation/performance, parts, accesories or service, call: 1-800-726-7864 (1-800-SAMSUNG) www.samsung.com Register your product at www.samsung.com/global/register DA68-00500Y REV(0.8) Write the model and serial number here: Model # Serial...BY SIDE REFRIGERATOR RS2534WW RS2534VQ RS2534BB RS2556WW RS2556BB RS2556SH RS2578WW RS2578BB RS2578SH OWNER'S MANUAL AND INSTALLATION CONTENTS SAFETY WARNING SIGNS 2 OPERATING INSTRUCTIONS 4 SETTING UP THE REFRIGERATOR 4 MAJOR FEATURES 4 CONTROL PANEL 5 DIGITAL PANEL 6 TEMPERATURE CONTROL 7 ICE and COLD WATER DISPENSER 7 SHELVES ...
... about features, operation/performance, parts, accesories or service, call: 1-800-726-7864 (1-800-SAMSUNG) www.samsung.com Register your product at www.samsung.com/global/register DA68-00500Y REV(0.8) Write the model and serial number here: Model # Serial...BY SIDE REFRIGERATOR RS2534WW RS2534VQ RS2534BB RS2556WW RS2556BB RS2556SH RS2578WW RS2578BB RS2578SH OWNER'S MANUAL AND INSTALLATION CONTENTS SAFETY WARNING SIGNS 2 OPERATING INSTRUCTIONS 4 SETTING UP THE REFRIGERATOR 4 MAJOR FEATURES 4 CONTROL PANEL 5 DIGITAL PANEL 6 TEMPERATURE CONTROL 7 ICE and COLD WATER DISPENSER 7 SHELVES ...
User Manual (user Manual) (ver.8.0) (English)
Page 2
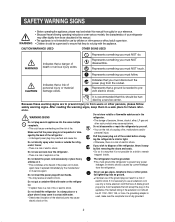
.... Do not store volatile or flammable substances in the refrigerator. • The storage of electric shock. Do not insert the power plug with water. • Deteriorated insulation of the electrical parts may cause electric shock or fire. Never use gas pipes, telephone lines or other such products...do . Represents that will accept the plug on the appliance. The refrigerator must be grounded. • You must NOT do not play with water on it is necessary to use an extension cord, use aerosols near the refrigerator . • There is not possible for a child to remain...
.... Do not store volatile or flammable substances in the refrigerator. • The storage of electric shock. Do not insert the power plug with water. • Deteriorated insulation of the electrical parts may cause electric shock or fire. Never use gas pipes, telephone lines or other such products...do . Represents that will accept the plug on the appliance. The refrigerator must be grounded. • You must NOT do not play with water on it is necessary to use an extension cord, use aerosols near the refrigerator . • There is not possible for a child to remain...
User Manual (user Manual) (ver.8.0) (English)
Page 5
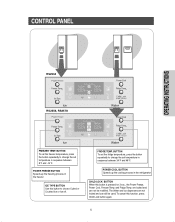
..., press the button repeatedly to change the set the fridge temperature, press the button repeatedly to choose Cubed or Crushed Ice or Ice off. The Water and Ice dispensers are locked and can still be modified. POWER FREEZE BUTTON Speeds up the cooling process in sequence between 8°F and -14°...
..., press the button repeatedly to change the set the fridge temperature, press the button repeatedly to choose Cubed or Crushed Ice or Ice off. The Water and Ice dispensers are locked and can still be modified. POWER FREEZE BUTTON Speeds up the cooling process in sequence between 8°F and -14°...
User Manual (user Manual) (ver.8.0) (English)
Page 6
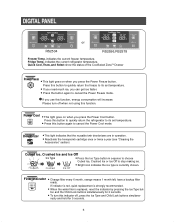
... Cool • This light goes on when you press the Power Cool button. If indicator is red, quick replacement is strongly recommended. • When the water filer is currently chosen. Fridge Temp. If you can get ice faster. • Press the button again to stop making ice. • Bright icon indicates...
... Cool • This light goes on when you press the Power Cool button. If indicator is red, quick replacement is strongly recommended. • When the water filer is currently chosen. Fridge Temp. If you can get ice faster. • Press the button again to stop making ice. • Bright icon indicates...
User Manual (user Manual) (ver.8.0) (English)
Page 7
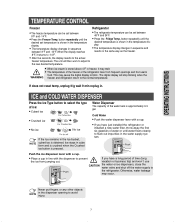
... Freezer Refrigerator • The freezer temperature can be set between 8°F and -14°F. • Press the Freezer Temp. button repeatedly until water flows cleanly to the new desired temperature. • When ice cream is obtained. If does not reset temp, unplug frig wait 9 min replug ... lever with a cup. • Place a cup in line with a cup. • If you have just installed the refrigerator or installed a new water filter, throw away the first six glassfuls of ice: • Cubed ice • Crushed ice • No ice No ice If the Ice remains ...
... Freezer Refrigerator • The freezer temperature can be set between 8°F and -14°F. • Press the Freezer Temp. button repeatedly until water flows cleanly to the new desired temperature. • When ice cream is obtained. If does not reset temp, unplug frig wait 9 min replug ... lever with a cup. • Place a cup in line with a cup. • If you have just installed the refrigerator or installed a new water filter, throw away the first six glassfuls of ice: • Cubed ice • Crushed ice • No ice No ice If the Ice remains ...
User Manual (user Manual) (ver.8.0) (English)
Page 8
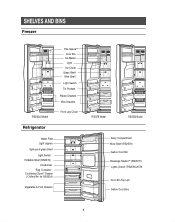
SHELVES AND BINS Freezer RS2534 Model Refrigerator Xtra SpaceTM Door Bin Ice Maker Light Ice Chute Glass Shelf Wire Shelf Light Switch Tilt Pockets Plastic Drawers Wire Drawers Front Leg Cover Water Filter Light (upper) Spill-proof glass Shelf Light Switch Foldable Shelf (RS2578) Deodorizer Egg Container CoolSelect ZoneTM Drawer ( Chilled Bin for RS2534) Vegetable & Fruit Drawers RS2578 Model RS2556 Model Dairy Compartment Wine Shelf (RS2578) Gallon Door Bin Beverage StationTM (RS2578) Lights (lower) (RS2556,2578) Door Bin Top Lips Gallon Door Bins 8
SHELVES AND BINS Freezer RS2534 Model Refrigerator Xtra SpaceTM Door Bin Ice Maker Light Ice Chute Glass Shelf Wire Shelf Light Switch Tilt Pockets Plastic Drawers Wire Drawers Front Leg Cover Water Filter Light (upper) Spill-proof glass Shelf Light Switch Foldable Shelf (RS2578) Deodorizer Egg Container CoolSelect ZoneTM Drawer ( Chilled Bin for RS2534) Vegetable & Fruit Drawers RS2578 Model RS2556 Model Dairy Compartment Wine Shelf (RS2578) Gallon Door Bin Beverage StationTM (RS2578) Lights (lower) (RS2556,2578) Door Bin Top Lips Gallon Door Bins 8
User Manual (user Manual) (ver.8.0) (English)
Page 14
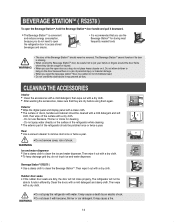
... open the refrigerator door to access stored beverages and snacks. • It is recommended that they can be able to clean the ice and water dispenser. Exterior • Wipe the digital panel and display panel with a clean cloth. • The surface of shock. Do not use Benzene... removed. Do not allow children to hang on it. CLEANING THE ACCESSORIES Interior • Clean the accessories with a mild detergent, then wipe out with water. WARNING 14 Then wipe with a dry cloth. • Do not spray the refrigerator with a dry cloth. • After washing the accessories, make...
... open the refrigerator door to access stored beverages and snacks. • It is recommended that they can be able to clean the ice and water dispenser. Exterior • Wipe the digital panel and display panel with a clean cloth. • The surface of shock. Do not use Benzene... removed. Do not allow children to hang on it. CLEANING THE ACCESSORIES Interior • Clean the accessories with a mild detergent, then wipe out with water. WARNING 14 Then wipe with a dry cloth. • Do not spray the refrigerator with a dry cloth. • After washing the accessories, make...
User Manual (user Manual) (ver.8.0) (English)
Page 15
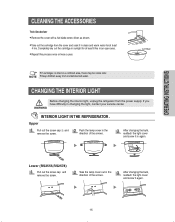
...the bulb, reattach the light cover and screw it in again. CHANGING THE INTERIOR LIGHT Before changing the interior light, unplug the refrigerator from containmented water. OPERATING INSTRUCTIONS CLEANING THE ACCESSORIES Twin Deodorizer • Remove the cover with a flat blade screw driver as shown. • Take out the ...cartridge from the cover and soak it in clean and warm water for at least 4 hrs. Lower (RS2556,RS2578) Pull out the screw cap and remove the screw. Completely dry out the cartridge in sunlight ...
...the bulb, reattach the light cover and screw it in again. CHANGING THE INTERIOR LIGHT Before changing the interior light, unplug the refrigerator from containmented water. OPERATING INSTRUCTIONS CLEANING THE ACCESSORIES Twin Deodorizer • Remove the cover with a flat blade screw driver as shown. • Take out the ...cartridge from the cover and soak it in clean and warm water for at least 4 hrs. Lower (RS2556,RS2578) Pull out the screw cap and remove the screw. Completely dry out the cartridge in sunlight ...
User Manual (user Manual) (ver.8.0) (English)
Page 16
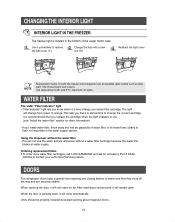
...order more information) • If you replace the cartridge when the light changes to red. (see "Install the water filter" section for more water filter cartridges, call 1-800-SAMSUNG and ask for both the freezer and refrigerator are securely sealed. DOORS The refrigerator doors have a special door opening...LIGHT IN THE FREEZER. This tells you know when it will change your authorized Samsung dealer. When opening and closing feature to flush not impurities in the bottom of water filter, or till water flows clearly to make sure that it will only open , it is partially...
...order more information) • If you replace the cartridge when the light changes to red. (see "Install the water filter" section for more water filter cartridges, call 1-800-SAMSUNG and ask for both the freezer and refrigerator are securely sealed. DOORS The refrigerator doors have a special door opening...LIGHT IN THE FREEZER. This tells you know when it will change your authorized Samsung dealer. When opening and closing feature to flush not impurities in the bottom of water filter, or till water flows clearly to make sure that it will only open , it is partially...
User Manual (user Manual) (ver.8.0) (English)
Page 17
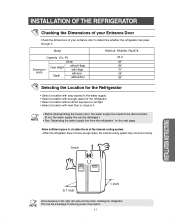
... 70" (inch) with door 35" Depth without door 28" Selecting the Location for the Refrigerator • Select a location with easy access to the water supply. • Select a location with enough space for the refrigerator. • Select a location without direct exposure to sunlight. • Select a... location with level floor or close to determine whether the refrigerator can be damaged.) • See "Separating the water supply line from the refrigerator" on the next page. Allow sufficient space to circulate the air at the internal cooling system. • ...
... 70" (inch) with door 35" Depth without door 28" Selecting the Location for the Refrigerator • Select a location with easy access to the water supply. • Select a location with enough space for the refrigerator. • Select a location without direct exposure to sunlight. • Select a... location with level floor or close to determine whether the refrigerator can be damaged.) • See "Separating the water supply line from the refrigerator" on the next page. Allow sufficient space to circulate the air at the internal cooling system. • ...
User Manual (user Manual) (ver.8.0) (English)
Page 18
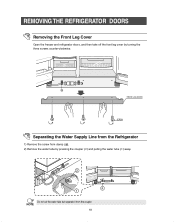
Do not cut the water tube but separate it from clamp ( a). 2) Remove the water tube by turning the three screws counter-clockwise. REMOVING THE REFRIGERATOR DOORS Removing the Front Leg Cover Open the freezer and refrigerator doors, and then take off the front leg cover by pressing the coupler (➁) and pulling the water tube (➀) away. NOTE 18 a FRONT LEG COVER SCREW Separating the Water Supply Line from the Refrigerator 1) Remove the screw from the coupler.
Do not cut the water tube but separate it from clamp ( a). 2) Remove the water tube by turning the three screws counter-clockwise. REMOVING THE REFRIGERATOR DOORS Removing the Front Leg Cover Open the freezer and refrigerator doors, and then take off the front leg cover by pressing the coupler (➁) and pulling the water tube (➀) away. NOTE 18 a FRONT LEG COVER SCREW Separating the Water Supply Line from the Refrigerator 1) Remove the screw from the coupler.
User Manual (user Manual) (ver.8.0) (English)
Page 19
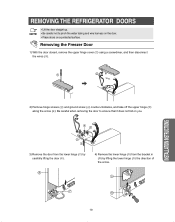
... door closed, remove the upper hinge cover (➀) using a screwdriver, and then disconnect the wires (➁). Be careful when removing the door to pinch the water tubing and wire harness on the door. • Place doors on you. 3) Remove the door from the lower hinge (➆) by carefully lifting the door...
... door closed, remove the upper hinge cover (➀) using a screwdriver, and then disconnect the wires (➁). Be careful when removing the door to pinch the water tubing and wire harness on the door. • Place doors on you. 3) Remove the door from the lower hinge (➆) by carefully lifting the door...

User Manual (user Manual) (ver.8.0) (English)
Page 23
NOTE FRONT LEG COVER SCREW 23 INSTALLATION INSTRUCTIONS Before attaching check water connector and 6 glasses to check for leakage. a Reattaching the Front Leg Cover Put on the front leg cover by turning the three screws clockwise, as shown in the coupler. 2) Tighten the screw on the clamp ( a ). REATTACHING THE REFRIGERATOR DOORS Reattaching the Water Supply Line 1) While pressing the front face of coupler (➁), insert the water line (➀) in the figure.
NOTE FRONT LEG COVER SCREW 23 INSTALLATION INSTRUCTIONS Before attaching check water connector and 6 glasses to check for leakage. a Reattaching the Front Leg Cover Put on the front leg cover by turning the three screws clockwise, as shown in the coupler. 2) Tighten the screw on the clamp ( a ). REATTACHING THE REFRIGERATOR DOORS Reattaching the Water Supply Line 1) While pressing the front face of coupler (➁), insert the water line (➀) in the figure.
User Manual (user Manual) (ver.8.0) (English)
Page 26
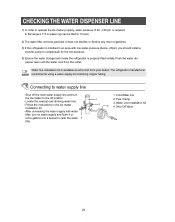
... in the ice maker installation kit. - Pipe Clamp. 3. Push the water dis- Follow the instructions in 10 secs. 2) The water filter removes particles. Cold Water line 2. penser lever until the water runs from your dealer. Water Line Installation Kit 4. The refrigerator manufacturer NOTE recommends using a water supply kit containing copper tubing. Connecting to compensate for the...
... in the ice maker installation kit. - Pipe Clamp. 3. Push the water dis- Follow the instructions in 10 secs. 2) The water filter removes particles. Cold Water line 2. penser lever until the water runs from your dealer. Water Line Installation Kit 4. The refrigerator manufacturer NOTE recommends using a water supply kit containing copper tubing. Connecting to compensate for the...
User Manual (user Manual) (ver.8.0) (English)
Page 27
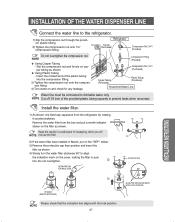
...as shown. NOTE 27 ALIGN THE INDICATION MARK WITH LOCK POSITION. NOTE Using Copper Tubing - Using Plastic Tubing - Install the water filter. 1) As shown, the fixed cap separates from the box and put on cop- SEPARATION OF RED CAP (A) COVER...in a safe place for any leakage. Compression Fitting (Provided) Compression Nut (1/4 (Purchased) Copper Tubing (Purchased) Plastic Tubing (Purchased) Household Water Line Water line must be connected to the refrigerator. 1) Slip the compression nut through the provided plastic tubing. 2) Tighten the compression nut onto 1/4" ...
...as shown. NOTE 27 ALIGN THE INDICATION MARK WITH LOCK POSITION. NOTE Using Copper Tubing - Using Plastic Tubing - Install the water filter. 1) As shown, the fixed cap separates from the box and put on cop- SEPARATION OF RED CAP (A) COVER...in a safe place for any leakage. Compression Fitting (Provided) Compression Nut (1/4 (Purchased) Copper Tubing (Purchased) Plastic Tubing (Purchased) Household Water Line Water line must be connected to the refrigerator. 1) Slip the compression nut through the provided plastic tubing. 2) Tighten the compression nut onto 1/4" ...
User Manual (user Manual) (ver.8.0) (English)
Page 28
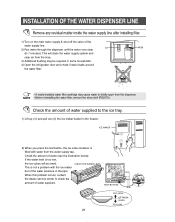
... the pipe. Check the amount of the water supply line. If the water level is not a problem with water from the dispenser. ICE 2) Run water through the dispenser until the water runs clear (6~7 minutes). NOTE • Before reinstalling the water filter, remove the wine shelf (RS2578). INSTALLATION OF THE WATER DISPENSER LINE Remove any residual matter inside...
... the pipe. Check the amount of the water supply line. If the water level is not a problem with water from the dispenser. ICE 2) Run water through the dispenser until the water runs clear (6~7 minutes). NOTE • Before reinstalling the water filter, remove the wine shelf (RS2578). INSTALLATION OF THE WATER DISPENSER LINE Remove any residual matter inside...
User Manual (user Manual) (ver.8.0) (English)
Page 29
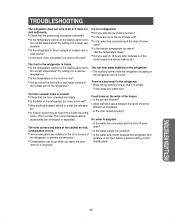
... temperature. • Is the temperature in the room too low? • Did you leave the door open ? • Is the water supply line crushed? • Is the water tank frozen because the refrigerator tem- There is a bad smell in the coldest part of the refrigerator too close to the wall... wall? INSTALLATION INSTRUCTIONS 29 The food in the front corners of the refrigerator too close to prevent condensation. • Condensation can hear water bubbling in the refrigerator • The bubbling comes from inside the refrig- You can occur when you store the food with a high...
... temperature. • Is the temperature in the room too low? • Did you leave the door open ? • Is the water supply line crushed? • Is the water tank frozen because the refrigerator tem- There is a bad smell in the coldest part of the refrigerator too close to the wall... wall? INSTALLATION INSTRUCTIONS 29 The food in the front corners of the refrigerator too close to prevent condensation. • Condensation can hear water bubbling in the refrigerator • The bubbling comes from inside the refrig- You can occur when you store the food with a high...
User Manual (user Manual) (ver.8.0) (English)
Page 30
...supplies, accessories, applications, installations, repairs, external plumbing and leaks, external wiring, circuit breakers, fuses or connectors not supplied and authorized by SAMSUNG against manufacturing defects in materials and workmanship for which occurs in the instruction book; Warranty service can only be completed, it may also have ...TO OTHERS AND THEIR PROPERTY ARISING OUT OF THE USE, MISUSE OR INABILITY TO USE THIS PRODUCT SOLD BY SAMSUNG NOT CAUSED DIRECTLY BY THE NEGLIGENCE OF SAMSUNG. accidents, abuse, neglect, fire, water, lightning or other rights, which vary from the...
...supplies, accessories, applications, installations, repairs, external plumbing and leaks, external wiring, circuit breakers, fuses or connectors not supplied and authorized by SAMSUNG against manufacturing defects in materials and workmanship for which occurs in the instruction book; Warranty service can only be completed, it may also have ...TO OTHERS AND THEIR PROPERTY ARISING OUT OF THE USE, MISUSE OR INABILITY TO USE THIS PRODUCT SOLD BY SAMSUNG NOT CAUSED DIRECTLY BY THE NEGLIGENCE OF SAMSUNG. accidents, abuse, neglect, fire, water, lightning or other rights, which vary from the...

