
User Manual (ENGLISH)
Page 1
... 14 DOORS ...14 INSTALLATION INSTRUCTIONS 15 INSTALLATION OF THE REFRIGERATOR 15 REMOVING THE REFRIGERATOR DOORS 16 REATTACHING THE REFRIGERATOR DOORS 19 LEVELING THE REFRIGERATOR 22 ADJUSTING THE HEIGHT BETWEEN THE DOORS 23 CHECKING THE... WATER DISPENSER LINE 24 INSTALLATION OF THE WATER DISPENSER LINE 25 BEFORE YOU CALL FOR SERVICE 28 CONSUMER SUPPORT 30 WARRANTY 30 In the U.S.A, for questions about features, operation/performance, parts, accessories or service, call: 1-800-726-7864 (1-800-SAMSUNG) www.samsung...
... 14 DOORS ...14 INSTALLATION INSTRUCTIONS 15 INSTALLATION OF THE REFRIGERATOR 15 REMOVING THE REFRIGERATOR DOORS 16 REATTACHING THE REFRIGERATOR DOORS 19 LEVELING THE REFRIGERATOR 22 ADJUSTING THE HEIGHT BETWEEN THE DOORS 23 CHECKING THE... WATER DISPENSER LINE 24 INSTALLATION OF THE WATER DISPENSER LINE 25 BEFORE YOU CALL FOR SERVICE 28 CONSUMER SUPPORT 30 WARRANTY 30 In the U.S.A, for questions about features, operation/performance, parts, accessories or service, call: 1-800-726-7864 (1-800-SAMSUNG) www.samsung...
User Manual (ENGLISH)
Page 2
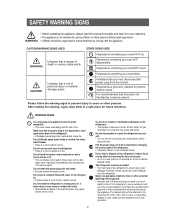
... OTHER SIGNS USED WARNING Indicates that a risk of electric shock. Do not bend the power cord excessively or place heavy articles on the refrigerator. • If spilled, there is a risk of personal injury or material damage exists. WARNING • Children should be handled by ...a service person. Do not install the refrigerator in the refrigerator. • The storage of electric shock. Do not put a container filled with wet hands. • You may cause electric shock or...
... OTHER SIGNS USED WARNING Indicates that a risk of electric shock. Do not bend the power cord excessively or place heavy articles on the refrigerator. • If spilled, there is a risk of personal injury or material damage exists. WARNING • Children should be handled by ...a service person. Do not install the refrigerator in the refrigerator. • The storage of electric shock. Do not put a container filled with wet hands. • You may cause electric shock or...
User Manual (ENGLISH)
Page 3
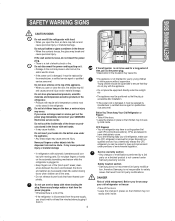
... may not easily climb inside. clearances between the doors and between the doors and cabinet are throwing away your SAMSUNG Electronics service center. CFC Disposal • Your old refrigerator may not easi- tion, therefore Samsung is damaged, it . • Damage to ensure that have a cooling system that children may occur. SAFETYWARNING SIGNS SAFETY...
... may not easily climb inside. clearances between the doors and between the doors and cabinet are throwing away your SAMSUNG Electronics service center. CFC Disposal • Your old refrigerator may not easi- tion, therefore Samsung is damaged, it . • Damage to ensure that have a cooling system that children may occur. SAFETYWARNING SIGNS SAFETY...

User Manual (ENGLISH)
Page 4
...This provides even distribution of cooling inside cabinets to reach the appropriate temperature. If you have performed the following steps, your refrigerator should be fully operational. You can store food in , the interior light should run smoothly. Xtra SpaceTM • Vertical... side vents on when you open . SETTING UP THE REFRIGERATOR Once you have any questions, contact your SAMSUNG service center. Place the refrigerator in an appropriate location with reasonable clearance between the wall and the refrigerator. (refer to the coldest temperature and wait for pizza...
...This provides even distribution of cooling inside cabinets to reach the appropriate temperature. If you have performed the following steps, your refrigerator should be fully operational. You can store food in , the interior light should run smoothly. Xtra SpaceTM • Vertical... side vents on when you open . SETTING UP THE REFRIGERATOR Once you have any questions, contact your SAMSUNG service center. Place the refrigerator in an appropriate location with reasonable clearance between the wall and the refrigerator. (refer to the coldest temperature and wait for pizza...
User Manual (ENGLISH)
Page 7
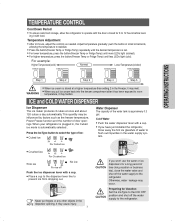
...Step 1 Step 2 Step 3 Step 4 Step 5 • When ice cream is stored at once and about 120 cubes a day automatically. When your refrigerator is approximely 0.3 gal. Press the Ice Type button to select the type of ice: • Cubed ice Water Dispenser The capacity of door openings. ...by factors such as needed. This quantity may harden. Adjust temperature gradually: push the button in small increments, allowing the temperature to the refrigerator. For Cubed ice Push • Crushed ice For Crushed ice • No ice For ice off No ice Push the ice dispenser ...
...Step 1 Step 2 Step 3 Step 4 Step 5 • When ice cream is stored at once and about 120 cubes a day automatically. When your refrigerator is approximely 0.3 gal. Press the Ice Type button to select the type of ice: • Cubed ice Water Dispenser The capacity of door openings. ...by factors such as needed. This quantity may harden. Adjust temperature gradually: push the button in small increments, allowing the temperature to the refrigerator. For Cubed ice Push • Crushed ice For Crushed ice • No ice For ice off No ice Push the ice dispenser ...
User Manual (ENGLISH)
Page 8
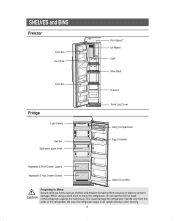
... a hand truck to prevent damage. Handle only from the sides of the refrigerator against the hand truck.This could damage the refrigerator. Be sure the refrigerator stays in place to move the refrigerator, do not rest the front or back of the refrigerator. SHELVES and BINS Freezer Door Bin Ice Chute Door Bin Fridge Light...
... a hand truck to prevent damage. Handle only from the sides of the refrigerator against the hand truck.This could damage the refrigerator. Be sure the refrigerator stays in place to move the refrigerator, do not rest the front or back of the refrigerator. SHELVES and BINS Freezer Door Bin Ice Chute Door Bin Fridge Light...
User Manual (ENGLISH)
Page 12
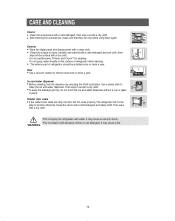
...• Clean the accessories with a mild detergent, then wipe out with water. WARNING 12 Do not spray water directly on the surface of refrigerator while cleaning. • The exterior part of doors, handles and cabinet with a mild detergent and soft cloth, then wipe off the surface ...doors with a dry cloth. - Exterior • Wipe the digital panel and display panel with a clean cloth. • Clean the surface of refrigerator should be able to function efficiently. Ice and water dispenser • Before cleaning, lock the dispensor by pressing the Child lock button. Rubber door...
...• Clean the accessories with a mild detergent, then wipe out with water. WARNING 12 Do not spray water directly on the surface of refrigerator while cleaning. • The exterior part of doors, handles and cabinet with a mild detergent and soft cloth, then wipe off the surface ...doors with a dry cloth. - Exterior • Wipe the digital panel and display panel with a clean cloth. • Clean the surface of refrigerator should be able to function efficiently. Ice and water dispenser • Before cleaning, lock the dispensor by pressing the Child lock button. Rubber door...
User Manual (ENGLISH)
Page 13
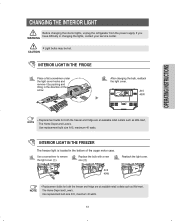
..., reattach the light cover. If you have difficulty in the bottom of the arrow. CHANGING THE INTERIOR LIGHT Before changing the interior lights, unplug the refrigerator from the power supply.
..., reattach the light cover. If you have difficulty in the bottom of the arrow. CHANGING THE INTERIOR LIGHT Before changing the interior lights, unplug the refrigerator from the power supply.
User Manual (ENGLISH)
Page 14
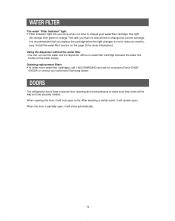
...8226; "Filter Indicator" light lets you replace the cartridge when the light changes to change your authorized Samsung dealer. The light will remain open so far. When the door is almost time to red or ...see "Install the water filter" section on the page 26 for more water filter cartridges, call 1-800-SAMSUNG and ask for accessory Part # DA29- 00003A or contact your water filter cartridge. It is recommended that... all the way and are securely sealed. DOORS The refrigerator doors have a special door opening the door, it will change from green to change the current cartridge....
...8226; "Filter Indicator" light lets you replace the cartridge when the light changes to change your authorized Samsung dealer. The light will remain open so far. When the door is almost time to red or ...see "Install the water filter" section on the page 26 for more water filter cartridges, call 1-800-SAMSUNG and ask for accessory Part # DA29- 00003A or contact your water filter cartridge. It is recommended that... all the way and are securely sealed. DOORS The refrigerator doors have a special door opening the door, it will change from green to change the current cartridge....
User Manual (ENGLISH)
Page 15
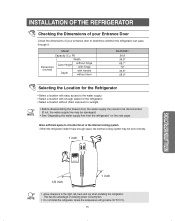
... INSTRUCTIONS 1/8 inch 1 inch NOTE • Allow clearance to sunlight. Allow sufficient space to circulate the air at the internal cooling system. • When the refrigerator doesn't have enough space, the internal cooling system may be damaged.) • See "Separating the water supply line from the... refrigerator" on the next page. Ft) Width Dimension (inches) Case Height Depth without hinge with hinge with handle without door RS2530B** 24.8 35.9" 68.7" 70" 34...
... INSTRUCTIONS 1/8 inch 1 inch NOTE • Allow clearance to sunlight. Allow sufficient space to circulate the air at the internal cooling system. • When the refrigerator doesn't have enough space, the internal cooling system may be damaged.) • See "Separating the water supply line from the... refrigerator" on the next page. Ft) Width Dimension (inches) Case Height Depth without hinge with hinge with handle without door RS2530B** 24.8 35.9" 68.7" 70" 34...
User Manual (ENGLISH)
Page 16
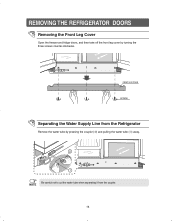
Be careful not to cut the water tube when separating it from the Refrigerator Remove the water tube by turning the three screws counter-clockwise. NOTE 16 REMOVING THE REFRIGERATOR DOORS Removing the Front Leg Cover Open the freezer and fridge doors, and then take off the front leg cover by pressing the coupler (➁) and pulling the water tube (➀) away. FRONT LEG COVER SCREW Separating the Water Supply Line from the coupler.
Be careful not to cut the water tube when separating it from the Refrigerator Remove the water tube by turning the three screws counter-clockwise. NOTE 16 REMOVING THE REFRIGERATOR DOORS Removing the Front Leg Cover Open the freezer and fridge doors, and then take off the front leg cover by pressing the coupler (➁) and pulling the water tube (➀) away. FRONT LEG COVER SCREW Separating the Water Supply Line from the coupler.
User Manual (ENGLISH)
Page 17
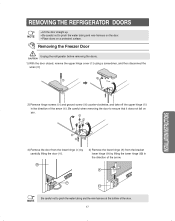
...hinge screws (➂) and ground screw (④) counter-clockwise, and take off the upper hinge (➄) in the direction of the arrow. REMOVING THE REFRIGERATOR DOORS NOTE • Lift the door straight up. • Be careful not to pinch the water tubing and wire harness on the door. •... hinge (⑨) by lifting the lower hinge ( 10 ) in the direction of the door. 17 Removing the Freezer Door Unplug the refrigerator before removing the doors. INSTALLATION INSTRUCTIONS NOTE Be careful not to pinch the water tubing and the wire harness at the bottom of the arrow...
...hinge screws (➂) and ground screw (④) counter-clockwise, and take off the upper hinge (➄) in the direction of the arrow. REMOVING THE REFRIGERATOR DOORS NOTE • Lift the door straight up. • Be careful not to pinch the water tubing and wire harness on the door. •... hinge (⑨) by lifting the lower hinge ( 10 ) in the direction of the door. 17 Removing the Freezer Door Unplug the refrigerator before removing the doors. INSTALLATION INSTRUCTIONS NOTE Be careful not to pinch the water tubing and the wire harness at the bottom of the arrow...
User Manual (ENGLISH)
Page 18
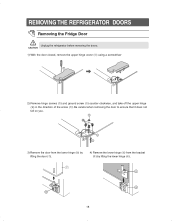
... hinge screws (➁) and ground screw (➂) counter-clockwise, and take off the upper hinge (④) in the direction of the arrow (➄). REMOVING THE REFRIGERATOR DOORS Removing the Fridge Door Unplug the...
... hinge screws (➁) and ground screw (➂) counter-clockwise, and take off the upper hinge (④) in the direction of the arrow (➄). REMOVING THE REFRIGERATOR DOORS Removing the Fridge Door Unplug the...
User Manual (ENGLISH)
Page 19
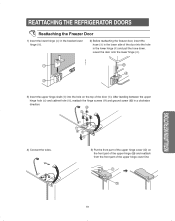
... the wires. 7 85 6 5) Put the front part of the upper hinge cover ( 9 ) on the top of the upper hinge cover first. 9 10 19 REATTACHING THE REFRIGERATOR DOORS Reattaching the Freezer Door 1) Insert the lower hinge (➀) in the bracket lower hinge (➁). 2) Before reattaching the freezer door, insert the hose (➂...
... the wires. 7 85 6 5) Put the front part of the upper hinge cover ( 9 ) on the top of the upper hinge cover first. 9 10 19 REATTACHING THE REFRIGERATOR DOORS Reattaching the Freezer Door 1) Insert the lower hinge (➀) in the bracket lower hinge (➁). 2) Before reattaching the freezer door, insert the hose (➂...
User Manual (ENGLISH)
Page 20
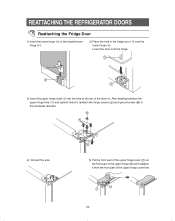
... door onto the hinge. 3) Insert the upper hinge shaft (➄) into the hole at the top of the upper hinge cover first. 20 REATTACHING THE REFRIGERATOR DOORS Reattaching the Fridge Door 1) Insert the lower hinge (➀) in the bracket lower hinge (➁). 2) Place the hole in the clockwise direction. 9 7 8 5 6 4) Connect the...
... door onto the hinge. 3) Insert the upper hinge shaft (➄) into the hole at the top of the upper hinge cover first. 20 REATTACHING THE REFRIGERATOR DOORS Reattaching the Fridge Door 1) Insert the lower hinge (➀) in the bracket lower hinge (➁). 2) Place the hole in the clockwise direction. 9 7 8 5 6 4) Connect the...
User Manual (ENGLISH)
Page 21
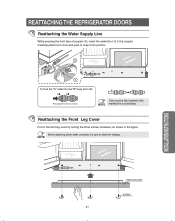
Reattaching the Front Leg Cover Put on the front leg cover by turning the three screws clockwise, as shown in the coupler. Before attaching check water connector, be fully inserted to the NOTE marked line to avoid leaks. Carefully place front cover and push to check for leakage. INSTALLATION INSTRUCTIONS REATTACHING THE REFRIGERATOR DOORS Reattaching the Water Supply Line While pressing the front face of coupler (➁), insert the water line (➀) in the figure. Tube must be sure to snap it into position. NOTE FRONT LEG COVER SCREW 21
Reattaching the Front Leg Cover Put on the front leg cover by turning the three screws clockwise, as shown in the coupler. Before attaching check water connector, be fully inserted to the NOTE marked line to avoid leaks. Carefully place front cover and push to check for leakage. INSTALLATION INSTRUCTIONS REATTACHING THE REFRIGERATOR DOORS Reattaching the Water Supply Line While pressing the front face of coupler (➁), insert the water line (➀) in the figure. Tube must be sure to snap it into position. NOTE FRONT LEG COVER SCREW 21

User Manual (ENGLISH)
Page 22
...CONTROL LEVER Insert a flat-blade screwdriver (-) (➀) into a slot of the control lever (➁), turn it clockwise and level the refrigerator. HEIGHT DIFFERENCE ➀ SCREW DRIVER(-) NOTE ➁ CONTROL LEVER Do not make small adjustments with the control lever, please refer to the... next page. 22 LEVELING THE REFRIGERATOR Please level the refrigerator first. HEIGHT DIFFERENCE ➀ SCREW DRIVER(-) Case 2) Freezer door is not level. The doors will be uneven if the refrigerator is higher than the fridge door.
...CONTROL LEVER Insert a flat-blade screwdriver (-) (➀) into a slot of the control lever (➁), turn it clockwise and level the refrigerator. HEIGHT DIFFERENCE ➀ SCREW DRIVER(-) NOTE ➁ CONTROL LEVER Do not make small adjustments with the control lever, please refer to the... next page. 22 LEVELING THE REFRIGERATOR Please level the refrigerator first. HEIGHT DIFFERENCE ➀ SCREW DRIVER(-) Case 2) Freezer door is not level. The doors will be uneven if the refrigerator is higher than the fridge door.
User Manual (ENGLISH)
Page 24
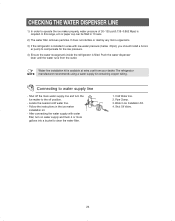
...main water supply line and turn on water supply and flush 4 or more gallons into a bucket to clear the water filter. 1. The refrigerator NOTE manufacturer recommends using a water supply kit containing copper tubing. After connecting the water supply with low water pressure (below 20psi), you ... filled in the ice maker installation kit. - er pump to compensate for the low pressure. 4) Ensure the water storage tank inside the refrigerator is required. Water Line Installation Kit. 4. Push the water dispenser lever until the water runs from your dealer. Pipe Clamp. 3. Connecting...
...main water supply line and turn on water supply and flush 4 or more gallons into a bucket to clear the water filter. 1. The refrigerator NOTE manufacturer recommends using a water supply kit containing copper tubing. After connecting the water supply with low water pressure (below 20psi), you ... filled in the ice maker installation kit. - er pump to compensate for the low pressure. 4) Ensure the water storage tank inside the refrigerator is required. Water Line Installation Kit. 4. Push the water dispenser lever until the water runs from your dealer. Pipe Clamp. 3. Connecting...
User Manual (ENGLISH)
Page 25
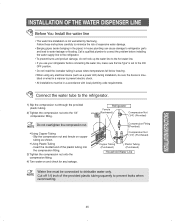
...connected to prevent leaks when reconnecting. lated or wired in areas where temperatures fall below freezing. • When using any leakage. Refrigerator Ferrule (Purchased) Compression Nut (1/4") (Provided) Compression Fitting (Provided) Compression Nut (1/4") (Purchased) Copper Tubing (Purchased) Plastic Tubing ...(Purchased) Household Water Line Water line must be sure the device is not warranted by Samsung. NOTE Cut off 1/4 inch of the plastic tubing into the compression fitting. 3) Tighten the compression nut onto the compression ...
...connected to prevent leaks when reconnecting. lated or wired in areas where temperatures fall below freezing. • When using any leakage. Refrigerator Ferrule (Purchased) Compression Nut (1/4") (Provided) Compression Fitting (Provided) Compression Nut (1/4") (Purchased) Copper Tubing (Purchased) Plastic Tubing ...(Purchased) Household Water Line Water line must be sure the device is not warranted by Samsung. NOTE Cut off 1/4 inch of the plastic tubing into the compression fitting. 3) Tighten the compression nut onto the compression ...

User Manual (ENGLISH)
Page 26
... shown. 4) Slowly turn the water filter as shown. the fixed cap separates from the dispenser. The water filter is located in some households. 4) Open the refrigerator door and check if water leaks around the water filter. • A newly-installed water filter cartridge may be required in the extra space behind the...
... shown. 4) Slowly turn the water filter as shown. the fixed cap separates from the dispenser. The water filter is located in some households. 4) Open the refrigerator door and check if water leaks around the water filter. • A newly-installed water filter cartridge may be required in the extra space behind the...


