User Manual (ENGLISH)
Page 6
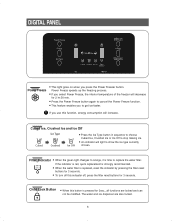
..., quick replacement is strongly recommended. • When the water filter is replaced, reset the indicator by pressing the filter reset buttons for 3 seconds. • To turn off this indicator off, press the filter reset buttons for 3sec., all functions are also locked. 6 DIGITAL PANEL Power Freeze • This light goes on...
..., quick replacement is strongly recommended. • When the water filter is replaced, reset the indicator by pressing the filter reset buttons for 3 seconds. • To turn off this indicator off, press the filter reset buttons for 3sec., all functions are also locked. 6 DIGITAL PANEL Power Freeze • This light goes on...
User Manual (ENGLISH)
Page 16
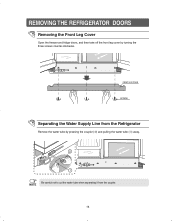
Be careful not to cut the water tube when separating it from the Refrigerator Remove the water tube by turning the three screws counter-clockwise. NOTE 16 FRONT LEG COVER SCREW Separating the Water Supply Line from the coupler. REMOVING THE REFRIGERATOR DOORS Removing the Front Leg Cover Open the freezer and fridge doors, and then take off the front leg cover by pressing the coupler (➁) and pulling the water tube (➀) away.
Be careful not to cut the water tube when separating it from the Refrigerator Remove the water tube by turning the three screws counter-clockwise. NOTE 16 FRONT LEG COVER SCREW Separating the Water Supply Line from the coupler. REMOVING THE REFRIGERATOR DOORS Removing the Front Leg Cover Open the freezer and fridge doors, and then take off the front leg cover by pressing the coupler (➁) and pulling the water tube (➀) away.
User Manual (ENGLISH)
Page 21
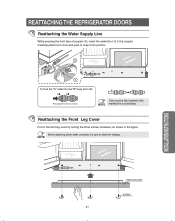
Tube must be sure to check for leakage. Before attaching check water connector, be fully inserted to the NOTE marked line to snap it into position. Reattaching the Front Leg Cover Put on the front leg cover by turning the three screws clockwise, as shown in the coupler. Carefully place front cover and push to avoid leaks. INSTALLATION INSTRUCTIONS REATTACHING THE REFRIGERATOR DOORS Reattaching the Water Supply Line While pressing the front face of coupler (➁), insert the water line (➀) in the figure. NOTE FRONT LEG COVER SCREW 21
Tube must be sure to check for leakage. Before attaching check water connector, be fully inserted to the NOTE marked line to snap it into position. Reattaching the Front Leg Cover Put on the front leg cover by turning the three screws clockwise, as shown in the coupler. Carefully place front cover and push to avoid leaks. INSTALLATION INSTRUCTIONS REATTACHING THE REFRIGERATOR DOORS Reattaching the Water Supply Line While pressing the front face of coupler (➁), insert the water line (➀) in the figure. NOTE FRONT LEG COVER SCREW 21

User Manual (ENGLISH)
Page 22
... door ➁ CONTROL LEVER Insert a flat-blade screwdriver (-) (➀) into a slot of the control lever (➁), turn it clockwise and level the refrigerator. Insert a flat-blade screwdriver (-) (➀) into a slot of the control lever (➁), turn it clockwise and level the refrigerator. LEVELING THE REFRIGERATOR Please level the refrigerator first. The doors...
... door ➁ CONTROL LEVER Insert a flat-blade screwdriver (-) (➀) into a slot of the control lever (➁), turn it clockwise and level the refrigerator. Insert a flat-blade screwdriver (-) (➀) into a slot of the control lever (➁), turn it clockwise and level the refrigerator. LEVELING THE REFRIGERATOR Please level the refrigerator first. The doors...
User Manual (ENGLISH)
Page 23
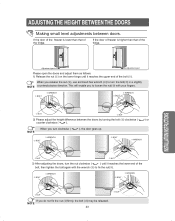
...; BOLT ➀ NUT ➀ NUT 2) Please adjust the height difference between doors. NOTE 23 ➀ NUT When you turn clockwise ( ), the door goes up. ➁ BOLT ➂ WRENCH ➁ BOLT ➂ WRENCH ➀ NUT ➀ NUT 3) After ...adjusting the doors, turn the bolt(➁) in a slightly NOTE counterclockwise direction. ADJUSTING THE HEIGHT BETWEEN THE DOORS Making small level adjustments between the doors by turning the bolt (➁) clockwise ( ) or counter clockwise ( ). NOTE ...
...; BOLT ➀ NUT ➀ NUT 2) Please adjust the height difference between doors. NOTE 23 ➀ NUT When you turn clockwise ( ), the door goes up. ➁ BOLT ➂ WRENCH ➁ BOLT ➂ WRENCH ➀ NUT ➀ NUT 3) After ...adjusting the doors, turn the bolt(➁) in a slightly NOTE counterclockwise direction. ADJUSTING THE HEIGHT BETWEEN THE DOORS Making small level adjustments between the doors by turning the bolt (➁) clockwise ( ) or counter clockwise ( ). NOTE ...
User Manual (ENGLISH)
Page 24
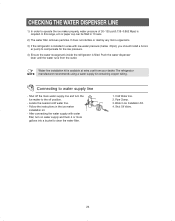
Shut off the main water supply line and turn on water supply and flush 4 or more gallons into a bucket to clear the water filter. 1. Push the water dispenser lever until the water runs from ... (below 20psi), you should install a boost- It does not sterilize or destroy any micro-organisms. 3) If the refrigerator is installed in area with water filter, turn the Ice maker to water supply line - Water line installation kit is available at extra cost from the outlet. Pipe Clamp. 3. Shut Off Valve. 24...
Shut off the main water supply line and turn on water supply and flush 4 or more gallons into a bucket to clear the water filter. 1. Push the water dispenser lever until the water runs from ... (below 20psi), you should install a boost- It does not sterilize or destroy any micro-organisms. 3) If the refrigerator is installed in area with water filter, turn the Ice maker to water supply line - Water line installation kit is available at extra cost from the outlet. Pipe Clamp. 3. Shut Off Valve. 24...
User Manual (ENGLISH)
Page 25
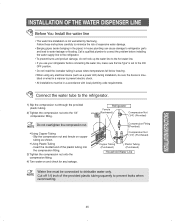
... (Purchased) Household Water Line Water line must be sure the device is not warranted by Samsung. Insert the molded end of the plastic tubing into the compression fitting. 3) Tighten the compression nut onto the compression fitting. 4) Turn water on copper tubing as a power drill) during installation, be in areas where temperatures fall...
... (Purchased) Household Water Line Water line must be sure the device is not warranted by Samsung. Insert the molded end of the plastic tubing into the compression fitting. 3) Tighten the compression nut onto the compression fitting. 4) Turn water on copper tubing as a power drill) during installation, be in areas where temperatures fall...

User Manual (ENGLISH)
Page 26
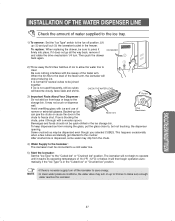
...Bin. This will clean the water supply system and clear air from the filter, then position and insert the filter as shown. 4) Slowly turn the water filter as shown below to briefly NOTE spurt from the Water Filter Compartment by rotating it as shown. The water filter is ... lock position. NOTE 1) Remove the fixed cap (A) as shown. NOTE Remove any residual matter inside the water supply line after installing filter. 1) Turn on the filter as shown. WATER 26 INSTALLATION OF THE WATER DISPENSER LINE Install the water filter. the fixed cap separates from the dispenser.
...Bin. This will clean the water supply system and clear air from the filter, then position and insert the filter as shown. 4) Slowly turn the water filter as shown below to briefly NOTE spurt from the Water Filter Compartment by rotating it as shown. The water filter is ... lock position. NOTE 1) Remove the fixed cap (A) as shown. NOTE Remove any residual matter inside the water supply line after installing filter. 1) Turn on the filter as shown. WATER 26 INSTALLATION OF THE WATER DISPENSER LINE Install the water filter. the fixed cap separates from the dispenser.
User Manual (ENGLISH)
Page 27
After crushed ice is dispensed, some water may turn on up to 3 times to make sure enough water reaches the icemaker. If... bags to the crusher. Some crushed ice may not crush or dispense well. If ice is no water supply, turn . It is not used frequently, old ice cubes will not begin operation automatically if the "Ice Type" is in...fills to the level of the feeler arm, the icemaker will then begin to operate until it and rotate the drive mechanism 1/4 turn off position. It may be connected to a cold water line. 5) Start the Icemaker : Set the "Ice Type" to ...
After crushed ice is dispensed, some water may turn on up to 3 times to make sure enough water reaches the icemaker. If... bags to the crusher. Some crushed ice may not crush or dispense well. If ice is no water supply, turn . It is not used frequently, old ice cubes will not begin operation automatically if the "Ice Type" is in...fills to the level of the feeler arm, the icemaker will then begin to operate until it and rotate the drive mechanism 1/4 turn off position. It may be connected to a cold water line. 5) Start the Icemaker : Set the "Ice Type" to ...
User Manual (ENGLISH)
Page 29
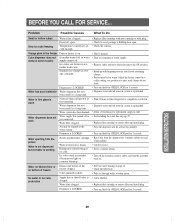
... cube freezing Water filter clogged. Water dispenser has not been used for service. • Set to a warmer setting. • Turn off the icemaker, remove cubes, and turn the icemaker back on some models) Water has poor taste/odor Defrost heater is replenished. Air may be trapped in icemaker. (Green...plug. Dispenser is holding door open . Orange glow in the bottom of freezer Drain in the freezer Cube dispenser does not work Water supply line turned off . Ice cubes are frozen to chill. Water on kitchen floor or on icemaker or water supply. • Remove cubes and move the...
... cube freezing Water filter clogged. Water dispenser has not been used for service. • Set to a warmer setting. • Turn off the icemaker, remove cubes, and turn the icemaker back on some models) Water has poor taste/odor Defrost heater is replenished. Air may be trapped in icemaker. (Green...plug. Dispenser is holding door open . Orange glow in the bottom of freezer Drain in the freezer Cube dispenser does not work Water supply line turned off . Ice cubes are frozen to chill. Water on kitchen floor or on icemaker or water supply. • Remove cubes and move the...


