User Manual
Page 2
... disposal warnings Installation Refrigerator at a glance Step-by-step installation Operations 01 Home screen 02 Soft buttons Fridge Manager Display reset (applicable models only) SmartThings SMART GRID Function (Demand Response) Recommendations for voice recognition Samsung Family Hub Dispenser panel Special features Maintenance Handling and care Cleaning Replacement 2 English Untitled-5 2 4 4 5 5 5 7 8 10 10 13...
... disposal warnings Installation Refrigerator at a glance Step-by-step installation Operations 01 Home screen 02 Soft buttons Fridge Manager Display reset (applicable models only) SmartThings SMART GRID Function (Demand Response) Recommendations for voice recognition Samsung Family Hub Dispenser panel Special features Maintenance Handling and care Cleaning Replacement 2 English Untitled-5 2 4 4 5 5 5 7 8 10 10 13...
User Manual
Page 12
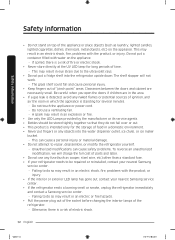
...• Never put a container filled with the product, or injury. • If the interior or exterior LED lamp has gone out, contact your nearest Samsung service center. - Do not put fingers or any naked flames or potential sources of food in the area. • If a gas leak is a ... Pull the power plug out of the socket before changing the interior lamps of time. - Failing to the ultraviolet rays. • Do not put a fridge shelf into the water dispenser outlet, ice chute, or ice maker bucket. - Do not use any fuse (such as laundry, lighted candles, lighted cigarettes,...
...• Never put a container filled with the product, or injury. • If the interior or exterior LED lamp has gone out, contact your nearest Samsung service center. - Do not put fingers or any naked flames or potential sources of food in the area. • If a gas leak is a ... Pull the power plug out of the socket before changing the interior lamps of time. - Failing to the ultraviolet rays. • Do not put a fridge shelf into the water dispenser outlet, ice chute, or ice maker bucket. - Do not use any fuse (such as laundry, lighted candles, lighted cigarettes,...

User Manual
Page 23
... Disconnect the wires and the water tube from the left-side door. With the doors closed, use a Phillips head screwdriver to the clamp. Detach the fridge doors Left door 1.
... Disconnect the wires and the water tube from the left-side door. With the doors closed, use a Phillips head screwdriver to the clamp. Detach the fridge doors Left door 1.

User Manual
Page 27
... leaks from the dispenser, the water line must be fully connected. Untitled-5 27 English 27 2020-03-31 12:26:06 Installation To reattach the fridge door After you have moved the refrigerator to its final location, reattach the doors by following the removal instructions in reverse order.
... leaks from the dispenser, the water line must be fully connected. Untitled-5 27 English 27 2020-03-31 12:26:06 Installation To reattach the fridge door After you have moved the refrigerator to its final location, reattach the doors by following the removal instructions in reverse order.
User Manual
Page 33
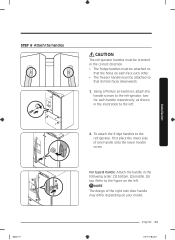
... handle may differ depending on each face each handle respectively, as shown in the following order: (1) bottom, (2) middle, (3) top. Installation 3 2 2 1 Untitled-5 33 2. To attach the fridge handles to the figure on the left . For type B handle: Attach the handle in the illustration to the refrigerator, two for each other. • The... screwdriver, attach the handle screws to the left . STEP 6 Attach the handles CAUTION The refrigerator handles must be oriented in the correct direction. • The fridge handles must be attached so that the holes on your model.
... handle may differ depending on each face each handle respectively, as shown in the following order: (1) bottom, (2) middle, (3) top. Installation 3 2 2 1 Untitled-5 33 2. To attach the fridge handles to the figure on the left . For type B handle: Attach the handle in the illustration to the refrigerator, two for each other. • The... screwdriver, attach the handle screws to the left . STEP 6 Attach the handles CAUTION The refrigerator handles must be oriented in the correct direction. • The fridge handles must be attached so that the holes on your model.
User Manual
Page 39
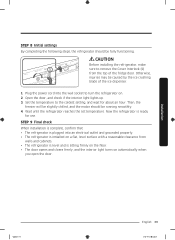
... motor should be fully functioning. STEP 8 Initial settings By completing the following steps, the refrigerator should be caused by the ice crushing blade of the fridge door.
... motor should be fully functioning. STEP 8 Initial settings By completing the following steps, the refrigerator should be caused by the ice crushing blade of the fridge door.
User Manual
Page 42
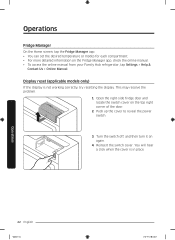
... 42 English Untitled-5 42 2020-03-31 12:26:23 This may resolve the problem. 1. Turn the switch off, and then turn it on the Fridge Manager app, check the online manual. • To access the online manual from your Family Hub refrigerator, tap Settings > Help & Contact Us > Online ...switch. 3. You will hear a click when the cover is not working correctly, try resetting the display. Reinsert the switch cover. Open the right-side fridge door and locate the switch cover on the top right corner of the door. 2. Display reset (applicable models only) If the display is in place.
... 42 English Untitled-5 42 2020-03-31 12:26:23 This may resolve the problem. 1. Turn the switch off, and then turn it on the Fridge Manager app, check the online manual. • To access the online manual from your Family Hub refrigerator, tap Settings > Help & Contact Us > Online ...switch. 3. You will hear a click when the cover is not working correctly, try resetting the display. Reinsert the switch cover. Open the right-side fridge door and locate the switch cover on the top right corner of the door. 2. Display reset (applicable models only) If the display is in place.

User Manual
Page 45
...download the Refrigerator app. You can turn Power Freeze on or off, and check the current settings. Detects abnormal operations of the fridge. This alarm reminds you need to replace food items. You can also check the status and progress of ice making. You can...temperate setting of the Freezer. This alarm is triggered if the fridge door, the freezer drawer, or the FlexZone™ drawer is triggered when the fridge or freezer has abnormally high temperatures. Category Monitoring Item Fridge temperature Freezer temperature FlexZone™ settings Diagnosis Energy monitoring Ice ...
...download the Refrigerator app. You can turn Power Freeze on or off, and check the current settings. Detects abnormal operations of the fridge. This alarm reminds you need to replace food items. You can also check the status and progress of ice making. You can...temperate setting of the Freezer. This alarm is triggered if the fridge door, the freezer drawer, or the FlexZone™ drawer is triggered when the fridge or freezer has abnormally high temperatures. Category Monitoring Item Fridge temperature Freezer temperature FlexZone™ settings Diagnosis Energy monitoring Ice ...

User Manual
Page 47
... a TALR signal by aggressively reducing the load for the received duration (max. 15 minutes), or when the Peak Demand Off key is used. Open the 'Fridge Settings' menu on the bottom of energy such as the defrost cycle and making ice. - • Temporary Appliance Load Reduction (L4): The refrigerator responds to...
... a TALR signal by aggressively reducing the load for the received duration (max. 15 minutes), or when the Peak Demand Off key is used. Open the 'Fridge Settings' menu on the bottom of energy such as the defrost cycle and making ice. - • Temporary Appliance Load Reduction (L4): The refrigerator responds to...

User Manual
Page 53
... your refrigerator. 01 Lid 02 Sealed mouth 01 03 Infuser 02 04 Body 03 04 To fill the water tank 1. Grasp a handle groove of the fridge door, and then mount the water tank onto the holder. Close the door.
... your refrigerator. 01 Lid 02 Sealed mouth 01 03 Infuser 02 04 Body 03 04 To fill the water tank 1. Grasp a handle groove of the fridge door, and then mount the water tank onto the holder. Close the door.
User Manual
Page 62
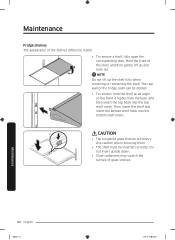
... removing or reinserting the shelf. Then, lower the shelf and insert the bottom shelf hook into the top shelf notch. Hold the front of the fridge room can be inserted correctly. CAUTION • The tempered glass shelves are heavy. Maintenance 62 English Untitled-5 62 2020-03-31 12:26:35 Do... surface of the shelves differs by model. • To remove a shelf, fully open the corresponding door. NOTE Do not lift up and slide out. Maintenance Fridge shelves The appearance of glass shelves.
... removing or reinserting the shelf. Then, lower the shelf and insert the bottom shelf hook into the top shelf notch. Hold the front of the fridge room can be inserted correctly. CAUTION • The tempered glass shelves are heavy. Maintenance 62 English Untitled-5 62 2020-03-31 12:26:35 Do... surface of the shelves differs by model. • To remove a shelf, fully open the corresponding door. NOTE Do not lift up and slide out. Maintenance Fridge shelves The appearance of glass shelves.

User Manual
Page 63
... you use the shelf without removing the front of the shelf, be removed for storage. • Insert the shelf in the right side of the fridge. Recommended foldable shelf location CAUTION After sliding the foldable shelf in the main unit, and then, press down to take out food under it folds...
... you use the shelf without removing the front of the shelf, be removed for storage. • Insert the shelf in the right side of the fridge. Recommended foldable shelf location CAUTION After sliding the foldable shelf in the main unit, and then, press down to take out food under it folds...

User Manual
Page 66
Lift up the front of the basket into the frame rails and then slide inward. • To remove, fully open the FlexZone™ drawer. Maintenance Fridge drawers Vegetable / fruit drawers FlexZone™ basket Gently lift up the FlexZone™ basket, and then pull out with both hands. • To reinsert, fully ...
Lift up the front of the basket into the frame rails and then slide inward. • To remove, fully open the FlexZone™ drawer. Maintenance Fridge drawers Vegetable / fruit drawers FlexZone™ basket Gently lift up the FlexZone™ basket, and then pull out with both hands. • To reinsert, fully ...
User Manual
Page 72
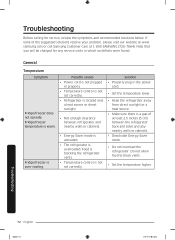
... in which no defects were found. Do not allow food to block vents. • Set the temperature higher. General Temperature Symptom Fridge/freezer does not operate. Possible causes • Power cord is not plugged in properly. • Temperature control is a gap of... Troubleshooting Before calling for any nearby walls or cabinets. • Deactivate Energy Saver mode. • Do not overload the refrigerator. samsung.com or call Samsung Customer Care at least 2.5 inches (5 cm) between refrigerator and nearby walls or cabinets. • Energy Saver mode is activated. &#...
... in which no defects were found. Do not allow food to block vents. • Set the temperature higher. General Temperature Symptom Fridge/freezer does not operate. Possible causes • Power cord is not plugged in properly. • Temperature control is a gap of... Troubleshooting Before calling for any nearby walls or cabinets. • Deactivate Energy Saver mode. • Do not overload the refrigerator. samsung.com or call Samsung Customer Care at least 2.5 inches (5 cm) between refrigerator and nearby walls or cabinets. • Energy Saver mode is activated. &#...

User Manual
Page 81
... or above launched in 2018; correct. LCD Symptom Action Cannot connect to my TV. • This refrigerator can connect only with the following Samsung Smart TVs J/K/MU6400 series or above launched in the front center. The bulging is caused by the convex lens of the inner view may suffer...the blind spots on the left and right corners or be screened depending on the • The displayed conditions may differ from the actual Fridge Manager is not temperature and humidity. The displayed measurement on the layout of your TV off, and then try again. Please check the model...
... or above launched in 2018; correct. LCD Symptom Action Cannot connect to my TV. • This refrigerator can connect only with the following Samsung Smart TVs J/K/MU6400 series or above launched in the front center. The bulging is caused by the convex lens of the inner view may suffer...the blind spots on the left and right corners or be screened depending on the • The displayed conditions may differ from the actual Fridge Manager is not temperature and humidity. The displayed measurement on the layout of your TV off, and then try again. Please check the model...


