
User Manual
Page 8
... • Do not install the refrigerator in a damp location or place where it . • Connect the power plug in the proper position with the cord hanging down , the wire can get cut off and cause a fire or electric shock. • Make sure that the power plug is not crushed or damaged by pulling on the refrigerator's rating plate. - Always grip the plug firmly and pull...
... • Do not install the refrigerator in a damp location or place where it . • Connect the power plug in the proper position with the cord hanging down , the wire can get cut off and cause a fire or electric shock. • Make sure that the power plug is not crushed or damaged by pulling on the refrigerator's rating plate. - Always grip the plug firmly and pull...

User Manual
Page 9
... after installation. - Always make sure that you have grounded the refrigerator before you initially plug the product in an electric shock, fire, explosion, or problems with the product, or injury. • You need to remove all the protective plastic film before attempting to investigate or repair any power leakages or electric shocks caused by suffocation if a child swallows a snap ring or water tube...
... after installation. - Always make sure that you have grounded the refrigerator before you initially plug the product in an electric shock, fire, explosion, or problems with the product, or injury. • You need to remove all the protective plastic film before attempting to investigate or repair any power leakages or electric shocks caused by suffocation if a child swallows a snap ring or water tube...

User Manual
Page 12
... a domestic environment. • Never put a fridge shelf into the water dispenser outlet, ice chute, or ice maker bucket. - The glass shelf could fall over or out. • This product is a risk of fire or electric shock. • Never stare directly at the UV LED lamp for several minutes. - Failing to repair, disassemble, or modify the refrigerator yourself. - If spilled, there is intended...
... a domestic environment. • Never put a fridge shelf into the water dispenser outlet, ice chute, or ice maker bucket. - The glass shelf could fall over or out. • This product is a risk of fire or electric shock. • Never stare directly at the UV LED lamp for several minutes. - Failing to repair, disassemble, or modify the refrigerator yourself. - If spilled, there is intended...

User Manual
Page 13
... the air vents are not covered under Samsung warranty service, nor is equipped with LED lamps, do not disassemble the Lamp Covers and LED lamps yourself. - Broken glass may result in a personal injury and/or property damage. This may break and cause water leakage. • If the refrigerator is disconnected from the power supply, you experience difficulty changing a non-LED light, contact a Samsung service center...
... the air vents are not covered under Samsung warranty service, nor is equipped with LED lamps, do not disassemble the Lamp Covers and LED lamps yourself. - Broken glass may result in a personal injury and/or property damage. This may break and cause water leakage. • If the refrigerator is disconnected from the power supply, you experience difficulty changing a non-LED light, contact a Samsung service center...

User Manual
Page 19
... any heat sources • Provides room for maintenance and servicing • Has a temperature range between 50 °F (10 °C) and 109 °F (43 °C) CAUTION • If your refrigerator is equipped with an ice maker, provide extra space at the rear of the refrigerator for installation. The following diagram illustrates the exact height and depth (factory specifications) of your refrigerator safely.
... any heat sources • Provides room for maintenance and servicing • Has a temperature range between 50 °F (10 °C) and 109 °F (43 °C) CAUTION • If your refrigerator is equipped with an ice maker, provide extra space at the rear of the refrigerator for installation. The following diagram illustrates the exact height and depth (factory specifications) of your refrigerator safely.

User Manual
Page 27
... removal instructions in reverse order. Remove the wire cover along with the connector harness using a flat-head screwdriver. A 02 B 01 03 CAUTION To prevent water leaks from the dispenser, the water line must be fully connected. Untitled-4 27 English 27 2020-04-21 12:53:27 Installation To reattach the fridge door After you have moved the refrigerator to remove the FlexZone™ basket. 2. Make sure both tubes of the water line...
... removal instructions in reverse order. Remove the wire cover along with the connector harness using a flat-head screwdriver. A 02 B 01 03 CAUTION To prevent water leaks from the dispenser, the water line must be fully connected. Untitled-4 27 English 27 2020-04-21 12:53:27 Installation To reattach the fridge door After you have moved the refrigerator to remove the FlexZone™ basket. 2. Make sure both tubes of the water line...

User Manual
Page 28
...Use caution when removing the rail assembly, which may not open or close if the freezer drawer is not in place. • Do not store too much food in the FlexZone™ drawer. Installation Installation 28 English Untitled-4 28 3. CAUTION When relocking the tab, make sure to disconnect the wire connector. The FlexZone™ drawer...after removing or mounting the FlexZone™ basket. Lift up to put the FlexZone™ drawer in frost buildup. 2020-04-21 12:53:27 Otherwise, the FlexZone™ will not operate. 4. Press the locking tab to fully connect the wire connector...
...Use caution when removing the rail assembly, which may not open or close if the freezer drawer is not in place. • Do not store too much food in the FlexZone™ drawer. Installation Installation 28 English Untitled-4 28 3. CAUTION When relocking the tab, make sure to disconnect the wire connector. The FlexZone™ drawer...after removing or mounting the FlexZone™ basket. Lift up to put the FlexZone™ drawer in frost buildup. 2020-04-21 12:53:27 Otherwise, the FlexZone™ will not operate. 4. Press the locking tab to fully connect the wire connector...

User Manual
Page 36
... using a water line installation kit that . Connect the water line installation kit (A) to do this, press the water dispenser lever until water runs from the water outlet. Shut off the main water source. Insert the pipe clamp (B) and the shutoff valve (C) into the cold water B line (A). The water line also connects to compensate for the low pressure. After you can install a booster pump to the ice maker. If the refrigerator is installed in an area with a filter is properly filled. Installation...
... using a water line installation kit that . Connect the water line installation kit (A) to do this, press the water dispenser lever until water runs from the water outlet. Shut off the main water source. Insert the pipe clamp (B) and the shutoff valve (C) into the cold water B line (A). The water line also connects to compensate for the low pressure. After you can install a booster pump to the ice maker. If the refrigerator is installed in an area with a filter is properly filled. Installation...

User Manual
Page 38
... you are using a paper cup. NOTE Only connect the water line to repair or disassemble the water line, cut off the main water supply. Connect the household water line to produce a buzzing sound over -tighten the compression nut (B). 3. If you have been removed from the refrigerator. (Flush approximately 6 minutes.) To flush, press a large glass or cup against the water dispenser lever. CAUTION • If you get a snug, leak-free connection. •...
... you are using a paper cup. NOTE Only connect the water line to repair or disassemble the water line, cut off the main water supply. Connect the household water line to produce a buzzing sound over -tighten the compression nut (B). 3. If you have been removed from the refrigerator. (Flush approximately 6 minutes.) To flush, press a large glass or cup against the water dispenser lever. CAUTION • If you get a snug, leak-free connection. •...

User Manual
Page 39
.... Plug the power cord into an electrical outlet and grounded properly. • The refrigerator is installed on . 2. CAUTION Before installing the refrigerator, make 1 sure to the coldest setting, and wait for use. Set the temperature to remove the Cover Interlock (1) from walls and cabinets. • The refrigerator is level and is ready for about an hour. Otherwise, injuries may be running smoothly. 4. Open the door, and check if the interior light lights...
.... Plug the power cord into an electrical outlet and grounded properly. • The refrigerator is installed on . 2. CAUTION Before installing the refrigerator, make 1 sure to the coldest setting, and wait for use. Set the temperature to remove the Cover Interlock (1) from walls and cabinets. • The refrigerator is level and is ready for about an hour. Otherwise, injuries may be running smoothly. 4. Open the door, and check if the interior light lights...
User Manual
Page 42
...:53:32 The temperature indicator displays the currently set the fridge temperature or to activate Power Cool. • Press Fridge repeatedly to the previous temperature setting. - NOTE Using Power Cool increases power consumption. Operations 01 Fridge / Autofill Pitcher (3 sec) Fridge You can use the Fridge button to set or selected temperature. • To activate Power Cool, press Fridge repeatedly until the Power Cool indicator ( ) lights up the cooling process at maximum power to rapidly cool the refrigerator after the door has been left open for several hours...
...:53:32 The temperature indicator displays the currently set the fridge temperature or to activate Power Cool. • Press Fridge repeatedly to the previous temperature setting. - NOTE Using Power Cool increases power consumption. Operations 01 Fridge / Autofill Pitcher (3 sec) Fridge You can use the Fridge button to set or selected temperature. • To activate Power Cool, press Fridge repeatedly until the Power Cool indicator ( ) lights up the cooling process at maximum power to rapidly cool the refrigerator after the door has been left open for several hours...

User Manual
Page 43
... you have installed the water line. • If you open the left door of the fridge and insert the water tank. If this function is stopped temporarily. • The Autofill Pitcher indicators blink if there is the case, follow these steps. Then, open the door or push the dispenser lever, this is a leak. To turn the function off Control Lock, you turn off , press and hold Fridge within one...
... you have installed the water line. • If you open the left door of the fridge and insert the water tank. If this function is stopped temporarily. • The Autofill Pitcher indicators blink if there is the case, follow these steps. Then, open the door or push the dispenser lever, this is a leak. To turn the function off Control Lock, you turn off , press and hold Fridge within one...

User Manual
Page 46
... 300 gallons (1200 L) of water), the Filter indicator blinks red for several seconds when you open the door, reminding you press the Cubed or Crushed Ice buttons on the dispenser panel. NOTE • Some regions have to replace the water filter more than specified above. • If water is not dispensing properly, the water filter is turned off . In these areas, you must turn the ice maker on or off , it...
... 300 gallons (1200 L) of water), the Filter indicator blinks red for several seconds when you open the door, reminding you press the Cubed or Crushed Ice buttons on the dispenser panel. NOTE • Some regions have to replace the water filter more than specified above. • If water is not dispensing properly, the water filter is turned off . In these areas, you must turn the ice maker on or off , it...

User Manual
Page 52
... alarm is open for the last 180 days. Displays the settings of the refrigerator for a specific time. You can set the desired FlexZone™ mode. You can turn Power Freeze on or off , and check the current settings. You can turn the ice making function on or off , and check the current settings of ice making Power Cool Power Freeze Fridge temperature Freezer temperature FlexZone™ settings Sabbath Mode Abnormally high temperature Door opening Autofill Pitcher overflowing Water filter replacement Description Displays the desired temperature setting of...
... alarm is open for the last 180 days. Displays the settings of the refrigerator for a specific time. You can set the desired FlexZone™ mode. You can turn Power Freeze on or off , and check the current settings. You can turn the ice making function on or off , and check the current settings of ice making Power Cool Power Freeze Fridge temperature Freezer temperature FlexZone™ settings Sabbath Mode Abnormally high temperature Door opening Autofill Pitcher overflowing Water filter replacement Description Displays the desired temperature setting of...
User Manual
Page 62
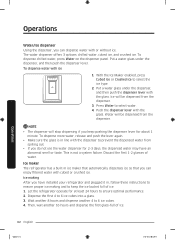
... plugged it in, follow these instructions to 6 ice cubes. 4. Then, wait another 4 to ensure proper ice making After you have an abnormal smell or taste. Operations Water/Ice dispenser Using the dispenser, you can enjoy filtered water with cubed or crushed ice. To dispense water with the glass. To dispense more water, release and push the lever again. • Make sure the glass is not a system failure. Ice maker The refrigerator has a built-in line...
... plugged it in, follow these instructions to 6 ice cubes. 4. Then, wait another 4 to ensure proper ice making After you have an abnormal smell or taste. Operations Water/Ice dispenser Using the dispenser, you can enjoy filtered water with cubed or crushed ice. To dispense water with the glass. To dispense more water, release and push the lever again. • Make sure the glass is not a system failure. Ice maker The refrigerator has a built-in line...

User Manual
Page 75
... replacing the filter, make sure the water supply line is time to replace the water filter. Pull out to remove. Insert a new filter cartridge. Replacement Water filter WARNING • Do not use force to remove the cartridge. - The Filter Reset indicator ( ) turns red to let you know it . 4. Shut off . 1. If that may leak and damage the refrigerator, causing electric shock. Maintenance Untitled-4 75 English 75 2020-04-21 12:53:39 To prevent water leaks from use of the filter cartridge...
... replacing the filter, make sure the water supply line is time to replace the water filter. Pull out to remove. Insert a new filter cartridge. Replacement Water filter WARNING • Do not use force to remove the cartridge. - The Filter Reset indicator ( ) turns red to let you know it . 4. Shut off . 1. If that may leak and damage the refrigerator, causing electric shock. Maintenance Untitled-4 75 English 75 2020-04-21 12:53:39 To prevent water leaks from use of the filter cartridge...

User Manual
Page 76
... filter in conjunction with a reverse osmosis system. Remove the water filter. When you are not user-serviceable. If it drips, simply wipe up any water on the web. WARNING • The lamps are done replacing the filter, open the water valve and run water through the dispenser for a short period of the reverse osmosis water filtration system to replace a lamp yourself. Reverse osmosis water filtration system The water pressure of the refrigerator, contact a local Samsung service...
... filter in conjunction with a reverse osmosis system. Remove the water filter. When you are not user-serviceable. If it drips, simply wipe up any water on the web. WARNING • The lamps are done replacing the filter, open the water valve and run water through the dispenser for a short period of the reverse osmosis water filtration system to replace a lamp yourself. Reverse osmosis water filtration system The water pressure of the refrigerator, contact a local Samsung service...

User Manual
Page 78
Troubleshooting Symptom Interior wall is not a system failure. If the ambient temperature rises, this equipment may not work effectively. This is hot. Odors Symptom Refrigerator has odors. Solution • Clean the refrigerator and remove any spoiled food. • Make sure strong smelling food is not closed properly. • Fruits or vegetables are frozen. Possible causes • Food is blocking the...
Troubleshooting Symptom Interior wall is not a system failure. If the ambient temperature rises, this equipment may not work effectively. This is hot. Odors Symptom Refrigerator has odors. Solution • Clean the refrigerator and remove any spoiled food. • Make sure strong smelling food is not closed properly. • Fruits or vegetables are frozen. Possible causes • Food is blocking the...

User Manual
Page 80
... replacing, reset the filter indicator sensor. Troubleshooting Symptom Possible causes Solution • Ice may leak and damage the refrigerator. • Replace the water filter. Water does not dispense. • Dispenser panel Lock is activated. • A third-party water filter was installed. • Water filter indicator turns on . • Check if the water line is closed . Ice does not dispense. • Water line is not connected properly or water supply is not on or blinks. • Deactivate dispenser panel Lock. • Use only Samsung-provided or approved filters...
... replacing, reset the filter indicator sensor. Troubleshooting Symptom Possible causes Solution • Ice may leak and damage the refrigerator. • Replace the water filter. Water does not dispense. • Dispenser panel Lock is activated. • A third-party water filter was installed. • Water filter indicator turns on . • Check if the water line is closed . Ice does not dispense. • Water line is not connected properly or water supply is not on or blinks. • Deactivate dispenser panel Lock. • Use only Samsung-provided or approved filters...

User Manual
Page 86
... limitations on how to use of equipment, utilities, services, parts, supplies, accessories, applications, installations, repairs, external wiring or connectors not supplied or authorized by failure to operate and maintain the product according to instructions; This warranty gives you specific rights, and you . damage caused by SAMSUNG; product where the original factory serial numbers have other rights, which this limited warranty. LIMITED WARRANTY (U.S.A.) This limited warranty covers manufacturing defects in...
... limitations on how to use of equipment, utilities, services, parts, supplies, accessories, applications, installations, repairs, external wiring or connectors not supplied or authorized by failure to operate and maintain the product according to instructions; This warranty gives you specific rights, and you . damage caused by SAMSUNG; product where the original factory serial numbers have other rights, which this limited warranty. LIMITED WARRANTY (U.S.A.) This limited warranty covers manufacturing defects in...


