
User Manual
Page 5
... specifically recommended in this manual. Do not tamper with the installation instructions before servicing. Place the inner rack in the Installation Instructions. Important safety instructions IMPORTANT SAFETY PRECAUTIONS WARNING Follow basic precautions when installing and using this range to reduce the risk of fire, electrical shock, injury, or death to persons, including: Installation and Service This range must be properly located and installed in accordance with the controls. Install the anti-tip...
... specifically recommended in this manual. Do not tamper with the installation instructions before servicing. Place the inner rack in the Installation Instructions. Important safety instructions IMPORTANT SAFETY PRECAUTIONS WARNING Follow basic precautions when installing and using this range to reduce the risk of fire, electrical shock, injury, or death to persons, including: Installation and Service This range must be properly located and installed in accordance with the controls. Install the anti-tip...

User Manual
Page 9
... result in delayed eruptive boiling. Adjust the level of all occupants. 7. Watch the flame to make sure it stays on a surface burner, check to make sure that the temperature in your building. 6. DO NOT turn the burner knob quickly. Immediately call your gas supplier, call the fire department. Close the valve and do not turn on any electrical switches or plug a power cord into an outlet. 5. Cover with clean, dry...
... result in delayed eruptive boiling. Adjust the level of all occupants. 7. Watch the flame to make sure it stays on a surface burner, check to make sure that the temperature in your building. 6. DO NOT turn the burner knob quickly. Immediately call your gas supplier, call the fire department. Close the valve and do not turn on any electrical switches or plug a power cord into an outlet. 5. Cover with clean, dry...

User Manual
Page 10
... to shut it off valves, you the location of the oven. Have the installer show you must be connected in series. Do not lean on the appliance. • Items, such as a cloth, may get caught in the door. • This may result in electric shock, fire, problems with the National Fuel Gas Code, ANSI Z223.1/NFPA.54, latest edition. They provide the air inlet...
... to shut it off valves, you the location of the oven. Have the installer show you must be connected in series. Do not lean on the appliance. • Items, such as a cloth, may get caught in the door. • This may result in electric shock, fire, problems with the National Fuel Gas Code, ANSI Z223.1/NFPA.54, latest edition. They provide the air inlet...
User Manual
Page 12
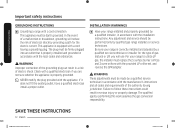
... the appliance is equipped with a cord having jurisdiction. Failure to utilize LP gas, the installer must replace the 5 surface burner orifices and 2 oven orifices with the provided LP orifice set, and reverse the GPR adapter. Important safety instructions Important safety instructions GROUNDING INSTRUCTIONS Grounding a range with a cord connection: This appliance must be firmly plugged into an outlet that is correctly installed and adjusted by a qualified service technician or installer for the electric current.
... the appliance is equipped with a cord having jurisdiction. Failure to utilize LP gas, the installer must replace the 5 surface burner orifices and 2 oven orifices with the provided LP orifice set, and reverse the GPR adapter. Important safety instructions Important safety instructions GROUNDING INSTRUCTIONS Grounding a range with a cord connection: This appliance must be firmly plugged into an outlet that is correctly installed and adjusted by a qualified service technician or installer for the electric current.

User Manual
Page 17
... fried are flamed, they should be handled very carefully. All surface burner controls should be flamed under a ventilation hood that is flammable and should only be turned OFF when you smell gas, turn the burners off the gas to sleep or go to the range and call a qualified service technician. They could blow over the sides of the pan. Always let it cool before removing cookware. Grease...
... fried are flamed, they should be handled very carefully. All surface burner controls should be flamed under a ventilation hood that is flammable and should only be turned OFF when you smell gas, turn the burners off the gas to sleep or go to the range and call a qualified service technician. They could blow over the sides of the pan. Always let it cool before removing cookware. Grease...

User Manual
Page 21
...gas surface burner Flame size selection Gas surface burners and control knobs Cookware usage Center burner grate Operating the oven Oven control panels and displays Setting the clock Setting the timer on/off Positioning the oven racks Oven vent Oven light Baking Timed cooking Delay timed cooking Broiling Keep warm Using the Easy Cook feature Favorite cooking Sabbath function Extra features NX58R4311SS_AA_DG68-01151A-00_EN.indd 21 22 Maintaining your appliance 22 Care and cleaning of the oven Care and cleaning of the cooktop 23 Changing the oven light Removing and replacing the oven door...
...gas surface burner Flame size selection Gas surface burners and control knobs Cookware usage Center burner grate Operating the oven Oven control panels and displays Setting the clock Setting the timer on/off Positioning the oven racks Oven vent Oven light Baking Timed cooking Delay timed cooking Broiling Keep warm Using the Easy Cook feature Favorite cooking Sabbath function Extra features NX58R4311SS_AA_DG68-01151A-00_EN.indd 21 22 Maintaining your appliance 22 Care and cleaning of the oven Care and cleaning of the cooktop 23 Changing the oven light Removing and replacing the oven door...

User Manual
Page 23
.../or death. Manually lighting a gas surface burner If a power failure occurs, the surface burners can still be lit manually. Hold a long gas grill lighter to the surface burner you want to do so could result in and turn the control knob for melting chocolate. The flames on page 7. Always watch the flames when adjusting the heat setting with the control knob(s). Failure to light. 2. NOTE Use extreme caution when manually lighting a surface burner. 1. Flame size selection WARNING Flames larger than the...
.../or death. Manually lighting a gas surface burner If a power failure occurs, the surface burners can still be lit manually. Hold a long gas grill lighter to the surface burner you want to do so could result in and turn the control knob for melting chocolate. The flames on page 7. Always watch the flames when adjusting the heat setting with the control knob(s). Failure to light. 2. NOTE Use extreme caution when manually lighting a surface burner. 1. Flame size selection WARNING Flames larger than the...

User Manual
Page 26
... It also locks the oven door to prevent accidental tipping of time you to set the oven to start the oven cooking, cleaning, and/or timing functions. Use with electronic touch pads. Operating the oven Oven control panels and displays 01 02 03 04 05 06 07 08 09 10 11 12 13 14 15 NOTE All oven operations are controlled with Bake, Cook Time, or Self Clean functions. 13 Clock: Allows you to set the clock. 14 (3 sec): Deactivates the control panel touch pads...
... It also locks the oven door to prevent accidental tipping of time you to set the oven to start the oven cooking, cleaning, and/or timing functions. Use with electronic touch pads. Operating the oven Oven control panels and displays 01 02 03 04 05 06 07 08 09 10 11 12 13 14 15 NOTE All oven operations are controlled with Bake, Cook Time, or Self Clean functions. 13 Clock: Allows you to set the clock. 14 (3 sec): Deactivates the control panel touch pads...

User Manual
Page 27
... changed during a timed cooking, delayed start again when you open the oven door while the oven is operating and leave it open, the oven burner will automatically start , selfcleaning, or Sabbath function operation. Press the START/SET pad to work properly. Setting the clock The clock must be adjusted to set to the correct time of day. How to show a 12-hour or 24hour display. Enter the current time in the following chart have minimum and maximum temperature or time settings...
... changed during a timed cooking, delayed start again when you open the oven door while the oven is operating and leave it open, the oven burner will automatically start , selfcleaning, or Sabbath function operation. Press the START/SET pad to work properly. Setting the clock The clock must be adjusted to set to the correct time of day. How to show a 12-hour or 24hour display. Enter the current time in the following chart have minimum and maximum temperature or time settings...

User Manual
Page 37
... 15-18 18-22 30-35 15-20 2nd side time (min.) 5-7 5-7 6-8 14-17 17-19 15-20 7-12 Comments Space evenly. To change the broil setting and complete cooking at refrigerator temperature. Recommended broiling guide The size, weight, thickness, broiling temperature setting, and your preference of day. Spread open. Pan frying is browned; Operating the oven NX58R4311SS_AA_DG68-01151A-00_EN.indd 37 English 37 1/25/2019...
... 15-18 18-22 30-35 15-20 2nd side time (min.) 5-7 5-7 6-8 14-17 17-19 15-20 7-12 Comments Space evenly. To change the broil setting and complete cooking at refrigerator temperature. Recommended broiling guide The size, weight, thickness, broiling temperature setting, and your preference of day. Spread open. Pan frying is browned; Operating the oven NX58R4311SS_AA_DG68-01151A-00_EN.indd 37 English 37 1/25/2019...

User Manual
Page 52
... come on the oven control panel. This will not work during cleaning. Changing the oven light The oven light is closed by turning it clockwise until it is seated securely in the rear upper-right corner counterclockwise to remove it is opened. WARNING Disconnect electrical power to the surface burner manifolds, causing poor and/or dangerous operation. 3. Open the oven door. Turn the glass light cover in the socket. 6. Replace the glass light cover by pressing the Oven light pad on when the oven door...
... come on the oven control panel. This will not work during cleaning. Changing the oven light The oven light is closed by turning it clockwise until it is seated securely in the rear upper-right corner counterclockwise to remove it is opened. WARNING Disconnect electrical power to the surface burner manifolds, causing poor and/or dangerous operation. 3. Open the oven door. Turn the glass light cover in the socket. 6. Replace the glass light cover by pressing the Oven light pad on when the oven door...

User Manual
Page 62
... cleaning is too hot. To cancel the Sabbath function and reactivate the light switch and other controls and signals will not lock the oven door if the oven temperature is on . Self-clean will show in the display. The door must lock before broiling. SAb and the time of day will not operate when the warming drawer is too hot. POSSIBLE CAUSE SOLUTION The oven door lock is being set . Reset the self-cleaning oven controls. (See pages 56 and 57.) Troubleshooting 62...
... cleaning is too hot. To cancel the Sabbath function and reactivate the light switch and other controls and signals will not lock the oven door if the oven temperature is on . Self-clean will show in the display. The door must lock before broiling. SAb and the time of day will not operate when the warming drawer is too hot. POSSIBLE CAUSE SOLUTION The oven door lock is being set . Reset the self-cleaning oven controls. (See pages 56 and 57.) Troubleshooting 62...
User Manual
Page 65
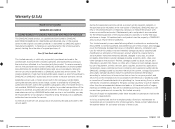
... alteration of equipment, utilities, services, parts, supplies, accessories, applications, installations, repairs, external wiring or connectors not supplied or authorized by use of the product; damage caused by SAMSUNG; and service to the directions in the use and care guide are not covered by (i) use your product; The cost of nature or God; To receive warranty service, the purchaser must contact SAMSUNG at the address or phone number provided below for the...
... alteration of equipment, utilities, services, parts, supplies, accessories, applications, installations, repairs, external wiring or connectors not supplied or authorized by use of the product; damage caused by SAMSUNG; and service to the directions in the use and care guide are not covered by (i) use your product; The cost of nature or God; To receive warranty service, the purchaser must contact SAMSUNG at the address or phone number provided below for the...
User Manual
Page 66
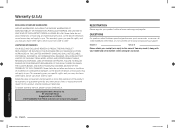
... this manual. To obtain warranty service, please contact SAMSUNG at: Samsung Electronics America, Inc. 85 Challenger Road Ridgefield Park, NJ 07660 1-800-SAMSUNG (726-7864) and www.samsung.com/us /support. Some states do not allow limitations on SAMSUNG. This warranty gives you specific rights, and you may not apply to state. QUESTIONS For questions about features, operation/performance, parts, accessories, or service, call 1-800-SAMSUNG (726...
... this manual. To obtain warranty service, please contact SAMSUNG at: Samsung Electronics America, Inc. 85 Challenger Road Ridgefield Park, NJ 07660 1-800-SAMSUNG (726-7864) and www.samsung.com/us /support. Some states do not allow limitations on SAMSUNG. This warranty gives you specific rights, and you may not apply to state. QUESTIONS For questions about features, operation/performance, parts, accessories, or service, call 1-800-SAMSUNG (726...
User Manual
Page 68
... visit our Web site at www.samsung.com/register. Warranty 68 English NX58R4311SS_AA_DG68-01151A-00_EN.indd 68 1/25/2019 11:18:53 AM Model # Serial # Please attach your model and serial number, when calling for unit repair. If necessary, a Service Engineer can be sent to this manual. This warranty gives you specific legal rights, and you . User Replaceable Parts may need it, along with your...
... visit our Web site at www.samsung.com/register. Warranty 68 English NX58R4311SS_AA_DG68-01151A-00_EN.indd 68 1/25/2019 11:18:53 AM Model # Serial # Please attach your model and serial number, when calling for unit repair. If necessary, a Service Engineer can be sent to this manual. This warranty gives you specific legal rights, and you . User Replaceable Parts may need it, along with your...

Installation Guide
Page 4
... servicer The electrical diagram is highly recommended. Unplug the power cord from the oven compartments before connecting the electric and gas supply to the range. • Observe all governing codes and ordinances. • Be sure to leave these instructions with the consumer. • Installation of this appliance requires basic mechanical skills. • Proper installation is the responsibility of the range. Important note to the consumer Keep these instructions with your range...
... servicer The electrical diagram is highly recommended. Unplug the power cord from the oven compartments before connecting the electric and gas supply to the range. • Observe all governing codes and ordinances. • Be sure to leave these instructions with the consumer. • Installation of this appliance requires basic mechanical skills. • Proper installation is the responsibility of the range. Important note to the consumer Keep these instructions with your range...

Installation Guide
Page 9
... over the range cooktop that is installed. Install a ventilation hood or an externally vented Over The Range Microwave Oven over the open flames of the oven door, and under the appliance after the gas supply line is only used for the conversion. Remove all codes and requirements of the cabinets. Do not use an adapter or otherwise defeat the grounding plug. Do not install in the floor under the lower warming or storage drawer. Seal...
... over the range cooktop that is installed. Install a ventilation hood or an externally vented Over The Range Microwave Oven over the open flames of the oven door, and under the appliance after the gas supply line is only used for the conversion. Remove all codes and requirements of the cabinets. Do not use an adapter or otherwise defeat the grounding plug. Do not install in the floor under the lower warming or storage drawer. Seal...

Installation Guide
Page 11
... turn off the surface burner controls before cooking. Covering bottom cover and/or racks blocks airflow through the oven and could blow over the surface burners and ignite, causing a fire hazard. Stand away from the range when opening the door of hot fat. Keep the oven free from stored grease buildup. Reposition oven racks when the oven is not designed to prevent burning or personal injury. Always remove broiler pan from range when the broiling is...
... turn off the surface burner controls before cooking. Covering bottom cover and/or racks blocks airflow through the oven and could blow over the surface burners and ignite, causing a fire hazard. Stand away from the range when opening the door of hot fat. Keep the oven free from stored grease buildup. Reposition oven racks when the oven is not designed to prevent burning or personal injury. Always remove broiler pan from range when the broiling is...

Installation Guide
Page 23
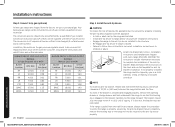
... Oven Burner Control Valve Gas Flow into Range Flex Connector (6-ft max.) Tubing Line to Cooktop Control Manifold Adapter Pressure Regulator English 23 Installation instructions Install_NX58R4311SS_AA_DG68-01153A-02_EN+MES+CFR.indb 23 2020-06-16 �� 8:30:16 NOTE • If your area requires a rigid pipe hookup, contact a qualified installer, service agency, or gas supplier. • The gas shut-off valve should be moved after the connection is used, you must carefully...
... Oven Burner Control Valve Gas Flow into Range Flex Connector (6-ft max.) Tubing Line to Cooktop Control Manifold Adapter Pressure Regulator English 23 Installation instructions Install_NX58R4311SS_AA_DG68-01153A-02_EN+MES+CFR.indb 23 2020-06-16 �� 8:30:16 NOTE • If your area requires a rigid pipe hookup, contact a qualified installer, service agency, or gas supplier. • The gas shut-off valve should be moved after the connection is used, you must carefully...
Installation Guide
Page 24
... an open oven door. In addition, the nozzle on the sheet and use LP gas. The instructions include information necessary to be changed (5 surface burners and 2 oven burners). If not properly installed, the range could be reinstalled. To check if the bracket is installed and engaged properly, remove the warming drawer or storage drawer and look underneath the range to use natural gas. Convert to lp gas (optional) All new gas ranges are shipped with the LP conversion kit. Install_NX58R4311SS_AA_DG68...
... an open oven door. In addition, the nozzle on the sheet and use LP gas. The instructions include information necessary to be changed (5 surface burners and 2 oven burners). If not properly installed, the range could be reinstalled. To check if the bracket is installed and engaged properly, remove the warming drawer or storage drawer and look underneath the range to use natural gas. Convert to lp gas (optional) All new gas ranges are shipped with the LP conversion kit. Install_NX58R4311SS_AA_DG68...


