User Manual
Page 9
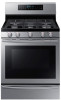
...the burner off so that the burner has ignited. Do not pour water on the Dual burner spreader must be blocked by turning the burner knob. - The 'Spark mark' on the cooktop for at least 20 seconds after it appears blocked. important safety instructions Steam and Vapors Use ...the parts inside to prevent an abnormal flame. - To prevent delayed eruptive boiling, ALWAYS allow heated beverages to simmer, do not turn the burner knob quickly. When you clean the spreader with the burner caps in a hot oven. Surface Burner Warnings - Heating of beverages can be placed beside ...
...the burner off so that the burner has ignited. Do not pour water on the Dual burner spreader must be blocked by turning the burner knob. - The 'Spark mark' on the cooktop for at least 20 seconds after it appears blocked. important safety instructions Steam and Vapors Use ...the parts inside to prevent an abnormal flame. - To prevent delayed eruptive boiling, ALWAYS allow heated beverages to simmer, do not turn the burner knob quickly. When you clean the spreader with the burner caps in a hot oven. Surface Burner Warnings - Heating of beverages can be placed beside ...
User Manual
Page 14
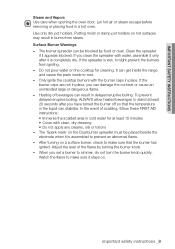
...not extend beyond the edge of -range cooking. Always make sure cookware is designed for top-of the cookware. If ignition fails, turn the knob to cover the burner grates. To decrease spattering when cooking foods with lots of the cooktop, but not over other surface burners. This will ...save cleaning time and prevent hazardous accumulations of a pot holder. Always use dry pot holders. If you keep the knob in place of food, since heavy spattering or spillovers left on the range can ignite. Never use pots or pans larger than a grate may ...
...not extend beyond the edge of -range cooking. Always make sure cookware is designed for top-of the cookware. If ignition fails, turn the knob to cover the burner grates. To decrease spattering when cooking foods with lots of the cooktop, but not over other surface burners. This will ...save cleaning time and prevent hazardous accumulations of a pot holder. Always use dry pot holders. If you keep the knob in place of food, since heavy spattering or spillovers left on the range can ignite. Never use pots or pans larger than a grate may ...

User Manual
Page 16
... hazard or damage the range. Do not strike the oven glass. Pressure in the oven, turn off . Meat fat can damage the surface burner control knobs and even the kitchen counter. Keep the oven door closed . Do not spray water onto the oven glass when the oven is recommended for use...
... hazard or damage the range. Do not strike the oven glass. Pressure in the oven, turn off . Meat fat can damage the surface burner control knobs and even the kitchen counter. Keep the oven door closed . Do not spray water onto the oven glass when the oven is recommended for use...
User Manual
Page 19
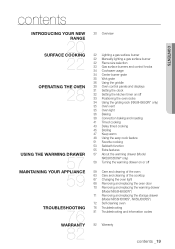
... Overview 22 Lighting a gas surface burner 22 Manually lighting a gas surface burner 22 Flame size selection 23 Gas surface burners and control knobs 24 Cookware usage 24 Center burner grate 25 Wok grate 26 Using the griddle 28 Oven control panels and displays 31 Setting the clock...cleaning of the cooktop 67 Changing the oven light 68 Removing and replacing the oven door 70 Removing and replacing the warming drawer (Model NX58H5650W*) 71 Removing and replacing the storage drawer (Model NX58H5600S*, NX58J5600S*) 72 Self-cleaning oven 76 Troubleshooting 81 Troubleshooting and information codes 82 ...
... Overview 22 Lighting a gas surface burner 22 Manually lighting a gas surface burner 22 Flame size selection 23 Gas surface burners and control knobs 24 Cookware usage 24 Center burner grate 25 Wok grate 26 Using the griddle 28 Oven control panels and displays 31 Setting the clock...cleaning of the cooktop 67 Changing the oven light 68 Removing and replacing the oven door 70 Removing and replacing the warming drawer (Model NX58H5650W*) 71 Removing and replacing the storage drawer (Model NX58H5600S*, NX58J5600S*) 72 Self-cleaning oven 76 Troubleshooting 81 Troubleshooting and information codes 82 ...

User Manual
Page 20
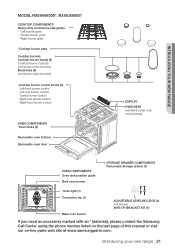
... fan (1) Convection heater (not shown) Bake oven burner ADJUSTABLE LEVELING LEGS (4) (not shown) ANTI-TIP BRACKET KIT (1) 20_ introducing your new range OVERVIEW MODEL NX58H5650W* COOKTOP COMPONENTS Heavy duty, continuous cast grates - * Left burner grate - * Center burner grate - * Right burner grate note: the left and right grates... Cooktop burner cups (5) (not shown under burners) Electrodes (5) (not shown under burners) Flat surface Concave line Common use * Cooktop burner control knobs (5) - Left-front burner control - Center burner control - introducing your new range
... fan (1) Convection heater (not shown) Bake oven burner ADJUSTABLE LEVELING LEGS (4) (not shown) ANTI-TIP BRACKET KIT (1) 20_ introducing your new range OVERVIEW MODEL NX58H5650W* COOKTOP COMPONENTS Heavy duty, continuous cast grates - * Left burner grate - * Center burner grate - * Right burner grate note: the left and right grates... Cooktop burner cups (5) (not shown under burners) Electrodes (5) (not shown under burners) Flat surface Concave line Common use * Cooktop burner control knobs (5) - Left-front burner control - Center burner control - introducing your new range
User Manual
Page 21
... fan (1) Bake oven burner ADJUSTABLE LEVELING LEGS (4) (not shown) ANTI-TIP BRACKET KIT (1) If you need an accessory marked with an * (asterisk), please contact the Samsung Call Center using the phone number listed on the last page of this manual or visit our on-line parts web site at www.samsungparts... burner control - Right-front burner control OVEN COMPONENTS *Oven racks (2) Removable oven bottom Removable oven door DISPLAY OVEN VENT (centered under burners) *Cooktop burner control knobs (5) -
... fan (1) Bake oven burner ADJUSTABLE LEVELING LEGS (4) (not shown) ANTI-TIP BRACKET KIT (1) If you need an accessory marked with an * (asterisk), please contact the Samsung Call Center using the phone number listed on the last page of this manual or visit our on-line parts web site at www.samsungparts... burner control - Right-front burner control OVEN COMPONENTS *Oven racks (2) Removable oven bottom Removable oven door DISPLAY OVEN VENT (centered under burners) *Cooktop burner control knobs (5) -

User Manual
Page 22
...off the electronic ignition system. The flames on page 8. The flames should always stay under the cookware. Push in and turn the control knob to adjust the power setting of the cookware will hear a "clicking" sound indicating the electronic ignition system is working properly. 2. Hold a...warnings and precautions listed on the burners should always match the size of the cookware. After the surface burner lights, turn the control knob for melting chocolate MANUALLY LIGHTING A GAS SURFACE BURNER If a power failure occurs, the surface burners can still be lit manually. You...
...off the electronic ignition system. The flames on page 8. The flames should always stay under the cookware. Push in and turn the control knob to adjust the power setting of the cookware will hear a "clicking" sound indicating the electronic ignition system is working properly. 2. Hold a...warnings and precautions listed on the burners should always match the size of the cookware. After the surface burner lights, turn the control knob for melting chocolate MANUALLY LIGHTING A GAS SURFACE BURNER If a power failure occurs, the surface burners can still be lit manually. You...
User Manual
Page 23
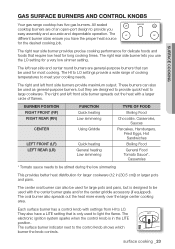
... Sandwiches Boiling Food General Food Tomato Sauce*, Casseroles * Tomato sauce needs to be used with settings from HI to LO. Each surface burner has a control knob with the center burner grate and/or the center griddle accessory (if equipped). The HI to meet your cooking needs. The right and left front... that is only used as general-purpose burners, but is in [30.5 cm]) or larger pots and pans. surface cooking GAS SURFACE BURNERS AND CONTROL KNOBS Your gas range cooktop has five gas burners. The electronic ignition system sparks when the control...
... Sandwiches Boiling Food General Food Tomato Sauce*, Casseroles * Tomato sauce needs to be used with settings from HI to LO. Each surface burner has a control knob with the center burner grate and/or the center griddle accessory (if equipped). The HI to meet your cooking needs. The right and left front... that is only used as general-purpose burners, but is in [30.5 cm]) or larger pots and pans. surface cooking GAS SURFACE BURNERS AND CONTROL KNOBS Your gas range cooktop has five gas burners. The electronic ignition system sparks when the control...

User Manual
Page 63
... back and stem hole). They CAUTION are in warm, soapy water. Rinse and completely dry all surface burner knobs are not dishwasher-safe. 3. Clean the control knobs in the OFF position. 2. Replace the control knobs in a dishwasher. Pull the control knobs straight off the surface burner control valve stems. Do not clean the control... knobs in the OFF position by pushing them straight onto the control valve stems. maintaining your appliance CARE AND CLEANING OF THE COOKTOP Surface burner controls 1. ...
... back and stem hole). They CAUTION are in warm, soapy water. Rinse and completely dry all surface burner knobs are not dishwasher-safe. 3. Clean the control knobs in the OFF position. 2. Replace the control knobs in a dishwasher. Pull the control knobs straight off the surface burner control valve stems. Do not clean the control... knobs in the OFF position by pushing them straight onto the control valve stems. maintaining your appliance CARE AND CLEANING OF THE COOKTOP Surface burner controls 1. ...

User Manual
Page 65
Push in and turn each surface burner control knob to the LITE position, let each burner light, and then set each control knob back to a burner setting to make sure each burner operates properly. maintaining your appliance _65 maintaining your appliance The caps on top of the range cooktop. 10. Precise Simmer Burner (RR) Flat surface Concave line 9. Replace burner grates on Precise simmer burner (RR) and inside Double-ring Burner (RF) can be interchangeably used.
Push in and turn each surface burner control knob to the LITE position, let each burner light, and then set each control knob back to a burner setting to make sure each burner operates properly. maintaining your appliance _65 maintaining your appliance The caps on top of the range cooktop. 10. Precise Simmer Burner (RR) Flat surface Concave line 9. Replace burner grates on Precise simmer burner (RR) and inside Double-ring Burner (RF) can be interchangeably used.

User Manual
Page 76
... circuit breaker. Ensure that came with your home may be not level. If the problem persists, disconnect all occupants. The surface burner knob is not ignited. Check and level the range. (See the Installation Instructions.) The kitchen cabinets are ) damaged or uneven. Clear the...ignite the gas. Immediately call your gas supplier from your gas supplier, call for a solution in the table below. troubleshooting TROUBLESHOOTING Samsung works hard to ensure that could cause a spark that you cannot reach your phone. The appliance has been installed improperly. If ...
... circuit breaker. Ensure that came with your home may be not level. If the problem persists, disconnect all occupants. The surface burner knob is not ignited. Check and level the range. (See the Installation Instructions.) The kitchen cabinets are ) damaged or uneven. Clear the...ignite the gas. Immediately call your gas supplier from your gas supplier, call for a solution in the table below. troubleshooting TROUBLESHOOTING Samsung works hard to ensure that could cause a spark that you cannot reach your phone. The appliance has been installed improperly. If ...
User Manual
Page 77
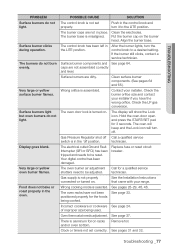
... and/or oven bottom. Surface burner clicks during operation. Align the burner base. The burner base is assembled. The control knob has been left in the control knob and turn the control knob to the LITE position. technician. See pages 28-29, 40, 46. Food does not bake or roast properly in the... components. (See pages 64 and 65.) Wrong orifice is misaligned. Surface burners light but oven burners do not light. POSSIBLE CAUSE SOLUTION The control knob is in place. Incorrect cookware or cookware See page 24. Clock or timers not set properly.
... and/or oven bottom. Surface burner clicks during operation. Align the burner base. The burner base is assembled. The control knob has been left in the control knob and turn the control knob to the LITE position. technician. See pages 28-29, 40, 46. Food does not bake or roast properly in the... components. (See pages 64 and 65.) Wrong orifice is misaligned. Surface burners light but oven burners do not light. POSSIBLE CAUSE SOLUTION The control knob is in place. Incorrect cookware or cookware See page 24. Clock or timers not set properly.


