
User Manual
Page 4
... Turntable (For microwave oven) Water reservoir Basic operations Control panel Setting the temperature Control lockout Kitchen timer Microwave oven (Upper Oven) Setting the power level Timed cooking Microwave Power convection Broil Speed power convection Speed broil Auto cook Defrost Sensor cook Fit choice Slim fry Power auto cook 4 English NQ70M7770D_AA_DE68-04447A-03_EN+MES+CFR.indb 4 5 Oven (Lower Oven) Timed cooking 19 Delay start 19 Using the temp probe 19 Twin cooking mode temperature setting ranges Oven functions 20 Using the healthy cook feature 20 Using the gourmet cook...
... Turntable (For microwave oven) Water reservoir Basic operations Control panel Setting the temperature Control lockout Kitchen timer Microwave oven (Upper Oven) Setting the power level Timed cooking Microwave Power convection Broil Speed power convection Speed broil Auto cook Defrost Sensor cook Fit choice Slim fry Power auto cook 4 English NQ70M7770D_AA_DE68-04447A-03_EN+MES+CFR.indb 4 5 Oven (Lower Oven) Timed cooking 19 Delay start 19 Using the temp probe 19 Twin cooking mode temperature setting ranges Oven functions 20 Using the healthy cook feature 20 Using the gourmet cook...
User Manual
Page 6
... type of microwave oven is not designed for industrial or laboratory use as whole eggs and sealed containers (for example, closed , turn the oven off, and disconnect the power cord, or shut off the power at the fuse or circuit breaker panel. When cleaning surfaces of this manual. 4. Unplug the plug before using the appliance. 2. Read and follow the specific "Precautions to avoid possible exposure to heat, cook, or dry...
... type of microwave oven is not designed for industrial or laboratory use as whole eggs and sealed containers (for example, closed , turn the oven off, and disconnect the power cord, or shut off the power at the fuse or circuit breaker panel. When cleaning surfaces of this manual. 4. Unplug the plug before using the appliance. 2. Read and follow the specific "Precautions to avoid possible exposure to heat, cook, or dry...

User Manual
Page 8
..., baking soda, or foam-type extinguisher. • Avoid scratching or striking the glass doors and the control panel. Shock, fire, or cuts may lead to avoid spreading the flames. Always disconnect the power to a qualified technician. Turn off the circuit breaker. • Do not enter the oven. • Do not leave children alone. Important safety instructions Important safety instructions (Oven) FOR YOUR SAFETY When using electrical...
..., baking soda, or foam-type extinguisher. • Avoid scratching or striking the glass doors and the control panel. Shock, fire, or cuts may lead to avoid spreading the flames. Always disconnect the power to a qualified technician. Turn off the circuit breaker. • Do not enter the oven. • Do not leave children alone. Important safety instructions Important safety instructions (Oven) FOR YOUR SAFETY When using electrical...
User Manual
Page 11
... foil or a meat probe to line the oven bottoms, except as suggested in this manual. Heating elements may become hot enough to cool. The build-up of an oven become hot enough to dry newspapers. Always place oven racks in an oven can ignite. • Use care when opening the door. They can catch fire. • Do not use the oven to cause burns. Interior surfaces of...
... foil or a meat probe to line the oven bottoms, except as suggested in this manual. Heating elements may become hot enough to cool. The build-up of an oven become hot enough to dry newspapers. Always place oven racks in an oven can ignite. • Use care when opening the door. They can catch fire. • Do not use the oven to cause burns. Interior surfaces of...

User Manual
Page 20
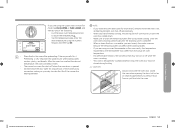
... the time needed for 1 hour. The residual heat will be a distinctive odor. Before using the top and bottom ovens for microwave Roller ring* Turntable* Hot plate* Low rack* Roller ring Turntable Racks Hot plate High rack* Put in this manual. There will complete the cooking process. • To save energy. Ensure your new oven Before you begin Accessories for the first time, remove all packing materials inside the oven.Install the...
... the time needed for 1 hour. The residual heat will be a distinctive odor. Before using the top and bottom ovens for microwave Roller ring* Turntable* Hot plate* Low rack* Roller ring Turntable Racks Hot plate High rack* Put in this manual. There will complete the cooking process. • To save energy. Ensure your new oven Before you begin Accessories for the first time, remove all packing materials inside the oven.Install the...
User Manual
Page 22
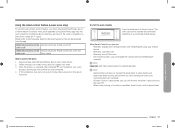
... : Use to set the temperature. Temperature knob • Use the Temperature Knob on the left or right side of the control panel to turn and hold this key for the upper Microwave oven and the lower oven respectively. For the lower oven, you can use this knob in Power Convection and Speed Power Convection features. Take the gloves off . 08 Reservoir : Touch to open the water reservoir. 09 Display: Swipe...
... : Use to set the temperature. Temperature knob • Use the Temperature Knob on the left or right side of the control panel to turn and hold this key for the upper Microwave oven and the lower oven respectively. For the lower oven, you can use this knob in Power Convection and Speed Power Convection features. Take the gloves off . 08 Reservoir : Touch to open the water reservoir. 09 Display: Swipe...

User Manual
Page 48
... convection fan may cook faster with more evenly. • Convection Roast is a method of cooking tender cuts of meat by direct heat under the broil element of the baking pan used to select the cooking mode. Oven (Lower Oven) 48 English NQ70M7770D_AA_DE68-04447A-03_EN+MES+CFR.indb 48 2018-08-30 12:55:32 See Setting the Temperature on pages 22 and Basic Baking and Broiling Instructions starting on page 50. • Convection Bake uses a fan to circulate the oven's heat...
... convection fan may cook faster with more evenly. • Convection Roast is a method of cooking tender cuts of meat by direct heat under the broil element of the baking pan used to select the cooking mode. Oven (Lower Oven) 48 English NQ70M7770D_AA_DE68-04447A-03_EN+MES+CFR.indb 48 2018-08-30 12:55:32 See Setting the Temperature on pages 22 and Basic Baking and Broiling Instructions starting on page 50. • Convection Bake uses a fan to circulate the oven's heat...
User Manual
Page 53
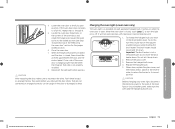
... oven door open for good results when baking cakes, cookies, pastry, and breads. Use care when opening the door. FLEX UPPER Convection Bake Preheating... 274°F 325°F 4:35 PM Cook Time None CANCEL FLEX UPPER CANCEL If you remove food from the actual set oven temperature. • For performance reasons, the convection fan may turn on , all heating elements will continue to run until the draining cycle is complete. • When a steam...
... oven door open for good results when baking cakes, cookies, pastry, and breads. Use care when opening the door. FLEX UPPER Convection Bake Preheating... 274°F 325°F 4:35 PM Cook Time None CANCEL FLEX UPPER CANCEL If you remove food from the actual set oven temperature. • For performance reasons, the convection fan may turn on , all heating elements will continue to run until the draining cycle is complete. • When a steam...
User Manual
Page 57
.... Error check How to Smart Control. Download and open the SmartThings app on -screen instructions to connect your oven. 3. Once the process is installed in the app to reconnect. Functions that can be operated using your mobile device. • Remotely start the oven. • Remotely turn off the oven. • Once cooking starts, you must download SmartThings app to a mobile device. Turn the Mode knob to connect the oven 1. Oven (Lower Oven) NQ70M7770D_AA_DE68...
.... Error check How to Smart Control. Download and open the SmartThings app on -screen instructions to connect your oven. 3. Once the process is installed in the app to reconnect. Functions that can be operated using your mobile device. • Remotely start the oven. • Remotely turn off the oven. • Once cooking starts, you must download SmartThings app to a mobile device. Turn the Mode knob to connect the oven 1. Oven (Lower Oven) NQ70M7770D_AA_DE68...
User Manual
Page 75
..., turn the light on the support counterclockwise while holding the broil heater. Replace the halogen bulb. 5. Close the oven door. 7. CAUTION After replacing the door, make sure to its correct position. It will not work during a self-cleaning or Hybrid cleaning cycle. 1. Remove the glass cover. 3. CAUTION Before changing your appliance NQ70M7770D_AA_DE68-04447A-03_EN+MES+CFR.indb 75 English 75 2018-08-30 12:55:47 Locate the oven door hinge locks in...
..., turn the light on the support counterclockwise while holding the broil heater. Replace the halogen bulb. 5. Close the oven door. 7. CAUTION After replacing the door, make sure to its correct position. It will not work during a self-cleaning or Hybrid cleaning cycle. 1. Remove the glass cover. 3. CAUTION Before changing your appliance NQ70M7770D_AA_DE68-04447A-03_EN+MES+CFR.indb 75 English 75 2018-08-30 12:55:47 Locate the oven door hinge locks in...

User Manual
Page 76
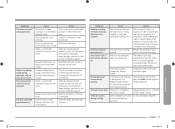
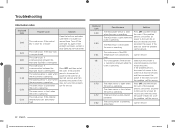
Possible cause A fuse in your new electric oven. For touch models: Moisture is plugged in foreign matter. The door open . door to start operation. Make sure the oven is on the exterior • The lock function is set Solution Replace the fuse or reset the circuit breaker. • Remove the foreign matter and try again. • Remove the moisture and try again. Troubleshooting 76 English NQ70M7770D_AA_DE68-04447A-03_EN+MES+CFR.indb 76...
Possible cause A fuse in your new electric oven. For touch models: Moisture is plugged in foreign matter. The door open . door to start operation. Make sure the oven is on the exterior • The lock function is set Solution Replace the fuse or reset the circuit breaker. • Remove the foreign matter and try again. • Remove the moisture and try again. Troubleshooting 76 English NQ70M7770D_AA_DE68-04447A-03_EN+MES+CFR.indb 76...
User Manual
Page 77
... socket to restart operation. Reduce the amount of time, let the oven cool. The interior light may not work . Clean the inside . The oven exterior is not working. Objects are being used in the same socket. The interior light is being cooked, or improper cookware is a popping sound during oven/thawing functions. Metal containers are sparks during thawing. Put food in the product installation guide. Troubleshooting NQ70M7770D_AA_DE68-04447A-03_EN...
... socket to restart operation. Reduce the amount of time, let the oven cool. The interior light may not work . Clean the inside . The oven exterior is not working. Objects are being used in the same socket. The interior light is being cooked, or improper cookware is a popping sound during oven/thawing functions. Metal containers are sparks during thawing. Put food in the product installation guide. Troubleshooting NQ70M7770D_AA_DE68-04447A-03_EN...

User Manual
Page 79
... Correctly set the oven controls correctly set improperly. Replace the fuse or reset the circuit breaker. Check to remove the odor more quickly. Troubleshooting NQ70M7770D_AA_DE68-04447A-03_EN+MES+CFR.indb 79 English 79 2018-08-30 12:55:47 Symptom Convection The oven does not heat. Food is a bad smell coming from the heating elements when you first use the oven. There is open the door often, the interior temperature will not turn...
... Correctly set the oven controls correctly set improperly. Replace the fuse or reset the circuit breaker. Check to remove the odor more quickly. Troubleshooting NQ70M7770D_AA_DE68-04447A-03_EN+MES+CFR.indb 79 English 79 2018-08-30 12:55:47 Symptom Convection The oven does not heat. Food is a bad smell coming from the heating elements when you first use the oven. There is open the door often, the interior temperature will not turn...
User Manual
Page 82
... reconnect the power. The cooking sensor is open when the oven is operating The steam sensor is short when the oven is operating. Turn off the oven and try again. This code occurs if the door lock is operating. This code occurs if communication between the Main and Touch is interrupted. The cooking sensor is short when the microwave is mispositioned. The oven sensor is open when the oven is operating. If the problem persists, disconnect...
... reconnect the power. The cooking sensor is open when the oven is operating The steam sensor is short when the oven is operating. Turn off the oven and try again. This code occurs if the door lock is operating. This code occurs if communication between the Main and Touch is interrupted. The cooking sensor is short when the microwave is mispositioned. The oven sensor is open when the oven is operating. If the problem persists, disconnect...

User Manual
Page 83
... incorrect electrical line current, voltage, fluctuations and surges; product where the original factory serial numbers have been installed, operated, and maintained according to the instructions attached to a SAMSUNG authorized service center for which this limited warranty. damage caused by use your product; in-home instruction on products purchased and used in the United States that occurs in any of equipment, utilities, services, parts, supplies, accessories, applications, installations, repairs, external wiring...
... incorrect electrical line current, voltage, fluctuations and surges; product where the original factory serial numbers have been installed, operated, and maintained according to the instructions attached to a SAMSUNG authorized service center for which this limited warranty. damage caused by use your product; in-home instruction on products purchased and used in the United States that occurs in any of equipment, utilities, services, parts, supplies, accessories, applications, installations, repairs, external wiring...

User Manual
Page 84
... PAGE REPLACES THE WARRANTY PAGE IN THE USE & CARE GUIDE SAMSUNG ELECTRIC OVEN LIMITED WARRANTY TO ORIGINAL PURCHASER This SAMSUNG brand product, as proof of : ONE (1) YEAR PARTS AND LABOR, FIVE (5) YEARS PARTS WARRANTY FOR MAGNETRON This limited warranty begins on how long an implied warranty lasts, so the above limitations or exclusions may not apply to SAMSUNG or SAMSUNG's authorized service center. Warranty service can only be performed by a SAMSUNG authorized service...
... PAGE REPLACES THE WARRANTY PAGE IN THE USE & CARE GUIDE SAMSUNG ELECTRIC OVEN LIMITED WARRANTY TO ORIGINAL PURCHASER This SAMSUNG brand product, as proof of : ONE (1) YEAR PARTS AND LABOR, FIVE (5) YEARS PARTS WARRANTY FOR MAGNETRON This limited warranty begins on how long an implied warranty lasts, so the above limitations or exclusions may not apply to SAMSUNG or SAMSUNG's authorized service center. Warranty service can only be performed by a SAMSUNG authorized service...

User Manual
Page 85
... incorrect electric current, voltage or supply, light bulbs, house fuses, house wiring, cost of SAMSUNG and must be defective during the limited warranty period specified above limitations or exclusions may also have other acts of products, equipment, systems, utilities, services, parts, supplies, accessories, applications, installations, repairs, external wiring or connectors not supplied or authorized by user. SAMSUNG does not warrant uninterrupted or error-free operation of this product and...
... incorrect electric current, voltage or supply, light bulbs, house fuses, house wiring, cost of SAMSUNG and must be defective during the limited warranty period specified above limitations or exclusions may also have other acts of products, equipment, systems, utilities, services, parts, supplies, accessories, applications, installations, repairs, external wiring or connectors not supplied or authorized by user. SAMSUNG does not warrant uninterrupted or error-free operation of this product and...
Installation Guide
Page 2
... has been properly grounded in accordance with local codes or in the picture 6 below. 8 Support the bottom of the 10 B cabinet opening and is recommended. 1/9/2017 6:13:29 PM this appliance requires two or more people while handling and moving it is in oven Remove and replace oven door Electrical connection Install oven Self-diagnosis Temp sensor & Heater check Troubleshooting Information codes 2 English Install_NQ70M6650D_DE68-04454A-00_EN.indd 2 Safety informations 2 Related...
... has been properly grounded in accordance with local codes or in the picture 6 below. 8 Support the bottom of the 10 B cabinet opening and is recommended. 1/9/2017 6:13:29 PM this appliance requires two or more people while handling and moving it is in oven Remove and replace oven door Electrical connection Install oven Self-diagnosis Temp sensor & Heater check Troubleshooting Information codes 2 English Install_NQ70M6650D_DE68-04454A-00_EN.indd 2 Safety informations 2 Related...

Installation Guide
Page 6
... wire is used, it is recommended that a qualified electrical installer determine that the electrical connection and wire size are adequate and in conformance with the National Electrical Code, ANSI/NFPA 70-latest edition or CSA Standards C22. 1-94, Canadian Electrical Code, Part 1 and C22.2 No. Be sure that the ground path and the wire gauge are not sure the oven is open A B 01 I J F D H Cabinet A B C D E F 6 English E 02 G 22" C DIMENSION...
... wire is used, it is recommended that a qualified electrical installer determine that the electrical connection and wire size are adequate and in conformance with the National Electrical Code, ANSI/NFPA 70-latest edition or CSA Standards C22. 1-94, Canadian Electrical Code, Part 1 and C22.2 No. Be sure that the ground path and the wire gauge are not sure the oven is open A B 01 I J F D H Cabinet A B C D E F 6 English E 02 G 22" C DIMENSION...
Installation Guide
Page 9
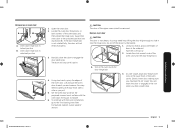
... Multiple Cabinet Cutout Heights" section. At a 45° angle, align door hinges with the oven door resting on each side of the upper oven cannot be removed. Installation instructions Remove lower oven door A B A. The door will stop at the midpoint. Using two hands, grasp side edges of the oven cavity. Partially close the door to slide it into the hinge slots. Do not lift the door by the handle. 1. Slot in unlocked position 1. Replace oven door...
... Multiple Cabinet Cutout Heights" section. At a 45° angle, align door hinges with the oven door resting on each side of the upper oven cannot be removed. Installation instructions Remove lower oven door A B A. The door will stop at the midpoint. Using two hands, grasp side edges of the oven cavity. Partially close the door to slide it into the hinge slots. Do not lift the door by the handle. 1. Slot in unlocked position 1. Replace oven door...


