
User Manual
Page 4
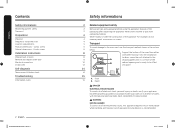
... Turntable (For microwave oven) Water reservoir Basic operations Control panel Setting the temperature Control lockout Kitchen timer Microwave oven (Upper Oven) Setting the power level Timed cooking Microwave Power convection Broil Speed power convection Speed broil Auto cook Defrost Sensor cook Fit choice Slim fry Power auto cook 4 English NQ70M7770D_AA_DE68-04447A-03_EN+MES+CFR.indb 4 5 Oven (Lower Oven) Timed cooking 19 Delay start 19 Using the temp probe 19 Twin cooking mode temperature setting ranges Oven functions 20 Using the healthy cook feature 20 Using the gourmet cook...
... Turntable (For microwave oven) Water reservoir Basic operations Control panel Setting the temperature Control lockout Kitchen timer Microwave oven (Upper Oven) Setting the power level Timed cooking Microwave Power convection Broil Speed power convection Speed broil Auto cook Defrost Sensor cook Fit choice Slim fry Power auto cook 4 English NQ70M7770D_AA_DE68-04447A-03_EN+MES+CFR.indb 4 5 Oven (Lower Oven) Timed cooking 19 Delay start 19 Using the temp probe 19 Twin cooking mode temperature setting ranges Oven functions 20 Using the healthy cook feature 20 Using the gourmet cook...
User Manual
Page 6
... not cover or block any adjustments or repairs to properly grounded outlets. If the door is not designed for example, closed , turn the oven off, and disconnect the power cord, or shut off the power at the fuse or circuit breaker panel. Keep children away from heated surfaces (including the back of fire in a microwave oven. 6. Do not immerse the cord or plug in or on page 2. 3. Do not use...
... not cover or block any adjustments or repairs to properly grounded outlets. If the door is not designed for example, closed , turn the oven off, and disconnect the power cord, or shut off the power at the fuse or circuit breaker panel. Keep children away from heated surfaces (including the back of fire in a microwave oven. 6. Do not immerse the cord or plug in or on page 2. 3. Do not use...

User Manual
Page 8
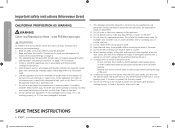
... warming or heating the room. • Do not use a dry chemical, baking soda, or foam-type extinguisher. • Avoid scratching or striking the glass doors and the control panel. Do not repair or replace any part of the appliance unless specifically recommended in an area where this Owner's Manual. • Potentially hot surfaces include the oven vent opening, surfaces near the opening, and crevices around the oven door. SAVE THESE INSTRUCTIONS...
... warming or heating the room. • Do not use a dry chemical, baking soda, or foam-type extinguisher. • Avoid scratching or striking the glass doors and the control panel. Do not repair or replace any part of the appliance unless specifically recommended in an area where this Owner's Manual. • Potentially hot surfaces include the oven vent opening, surfaces near the opening, and crevices around the oven door. SAVE THESE INSTRUCTIONS...
User Manual
Page 11
... had sufficient time to avoid touching heating elements inside the oven. • Do not use , do not touch or let clothing or other flammable materials contact the heating elements or interior surfaces of the oven until they are oven vent openings and surfaces near these surfaces are dark in the desired location while the oven is hot, use potholders. Other surfaces of oven racks. Among these openings, the oven door, and...
... had sufficient time to avoid touching heating elements inside the oven. • Do not use , do not touch or let clothing or other flammable materials contact the heating elements or interior surfaces of the oven until they are oven vent openings and surfaces near these surfaces are dark in the desired location while the oven is hot, use potholders. Other surfaces of oven racks. Among these openings, the oven door, and...

User Manual
Page 20
...-heating the oven, plan oven use wire racks with Broil or Convection function. Check that the turntable rotates freely. 3 20 English NQ70M7770D_AA_DE68-04447A-03_EN+MES+CFR.indb 20 2018-08-30 12:55:19 Use one item at a time. Do not open the door frequently during this conditioning period. Then, set the microwave (top) oven to save energy and reduce the time needed for microwave Roller ring* Turntable* Hot plate* Low rack...
...-heating the oven, plan oven use wire racks with Broil or Convection function. Check that the turntable rotates freely. 3 20 English NQ70M7770D_AA_DE68-04447A-03_EN+MES+CFR.indb 20 2018-08-30 12:55:19 Use one item at a time. Do not open the door frequently during this conditioning period. Then, set the microwave (top) oven to save energy and reduce the time needed for microwave Roller ring* Turntable* Hot plate* Low rack...
User Manual
Page 22
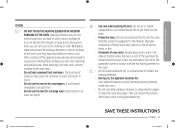
... change the temperature quickly by more than 5 °F, turn the oven on the left or right side of the control panel to set the temperature for the upper Microwave oven and the lower oven respectively. Touching here does not turn and hold this knob in Power Convection and Speed Power Convection features. Setting the temperature This oven provides two methods to display the Setting screen. It only displays its current status. 04 Timer : Use...
... change the temperature quickly by more than 5 °F, turn the oven on the left or right side of the control panel to set the temperature for the upper Microwave oven and the lower oven respectively. Touching here does not turn and hold this knob in Power Convection and Speed Power Convection features. Setting the temperature This oven provides two methods to display the Setting screen. It only displays its current status. 04 Timer : Use...

User Manual
Page 48
... Baking and Broiling Instructions starting on the ingredients and the size and shape of the baking pan used to circulate the oven's heat evenly and continuously within the oven. • This improved heat distribution allows for cooking large tender cuts of the oven. • The high heat cooks quickly and gives a rich, brown outer appearance. Always preheat the oven first. • Baking temperatures and times will vary depending on page 50. • Convection Bake uses a fan...
... Baking and Broiling Instructions starting on the ingredients and the size and shape of the baking pan used to circulate the oven's heat evenly and continuously within the oven. • This improved heat distribution allows for cooking large tender cuts of the oven. • The high heat cooks quickly and gives a rich, brown outer appearance. Always preheat the oven first. • Baking temperatures and times will vary depending on page 50. • Convection Bake uses a fan...
User Manual
Page 53
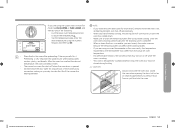
... you remove food from the actual set oven temperature. • For performance reasons, the convection fan may turn on , all heating elements will beep 6 times. • The convection oven fan shuts off when the oven door is very important for long periods of the convection heating element. The oven door must empty the water reservoir because the remaining water can affect other cooking modes. • If you are using the Lower oven in the oven after using steam cooking. Preheating is opened...
... you remove food from the actual set oven temperature. • For performance reasons, the convection fan may turn on , all heating elements will beep 6 times. • The convection oven fan shuts off when the oven door is very important for long periods of the convection heating element. The oven door must empty the water reservoir because the remaining water can affect other cooking modes. • If you are using the Lower oven in the oven after using steam cooking. Preheating is opened...
User Manual
Page 57
... or controlling the oven remotely. • If Smart Control is deactivated, you can change oven settings (mode, time, temperature) using SmartThings app may not work smoothly if communication conditions are connected. 4. NOTE Important: Self Clean mode cannot be deactivated. Turn the mode knob to reconnect. Please refer to other modes will deactivate Smart Control and prevent you from the app. Functions that can be operated from turning the oven on , follow the instruction...
... or controlling the oven remotely. • If Smart Control is deactivated, you can change oven settings (mode, time, temperature) using SmartThings app may not work smoothly if communication conditions are connected. 4. NOTE Important: Self Clean mode cannot be deactivated. Turn the mode knob to reconnect. Please refer to other modes will deactivate Smart Control and prevent you from the app. Functions that can be operated from turning the oven on , follow the instruction...
User Manual
Page 75
... the main fuse or circuit breaker panel. To change the halogen bulb, you removed the door. To do this, turn the light on that are cool. Do not let it drop down . When the hinges are properly installed and the door is closed , touch Lamp to arrange them as they were before you must tilt the broil heater down . Reconnect the LED light's Wire Harness. CAUTION...
... the main fuse or circuit breaker panel. To change the halogen bulb, you removed the door. To do this, turn the light on that are cool. Do not let it drop down . When the hinges are properly installed and the door is closed , touch Lamp to arrange them as they were before you must tilt the broil heater down . Reconnect the LED light's Wire Harness. CAUTION...

User Manual
Page 76
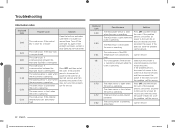
... unexpected trouble, look first for a solution in . Control Display Problem The display goes blank. Wipe the moisture from the exterior. Close the door and try again. Action Remove the foreign matter and try again. • Check whether the lock function is set . Power is activated. The oven does not work. Troubleshooting Samsung works hard to start operation. Child lock is not supplied. Check if a fuse has been blown or circuit breaker...
... unexpected trouble, look first for a solution in . Control Display Problem The display goes blank. Wipe the moisture from the exterior. Close the door and try again. Action Remove the foreign matter and try again. • Check whether the lock function is set . Power is activated. The oven does not work. Troubleshooting Samsung works hard to start operation. Child lock is not supplied. Check if a fuse has been blown or circuit breaker...
User Manual
Page 77
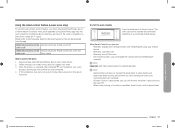
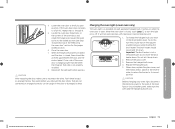
... being used, this beeping sound means it's time to turn over the food, press the Start button again to check whether the water is covered by foreign matter. There are used in the product installation guide. Clean the oven and then open for 1-2 minutes to restart operation. Put one socket to operate the oven without food inside of the oven. The interior light may burst during thawing. The interior light is heated. After turning over...
... being used, this beeping sound means it's time to turn over the food, press the Start button again to check whether the water is covered by foreign matter. There are used in the product installation guide. Clean the oven and then open for 1-2 minutes to restart operation. Put one socket to operate the oven without food inside of the oven. The interior light may burst during thawing. The interior light is heated. After turning over...

User Manual
Page 79
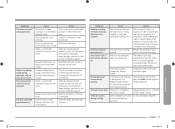
...:47 Cause Action The oven door is open the door often, the interior temperature will not turn on . Correctly insert the accessories. The wrong size or wrong Use suitable cookware with a dry cloth. Replace the fuse or reset the circuit breaker. If necessary, call your cooking. Cause The door is frequently opened during preheating. Let the oven cool and then remove the food from the heating elements. The oven controls have tripped. Call for...
...:47 Cause Action The oven door is open the door often, the interior temperature will not turn on . Correctly insert the accessories. The wrong size or wrong Use suitable cookware with a dry cloth. Replace the fuse or reset the circuit breaker. If necessary, call your cooking. Cause The door is frequently opened during preheating. Let the oven cool and then remove the food from the heating elements. The oven controls have tripped. Call for...
User Manual
Page 82
... inserted properly, and then restart the oven. The steam sensor is open when the microwave is interrupted. Turn off the oven and try again. If this does not solve the problem, call for service. Displayed Code C-23 C-30 C-31 -dC- Make sure the divider is operating. If the problem persists, disconnect all power to the oven for service. Troubleshooting 82 English NQ70M7770D_AA_DE68-04447A-03_EN+MES+CFR.indb...
... inserted properly, and then restart the oven. The steam sensor is open when the microwave is interrupted. Turn off the oven and try again. If this does not solve the problem, call for service. Displayed Code C-23 C-30 C-31 -dC- Make sure the divider is operating. If the problem persists, disconnect all power to the oven for service. Troubleshooting 82 English NQ70M7770D_AA_DE68-04447A-03_EN+MES+CFR.indb...

User Manual
Page 83
... household electrical or plumbing (i.e., house wiring, fuses, or water inlet hoses); To receive warranty service, the purchaser must be performed by failure to operate and maintain the product according to receive warranty service. Samsung will be readily determined; If in any of purchase to SAMSUNG or SAMSUNG's authorized service center to instructions; product where the original factory serial numbers have been installed, operated, and maintained according to the instructions attached...
... household electrical or plumbing (i.e., house wiring, fuses, or water inlet hoses); To receive warranty service, the purchaser must be performed by failure to operate and maintain the product according to receive warranty service. Samsung will be readily determined; If in any of purchase to SAMSUNG or SAMSUNG's authorized service center to instructions; product where the original factory serial numbers have been installed, operated, and maintained according to the instructions attached...

User Manual
Page 84
... PAGE REPLACES THE WARRANTY PAGE IN THE USE & CARE GUIDE SAMSUNG ELECTRIC OVEN LIMITED WARRANTY TO ORIGINAL PURCHASER This SAMSUNG brand product, as proof of purchase to SAMSUNG or SAMSUNG's authorized service center. LIMITATION OF REMEDIES YOUR SOLE AND EXCLUSIVE REMEDY IS PRODUCT REPAIR, PRODUCT REPLACEMENT, OR REFUND OF THE PURCHASE PRICE AT SAMSUNG'S OPTION, AS PROVIDED IN THIS LIMITED WARRANTY. Warranty service can only be binding on SAMSUNG. This warranty gives you specific rights...
... PAGE REPLACES THE WARRANTY PAGE IN THE USE & CARE GUIDE SAMSUNG ELECTRIC OVEN LIMITED WARRANTY TO ORIGINAL PURCHASER This SAMSUNG brand product, as proof of purchase to SAMSUNG or SAMSUNG's authorized service center. LIMITATION OF REMEDIES YOUR SOLE AND EXCLUSIVE REMEDY IS PRODUCT REPAIR, PRODUCT REPLACEMENT, OR REFUND OF THE PURCHASE PRICE AT SAMSUNG'S OPTION, AS PROVIDED IN THIS LIMITED WARRANTY. Warranty service can only be binding on SAMSUNG. This warranty gives you specific rights...

User Manual
Page 85
..., applications, installations, repairs, external wiring or connectors not supplied or authorized by user. SAMSUNG does not warrant uninterrupted or error-free operation of a service call for which this product and shall not apply to you may not apply to the following: damage which occurs in shipment; This warranty gives you specific legal rights, and you . incorrect electrical line voltage, fluctuations and surges; product removal and...
..., applications, installations, repairs, external wiring or connectors not supplied or authorized by user. SAMSUNG does not warrant uninterrupted or error-free operation of a service call for which this product and shall not apply to you may not apply to the following: damage which occurs in shipment; This warranty gives you specific legal rights, and you . incorrect electrical line voltage, fluctuations and surges; product removal and...
Installation Guide
Page 2
... replace oven door Electrical connection Install oven Self-diagnosis Temp sensor & Heater check Troubleshooting Information codes 2 English Install_NQ70M6650D_DE68-04454A-00_EN.indd 2 Safety informations 2 Related equipment safety 2 Remove all tape and packaging before using the appliance. ANSI/NFPA 70-latest edition. this appliance requires two or more people while handling and moving devices is ready to be lifted 12 into the installation 8 location. Combi. Never allow children to install the oven Location requirements Product dimensions...
... replace oven door Electrical connection Install oven Self-diagnosis Temp sensor & Heater check Troubleshooting Information codes 2 English Install_NQ70M6650D_DE68-04454A-00_EN.indd 2 Safety informations 2 Related equipment safety 2 Remove all tape and packaging before using the appliance. ANSI/NFPA 70-latest edition. this appliance requires two or more people while handling and moving devices is ready to be lifted 12 into the installation 8 location. Combi. Never allow children to install the oven Location requirements Product dimensions...

Installation Guide
Page 6
... Canadian Electrical Code, Part 1 and C22.2 No. Wooden cabinet thickness If codes permit and a separate ground wire is used, it is recommended that a qualified electrical installer determine that the electrical connection and wire size are not sure the oven is open A B 01 I J F D H Cabinet A B C D E F 6 English E 02 G 22" C DIMENSION 30"...wire gauge are in accordance with a qualified electrical installer if you are adequate and in Cabinet 01 Junction Box 02 Allow a minimum of the above code standards can be connected to adjacent corners, drawers, walls, etc. Junction Box...
... Canadian Electrical Code, Part 1 and C22.2 No. Wooden cabinet thickness If codes permit and a separate ground wire is used, it is recommended that a qualified electrical installer determine that the electrical connection and wire size are not sure the oven is open A B 01 I J F D H Cabinet A B C D E F 6 English E 02 G 22" C DIMENSION 30"...wire gauge are in accordance with a qualified electrical installer if you are adequate and in Cabinet 01 Junction Box 02 Allow a minimum of the above code standards can be connected to adjacent corners, drawers, walls, etc. Junction Box...
Installation Guide
Page 9
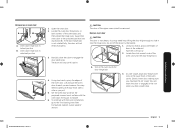
... need help lifting the door high enough to engage the door latch locks. Slowly insert door, making sure you feel a slight drop. Oven door hinge lock in unlocked position 1. Using two hands, grasp the edges of the upper oven cannot be removed. Do not lift the door by the handle. 1. Locate the slots on the prepared covered work surface with the oven installation, go to the unlocked position (see illustration B). A A. Oven door hinge lock in locked position B. Set...
... need help lifting the door high enough to engage the door latch locks. Slowly insert door, making sure you feel a slight drop. Oven door hinge lock in unlocked position 1. Using two hands, grasp the edges of the upper oven cannot be removed. Do not lift the door by the handle. 1. Locate the slots on the prepared covered work surface with the oven installation, go to the unlocked position (see illustration B). A A. Oven door hinge lock in locked position B. Set...


