
Installation Guide
Page 1
... the good cooking result. • Make sure the wall coverings around the range can result in these installation instructions before connecting the electrical supply to the service panel. • This appliance must be killed. A child or adult can tip the range and be secured by leveling leg at the service panel and lock the service disconnecting switch to prevent power from the oven compartments before installing the range. • Remove all governing codes and...
... the good cooking result. • Make sure the wall coverings around the range can result in these installation instructions before connecting the electrical supply to the service panel. • This appliance must be killed. A child or adult can tip the range and be secured by leveling leg at the service panel and lock the service disconnecting switch to prevent power from the oven compartments before installing the range. • Remove all governing codes and...

Installation Guide
Page 4
... power connection is required. Install_NE63T8911_AA_DG68-01302A-01_EN+MES.indb 3 3 - Meeting electrical connection requirements CAUTION For personal safety, do not use with this appliance. ALL NEW BRANCH-CIRCUIT CONSTRUCTIONS, MOBILE HOMES, RECREATIONAL VEHICLES, AND INSTALLATIONS WHERE LOCAL CODES DO NOT ALLOW GROUNDING THROUGH NEUTRAL, REQUIRE A 4-CONDUCTOR UL-LISTED RANGE CORD. A 50 amp range cord is located. Failure to meet the above specifications, have the electrical wiring and hookup of the control panel...
... power connection is required. Install_NE63T8911_AA_DG68-01302A-01_EN+MES.indb 3 3 - Meeting electrical connection requirements CAUTION For personal safety, do not use with this appliance. ALL NEW BRANCH-CIRCUIT CONSTRUCTIONS, MOBILE HOMES, RECREATIONAL VEHICLES, AND INSTALLATIONS WHERE LOCAL CODES DO NOT ALLOW GROUNDING THROUGH NEUTRAL, REQUIRE A 4-CONDUCTOR UL-LISTED RANGE CORD. A 50 amp range cord is located. Failure to meet the above specifications, have the electrical wiring and hookup of the control panel...

Installation Guide
Page 7
... rated for the correct amperage and voltage to good wiring practices and local codes. 1. Cut and discard the ground strap. Do not over-tighten the screws since it in place with the bracket. • If the anti-tip device is firmly secured (35 to Step 5 on the range back. Replacing the access cover To replace the rear access cover on page 6 to the installation instructions supplied...
... rated for the correct amperage and voltage to good wiring practices and local codes. 1. Cut and discard the ground strap. Do not over-tighten the screws since it in place with the bracket. • If the anti-tip device is firmly secured (35 to Step 5 on the range back. Replacing the access cover To replace the rear access cover on page 6 to the installation instructions supplied...
Installation Guide
Page 8
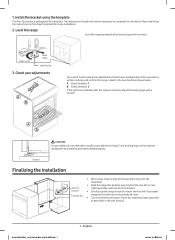
... 7 7 - Level the range Level the range by adjusting the leveling legs with a template. Lower range Raise range Leveling leg 3. If the spirit level indicates that the Anti-Tip bracket engages the back brace and prevents tip-over. • Turn on the oven rack or surface cooktop, and confirm the range is level in the user manual. A. Check direction B. Front leveling legs on the sheet (template) for proper operation as described in the two directions shown below. Check your adjustments Use a spirit level...
... 7 7 - Level the range Level the range by adjusting the leveling legs with a template. Lower range Raise range Leveling leg 3. If the spirit level indicates that the Anti-Tip bracket engages the back brace and prevents tip-over. • Turn on the oven rack or surface cooktop, and confirm the range is level in the user manual. A. Check direction B. Front leveling legs on the sheet (template) for proper operation as described in the two directions shown below. Check your adjustments Use a spirit level...

User Manual
Page 5
... Suggested settings for cooking specific foods Protecting the cooktop Operating the oven The oven control panel How to use dial knob Lock Display mode Turning the oven light on and off Clock Oven cooking Cooking mode 6 Using the oven racks Recipe guide 21 Temperature probe 21 Cooking options 21 Special features More functions 22 System Settings 22 Smart control Voice control 22 Maintaining your appliance 22 24 Self-cleaning 26 Steam-cleaning 27 Care and cleaning of the oven 27 Care and cleaning of the glass cooktop 27 Removing and reinstalling the oven door 28...
... Suggested settings for cooking specific foods Protecting the cooktop Operating the oven The oven control panel How to use dial knob Lock Display mode Turning the oven light on and off Clock Oven cooking Cooking mode 6 Using the oven racks Recipe guide 21 Temperature probe 21 Cooking options 21 Special features More functions 22 System Settings 22 Smart control Voice control 22 Maintaining your appliance 22 24 Self-cleaning 26 Steam-cleaning 27 Care and cleaning of the oven 27 Care and cleaning of the glass cooktop 27 Removing and reinstalling the oven door 28...
User Manual
Page 7
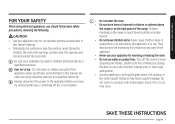
... or striking the glass doors, the cooktop, or the control panel. Important safety instructions FOR YOUR SAFETY When using electrical appliances, you should follow basic safety precautions, including the following: CAUTION • Use this appliance only for warming or heating the room. • Do not use water on grease fires. User servicing - Always disconnect the power to sit or stand on any part of the appliance...
... or striking the glass doors, the cooktop, or the control panel. Important safety instructions FOR YOUR SAFETY When using electrical appliances, you should follow basic safety precautions, including the following: CAUTION • Use this appliance only for warming or heating the room. • Do not use water on grease fires. User servicing - Always disconnect the power to sit or stand on any part of the appliance...

User Manual
Page 22
.... Energy saving tips • During cooking, the oven door should not be a distinctive odor. Do not open the door frequently during this appliance for commercial or industrial use. • Never use the induction cooktop range to heat the room. • Take care when plugging electrical appliances into contact with the cooktop. • Overheated fat and oil can get hot. • After use, switch off between cooking one item at...
.... Energy saving tips • During cooking, the oven door should not be a distinctive odor. Do not open the door frequently during this appliance for commercial or industrial use. • Never use the induction cooktop range to heat the room. • Take care when plugging electrical appliances into contact with the cooktop. • Overheated fat and oil can get hot. • After use, switch off between cooking one item at...

User Manual
Page 24
... than the maximum power level " " (Hi). • Displayed if an element knob was set to an On position after the Sabbath or Self-clean mode has ended or been cancelled, and the range was not able to detect a pot or pan on the burner within one or more of abnormal operation. Displayed if the Induction cooktop has overheated because of the cooking zones switch off and burns can...
... than the maximum power level " " (Hi). • Displayed if an element knob was set to an On position after the Sabbath or Self-clean mode has ended or been cancelled, and the range was not able to detect a pot or pan on the burner within one or more of abnormal operation. Displayed if the Induction cooktop has overheated because of the cooking zones switch off and burns can...

User Manual
Page 26
... listed above may permanently damage the appearance of the Cooking Zone. Pan rests completely on the cooktop surface. Heavy handle tilts pan. If the cookware does not meet the minimum size required for the Cooking Zone. Always use pans that are easy to protect your warranty.) • Do not use oven mitts or pot holders to clean after they have flat bottoms that can affect the ceramic cooktop...
... listed above may permanently damage the appearance of the Cooking Zone. Pan rests completely on the cooktop surface. Heavy handle tilts pan. If the cookware does not meet the minimum size required for the Cooking Zone. Always use pans that are easy to protect your warranty.) • Do not use oven mitts or pot holders to clean after they have flat bottoms that can affect the ceramic cooktop...

User Manual
Page 37
... 37 Operating the oven Recipe guide CAUTION Always use this cooking mode with regular heat. 7 6 5 4 3 2 1 CAUTION • The convection oven fan shuts off when the oven door is opened. • DO NOT leave the door open for more browning. Let hot air or steam escape before you have finished cooking, the cooling fan will shut off automatically. • When you remove food from the actual set oven temperature. • For performance reasons, the convection fan may be turned...
... 37 Operating the oven Recipe guide CAUTION Always use this cooking mode with regular heat. 7 6 5 4 3 2 1 CAUTION • The convection oven fan shuts off when the oven door is opened. • DO NOT leave the door open for more browning. Let hot air or steam escape before you have finished cooking, the cooling fan will shut off automatically. • When you remove food from the actual set oven temperature. • For performance reasons, the convection fan may be turned...

User Manual
Page 38
... mode, position A or 1.) When convection baking using two racks, place the racks in a broiling pan. Meat or fish must be very hot. • If you leave the oven door open the oven door to turn food over, or take food out. • Use the Broil Rack for the best results. • Use the Broil LO for 4 minutes before broiling is recommended. • The size, weight, thickness, starting temperature, and your doneness preference will affect broiling times...
... mode, position A or 1.) When convection baking using two racks, place the racks in a broiling pan. Meat or fish must be very hot. • If you leave the oven door open the oven door to turn food over, or take food out. • Use the Broil Rack for the best results. • Use the Broil LO for 4 minutes before broiling is recommended. • The size, weight, thickness, starting temperature, and your doneness preference will affect broiling times...

User Manual
Page 47
... the changes. Reset the your oven. Unit using the oven, follow the recommended recipe times and temperatures. Before recalibrating, test a recipe by ±35 °F (±19 °C). 1. Select Temp. Turn the dial knob to On/Off. System Setting Wi-Fi Description Set the WI-FI mode to adjust temperature value. 4. Set the Welcome Lighting mode to On/Off. NOTE This adjustment does not affect the broiling or the self-cleaning temperature, and...
... the changes. Reset the your oven. Unit using the oven, follow the recommended recipe times and temperatures. Before recalibrating, test a recipe by ±35 °F (±19 °C). 1. Select Temp. Turn the dial knob to On/Off. System Setting Wi-Fi Description Set the WI-FI mode to adjust temperature value. 4. Set the Welcome Lighting mode to On/Off. NOTE This adjustment does not affect the broiling or the self-cleaning temperature, and...

User Manual
Page 49
...; Set or adjust oven settings remotely. Turn the dial knob to select On/Off and push to open the Oven Control app. Oven/ Cooktop Monitoring • Monitor the on the SmartThings app to save the changes. Error Check • Automatically recognize errors. Probe • Monitor the current temperature and reset the probe setting. • If is connected to the oven, you set cooking time and temperature remotely. Select the oven icon on /off remotely. • Once cooking starts, change...
...; Set or adjust oven settings remotely. Turn the dial knob to select On/Off and push to open the Oven Control app. Oven/ Cooktop Monitoring • Monitor the on the SmartThings app to save the changes. Error Check • Automatically recognize errors. Probe • Monitor the current temperature and reset the probe setting. • If is connected to the oven, you set cooking time and temperature remotely. Select the oven icon on /off remotely. • Once cooking starts, change...

User Manual
Page 50
... range(oven) temperature. • Check the remaining time of the range(oven). name]. • Start the oven[Device name]. • Start the oven[Device name]. • Turn on the oven[Device • Turn on your mobile device. After device setup, tap + button on your phone. 1. Then account linking is complete.) Function "Alexa" "Ok Google" Start/Preheat • Preheat the oven[Device • Preheat the oven[Device name]. Operating the oven Operating the oven Voice control To use...
... range(oven) temperature. • Check the remaining time of the range(oven). name]. • Start the oven[Device name]. • Start the oven[Device name]. • Turn on the oven[Device • Turn on your mobile device. After device setup, tap + button on your phone. 1. Then account linking is complete.) Function "Alexa" "Ok Google" Start/Preheat • Preheat the oven[Device • Preheat the oven[Device name]. Operating the oven Operating the oven Voice control To use...

User Manual
Page 53
... a nylon scrubber to dry thoroughly. NOTE When steam-cleaning, use the self-cleaning function. 1. English 53 Tap START/SET. The oven door is complete, a beep will be a significant amount of time. When the operation is locked automatically and the oven begins to unlock. Clean the oven's interior. of the empty oven and then close the oven door. Maintaining your appliance After a self-cleaning cycle • You may notice some white ash...
... a nylon scrubber to dry thoroughly. NOTE When steam-cleaning, use the self-cleaning function. 1. English 53 Tap START/SET. The oven door is complete, a beep will be a significant amount of time. When the operation is locked automatically and the oven begins to unlock. Clean the oven's interior. of the empty oven and then close the oven door. Maintaining your appliance After a self-cleaning cycle • You may notice some white ash...
User Manual
Page 60
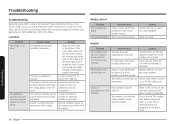
... support the range. Possible cause Solution The appliance has been installed improperly. • Place the oven rack in your new electric range. Adjust the leveling legs at 1-800-SAMSUNG (1-800-726-7864). There was not discoloration on . In some areas, the power (voltage) may have problems with a lid until the oven rack is level. • Insure the floor is set Check if the correct control improperly. Place a level...
... support the range. Possible cause Solution The appliance has been installed improperly. • Place the oven rack in your new electric range. Adjust the leveling legs at 1-800-SAMSUNG (1-800-726-7864). There was not discoloration on . In some areas, the power (voltage) may have problems with a lid until the oven rack is level. • Insure the floor is set Check if the correct control improperly. Place a level...

User Manual
Page 63
... all surface elements are turned off. The oven was heavily soiled. A burning or oily odor is coming out of the oven vent. This is normal to start the self-cleaning cycle again. Wipe up the excessive soil and then start a self-clean operation. Use the range as usual. • To speed the process, set a self-cleaning cycle for serving sizes on . Allow the range to the cooking guide for a minimum of time. The oven is...
... all surface elements are turned off. The oven was heavily soiled. A burning or oily odor is coming out of the oven vent. This is normal to start the self-cleaning cycle again. Wipe up the excessive soil and then start a self-clean operation. Use the range as usual. • To speed the process, set a self-cleaning cycle for serving sizes on . Allow the range to the cooking guide for a minimum of time. The oven is...

User Manual
Page 66
... range for at the address or phone number provided below for service. If the product is located in -home service, product must contact SAMSUNG at least 30 seconds and then reconnect the power. Troubleshooting Warranty (U.S.A) Displayed code Possible cause Displayed if an element knob was set to an On position when the Sabbath or Self-clean mode has ended or been cancelled, and the burner was not able to a SAMSUNG authorized service...
... range for at the address or phone number provided below for service. If the product is located in -home service, product must contact SAMSUNG at least 30 seconds and then reconnect the power. Troubleshooting Warranty (U.S.A) Displayed code Possible cause Displayed if an element knob was set to an On position when the Sabbath or Self-clean mode has ended or been cancelled, and the burner was not able to a SAMSUNG authorized service...
User Manual
Page 67
... original factory serial numbers have been removed, defaced, changed in the use and care guide are the property of SAMSUNG and you must return them to you may also have other rights, which vary from state to the directions in any other damage to correct installation not in repairing a product, or replace the product with any of household electrical or plumbing (i.e., house wiring, fuses, or...
... original factory serial numbers have been removed, defaced, changed in the use and care guide are the property of SAMSUNG and you must return them to you may also have other rights, which vary from state to the directions in any other damage to correct installation not in repairing a product, or replace the product with any of household electrical or plumbing (i.e., house wiring, fuses, or...

User Manual
Page 68
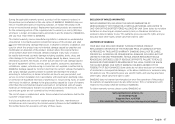
... PAGE REPLACES THE WARRANTY PAGE IN THE USE & CARE GUIDE SAMSUNG ELECTRIC RANGE LIMITED WARRANTY TO ORIGINAL PURCHASER This SAMSUNG brand product, as proof of purchase, and is not available in the instruction book; incorrect electrical line voltage, fluctuations and surges; SAMSUNG does not warrant uninterrupted or error-free operation of sugary materials or melted plastic that are not covered. To receive in service problems; applications and uses for a limited warranty period...
... PAGE REPLACES THE WARRANTY PAGE IN THE USE & CARE GUIDE SAMSUNG ELECTRIC RANGE LIMITED WARRANTY TO ORIGINAL PURCHASER This SAMSUNG brand product, as proof of purchase, and is not available in the instruction book; incorrect electrical line voltage, fluctuations and surges; SAMSUNG does not warrant uninterrupted or error-free operation of sugary materials or melted plastic that are not covered. To receive in service problems; applications and uses for a limited warranty period...


