
Owners Manual
Page 1
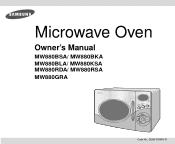
Microwave Oven Owner's Manual MW880BSA/ MW880BKA MW880BLA/ MW880KSA MW880RDA/ MW880RSA MW880GRA Clock Auto Reheat 1.Plate of food 2.Reheat Pasta 3.Casserole Auto Cook 1.Popcorn 2.Potato 3.Frozen dinner Defrost 10 Sec. Minutes Pause/ Cancel 10 Min. Hours Power level Start 1 Min + Code No.: DE68-01843A-01 Servings 1 Min.
Microwave Oven Owner's Manual MW880BSA/ MW880BKA MW880BLA/ MW880KSA MW880RDA/ MW880RSA MW880GRA Clock Auto Reheat 1.Plate of food 2.Reheat Pasta 3.Casserole Auto Cook 1.Popcorn 2.Potato 3.Frozen dinner Defrost 10 Sec. Minutes Pause/ Cancel 10 Min. Hours Power level Start 1 Min + Code No.: DE68-01843A-01 Servings 1 Min.
Owners Manual
Page 2
... with the door open since open-door operation can result in the manual. Connect only to the 1) Door (bent or dented), 2) Hinges and latches (broken or loosened), 3) Door seals and sealing surfaces. (d) The oven should be serviced only by anyone except properly qualified service personnel. See "IMPORTANT GROUNDING INSTRUCTIONS" on your oven. If the oven needs to be repaired, call 1-800-SAMSUNG for its intended use corrosive chemicals or...
... with the door open since open-door operation can result in the manual. Connect only to the 1) Door (bent or dented), 2) Hinges and latches (broken or loosened), 3) Door seals and sealing surfaces. (d) The oven should be serviced only by anyone except properly qualified service personnel. See "IMPORTANT GROUNDING INSTRUCTIONS" on your oven. If the oven needs to be repaired, call 1-800-SAMSUNG for its intended use corrosive chemicals or...

Owners Manual
Page 3
... not defrost frozen beverages in the oven: a. Watch appliance carefully if paper, plastic, or other combustible materials are available and may be used with care. • Carefully remove container coverings, directing steam away from hands and face. • Remove lids from plastic cooking bags before placing bags in or tripping over a longer cord. Food will not cook properly without the glass tray in operation. SAVE THESE INSTRUCTIONS 3 Handle with...
... not defrost frozen beverages in the oven: a. Watch appliance carefully if paper, plastic, or other combustible materials are available and may be used with care. • Carefully remove container coverings, directing steam away from hands and face. • Remove lids from plastic cooking bags before placing bags in or tripping over a longer cord. Food will not cook properly without the glass tray in operation. SAVE THESE INSTRUCTIONS 3 Handle with...

Owners Manual
Page 4
... electrical current. WARNING Do not cut or remove the third (ground) prong from the power cord under any circumstances. WARNING Improper use . Safety IMPORTANT GROUNDING INSTRUCTIONS This appliance must be a grounding-type 3- If a long cord or extension cord is used if care is properly grounded. Longer cord sets or extension cords are not sure if the appliance is exercised in or tripping over accidentally. Cooking times...
... electrical current. WARNING Do not cut or remove the third (ground) prong from the power cord under any circumstances. WARNING Improper use . Safety IMPORTANT GROUNDING INSTRUCTIONS This appliance must be a grounding-type 3- If a long cord or extension cord is used if care is properly grounded. Longer cord sets or extension cords are not sure if the appliance is exercised in or tripping over accidentally. Cooking times...
Owners Manual
Page 5
...Microwave oven 6 Checking Parts 6 Warranty and Service Information 6 Setting Up Your Microwave Oven 6 Control Panel Buttons 7 Operation Guide 8 Setting the Clock 8 Using the Pause/Cancel Button 8 Using the Auto Cook Button 9 Auto Cook Chart 9 Using the 1 Min+ Button 10 Reheating Automatically 10 Auto Reheat Chart 10 Defrosting 11 Setting Cooking Times & Power Levels 11 Cooking Instructions 12 Cooking Utensils 12 Testing Utensils 12 Cooking Techniques 13 General Tips 13 Cooking Guide 14 Recipes 17 Appendix 19 Troubleshooting Guide 19 Care and Cleaning 19 Specifications...
...Microwave oven 6 Checking Parts 6 Warranty and Service Information 6 Setting Up Your Microwave Oven 6 Control Panel Buttons 7 Operation Guide 8 Setting the Clock 8 Using the Pause/Cancel Button 8 Using the Auto Cook Button 9 Auto Cook Chart 9 Using the 1 Min+ Button 10 Reheating Automatically 10 Auto Reheat Chart 10 Defrosting 11 Setting Cooking Times & Power Levels 11 Cooking Instructions 12 Cooking Utensils 12 Testing Utensils 12 Cooking Techniques 13 General Tips 13 Cooking Guide 14 Recipes 17 Appendix 19 Troubleshooting Guide 19 Care and Cleaning 19 Specifications...

Owners Manual
Page 6
... plugged in, the display on your oven will show: Make sure there is missing or broken, call your dealer. If any part is adequate ventilation for your oven by leaving at WWW.SAMSUNGUSA.COM When contacting Samsung, please provide the specific model and serial number information which is needed. Hours Start 1 Min + Power level microwave oven roller guide ring instruction manual glass tray registration card Warranty and Service Information To help us...
... plugged in, the display on your oven will show: Make sure there is missing or broken, call your dealer. If any part is adequate ventilation for your oven by leaving at WWW.SAMSUNGUSA.COM When contacting Samsung, please provide the specific model and serial number information which is needed. Hours Start 1 Min + Power level microwave oven roller guide ring instruction manual glass tray registration card Warranty and Service Information To help us...
Owners Manual
Page 7
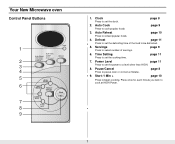
... clock. Auto Reheat Press to cook at HIGH Power. 7 page 9 6. Time Setting Press to set the cooking time. Press once for each minute you wish to reheat popular foods. Auto Cook Press to select number of servings. Defrost page 11 Press to set the power to be defrosted. 5. Servings Press to cook popular foods page 9 3. Your New Microwave oven Control Panel Buttons Clock 1 Auto Cook Auto Reheat 1.Popcorn 2.Potato Defrost 1.Plate of the food to a level other than HIGH. 8. page 10 4. page 11 7. Power Level...
... clock. Auto Reheat Press to cook at HIGH Power. 7 page 9 6. Time Setting Press to set the cooking time. Press once for each minute you wish to reheat popular foods. Auto Cook Press to select number of servings. Defrost page 11 Press to set the power to be defrosted. 5. Servings Press to cook popular foods page 9 3. Your New Microwave oven Control Panel Buttons Clock 1 Auto Cook Auto Reheat 1.Popcorn 2.Potato Defrost 1.Plate of the food to a level other than HIGH. 8. page 10 4. page 11 7. Power Level...

Owners Manual
Page 8
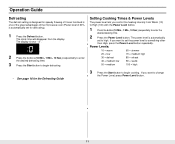
.../Cancel twice. • To correct a mistake you can check the food. • To pause the oven during cooking: press Pause/Cancel once. Using the Pause/Cancel Button The Pause/Cancel button allows you have just entered: press Pause/Cancel once, then re-enter the instructions. 3 Press Clock again. Operation Guide Setting the Clock 1 Press the Clock button. The display will need to clear instructions you to reset the clock. 8
.../Cancel twice. • To correct a mistake you can check the food. • To pause the oven during cooking: press Pause/Cancel once. Using the Pause/Cancel Button The Pause/Cancel button allows you have just entered: press Pause/Cancel once, then re-enter the instructions. 3 Press Clock again. Operation Guide Setting the Clock 1 Press the Clock button. The display will need to clear instructions you to reset the clock. 8

Owners Manual
Page 9
... food over , the oven beeps 4 times and the display shows "End". Remove package from oven. After cooking, let stand 1-3 min. Cooking time is adjustable for desired taste by pressing the Servings button ones or more times. Prick each end of the bag up one or more times. Place it still gets stuck, open the door and reposition the bag, close the door and press start. microwave-popcorn depends on turntable...
... food over , the oven beeps 4 times and the display shows "End". Remove package from oven. After cooking, let stand 1-3 min. Cooking time is adjustable for desired taste by pressing the Servings button ones or more times. Prick each end of the bag up one or more times. Place it still gets stuck, open the door and reposition the bag, close the door and press start. microwave-popcorn depends on turntable...
Owners Manual
Page 10
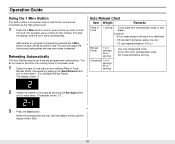
...; • • Use only refrigerated foods. When the cooking times are cooking (Plate of food that you want to add. For example, press it twice for each minute you wish to cook the food. Reheating Automatically The Auto Reheat feature has three pre-programmed cooking times. The display shows "2-1". 3 Press the Start button. Contents - 3-4 oz. You do not need to set either the cooking times or the power level. 1 Select the type...
...; • • Use only refrigerated foods. When the cooking times are cooking (Plate of food that you want to add. For example, press it twice for each minute you wish to cook the food. Reheating Automatically The Auto Reheat feature has three pre-programmed cooking times. The display shows "2-1". 3 Press the Start button. Contents - 3-4 oz. You do not need to set either the cooking times or the power level. 1 Select the type...
Owners Manual
Page 11
... the Power Level button repeatedly. If you want to set the power level to change the Power Level, press Power Level button. 11 Operation Guide Defrosting The defrost setting is designed for speedy thawing of frozen food and is one of the great advantages of the microwave oven (Power level of 30% is automatically set to begin defrosting. • See page 16 for the Defrosting Guide Setting Cooking Times & Power Levels The power level lets you control the heating intensity from the display. The clock time will disappear...
... the Power Level button repeatedly. If you want to set the power level to change the Power Level, press Power Level button. 11 Operation Guide Defrosting The defrost setting is designed for speedy thawing of frozen food and is one of the great advantages of the microwave oven (Power level of 30% is automatically set to begin defrosting. • See page 16 for the Defrosting Guide Setting Cooking Times & Power Levels The power level lets you control the heating intensity from the display. The clock time will disappear...

Owners Manual
Page 12
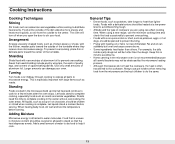
... fire. • Paper plates and cups - Cooking Instructions Cooking Utensils Recommended Use • Glass and glass-ceramic bowls and dishes - Leave a small opening for microwave use in a microwave, and can damage your oven. they can perform this test: 1 Fill a 1 cup glass measuring cup with water and put it directly on food. • Plastic storage and food containers - Do not use dishes with your oven, next to the dish...
... fire. • Paper plates and cups - Cooking Instructions Cooking Utensils Recommended Use • Glass and glass-ceramic bowls and dishes - Leave a small opening for microwave use in a microwave, and can damage your oven. they can perform this test: 1 Fill a 1 cup glass measuring cup with water and put it directly on food. • Plastic storage and food containers - Do not use dishes with your oven, next to the dish...
Owners Manual
Page 13
... outer areas. Roasts need shielding include poultry wing-tips, the ends of poultry legs, and corners of aluminum foil. For example, the jelly inside a jelly doughnut will turn off when you are using a new recipe, use pot holders when removing food from the outside of the turntable where they receive more quickly, so stir from the microwave and instruct children to stir...
... outer areas. Roasts need shielding include poultry wing-tips, the ends of poultry legs, and corners of aluminum foil. For example, the jelly inside a jelly doughnut will turn off when you are using a new recipe, use pot holders when removing food from the outside of the turntable where they receive more quickly, so stir from the microwave and instruct children to stir...

Owners Manual
Page 14
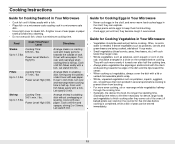
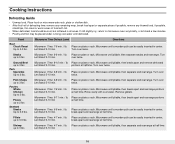
...: 2½- 3½ min. 6 slices: 4-5½ min. Power Level: High(100). Cover with vented plastic wrap. Microwave until juices run clear and meat near the bone is half up . Guide for Cooking Poultry in Your Microwave • Place poultry on a microwave-safe roasting rack in a microwave-safe dish. • Start meat fat-side down on roasting rack. Food Cook Time/Power Level Directions Whole Cooking Time: Chicken 8-11 min. / lbs. 170°...
...: 2½- 3½ min. 6 slices: 4-5½ min. Power Level: High(100). Cover with vented plastic wrap. Microwave until juices run clear and meat near the bone is half up . Guide for Cooking Poultry in Your Microwave • Place poultry on a microwave-safe roasting rack in a microwave-safe dish. • Start meat fat-side down on roasting rack. Food Cook Time/Power Level Directions Whole Cooking Time: Chicken 8-11 min. / lbs. 170°...
Owners Manual
Page 15
... Cooking Time: 3-6 ½ min. / lbs. Power Level: High(100). Cook until it at minimum cooking time. Cooking Instructions Guide for Cooking Seafood in Your Microwave • Cook fish until firm and opaque, stirring 2 or 3 times. Cover with wax paper. If over ½ inch thick, turn over after they come out of peas can stand on the turntable before cooking. Arrange shrimp in the shell; Guide for five minutes before cooking...
... Cooking Time: 3-6 ½ min. / lbs. Power Level: High(100). Cook until it at minimum cooking time. Cooking Instructions Guide for Cooking Seafood in Your Microwave • Cook fish until firm and opaque, stirring 2 or 3 times. Cover with wax paper. If over ½ inch thick, turn over after they come out of peas can stand on the turntable before cooking. Arrange shrimp in the shell; Guide for five minutes before cooking...
Owners Manual
Page 16
...Microwave Time Defrost Level Directions Microwave Time: 7-9 min. / lb. Ground Beef up to 2 lbs Seafood Steaks Up to 3 lbs. Place on plate or rack. Microwave until pliable, then separate steaks and rearrange. Turn over twice. Turn over twice. Shrimp up to 3 lbs Microwave Time: 4-7 min. / lb. Microwave... Let Stand: 5-10 min at half time. Place on plate or rack. Cooking Instructions Defrosting Guide • Unwrap food. Place on plate or rack. over twice. Microwave until pliable, then break apart and remove defrosted Let Stand: 5-10 min. Micorwave until...
...Microwave Time Defrost Level Directions Microwave Time: 7-9 min. / lb. Ground Beef up to 2 lbs Seafood Steaks Up to 3 lbs. Place on plate or rack. Microwave until pliable, then separate steaks and rearrange. Turn over twice. Turn over twice. Shrimp up to 3 lbs Microwave Time: 4-7 min. / lb. Microwave... Let Stand: 5-10 min at half time. Place on plate or rack. Cooking Instructions Defrosting Guide • Unwrap food. Place on plate or rack. over twice. Microwave until pliable, then break apart and remove defrosted Let Stand: 5-10 min. Micorwave until...
Owners Manual
Page 19
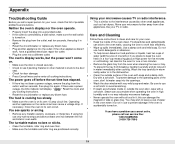
... has not been a power outage, remove the plug from other material is turned on the same circuit can damage the magnetron tube or glass tray. If there was a power outage, the time indicator will display " " Reset the clock and any cooking instructions. • Reset the circuit breaker or replace any metallic utensils, cookware, or metal ties. Using your oven. • Keep the inside or outside surface of the oven clean. Food particles and spilled...
... has not been a power outage, remove the plug from other material is turned on the same circuit can damage the magnetron tube or glass tray. If there was a power outage, the time indicator will display " " Reset the clock and any cooking instructions. • Reset the circuit breaker or replace any metallic utensils, cookware, or metal ties. Using your oven. • Keep the inside or outside surface of the oven clean. Food particles and spilled...

Owners Manual
Page 20
Appendix Specifications Model Number Oven Cavity Controls Timer Power Source Power Output Outside Dimensions Oven Cavity Dimensions Net/Gross Weight MW880BSA/ MW880BKA/ MW880KSA/ MW880BLA/ MW880RDA/MW880RSA/ MW880GRA 0.8cuft 10 power levels, including defrost 99 minutes, 90 seconds 120 VAC, 60 Hz 800 Watts 191/4"(W) X 1013/16"(H) X 153/4"(D) 13(W) X 729/32"(H) X 1261/64"(D) 26.5/28.5 lbs Note 20
Appendix Specifications Model Number Oven Cavity Controls Timer Power Source Power Output Outside Dimensions Oven Cavity Dimensions Net/Gross Weight MW880BSA/ MW880BKA/ MW880KSA/ MW880BLA/ MW880RDA/MW880RSA/ MW880GRA 0.8cuft 10 power levels, including defrost 99 minutes, 90 seconds 120 VAC, 60 Hz 800 Watts 191/4"(W) X 1013/16"(H) X 153/4"(D) 13(W) X 729/32"(H) X 1261/64"(D) 26.5/28.5 lbs Note 20
Owners Manual
Page 21
... products, equipment, systems, utilities, services, parts, supplies, accessories, applications, installations, repairs, external wiring or connectors not supplied or authorized by SAMSUNG which this product and shall not apply to the following, including, but not limited to state. customer adjustments and failure to follow operating instructions, cleaning, maintenance and environmental instructions that are covered and prescribed in service problems; SAMSUNG SHALL NOT BE LIABLE FOR...
... products, equipment, systems, utilities, services, parts, supplies, accessories, applications, installations, repairs, external wiring or connectors not supplied or authorized by SAMSUNG which this product and shall not apply to the following, including, but not limited to state. customer adjustments and failure to follow operating instructions, cleaning, maintenance and environmental instructions that are covered and prescribed in service problems; SAMSUNG SHALL NOT BE LIABLE FOR...
Owners Manual
Page 24
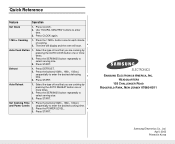
... of cooking. 2. Press the POWER LEVEL. 3. April. 2002 Printed in Korea Press the SERVINGS button repeatedly to enter the desired defrosting time. 3. Select the type of food that you are cooking by pressing the AUTO COOK button one or more times. 2. ELECTRONICS SAMSUNG ELECTRONICS AMERICA, INC. Press CLOCK. 2. Press CLOCK again. 1 Min + Cooking 1. Press START. Press START. Use "HOURS, MINUTES" buttons to enter time. 3. The time will display and the oven will start. Press DEFROST. 2. Set Cooking Time and Power Levels 1. Auto...
... of cooking. 2. Press the POWER LEVEL. 3. April. 2002 Printed in Korea Press the SERVINGS button repeatedly to enter the desired defrosting time. 3. Select the type of food that you are cooking by pressing the AUTO COOK button one or more times. 2. ELECTRONICS SAMSUNG ELECTRONICS AMERICA, INC. Press CLOCK. 2. Press CLOCK again. 1 Min + Cooking 1. Press START. Press START. Use "HOURS, MINUTES" buttons to enter time. 3. The time will display and the oven will start. Press DEFROST. 2. Set Cooking Time and Power Levels 1. Auto...


