

Owners Manual
Page 1
Microwave Oven Owner's Manual MW640WA MW640BA MW650WA MW650BA One Minute + INSTANT COOKING Popcorn Pizza Defrost Beverage 1 2 3 4 5 6 7 8 9 Power Level 0 Clock Pause Cancel Start Code No. : DE68-01931A-01
Microwave Oven Owner's Manual MW640WA MW640BA MW650WA MW650BA One Minute + INSTANT COOKING Popcorn Pizza Defrost Beverage 1 2 3 4 5 6 7 8 9 Power Level 0 Clock Pause Cancel Start Code No. : DE68-01931A-01
Owners Manual
Page 2
... is particularly important that the oven door close properly and that there is specifically designed to be grounded. See "Important Grounding Instructions" on your oven. If the oven needs to heat, cook, or dry food. on page 4 of oven is no damage to properly grounded outlets. This type of this manual. • Install or place this oven. It is not designed for its intended use .
... is particularly important that the oven door close properly and that there is specifically designed to be grounded. See "Important Grounding Instructions" on your oven. If the oven needs to heat, cook, or dry food. on page 4 of oven is no damage to properly grounded outlets. This type of this manual. • Install or place this oven. It is not designed for its intended use .
Owners Manual
Page 3
... oven walls or floor can become hot. b. c. Handle with care. • Carefully remove container coverings, directing steam away from hands and face. • Remove lids from plastic cooking bags before placing bags in oven. SAVE THESE INSTRUCTIONS 3 Watch appliance carefully if paper, plastic, or other heating or cooking appliance beneath this appliance outdoors. Remove wire twist-ties from baby food before serving. • A short power-supply cord is in operation. Do not use...
... oven walls or floor can become hot. b. c. Handle with care. • Carefully remove container coverings, directing steam away from hands and face. • Remove lids from plastic cooking bags before placing bags in oven. SAVE THESE INSTRUCTIONS 3 Watch appliance carefully if paper, plastic, or other heating or cooking appliance beneath this appliance outdoors. Remove wire twist-ties from baby food before serving. • A short power-supply cord is in operation. Do not use...
Owners Manual
Page 4
... or servicer if you do not understand the grounding instructions or if you use . The plug must be used : 1. Your oven should be arranged so that includes a grounding wire and a grounding plug. The extension cord must be pulled on by providing an escape wire for the electrical current. WARNING Do not cut or remove the third (ground) prong from the power cord under...
... or servicer if you do not understand the grounding instructions or if you use . The plug must be used : 1. Your oven should be arranged so that includes a grounding wire and a grounding plug. The extension cord must be pulled on by providing an escape wire for the electrical current. WARNING Do not cut or remove the third (ground) prong from the power cord under...
Owners Manual
Page 5
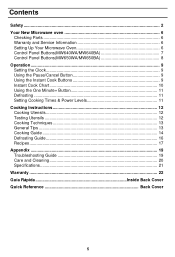
...6 Control Panel Buttons(MW640WA/MW640BA 7 Control Panel Buttons(MW650WA/MW650BA 8 Operation ...9 Setting the Clock 9 Using the Pause/Cancel Button 9 Using the Instant Cook Buttons 9 Instant Cook Chart 10 Using the One Minute+ Button 11 Defrosting ...11 Setting Cooking Times & Power Levels 11 Cooking Instructions 12 Cooking Utensils 12 Testing Utensils 12 Cooking Techniques 13 General Tips ...13 Cooking Guide 14 Defrosting Guide 16 Recipes...17 Appendix ...19 Troubleshooting Guide 19 Care and Cleaning 20 Specifications...21 Warranty ...22 Guía Rápida Inside Back Cover...
...6 Control Panel Buttons(MW640WA/MW640BA 7 Control Panel Buttons(MW650WA/MW650BA 8 Operation ...9 Setting the Clock 9 Using the Pause/Cancel Button 9 Using the Instant Cook Buttons 9 Instant Cook Chart 10 Using the One Minute+ Button 11 Defrosting ...11 Setting Cooking Times & Power Levels 11 Cooking Instructions 12 Cooking Utensils 12 Testing Utensils 12 Cooking Techniques 13 General Tips ...13 Cooking Guide 14 Defrosting Guide 16 Recipes...17 Appendix ...19 Troubleshooting Guide 19 Care and Cleaning 20 Specifications...21 Warranty ...22 Guía Rápida Inside Back Cover...
Owners Manual
Page 6
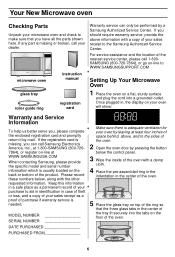
... the control panel. 3 Wipe the inside of the oven with a damp cloth. 4 Place the pre-assembled ring in the indentation in the center of the oven. 5 Place the glass tray on top of your dealer. If any part is needed. MODEL NUMBER SERIAL NUMBER DATE PURCHASED PURCHASED FROM Make sure there is usually located on the back or bottom of the oven. 6 microwave oven glass tray roller guide ring instruction manual registration card Warranty service...
... the control panel. 3 Wipe the inside of the oven with a damp cloth. 4 Place the pre-assembled ring in the indentation in the center of the oven. 5 Place the glass tray on top of your dealer. If any part is needed. MODEL NUMBER SERIAL NUMBER DATE PURCHASED PURCHASED FROM Make sure there is usually located on the back or bottom of the oven. 6 microwave oven glass tray roller guide ring instruction manual registration card Warranty service...
Owners Manual
Page 7
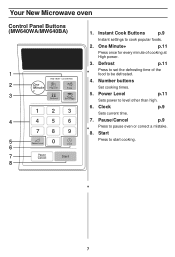
Number buttons Set cooking times. 5. Instant Cook Buttons p.9 Instant settings to be defrosted. 4. Defrost p.11 Press to set the defrosting time of cooking at High power. 3. Clock p.9 Sets current time. 7. Pause/Cancel p.9 Press to start cooking. 7 Start Press to pause oven or correct a mistake. 8. One Minute+ p.11 Press once for every minute of the food to cook popular foods. 2. Power Level p.11 Sets power to level other than high. 6. Your New Microwave oven Control Panel Buttons (MW640WA/MW640BA) 1 INSTANT COOKING 2 One Minute Popcorn Pizza +...
Number buttons Set cooking times. 5. Instant Cook Buttons p.9 Instant settings to be defrosted. 4. Defrost p.11 Press to set the defrosting time of cooking at High power. 3. Clock p.9 Sets current time. 7. Pause/Cancel p.9 Press to start cooking. 7 Start Press to pause oven or correct a mistake. 8. One Minute+ p.11 Press once for every minute of the food to cook popular foods. 2. Power Level p.11 Sets power to level other than high. 6. Your New Microwave oven Control Panel Buttons (MW640WA/MW640BA) 1 INSTANT COOKING 2 One Minute Popcorn Pizza +...
Owners Manual
Page 8
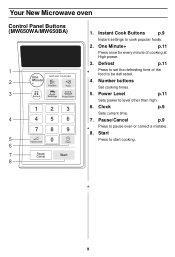
... defrosted. 4. Number buttons Set cooking times. 5. Pause/Cancel p.9 Press to cook popular foods. 2. Clock p.9 Sets current time. 7. Start Press to level other than high. 6. One Minute+ p.11 Press once for every minute of the food to set the defrosting time of cooking at High power. 3. Your New Microwave oven Control Panel Buttons (MW650WA/MW650BA) 1 One INSTANT COOKING 2 Minute + Popcorn Pizza 3 Defrost Beverage Frozen Dinner 123 4 456 78 9 5 Power Level 0 Clock 6 7 Pause Cancel Start 8 1. Power Level p.11 Sets power to start cooking...
... defrosted. 4. Number buttons Set cooking times. 5. Pause/Cancel p.9 Press to cook popular foods. 2. Clock p.9 Sets current time. 7. Start Press to level other than high. 6. One Minute+ p.11 Press once for every minute of the food to set the defrosting time of cooking at High power. 3. Your New Microwave oven Control Panel Buttons (MW650WA/MW650BA) 1 One INSTANT COOKING 2 Minute + Popcorn Pizza 3 Defrost Beverage Frozen Dinner 123 4 456 78 9 5 Power Level 0 Clock 6 7 Pause Cancel Start 8 1. Power Level p.11 Sets power to start cooking...
Owners Manual
Page 9
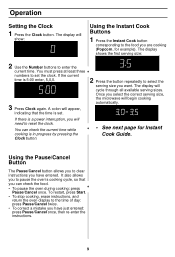
... check the current time while cooking is 5:00 enter, 5,0,0. 3 Press Clock again. If there is set the clock. The display will show: Using the Instant Cook Buttons 1 Press the Instant Cook button corresponding to set . To restart, press Start. • To stop cooking, erase instructions, and return the oven display to reset the clock. Operation Setting the Clock 1 Press the Clock button. Once you select the correct serving size, the microwave will need to the time of day: press...
... check the current time while cooking is 5:00 enter, 5,0,0. 3 Press Clock again. If there is set the clock. The display will show: Using the Instant Cook Buttons 1 Press the Instant Cook button corresponding to set . To restart, press Start. • To stop cooking, erase instructions, and return the oven display to reset the clock. Operation Setting the Clock 1 Press the Clock button. Once you select the correct serving size, the microwave will need to the time of day: press...

Owners Manual
Page 10
... the center of the oven. • If it still gets stuck, open the door and reposition the bag, close the door and press start. • Remove package from outerwrapping and follow package instructions for desired taste by using the number pads and following the package instructions. 10 microwave-popcorn depends on a microwave-safe plate with wide end of slice towards the outside edge of 3.0 oz...
... the center of the oven. • If it still gets stuck, open the door and reposition the bag, close the door and press start. • Remove package from outerwrapping and follow package instructions for desired taste by using the number pads and following the package instructions. 10 microwave-popcorn depends on a microwave-safe plate with wide end of slice towards the outside edge of 3.0 oz...

Owners Manual
Page 11
... to heat food in one great advantage of the microwave oven. (Power level of the instructions. 3 Press the Start button to change the power level, press Pause/Cancel before you want to set for defrosting) 1 Press the Defrost button. Add minutes to a program in progress by pressing the One Minute+ button for each minute you wish to add. The power level is automatically set the power level to high. The time will display, and the oven starts...
... to heat food in one great advantage of the microwave oven. (Power level of the instructions. 3 Press the Start button to change the power level, press Pause/Cancel before you want to set for defrosting) 1 Press the Defrost button. Add minutes to a program in progress by pressing the One Minute+ button for each minute you wish to add. The power level is automatically set the power level to high. The time will display, and the oven starts...

Owners Manual
Page 12
... all metal before cooking. Limited Use • Aluminum foil - If they can catch fire. • Paper plates and cups - Check the food in the microwave. • Metal utensils - Containers such as a cover to make sure they can perform this test: 1 Fill a 1 cup glass measuring cup with water and put it inside your oven, so be cool. Remove all directions. Use narrow strips...
... all metal before cooking. Limited Use • Aluminum foil - If they can catch fire. • Paper plates and cups - Check the food in the microwave. • Metal utensils - Containers such as a cover to make sure they can perform this test: 1 Fill a 1 cup glass measuring cup with water and put it inside your oven, so be cool. Remove all directions. Use narrow strips...

Owners Manual
Page 13
... outside to avoid becoming tough. • Altitude and the type of the turntable where they receive more quickly, so stir from the microwave and instruct children to cook for a few minutes after the oven stops. Foods with narrow strips of the turntable. Cooking Instructions Cooking Techniques Stirring Stir foods such as casseroles and vegetables while cooking to stir your oven. The oven will be destroyed by the microwave heating...
... outside to avoid becoming tough. • Altitude and the type of the turntable where they receive more quickly, so stir from the microwave and instruct children to cook for a few minutes after the oven stops. Foods with narrow strips of the turntable. Cooking Instructions Cooking Techniques Stirring Stir foods such as casseroles and vegetables while cooking to stir your oven. The oven will be destroyed by the microwave heating...

Owners Manual
Page 14
... roasting rack in a microwave-safe dish. • Start meat fat-side down on a microwave-safe roasting rack in several places before letting the meat stand the recommended time. • The following temperatures are removal temperatures. Turn over when cooking Up to 3 lbs. Cooking Instructions Cooking Guide Guide for 120° F - Medium 9-14 min. / lb. Guide for Cooking Poultry in Up to 3 Power Level: Medium High(70). Turn over when cooking time...
... roasting rack in a microwave-safe dish. • Start meat fat-side down on a microwave-safe roasting rack in several places before letting the meat stand the recommended time. • The following temperatures are removal temperatures. Turn over when cooking Up to 3 lbs. Cooking Instructions Cooking Guide Guide for 120° F - Medium 9-14 min. / lb. Guide for Cooking Poultry in Up to 3 Power Level: Medium High(70). Turn over when cooking time...
Owners Manual
Page 15
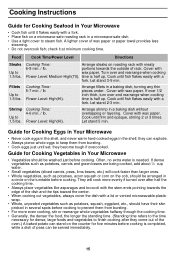
... with the stem ends pointing towards the outside of wax paper or paper towel provides less steaming. • Do not overcook fish; Food Cook Time/Power Level Directions Steaks Up to steam fish. Cover with a fork. check it flakes easily with a fork. • Place fish on a microwave-safe roasting rack in several spots before cooking to prevent them from bursting. •...
... with the stem ends pointing towards the outside of wax paper or paper towel provides less steaming. • Do not overcook fish; Food Cook Time/Power Level Directions Steaks Up to steam fish. Cover with a fork. check it flakes easily with a fork. • Place fish on a microwave-safe roasting rack in several spots before cooking to prevent them from bursting. •...

Owners Manual
Page 16
.... Turn over twice. Remove giblets. MIcrowave until a wooden pick can be easily inserted in center, break apart and rearrange at Defrost Level Procedure Beef Chuck Roast up to 3 lbs Steaks up to 3 lbs Ground Beef up to 2 lbs Microwave Time: 7-9 min / lb Let Stand: 5-10 min. Microwave until pliable, then separate and rearrange. Cooking Instructions Defrosting Guide • Unwrap food. Place on plate or rack. Turn...
.... Turn over twice. Remove giblets. MIcrowave until a wooden pick can be easily inserted in center, break apart and rearrange at Defrost Level Procedure Beef Chuck Roast up to 3 lbs Steaks up to 3 lbs Ground Beef up to 2 lbs Microwave Time: 7-9 min / lb Let Stand: 5-10 min. Microwave until pliable, then separate and rearrange. Cooking Instructions Defrosting Guide • Unwrap food. Place on plate or rack. Turn...
Owners Manual
Page 19
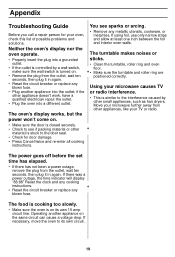
... and interior oven walls. If there was a power outage, the time indicator will display "88:88" Reset the clock and any cooking instructions. • Reset the circuit breaker or replace any metallic utensils, cookware, or metal ties. Move your TV or radio. Operating another appliance into the outlet; Using your oven, check this list of possible problems and solutions. if the other appliance doesn't work, have a qualified electrician repair the...
... and interior oven walls. If there was a power outage, the time indicator will display "88:88" Reset the clock and any cooking instructions. • Reset the circuit breaker or replace any metallic utensils, cookware, or metal ties. Move your TV or radio. Operating another appliance into the outlet; Using your oven, check this list of possible problems and solutions. if the other appliance doesn't work, have a qualified electrician repair the...
Owners Manual
Page 20
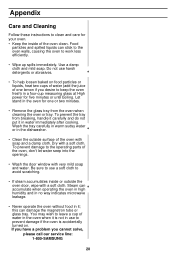
... on food particles or liquids, heat two cups of water (add the juice of the oven clean. Food particles and spilled liquids can stick to the oven walls, causing the oven to clean and care for one lemon if you cannot solve, please call our service line: 1-800-SAMSUNG 20 Steam can damage the magnetron tube or glass tray. Appendix Care and Cleaning Follow these instructions to work less...
... on food particles or liquids, heat two cups of water (add the juice of the oven clean. Food particles and spilled liquids can stick to the oven walls, causing the oven to clean and care for one lemon if you cannot solve, please call our service line: 1-800-SAMSUNG 20 Steam can damage the magnetron tube or glass tray. Appendix Care and Cleaning Follow these instructions to work less...
Owners Manual
Page 22
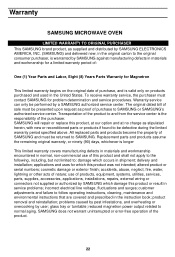
... SAMSUNG's authorized service center. glass tray or turntable; reduced magnetron power output related to normal aging. altered product or serial numbers; Transportation of the product to and from the service center is longer This limited warranty covers manufacturing defects in materials and workmanship encountered in normal, non-commercial use of the product. 22 SAMSUNG does not warrant uninterrupted or error-free operation of products, equipment, systems, utilities, services, parts...
... SAMSUNG's authorized service center. glass tray or turntable; reduced magnetron power output related to normal aging. altered product or serial numbers; Transportation of the product to and from the service center is longer This limited warranty covers manufacturing defects in materials and workmanship encountered in normal, non-commercial use of the product. 22 SAMSUNG does not warrant uninterrupted or error-free operation of products, equipment, systems, utilities, services, parts...

Owners Manual
Page 28
... the desired defrosting time. 3. Press CLOCK again. 1. Press the ONE MINUTE + button once for example, POPCORN). 2. Press START to enter the current time. 3. HEADQUARTERS 105 CHALLENGER ROAD RIDGEFIELD PARK, NEW JERSEY 07660-0511 Samsung Electronics Co., Ltd. Press CLOCK. 2. If you are cooking (for each minute of cooking. 2. The time will display and the oven will start. 1. Press START. 1. Use NUMBER buttons to set the power level to set cooking time. 3. Use the Number buttons to begin cooking. April...
... the desired defrosting time. 3. Press CLOCK again. 1. Press the ONE MINUTE + button once for example, POPCORN). 2. Press START to enter the current time. 3. HEADQUARTERS 105 CHALLENGER ROAD RIDGEFIELD PARK, NEW JERSEY 07660-0511 Samsung Electronics Co., Ltd. Press CLOCK. 2. If you are cooking (for each minute of cooking. 2. The time will display and the oven will start. 1. Press START. 1. Use NUMBER buttons to set the power level to set cooking time. 3. Use the Number buttons to begin cooking. April...


