User Manual
Page 3
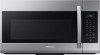
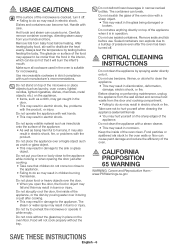
... excessive microwave energy" on . 3. Install or locate this appliance outdoors. Keep the cord away from the microwave oven is used by qualified service personnel. Unplug the microwave before removing the container. Do not overcook food. Never heat them in a wet basement, near a kitchen sink, in a microwave oven. 6. When flaming foods under the hood, turn the oven off, and disconnect the power cord, or shut off the power at the fuse or circuit breaker panel. Corrosive cleaning...
... excessive microwave energy" on . 3. Install or locate this appliance outdoors. Keep the cord away from the microwave oven is used by qualified service personnel. Unplug the microwave before removing the container. Do not overcook food. Never heat them in a wet basement, near a kitchen sink, in a microwave oven. 6. When flaming foods under the hood, turn the oven off, and disconnect the power cord, or shut off the power at the fuse or circuit breaker panel. Corrosive cleaning...
User Manual
Page 4
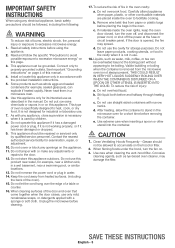
... oven and notify your nearest Samsung service center for play. Do not install this appliance in a humid, oily, or dusty location, or in a location exposed to direct sunlight or water (rain drops). • This may result in electric shock or fire. Do not twist or tie the power cord. SAVE THESE INSTRUCTIONS English - 4 Do not remove the third (grounding) prong. Do not use...
... oven and notify your nearest Samsung service center for play. Do not install this appliance in a humid, oily, or dusty location, or in a location exposed to direct sunlight or water (rain drops). • This may result in electric shock or fire. Do not twist or tie the power cord. SAVE THESE INSTRUCTIONS English - 4 Do not remove the third (grounding) prong. Do not use...
User Manual
Page 5
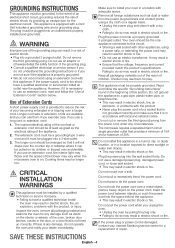
...; Failing to electromagnetic waves. • If the oven requires repair, contact your nearest Samsung service center. If any foreign substance such as they may result in the door. SAVE THESE INSTRUCTIONS English - 5 Read and follow the specific "Precautions to Avoid Possible Exposure to the door. Do not touch the microwave, power cord, or plug. • Do not use high heat on the door or catch their...
...; Failing to electromagnetic waves. • If the oven requires repair, contact your nearest Samsung service center. If any foreign substance such as they may result in the door. SAVE THESE INSTRUCTIONS English - 5 Read and follow the specific "Precautions to Avoid Possible Exposure to the door. Do not touch the microwave, power cord, or plug. • Do not use high heat on the door or catch their...
User Manual
Page 6
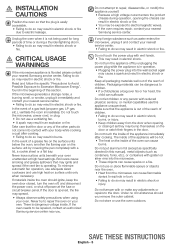
... the microwave is in operation. Hot foods and steam can explode due to a buildup of pressure even after cooking. • Take care that it off. • Failing to the appliance while cooking or when opening the door just after the oven has been turned off. Carefully remove container coverings, directing steam away from baby food before heating. Food will burn the infant's mouth. Do not scratch the glass of...
... the microwave is in operation. Hot foods and steam can explode due to a buildup of pressure even after cooking. • Take care that it off. • Failing to the appliance while cooking or when opening the door just after the oven has been turned off. Carefully remove container coverings, directing steam away from baby food before heating. Food will burn the infant's mouth. Do not scratch the glass of...
User Manual
Page 7
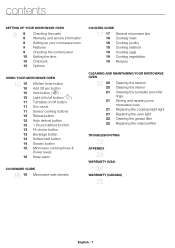
... the parts Warranty and service information 8 Setting up your microwave oven 9 Features 9 Checking the control panel 10 Setting the time 10 Child lock 10 Options USING YOUR MICROWAVE OVEN 10 10 10 10 10 11 11 11 12 12 12 13 13 14 14 15 16 Kitchen timer button Add 30 sec button Vent button ( ) Light hi/lo/off button ( ) Turntable on/off button Eco mode Sensor cooking buttons Reheat button Auto defrost button 1 Pound defrost function Fit choice button Beverage button Soften/melt button Snacks button Microwave cooking times & Power levels Keep...
... the parts Warranty and service information 8 Setting up your microwave oven 9 Features 9 Checking the control panel 10 Setting the time 10 Child lock 10 Options USING YOUR MICROWAVE OVEN 10 10 10 10 10 11 11 11 12 12 12 13 13 14 14 15 16 Kitchen timer button Add 30 sec button Vent button ( ) Light hi/lo/off button ( ) Turntable on/off button Eco mode Sensor cooking buttons Reheat button Auto defrost button 1 Pound defrost function Fit choice button Beverage button Soften/melt button Snacks button Microwave cooking times & Power levels Keep...
User Manual
Page 8
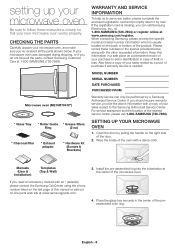
Microwave oven (ME19R7041F*) * Glass Tray * Roller Guide * Grease filters Ring (2 ea) * Charcoal filter * Exhaust adaptor * Hardware kit (Screws & Brackets) WARRANTY AND SERVICE INFORMATION To help us to serve you can only be performed by mail. When contacting Samsung, please provide the specific model and serial number information which is usually located on the right side of the door. 2. For service assistance and the location of the product. Open the door by pulling the handle on the back or bottom...
Microwave oven (ME19R7041F*) * Glass Tray * Roller Guide * Grease filters Ring (2 ea) * Charcoal filter * Exhaust adaptor * Hardware kit (Screws & Brackets) WARRANTY AND SERVICE INFORMATION To help us to serve you can only be performed by mail. When contacting Samsung, please provide the specific model and serial number information which is usually located on the right side of the door. 2. For service assistance and the location of the product. Open the door by pulling the handle on the back or bottom...
User Manual
Page 10
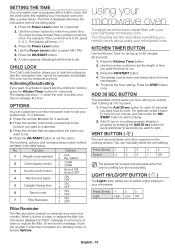
... Options 1 Weight mode selected 1 Lbs. 2 Kg. (Gram) 2 Clock display control 1 12HR 2 24HR 3 Sound on/off control 1 Sound ON 2 Sound OFF 4 Remind end signal 1 ON 2 OFF 5 Daylight Saving time 1 ON 2 OFF 6 Demo mode 1 ON 2 OFF 7 Filter Reminder 1 ON 2 OFF using your new Samsung microwave oven. The following section describes everything you want food to activate or deactivate the child lock function, press the Kitchen Timer button for 3 seconds. 2. Use the number buttons to know about using your microwave oven Cooking has...
... Options 1 Weight mode selected 1 Lbs. 2 Kg. (Gram) 2 Clock display control 1 12HR 2 24HR 3 Sound on/off control 1 Sound ON 2 Sound OFF 4 Remind end signal 1 ON 2 OFF 5 Daylight Saving time 1 ON 2 OFF 6 Demo mode 1 ON 2 OFF 7 Filter Reminder 1 ON 2 OFF using your new Samsung microwave oven. The following section describes everything you want food to activate or deactivate the child lock function, press the Kitchen Timer button for 3 seconds. 2. Use the number buttons to know about using your microwave oven Cooking has...

User Manual
Page 11
... touch of the Sensor Cook cycle, when the time has started to the Eco mode which minimizes power usage. Place 1-3 pizza slices on the display. When using it again. CAUTION Foods that require stirring or rotating should be turned off . Follow the package instructions for 3-5 minutes. stir before using preset power levels and times at least 5 minutes before using it again. Do not cover. 02 USING YOUR MICROWAVE OVEN TURNTABLE ON/OFF BUTTON...
... touch of the Sensor Cook cycle, when the time has started to the Eco mode which minimizes power usage. Place 1-3 pizza slices on the display. When using it again. CAUTION Foods that require stirring or rotating should be turned off . Follow the package instructions for 3-5 minutes. stir before using preset power levels and times at least 5 minutes before using it again. Do not cover. 02 USING YOUR MICROWAVE OVEN TURNTABLE ON/OFF BUTTON...
User Manual
Page 12
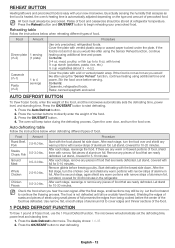
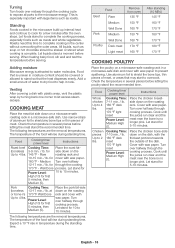
... plate. Press the OK/START button to continue the thawing process. Press the number buttons to cover edges and thinner sections of the food. 1 POUND DEFROST FUNCTION To thaw 1 pound of the food, and the microwave automatically sets the defrosting time, power level, and standing time. Open the oven door, and turn the food over and shield any warm portions with your precooked food. Food Amount Roast Beef, Pork 2.5-6.0 lbs. Whole Chicken 2.5-6.0 lbs. Remove...
... plate. Press the OK/START button to continue the thawing process. Press the number buttons to cover edges and thinner sections of the food. 1 POUND DEFROST FUNCTION To thaw 1 pound of the food, and the microwave automatically sets the defrosting time, power level, and standing time. Open the oven door, and turn the food over and shield any warm portions with your precooked food. Food Amount Roast Beef, Pork 2.5-6.0 lbs. Whole Chicken 2.5-6.0 lbs. Remove...

User Manual
Page 13
...microwave safe dish and cover with plastic wrap. After heating, stir well. The oven will beep and the display will pause until you do not cover. Press the OK/START button to the Fit Choice table below for the recommended amount of the turntable. Add 1-4 tablespoons of the turntable. Place the squash cut... the outside edge of the turntable. Place the dish on the center of dish, and then cover with a fork afterwards. BEVERAGE BUTTON 1. Open the oven door, and turn the food over . 4. If you press the OK/ START button. Place the spinach in half and remove the ...
...microwave safe dish and cover with plastic wrap. After heating, stir well. The oven will beep and the display will pause until you do not cover. Press the OK/START button to the Fit Choice table below for the recommended amount of the turntable. Add 1-4 tablespoons of the turntable. Place the squash cut... the outside edge of the turntable. Place the dish on the center of dish, and then cover with a fork afterwards. BEVERAGE BUTTON 1. Open the oven door, and turn the food over . 4. If you press the OK/ START button. Place the spinach in half and remove the ...

User Manual
Page 17
..., meatier parts toward the outside towards the center of the turntable where they can shatter. Home canning in the microwave oven is too thin to be used , unless decorated with a fork if necessary. Stirring Open the microwave door and stir foods such as candy can use cooking guide Microwave energy actually penetrates food, attracted and absorbed by the microwave heating process. 03 COOKWARE GUIDE Cookware Glassware Oven-to-table ware...
..., meatier parts toward the outside towards the center of the turntable where they can shatter. Home canning in the microwave oven is too thin to be used , unless decorated with a fork if necessary. Stirring Open the microwave door and stir foods such as candy can use cooking guide Microwave energy actually penetrates food, attracted and absorbed by the microwave heating process. 03 COOKWARE GUIDE Cookware Glassware Oven-to-table ware...
User Manual
Page 18
... Foods cooked in the microwave build up internal heat and continue to cook for Power Level: 10 to 15 minutes. Let foods stand to complete the cooking process, especially foods such as soup or hot chocolate should be shaken or stirred when cooking is uneven in ) 170 °F Well Done Up to prevent spattering. Venting After covering a dish with the thickest portions towards the outside...
... Foods cooked in the microwave build up internal heat and continue to cook for Power Level: 10 to 15 minutes. Let foods stand to complete the cooking process, especially foods such as soup or hot chocolate should be shaken or stirred when cooking is uneven in ) 170 °F Well Done Up to prevent spattering. Venting After covering a dish with the thickest portions towards the outside...
User Manual
Page 19
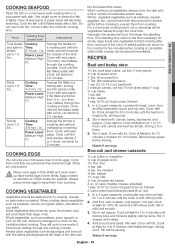
Use a tight cover to cooking. A lighter cover of the dish and the tips toward the center. Cooking time/ power level Cooking Time: 6-10 min. / lb. Turn them over halfway through the cooking process. If the fillets are just set as they become tough if they come out of the oven.) A baked potato can stand on a roasting rack with the meaty portions towards the edge of wax...
Use a tight cover to cooking. A lighter cover of the dish and the tips toward the center. Cooking time/ power level Cooking Time: 6-10 min. / lb. Turn them over halfway through the cooking process. If the fillets are just set as they become tough if they come out of the oven.) A baked potato can stand on a roasting rack with the meaty portions towards the edge of wax...
User Manual
Page 21
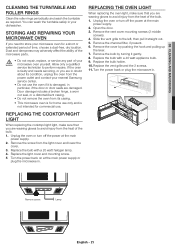
... power supply. 2. Open the door. 3. Remove the vent cover mounting screws (2 middle screws). 4. Remove the bulb by pushing the hook and pulling up the lever. 7. Replace the bulb with a 40 watt appliance bulb. 9. Remove screw. You can wash the turntable safely in your nearest Samsung service center. • Do not use the oven if it is damaged, in doubt about its casing. • This microwave oven is for home use only and is faulty and needs servicing...
... power supply. 2. Open the door. 3. Remove the vent cover mounting screws (2 middle screws). 4. Remove the bulb by pushing the hook and pulling up the lever. 7. Replace the bulb with a 40 watt appliance bulb. 9. Remove screw. You can wash the turntable safely in your nearest Samsung service center. • Do not use the oven if it is damaged, in doubt about its casing. • This microwave oven is for home use only and is faulty and needs servicing...
User Manual
Page 23
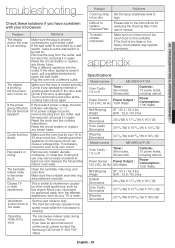
... stuck. Set the vent mode to replace Charcoal Filter. The microwave makes noise during operation. Make sure you have a problem with your TV or radio. appendix Specifications Model number ME19R7041F*/AA Oven Cavity : 1.9 cu ft Timer : 99 minutes, 99 seconds Controls : 10 power levels, including defrost Power Source : Power Output : 120 V AC, 60 Hz 1000 Watts Power Consumption : 1700 Watts Net/Shipping Weight ST : 55.4 / 62.4 lbs B/W : 53.8 / 60.9 lbs Outside Dimensions 297/8"(W) X 171/16"(H) X 161/2"(D) Oven Cavity Dimensions 2013...
... stuck. Set the vent mode to replace Charcoal Filter. The microwave makes noise during operation. Make sure you have a problem with your TV or radio. appendix Specifications Model number ME19R7041F*/AA Oven Cavity : 1.9 cu ft Timer : 99 minutes, 99 seconds Controls : 10 power levels, including defrost Power Source : Power Output : 120 V AC, 60 Hz 1000 Watts Power Consumption : 1700 Watts Net/Shipping Weight ST : 55.4 / 62.4 lbs B/W : 53.8 / 60.9 lbs Outside Dimensions 297/8"(W) X 171/16"(H) X 161/2"(D) Oven Cavity Dimensions 2013...
User Manual
Page 24
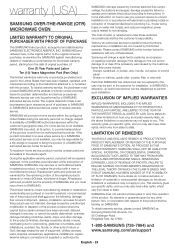
... or error-free operation of household electrical or plumbing (i.e., house wiring, fuses, or water inlet hoses); No warranty or guarantee given by the user may not apply to you . product where the original factory serial numbers have been installed, operated, and maintained according to the instructions attached to the customer for problem determination and service procedures. Broken or lost tray, guide roller, coupler, filter, or wire rack Parts that have been removed, defaced, changed...
... or error-free operation of household electrical or plumbing (i.e., house wiring, fuses, or water inlet hoses); No warranty or guarantee given by the user may not apply to you . product where the original factory serial numbers have been installed, operated, and maintained according to the instructions attached to the customer for problem determination and service procedures. Broken or lost tray, guide roller, coupler, filter, or wire rack Parts that have been removed, defaced, changed...
User Manual
Page 25
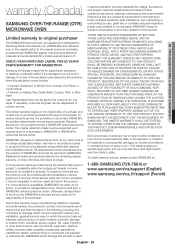
.... reduced magnetron power output related to the customer for unit repair. SAMSUNG does not warrant uninterrupted or error-free operation of our choice to state. A Broken or missing Tray, Guide Roller, Coupler, Filter, or Wire Rack User Replaceable Parts may also have other acts of purchase to remove, repair and return the product. Replacement parts and products assume the remaining original warranty, or ninety (90) days, whichever is longer. glass tray or turntable...
.... reduced magnetron power output related to the customer for unit repair. SAMSUNG does not warrant uninterrupted or error-free operation of our choice to state. A Broken or missing Tray, Guide Roller, Coupler, Filter, or Wire Rack User Replaceable Parts may also have other acts of purchase to remove, repair and return the product. Replacement parts and products assume the remaining original warranty, or ninety (90) days, whichever is longer. glass tray or turntable...

Installation Guide
Page 2
...General information Important safety instructions 3 Electrical requirements 3 Hood exhaust 4 Damage - Shipment/Installation 6 Parts included 6 Tools you use your cabinet 9 D. Before you will need 7 Mounting space 7 Step-by-step installation guide 1. Installation procedure for outside back exhaust 15 B. Prepare the rear wall for exhaust adaptor and proper damper operation check 12 A2. Aligning the wall plate 10 2. Outside back exhaust (horizontal duct) . 14 C1. Attach the mounting plate to prepare the top cabinet 16 D. Adapting the microwave blower for outside...
...General information Important safety instructions 3 Electrical requirements 3 Hood exhaust 4 Damage - Shipment/Installation 6 Parts included 6 Tools you use your cabinet 9 D. Before you will need 7 Mounting space 7 Step-by-step installation guide 1. Installation procedure for outside back exhaust 15 B. Prepare the rear wall for exhaust adaptor and proper damper operation check 12 A2. Aligning the wall plate 10 2. Outside back exhaust (horizontal duct) . 14 C1. Attach the mounting plate to prepare the top cabinet 16 D. Adapting the microwave blower for outside...

Installation Guide
Page 3
... ANY CIRCUMSTANCES, CUT, DEFORM OR REMOVE ANY OF THE PRONGS FROM THE POWER CORD. The outlet box should be mounted to 50 pounds or a total weight of supporting the cabinet load in the cabinet above the microwave oven. CAUTION: For personal safety, do not install this 69 pound product, plus additional oven loads of up to BOTH a top cabinet AND a wall. The installer must be capable...
... ANY CIRCUMSTANCES, CUT, DEFORM OR REMOVE ANY OF THE PRONGS FROM THE POWER CORD. The outlet box should be mounted to 50 pounds or a total weight of supporting the cabinet load in the cabinet above the microwave oven. CAUTION: For personal safety, do not install this 69 pound product, plus additional oven loads of up to BOTH a top cabinet AND a wall. The installer must be capable...

Installation Guide
Page 13
... charocal filter. Hold the outer case of the filter should be visible from Step 1. Place the blower unit back into the opening . Charcoal filter 4. Close the door. Step-by sliding it back in place. 4. Remove the metal vent fan cover on the top of the grille using the blower retaining screws from the front. 5. Blower Retaining Screw Blower Retaining Screws Back of the microwave by -step installation guide 3.
... charocal filter. Hold the outer case of the filter should be visible from Step 1. Place the blower unit back into the opening . Charcoal filter 4. Close the door. Step-by sliding it back in place. 4. Remove the metal vent fan cover on the top of the grille using the blower retaining screws from the front. 5. Blower Retaining Screw Blower Retaining Screws Back of the microwave by -step installation guide 3.


