User Manual (ENGLISH)
Page 4
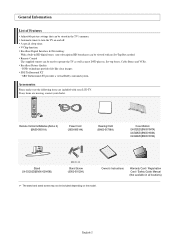
... dealer. SRS TruSurround XT - SRS TruSurround XT provides a virtual Dolby surround system. Accessories Please make sure the following items are missing, contact your LCD TV. If any items are included with no Set-Top Box needed. Remote Control The supplied remote can be stored in the... TV's memory. V-Chip function. DNIe technology provides life-like clear images. Remote Control & Batteries (AAA x 2) (BN59-00511A) Power Cord (3903-000144) Cleaning Cloth (BN63-...
... dealer. SRS TruSurround XT - SRS TruSurround XT provides a virtual Dolby surround system. Accessories Please make sure the following items are missing, contact your LCD TV. If any items are included with no Set-Top Box needed. Remote Control The supplied remote can be stored in the... TV's memory. V-Chip function. DNIe technology provides life-like clear images. Remote Control & Batteries (AAA x 2) (BN59-00511A) Power Cord (3903-000144) Cleaning Cloth (BN63-...
User Manual (ENGLISH)
Page 24
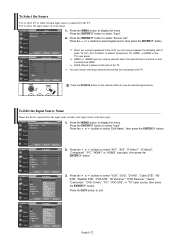
..."AV1", "AV2", "S-Video1", "S-Video2", "Component", "PC", "HDMI1" or "HDMI2" input jack, then press the ENTER button. 3. AV2/S-Video2 is turned on the TV's rear panel. Press the MENU button to select "Input". 2. Press the ENTER button to display the menu. Press the ENTER button to select "Edit Name... source selection easier. 1. Press the or buttons to make your choice. 1. When you connect equipment to the LCD, you can choose only those external devices that are connected to the TV. To Edit the Input Source Name Name the device connected to the input jacks to select "VCR", "DVD",...
..."AV1", "AV2", "S-Video1", "S-Video2", "Component", "PC", "HDMI1" or "HDMI2" input jack, then press the ENTER button. 3. AV2/S-Video2 is turned on the TV's rear panel. Press the MENU button to select "Input". 2. Press the ENTER button to display the menu. Press the ENTER button to select "Edit Name... source selection easier. 1. Press the or buttons to make your choice. 1. When you connect equipment to the LCD, you can choose only those external devices that are connected to the TV. To Edit the Input Source Name Name the device connected to the input jacks to select "VCR", "DVD",...
User Manual (ENGLISH)
Page 57
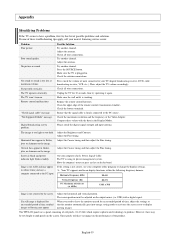
... computer check: Power, Signal Cable. STB) with the data in . The TFT LCD panel uses a panel consisting of possible problems and solutions. These pixels will have no...dark. Adjust the antenna. Check all wire connections. Replace the remote control batteries. Your TV supports multiscan display functions within the following frequency domain: Horizontal frequency (kHz) 30~60 ...If none of the remote control (transmission window). Horizontal bars appear to your nearest Samsung service center. Problem Poor picture Poor sound quality. The screen position must be few...
... computer check: Power, Signal Cable. STB) with the data in . The TFT LCD panel uses a panel consisting of possible problems and solutions. These pixels will have no...dark. Adjust the antenna. Check all wire connections. Replace the remote control batteries. Your TV supports multiscan display functions within the following frequency domain: Horizontal frequency (kHz) 30~60 ...If none of the remote control (transmission window). Horizontal bars appear to your nearest Samsung service center. Problem Poor picture Poor sound quality. The screen position must be few...
User Manual (ENGLISH)
Page 59
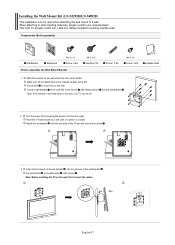
... . 3 Insert three Hangers of the set -bracket and wall-bracket with wood screws after fitting anchors into the grooves of the wall-bracket . Place the TV faced down on a soft cloth or cushion on the wall, first connect the cables. English-57 Installation Guide 2 Turn the power off . When attaching to... wall-bracket to the wall with screws . Installing the Wall Mount Kit (LN-S3292D/LN-S4092D) This installation is not firmly fixed to the wall, LCD TV can fall off and unplug the power cord from the outlet. This LCD TV accepts a 200 mm x 200 mm VESA-compliant mounting interface pad.
... . 3 Insert three Hangers of the set -bracket and wall-bracket with wood screws after fitting anchors into the grooves of the wall-bracket . Place the TV faced down on a soft cloth or cushion on the wall, first connect the cables. English-57 Installation Guide 2 Turn the power off . When attaching to... wall-bracket to the wall with screws . Installing the Wall Mount Kit (LN-S3292D/LN-S4092D) This installation is not firmly fixed to the wall, LCD TV can fall off and unplug the power cord from the outlet. This LCD TV accepts a 200 mm x 200 mm VESA-compliant mounting interface pad.
User Manual (ENGLISH)
Page 60
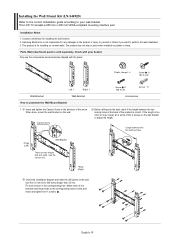
This LCD TV accepts a 600 mm x 400 mm VESA-compliant mounting interface pad. This product is correct. Check with your wall bracket. If the length is too short ... each of the arrow. Installing the Wall Mount Kit (LN-S4692D) Refer to the correct installation guide according to drill holes deeper than 35 mm. Samsung Electronics is sold separately. Captive Screw Before drilling into the wall, check if the length between the two locking holes Hinge (Left) Wall Bracket There...
This LCD TV accepts a 600 mm x 400 mm VESA-compliant mounting interface pad. This product is correct. Check with your wall bracket. If the length is too short ... each of the arrow. Installing the Wall Mount Kit (LN-S4692D) Refer to the correct installation guide according to drill holes deeper than 35 mm. Samsung Electronics is sold separately. Captive Screw Before drilling into the wall, check if the length between the two locking holes Hinge (Left) Wall Bracket There...

User Manual (ENGLISH)
Page 61
...safety pin ( ) and insert the 4 product holders into the plastic hanger. (See the figure below) • Mount the product on the wall. LCD TV How to Adjust Mounting Angle Adjust the bracket angle to -2° before installing it on the wall bracket and make sure it is properly fixed ...the arrow) to adjust the angle. (See the figure to the right) 3. Wall Bracket Wall 1. Installing the Wall Mount Kit (LN-S4692D) Fixing the TV panel to the wall attachment panel bracket The shape of the product may not stay in place after installation. Insert the screw into the corresponding...
...safety pin ( ) and insert the 4 product holders into the plastic hanger. (See the figure below) • Mount the product on the wall. LCD TV How to Adjust Mounting Angle Adjust the bracket angle to -2° before installing it on the wall bracket and make sure it is properly fixed ...the arrow) to adjust the angle. (See the figure to the right) 3. Wall Bracket Wall 1. Installing the Wall Mount Kit (LN-S4692D) Fixing the TV panel to the wall attachment panel bracket The shape of the product may not stay in place after installation. Insert the screw into the corresponding...
User Manual (ENGLISH)
Page 62
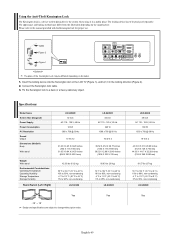
... and specifications are subject to the manual provided with the Kensington lock for proper use. Insert the locking device into the Kensington slot on the LCD TV (Figure 1), and turn it in the locking direction (Figure 2). 2. Connect the Kensington lock cable. 3. The locking device has to a desk or... a heavy stationary object. LN-S4092D 40 inch AC 110 - 120 V, 60 Hz 240 W 1360 x 768 @ 60 Hz 10 W X 2 39.52 X 4.52 X 26.77 inches (1004 X 115 X ...
... and specifications are subject to the manual provided with the Kensington lock for proper use. Insert the locking device into the Kensington slot on the LCD TV (Figure 1), and turn it in the locking direction (Figure 2). 2. Connect the Kensington lock cable. 3. The locking device has to a desk or... a heavy stationary object. LN-S4092D 40 inch AC 110 - 120 V, 60 Hz 240 W 1360 x 768 @ 60 Hz 10 W X 2 39.52 X 4.52 X 26.77 inches (1004 X 115 X ...


