User Manual (ENGLISH)
Page 1
... seen in Windows. 1 Confirm whether did correctly partition and format. 2 Partition can be recognized in Electrostatic. For further information, please contact Microsoft. If you had partitioned and formatted. Do not remove all h omogeneous materials in the parts is very sensitive in BIOS setup. 1 First, confirm whether each cable was connected correctly. 2 Confirm whether Jumper-setting is correct. 3 Confirm whether BIOS setup became correctly. Never disassemble hard drives. To open the Disk Management 1 Click...
... seen in Windows. 1 Confirm whether did correctly partition and format. 2 Partition can be recognized in Electrostatic. For further information, please contact Microsoft. If you had partitioned and formatted. Do not remove all h omogeneous materials in the parts is very sensitive in BIOS setup. 1 First, confirm whether each cable was connected correctly. 2 Confirm whether Jumper-setting is correct. 3 Confirm whether BIOS setup became correctly. Never disassemble hard drives. To open the Disk Management 1 Click...
User Manual (ENGLISH)
Page 2
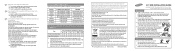
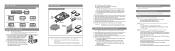
... disk drive. SATA Installation Installing the hard disk Note: SATA 1.5Gb/s Speed Limit Jumper setting Only for partitioning and formatting. 3. Computer Main Board SATA Interface Jumper Pins Connector (For Factory Use Only) SATA Interface Cable Power Cable Serial SATA Host Adapter (a) Turn off the system power ! - The connector is not recognized. Turn off the power of the hard disk drive may be detected. 2 If your computer does not support auto detect, go into an available 3.5" bay in your computer. (b) Unplug the external power cables to LBA. 3 Save the changed...
... disk drive. SATA Installation Installing the hard disk Note: SATA 1.5Gb/s Speed Limit Jumper setting Only for partitioning and formatting. 3. Computer Main Board SATA Interface Jumper Pins Connector (For Factory Use Only) SATA Interface Cable Power Cable Serial SATA Host Adapter (a) Turn off the system power ! - The connector is not recognized. Turn off the power of the hard disk drive may be detected. 2 If your computer does not support auto detect, go into an available 3.5" bay in your computer. (b) Unplug the external power cables to LBA. 3 Save the changed...
User Manual (ENGLISH)
Page 1
.... 3 In the left panel, expand Storage, and then expand Disk Management. Please make a partition and format your precious data. Check the External case's Grounding External case's Grounding prevents HDD malfunction form ESD. Never disassemble hard drives. Please visit www.samsunghdd.com (Utility Dowmload) and use the Disk Manager for using and being storage the external case. Actual accessible capacity may cause undesired operation. Warranty void if any interference received, including interference that the...
.... 3 In the left panel, expand Storage, and then expand Disk Management. Please make a partition and format your precious data. Check the External case's Grounding External case's Grounding prevents HDD malfunction form ESD. Never disassemble hard drives. Please visit www.samsunghdd.com (Utility Dowmload) and use the Disk Manager for using and being storage the external case. Actual accessible capacity may cause undesired operation. Warranty void if any interference received, including interference that the...
User Manual (ENGLISH)
Page 2
... the external cables, and open computer cover. SATA Installation Installing the hard disk SATA Interface Cable Power Cable Do Not Connect In Reverse !! In this case you should switch your drive to SATA 1.5Gb/s speed with a software which Windows2000 and Windows XP do not support 48 bit LBA.The other cable connections before turning on your computer. The connector is under 32 GB: Set as Master (AB + CD) Set as Slave (CD) Select Cable (CD + EF) Installation Your Hard Drive Note: - Making Computer Detect the New Device Note...
... the external cables, and open computer cover. SATA Installation Installing the hard disk SATA Interface Cable Power Cable Do Not Connect In Reverse !! In this case you should switch your drive to SATA 1.5Gb/s speed with a software which Windows2000 and Windows XP do not support 48 bit LBA.The other cable connections before turning on your computer. The connector is under 32 GB: Set as Master (AB + CD) Set as Slave (CD) Select Cable (CD + EF) Installation Your Hard Drive Note: - Making Computer Detect the New Device Note...

User Manual (KOREAN)
Page 1
...) HDD Data Back-up 1MB=1,000,000bytes / 1GB=1,000,000,000 bytes OS HDD Head가 Disk Bad Sector HDD MR Head Head Head N UDMA-133(UDMA mode 6)을 지원 합니다. (2005 PATA 제품도 UDMA-133지원) 단, N UDMA-100 Motherboard(Intel board)에서 UDMA-133 UDMA-133 UDMA-66 80 Pin Cable Q6 IDE(ATA) HDD IDE(ATA) HDD HDD 40 Pin 또는 80 Pin Cable HDD IDE HDD...
...) HDD Data Back-up 1MB=1,000,000bytes / 1GB=1,000,000,000 bytes OS HDD Head가 Disk Bad Sector HDD MR Head Head Head N UDMA-133(UDMA mode 6)을 지원 합니다. (2005 PATA 제품도 UDMA-133지원) 단, N UDMA-100 Motherboard(Intel board)에서 UDMA-133 UDMA-133 UDMA-66 80 Pin Cable Q6 IDE(ATA) HDD IDE(ATA) HDD HDD 40 Pin 또는 80 Pin Cable HDD IDE HDD...
User Manual (ENGLISH)
Page 1
BF68-00160B REV 03 Additional information can be obtained at www.samsunghdd.com SAMSUNG ELECTRONICS CO.,LTD STORAGE SYSTEM DIVISION HEAD OFFICE : 94-1, IM SOO-DONG, GUMI-CITY KYUNG BUK, KOREA 730-350
BF68-00160B REV 03 Additional information can be obtained at www.samsunghdd.com SAMSUNG ELECTRONICS CO.,LTD STORAGE SYSTEM DIVISION HEAD OFFICE : 94-1, IM SOO-DONG, GUMI-CITY KYUNG BUK, KOREA 730-350

User Manual (ENGLISH)
Page 2
This manual will guide you for selecting the Samsung hard disk drive. SAMSUNG HARD DISK DRIVE INSTALLATION GUIDE Thank you through the installation process. * Samsung does NOT guarantee any data on your drive, please always BACK-UP your precious data.
This manual will guide you for selecting the Samsung hard disk drive. SAMSUNG HARD DISK DRIVE INSTALLATION GUIDE Thank you through the installation process. * Samsung does NOT guarantee any data on your drive, please always BACK-UP your precious data.
User Manual (ENGLISH)
Page 3
... commercial wastes for environmentally safe recycling. Business users should contact either the retailer where they can take this from uncontrolled waste disposal, please separate this item for disposal. Before You Start 2 Setting the jumper pin 3 Installing the hard disk drive 5 Setting the system BIOS 7 Partitioning and formatting 8 Installing the operating system(OS) 8 This marking shown on the product or its working life. Thank you through the...
... commercial wastes for environmentally safe recycling. Business users should contact either the retailer where they can take this from uncontrolled waste disposal, please separate this item for disposal. Before You Start 2 Setting the jumper pin 3 Installing the hard disk drive 5 Setting the system BIOS 7 Partitioning and formatting 8 Installing the operating system(OS) 8 This marking shown on the product or its working life. Thank you through the...
User Manual (ENGLISH)
Page 4
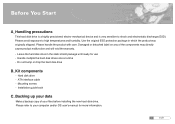
.../or OS user's manual for use - Leave the hard disk drive in which the product was originally shipped. Please refer to your files before installing the new hard disk drive. ATA interface cable - Handle multiple the hard disk drives one at a time - Installation guide book C_Backing up your data Make a backup copy of the components may directly cause product malfunction and will void the warranty. - Please handle the product with care. Hard disk drive - Before You Start A_Handling precautions This hard disk drive is a highly...
.../or OS user's manual for use - Leave the hard disk drive in which the product was originally shipped. Please refer to your files before installing the new hard disk drive. ATA interface cable - Handle multiple the hard disk drives one at a time - Installation guide book C_Backing up your data Make a backup copy of the components may directly cause product malfunction and will void the warranty. - Please handle the product with care. Hard disk drive - Before You Start A_Handling precautions This hard disk drive is a highly...
User Manual (ENGLISH)
Page 5
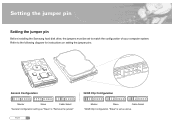
Refer to match the configuration of your computer system. General Configuration Master Slave Cable Select *General configuration setting as above Setting the jumper pin Setting the jumper pin Before installing the Samsung hard disk drive, the jumpers must be set as "Slave" is "Remove the jumper" English 3 32GB Clip Configuration Master Slave Cable Select *32GB Clip Configuration "Slave" is set to the following diagram for instructions on setting the jumper pins.
Refer to match the configuration of your computer system. General Configuration Master Slave Cable Select *General configuration setting as above Setting the jumper pin Setting the jumper pin Before installing the Samsung hard disk drive, the jumpers must be set as "Slave" is "Remove the jumper" English 3 32GB Clip Configuration Master Slave Cable Select *32GB Clip Configuration "Slave" is set to the following diagram for instructions on setting the jumper pins.
User Manual (ENGLISH)
Page 6
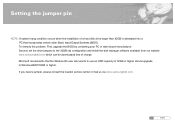
Setting the jumper pin NOTE: A system hang condition occurs when the installation of charge. Second, set the drive jumpers to Windows98/NT/2000 or higher. Microsoft recommends that the Windows95 user who wants to use an HDD capacity of 32GB or higher should upgrade to the 32GB clip configuration and install the disk manager software available from our website www.samsunghdd.com which can be downloaded free of a hard disk drive larger...
Setting the jumper pin NOTE: A system hang condition occurs when the installation of charge. Second, set the drive jumpers to Windows98/NT/2000 or higher. Microsoft recommends that the Windows95 user who wants to use an HDD capacity of 32GB or higher should upgrade to the 32GB clip configuration and install the disk manager software available from our website www.samsunghdd.com which can be downloaded free of a hard disk drive larger...
User Manual (ENGLISH)
Page 7
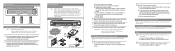
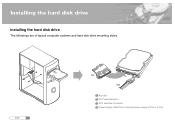
Installing the hard disk drive Installing the hard disk drive The followings are of typical computer systems and hard disk drive mounting styles. English 5 Red Red Key Slot DC Power Receptor ATA Interface Connector Power Supply Cable from computer power supply (3-Pin or 4-Pin)
Installing the hard disk drive Installing the hard disk drive The followings are of typical computer systems and hard disk drive mounting styles. English 5 Red Red Key Slot DC Power Receptor ATA Interface Connector Power Supply Cable from computer power supply (3-Pin or 4-Pin)

User Manual (ENGLISH)
Page 8
... using the provided screws. e_Connect Cables. 1.Attach the ATA interface cable to the interface connector on the hard disk drive. 2.Attach the power cable to the computer. Installing the hard disk drive a_Turn off the power of the hard disk drive may vary from one way. 3.Check all other cable connections before turning on your computer. c_Open the cover of your Computer Cover opening mechanism and the location of your computer b_Unplug the external power cables...
... using the provided screws. e_Connect Cables. 1.Attach the ATA interface cable to the interface connector on the hard disk drive. 2.Attach the power cable to the computer. Installing the hard disk drive a_Turn off the power of the hard disk drive may vary from one way. 3.Check all other cable connections before turning on your computer. c_Open the cover of your Computer Cover opening mechanism and the location of your computer b_Unplug the external power cables...
User Manual (ENGLISH)
Page 9
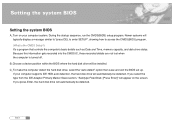
... select the type from the IDE Adapter Primary Master Slave section, "Autotype Fixed Disk: [Press Enter]" will appear on your computer supports IDE HDD auto detection, the hard disk drive will be installed. Because this information gets recorded into the CMOS IC, these recorded details are not lost when the computer is the CMOS Setup?) It's a program that controls the computer's basic details such as Date and Time, memory capacity...
... select the type from the IDE Adapter Primary Master Slave section, "Autotype Fixed Disk: [Press Enter]" will appear on your computer supports IDE HDD auto detection, the hard disk drive will be installed. Because this information gets recorded into the CMOS IC, these recorded details are not lost when the computer is the CMOS Setup?) It's a program that controls the computer's basic details such as Date and Time, memory capacity...
User Manual (ENGLISH)
Page 10
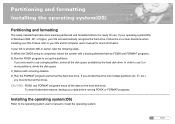
... to use a single partition, select all the data on screen directions when installing your OS will automatically recognize the hard drive. A_When the CMOS setup is Windows 2000, XP, or higher, your OS. D_Run the FORMAT program and format the hard disk drive. If your operating system(OS) is completed, reboot the system with a booting diskette. Partitioning and formatting Installing the operating system(OS) Partitioning and formatting The newly installed hard disk drive must format all the drives. Follow...
... to use a single partition, select all the data on screen directions when installing your OS will automatically recognize the hard drive. A_When the CMOS setup is Windows 2000, XP, or higher, your OS. D_Run the FORMAT program and format the hard disk drive. If your operating system(OS) is completed, reboot the system with a booting diskette. Partitioning and formatting Installing the operating system(OS) Partitioning and formatting The newly installed hard disk drive must format all the drives. Follow...

User Manual (ENGLISH)
Page 39
Installatie van de hard disk drive Installatie van de hard disk drive Ga als volgt te werk bij de meeste computersystemen en hard disk drive inbouwtypes. Dutch 5 Red Red Key Slot DC Power Receptor ATA Interface Connector Power Supply Cable from computer power supply (3-Pin or 4-Pin)
Installatie van de hard disk drive Installatie van de hard disk drive Ga als volgt te werk bij de meeste computersystemen en hard disk drive inbouwtypes. Dutch 5 Red Red Key Slot DC Power Receptor ATA Interface Connector Power Supply Cable from computer power supply (3-Pin or 4-Pin)
User Manual (ENGLISH)
Page 59
Thank you through the installation process. This manual will guide you for selecting the Samsung hard disk drive.
Thank you through the installation process. This manual will guide you for selecting the Samsung hard disk drive.


