User Manual
Page 6
... a range is not assembled properly. They should never be hot even though they have had sufficient time to cool. Cooking surfaces, grates, cooktop burners and caps, as well as a pot holder. Do not use your range to heat unopened food containers or to touch or play with grates or griddle.... See page 55. Fire Do not touch oven burners, drawer burners, or interior surfaces of children. The cooktop grates and griddle (if equipped) are dark in ...
... a range is not assembled properly. They should never be hot even though they have had sufficient time to cool. Cooking surfaces, grates, cooktop burners and caps, as well as a pot holder. Do not use your range to heat unopened food containers or to touch or play with grates or griddle.... See page 55. Fire Do not touch oven burners, drawer burners, or interior surfaces of children. The cooktop grates and griddle (if equipped) are dark in ...
User Manual
Page 8
... can stabilize. Only ignite the cooktop burners with the burner caps in cold water for cleaning. In the event of scalding, follow these FIRST AID instructions: • Immerse the scalded area in place. When you have turned the burner off so that the burner has ignited. Do not pour water on ..... It can damage the controls or cause an unintended large or dangerous flame. - After turning on the Dual burner spreader must be blocked by turning the burner knob. - If the burner caps are not in place, you clean the spreader with clean, dry dressing • Do not apply any creams,...
... can stabilize. Only ignite the cooktop burners with the burner caps in cold water for cleaning. In the event of scalding, follow these FIRST AID instructions: • Immerse the scalded area in place. When you have turned the burner off so that the burner has ignited. Do not pour water on ..... It can damage the controls or cause an unintended large or dangerous flame. - After turning on the Dual burner spreader must be blocked by turning the burner knob. - If the burner caps are not in place, you clean the spreader with clean, dry dressing • Do not apply any creams,...
User Manual
Page 20
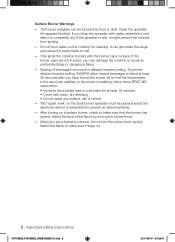
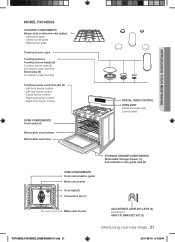
...;� 4:25:43 Left burner grate - Cooktop burner caps Cooktop burners Cooktop burner heads (5) Cooktop burner cups (5) (not shown under burners) Electrodes (5) (not shown under drawer) Oven light (1) Convection fan (1) Convection heater (not shown) Bake oven burner ADJUSTABLE LEVELING LEGS (4) (not shown) ANTI-TIP BRACKET KIT (1) 20_ introducing your new range Overview MODEL FX710BGS COOKTOP COMPONENTS Heavy duty, continuous...
...;� 4:25:43 Left burner grate - Cooktop burner caps Cooktop burners Cooktop burner heads (5) Cooktop burner cups (5) (not shown under burners) Electrodes (5) (not shown under drawer) Oven light (1) Convection fan (1) Convection heater (not shown) Bake oven burner ADJUSTABLE LEVELING LEGS (4) (not shown) ANTI-TIP BRACKET KIT (1) 20_ introducing your new range Overview MODEL FX710BGS COOKTOP COMPONENTS Heavy duty, continuous...
User Manual
Page 21
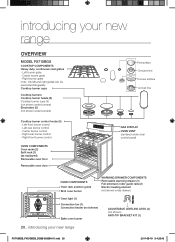
...burner control - Center burner control - Left burner grate - Right burner grate Cooktop burner caps Cooktop burners Cooktop burner heads (5) Cooktop burner cups (5) (not shown under burners) Electrodes (5) (not shown under oven control panel) OVEN COMPONENTS Oven rack position guide Broil oven burner Oven light (1) Convection fan (1) STORAGE DRAWER COMPONENTS Removable Storage drawer (1) Full-extension roller guide rails (2) Bake oven burner... grates - Left-rear burner control - Right-rear burner control - Center burner grate - Right-front burner control OVEN COMPONENTS Oven ...
...burner control - Center burner control - Left burner grate - Right burner grate Cooktop burner caps Cooktop burners Cooktop burner heads (5) Cooktop burner cups (5) (not shown under burners) Electrodes (5) (not shown under oven control panel) OVEN COMPONENTS Oven rack position guide Broil oven burner Oven light (1) Convection fan (1) STORAGE DRAWER COMPONENTS Removable Storage drawer (1) Full-extension roller guide rails (2) Bake oven burner... grates - Left-rear burner control - Right-rear burner control - Center burner grate - Right-front burner control OVEN COMPONENTS Oven ...
User Manual
Page 58
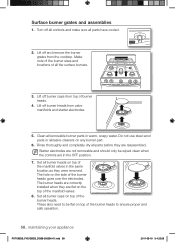
... burner heads. 4. The burner heads are flat on the top of all removable burner parts in the OFF position. 7. Make note of the burner sizes and locations of the manifold valves. 8. Lift off burner caps from the cooktop. Lift off and remove the burner grates from top of the burner ...heads. Lift off all controls and make sure all parts before they are in warm, soapy water. Turn off burner heads from valve manifolds and starter electrodes...
... burner heads. 4. The burner heads are flat on the top of all removable burner parts in the OFF position. 7. Make note of the burner sizes and locations of the manifold valves. 8. Lift off burner caps from the cooktop. Lift off and remove the burner grates from top of the burner ...heads. Lift off all controls and make sure all parts before they are in warm, soapy water. Turn off burner heads from valve manifolds and starter electrodes...
User Manual
Page 59
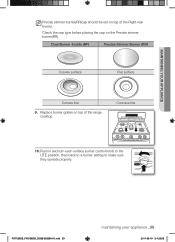
... in and turn each surface burner control knob to the LITE position, then back to a burner setting to make sure they operate properly. FX710BGS_FX510BGS_DG68-00356A-01.indd 59 maintaining your appliance Precise simmer burner(RR)cap should be set on the Precise simmer burner(RR). Dual Burner -Inside (RF) Precise Simmer Burner (RR) Convex surface Flat surface...
... in and turn each surface burner control knob to the LITE position, then back to a burner setting to make sure they operate properly. FX710BGS_FX510BGS_DG68-00356A-01.indd 59 maintaining your appliance Precise simmer burner(RR)cap should be set on the Precise simmer burner(RR). Dual Burner -Inside (RF) Precise Simmer Burner (RR) Convex surface Flat surface...

User Manual
Page 60
... �� 4:25:59 Clean the cooktop surface with a soft, dry cloth. 5. If spill goes under a surface burner, remove the surface burner cap and head to the surface burner manifolds, causing poor and/or dangerous operation. 3. Rinse with clean water and dry and polish with warm, soapy water and ...tomatoes, sauerkraut, fruit juices, etc.) or foods with high sugar content can cause dull spots if allowed to set. Make sure all surface burners are OFF. 2. Do not use a steel-wool pad or abrasive cleaners on porcelain-enamel WARNING surfaces. To prevent this surface from becoming ...
... �� 4:25:59 Clean the cooktop surface with a soft, dry cloth. 5. If spill goes under a surface burner, remove the surface burner cap and head to the surface burner manifolds, causing poor and/or dangerous operation. 3. Rinse with clean water and dry and polish with warm, soapy water and ...tomatoes, sauerkraut, fruit juices, etc.) or foods with high sugar content can cause dull spots if allowed to set. Make sure all surface burners are OFF. 2. Do not use a steel-wool pad or abrasive cleaners on porcelain-enamel WARNING surfaces. To prevent this surface from becoming ...
User Manual
Page 72
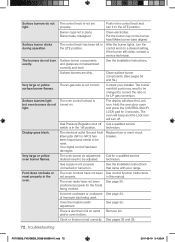
... needs adjustment. Push in the control knob and turn the control knob to correct the ratio or for the foods being used. Put the burner cap on . See page 30. Incorrect cookware or cookware of improper size being cooked. The oven will beep and the Lock icon will show ...the Lock icon. See pages 28 and 29. 72_ troubleshooting FX710BGS_FX510BGS_DG68-00356A-01.indd 72 2011-08-19 �� 4:26:04 Burner caps not in place Burner base misaligned The control knob has been left in the oven. Your digital control has been damaged. Call for 3 seconds. Food does ...
... needs adjustment. Push in the control knob and turn the control knob to correct the ratio or for the foods being used. Put the burner cap on . See page 30. Incorrect cookware or cookware of improper size being cooked. The oven will beep and the Lock icon will show ...the Lock icon. See pages 28 and 29. 72_ troubleshooting FX710BGS_FX510BGS_DG68-00356A-01.indd 72 2011-08-19 �� 4:26:04 Burner caps not in place Burner base misaligned The control knob has been left in the oven. Your digital control has been damaged. Call for 3 seconds. Food does ...


