User Manual
Page 2
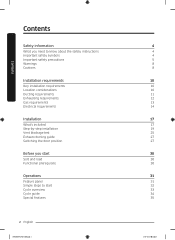
... Safety information What you need to know about the safety instructions Important safety symbols Important safety precautions Warnings Cautions Installation requirements Key installation requirements Location considerations Ducting requirements Exhausting requirements Gas requirements Electrical requirements Installation What's included Step-by-step installation Vent blockage test Exhaust ducting guide Switching the door position Before you start Sort and load Functional prerequisite Operations Feature panel Simple steps to start Cycle overview Cycle guide Special features 2 English DV7450M...
... Safety information What you need to know about the safety instructions Important safety symbols Important safety precautions Warnings Cautions Installation requirements Key installation requirements Location considerations Ducting requirements Exhausting requirements Gas requirements Electrical requirements Installation What's included Step-by-step installation Vent blockage test Exhaust ducting guide Switching the door position Before you start Sort and load Functional prerequisite Operations Feature panel Simple steps to start Cycle overview Cycle guide Special features 2 English DV7450M...
User Manual
Page 6
...if the drum is used near children. 6. See "Electrical requirements" and "Grounding" in the appliance. Items contaminated with internal controls. 10.Do not repair or replace any part of electric shock only during servicing. &#...Clean the lint screen before or after each load. 13.Do not use heat to dry articles containing foam rubber or similarly textured rubber-like materials. 14.Keep area around the exhaust opening and adjacent surrounding areas free from service or discarded, remove the door to cooking oils in your hand under the dryer. • This may result in injury. 20.Take care...
...if the drum is used near children. 6. See "Electrical requirements" and "Grounding" in the appliance. Items contaminated with internal controls. 10.Do not repair or replace any part of electric shock only during servicing. &#...Clean the lint screen before or after each load. 13.Do not use heat to dry articles containing foam rubber or similarly textured rubber-like materials. 14.Keep area around the exhaust opening and adjacent surrounding areas free from service or discarded, remove the door to cooking oils in your hand under the dryer. • This may result in injury. 20.Take care...
User Manual
Page 7
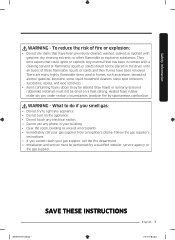
... cleaners, some spot removers, turpentine, wpees, and wpe removers. • Items containing foam rubber (may be labeled latex foam) or similarly textured rubberlike materials must be dried on a heat setting. Heated foam rubber materials can, under certain circumstances, produce fire by a qualified installer, service agency, or the gas supplier. Follow the gas supplier's instructions. • If you smell gas: • Do not...
... cleaners, some spot removers, turpentine, wpees, and wpe removers. • Items containing foam rubber (may be labeled latex foam) or similarly textured rubberlike materials must be dried on a heat setting. Heated foam rubber materials can, under certain circumstances, produce fire by a qualified installer, service agency, or the gas supplier. Follow the gas supplier's instructions. • If you smell gas: • Do not...
User Manual
Page 8
...; Do not tamper with controls. • Do not repair, replace, or attempt to service any part of the dryer and exhaust duct should be properly grounded. These objects could damage your dryer from service, remove the door to the drying compartment to prevent children or animals from small, irregularly shaped hard objects, foreign material, etc. See installation instructions for dryer use by qualified service personnel. • This appliance...
...; Do not tamper with controls. • Do not repair, replace, or attempt to service any part of the dryer and exhaust duct should be properly grounded. These objects could damage your dryer from service, remove the door to the drying compartment to prevent children or animals from small, irregularly shaped hard objects, foreign material, etc. See installation instructions for dryer use by qualified service personnel. • This appliance...
User Manual
Page 10
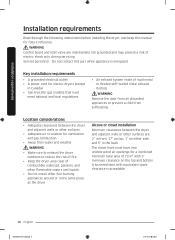
... instructions before installing the dryer, and keep this part while appliance is acceptable. 10 English DV7450M-03170Z-00_EN.indd 10 2017-01-25 11:24:17 Key installation requirements • A grounded electrical outlet. • A power cord for electric dryers (except in Canada). • Gas lines (for gas models) that must have two unobstructed air openings for a combined minimum total area of rigid metal or flexible stiff-walled metal exhaust ducting...
... instructions before installing the dryer, and keep this part while appliance is acceptable. 10 English DV7450M-03170Z-00_EN.indd 10 2017-01-25 11:24:17 Key installation requirements • A grounded electrical outlet. • A power cord for electric dryers (except in Canada). • Gas lines (for gas models) that must have two unobstructed air openings for a combined minimum total area of rigid metal or flexible stiff-walled metal exhaust ducting...
User Manual
Page 14
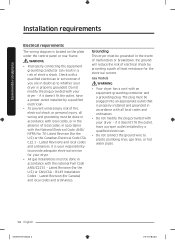
... plug. B149 Installation Codes - if it doesn't't fit the outlet, have a proper outlet installed by a qualified electrician. • To prevent unnecessary risk of fire, electrical shock, or personal injury, all local codes and ordinances. • Do not modify the plug provided with your dryer - The plug must be plugged into an appropriate outlet that is located on the plate under the control panel or rear frame. Installation requirements Installation requirements Electrical requirements The wiring diagram...
... plug. B149 Installation Codes - if it doesn't't fit the outlet, have a proper outlet installed by a qualified electrician. • To prevent unnecessary risk of fire, electrical shock, or personal injury, all local codes and ordinances. • Do not modify the plug provided with your dryer - The plug must be plugged into an appropriate outlet that is located on the plate under the control panel or rear frame. Installation requirements Installation requirements Electrical requirements The wiring diagram...
User Manual
Page 16
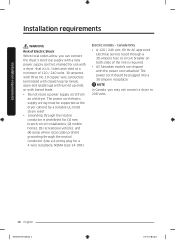
... electrical service fused through the neutral conductor. (Use a 4-prong plug for (1) new branch-circuit installations, (2) mobile homes, (3) recreational vehicles, and (4) areas where local codes prohibit grounding through a 30-ampere fuse or circuit breaker on both sides of 120 / 240 volts, 30-amperes with three No. 10 copper wire conductors terminated with closed loop terminals, open-end spade lugs with turned up ends, or with the power cord attached. The power cord electric...
... electrical service fused through the neutral conductor. (Use a 4-prong plug for (1) new branch-circuit installations, (2) mobile homes, (3) recreational vehicles, and (4) areas where local codes prohibit grounding through a 30-ampere fuse or circuit breaker on both sides of 120 / 240 volts, 30-amperes with three No. 10 copper wire conductors terminated with closed loop terminals, open-end spade lugs with turned up ends, or with the power cord attached. The power cord electric...
User Manual
Page 19
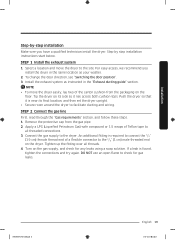
... is found, tighten the connections and try again. Installation Step-by step installation instructions start below. Step by -step installation Make sure you install the dryer in the same location as instructed in the "Exhaust ducting guide" section. To change the door direction, see "Switching the door position". 3. Tip the dryer on the dryer. Remove the protective cap from the packaging on the gas supply, and check for gas leaks. Turn on the floor. DV7450M...
... is found, tighten the connections and try again. Installation Step-by step installation instructions start below. Step by -step installation Make sure you install the dryer in the same location as instructed in the "Exhaust ducting guide" section. To change the door direction, see "Switching the door position". 3. Tip the dryer on the dryer. Remove the protective cap from the packaging on the gas supply, and check for gas leaks. Turn on the floor. DV7450M...
User Manual
Page 25
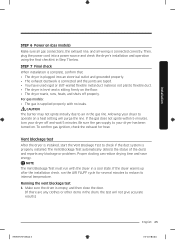
... a cool state. Then, plug the power cord into an electrical outlet and grounded properly. • The exhaust ductwork is connected and the joints are any blockage or problems. Proper ducting can reduce drying time and save energy. STEP 7 Final check When installation is complete, confirm that: • The dryer is plugged into a power source and check the dryer's installation and operation using the final checklist in the gas line. Be sure the gas supply to air in...
... a cool state. Then, plug the power cord into an electrical outlet and grounded properly. • The exhaust ductwork is connected and the joints are any blockage or problems. Proper ducting can reduce drying time and save energy. STEP 7 Final check When installation is complete, confirm that: • The dryer is plugged into a power source and check the dryer's installation and operation using the final checklist in the gas line. Be sure the gas supply to air in...
User Manual
Page 26
... remove it could be blocked slightly. Use caution to the installation instructions in incorrect results. "InS or In" appears in the dryer's display. (If you have started other problems, an information code appears in 6 clockwise steps. During the test, the number indicator makes a circle in the display. Properly install all duct work according to prevent burns. The Vent Blockage Test starts immediately. Do not open the door during the test...
... remove it could be blocked slightly. Use caution to the installation instructions in incorrect results. "InS or In" appears in the dryer's display. (If you have started other problems, an information code appears in 6 clockwise steps. During the test, the number indicator makes a circle in the display. Properly install all duct work according to prevent burns. The Vent Blockage Test starts immediately. Do not open the door during the test...

User Manual
Page 27
.... Installation Exhaust ducting guide Ducting 1. To facilitate the exhaust, keep the ducts as straight as possible. Switching the door position To reverse the direction of the door, we recommend that have multiple elbows. • Do not use lint-trapping screws. 3. It is installed properly so the air exhausts freely. 2. Make sure the dryer is recommended to put a soft rug on the floor to clean the exhaust system annually or on the door. 1. Remove...
.... Installation Exhaust ducting guide Ducting 1. To facilitate the exhaust, keep the ducts as straight as possible. Switching the door position To reverse the direction of the door, we recommend that have multiple elbows. • Do not use lint-trapping screws. 3. It is installed properly so the air exhausts freely. 2. Make sure the dryer is recommended to put a soft rug on the floor to clean the exhaust system annually or on the door. 1. Remove...
User Manual
Page 32
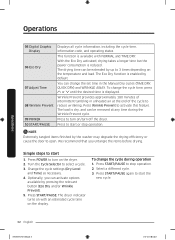
.... The dryer indicator turns on the display. Select a different cycle. 3. The drying time can be extended by the washer may degrade the drying efficiency or cause the door to start or stop operation. 2. The Eco Dry function is reduced. The load is displayed. Press POWER to turn on/turn on the temperature and load. Press START/PAUSE. Press START/PAUSE to reduce wrinkling. Press to turn off the dryer. Simple steps to open...
.... The dryer indicator turns on the display. Select a different cycle. 3. The drying time can be extended by the washer may degrade the drying efficiency or cause the door to start or stop operation. 2. The Eco Dry function is reduced. The load is displayed. Press POWER to turn on/turn on the temperature and load. Press START/PAUSE. Press START/PAUSE to reduce wrinkling. Press to turn off the dryer. Simple steps to open...
User Manual
Page 37
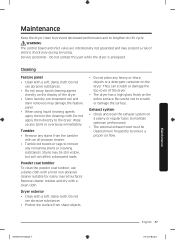
... a clean cloth. Be careful not to lengthen its life cycle. Do not contact this part while the dryer is energized. Wipe up any heavy or sharp objects or a detergent container on the display of the dryer. • Some laundry pre-treatment soil and stain removers may damage the feature panel. • When using liquid cleaning agents, apply them directly to ensure a proper air flow. Remove...
... a clean cloth. Be careful not to lengthen its life cycle. Do not contact this part while the dryer is energized. Wipe up any heavy or sharp objects or a detergent container on the display of the dryer. • Some laundry pre-treatment soil and stain removers may damage the feature panel. • When using liquid cleaning agents, apply them directly to ensure a proper air flow. Remove...
User Manual
Page 38
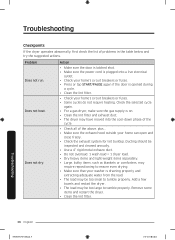
... power cord is plugged into the cool-down phase of the cycle. • Check all of problems in the table below and try the suggested actions. Check the selected cycle again. • For a gas dryer, make sure the gas supply is on. • Clean the lint filter and exhaust duct. • The dryer may have moved into a live electrical outlet. • Check your home's circuit breakers or fuses. • Some cycles do not require heating. Does not heat. Troubleshooting...
... power cord is plugged into the cool-down phase of the cycle. • Check all of problems in the table below and try the suggested actions. Check the selected cycle again. • For a gas dryer, make sure the gas supply is on. • Clean the lint filter and exhaust duct. • The dryer may have moved into a live electrical outlet. • Check your home's circuit breakers or fuses. • Some cycles do not require heating. Does not heat. Troubleshooting...
User Manual
Page 41
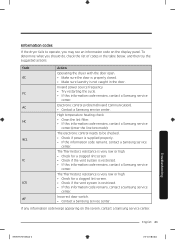
.... • Check for a clogged lint screen. • Check if the vent system is restricted. • If this information code remains, contact a Samsung service center.(enter the line test mode) The electronic control needs to operate, you should do, check the list of codes in the door. Information codes If the dryer fails to be checked. • Check if power is supplied properly. • If the information code remains, contact a Samsung service center. Invalid power source frequency...
.... • Check for a clogged lint screen. • Check if the vent system is restricted. • If this information code remains, contact a Samsung service center.(enter the line test mode) The electronic control needs to operate, you should do, check the list of codes in the door. Information codes If the dryer fails to be checked. • Check if power is supplied properly. • If the information code remains, contact a Samsung service center. Invalid power source frequency...
User Manual
Page 42
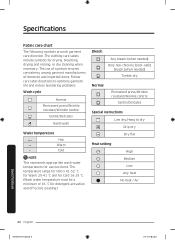
... water temperature must be a minimum of 16 °C for drying, bleaching, drying and ironing, or dry cleaning when necessary. The clothing care labels include symbols for detergent activation and eff ective cleaning.) Bleach Any bleach (when needed) Only non-chlorine (color-safe) bleach (when needed) Tumble dry Normal Permanent press/Wrinkle resistant/Wrinkle control Gentle/Delicates Special instructions Line dry/Hang to dry Drip dry Dry flat Heat setting High Medium Low Any heat...
... water temperature must be a minimum of 16 °C for drying, bleaching, drying and ironing, or dry cleaning when necessary. The clothing care labels include symbols for detergent activation and eff ective cleaning.) Bleach Any bleach (when needed) Only non-chlorine (color-safe) bleach (when needed) Tumble dry Normal Permanent press/Wrinkle resistant/Wrinkle control Gentle/Delicates Special instructions Line dry/Hang to dry Drip dry Dry flat Heat setting High Medium Low Any heat...
User Manual
Page 44
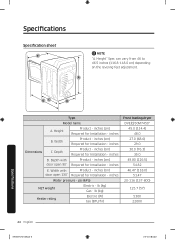
... adjustment. Width Product - inches Dimensions C. inches (cm) door open 90° Required for Installation - lb (kg) Gas - A DC B Type Model name A. inches (cm) door open 130° Required for Installation - Width with Product - Depth Product - inches (cm) Required for Installation - inches Water pressure - inches D. inches B. inches (cm) Required for Installation - Depth with Product - inches E. inches (cm) Required for Installation - lb (kg) Heater rating Electric (W) Gas (BTU/hr) Front loading dryer DVE(G)50M7450* 45.0 (114...
... adjustment. Width Product - inches Dimensions C. inches (cm) door open 90° Required for Installation - lb (kg) Gas - A DC B Type Model name A. inches (cm) door open 130° Required for Installation - Width with Product - Depth Product - inches (cm) Required for Installation - inches Water pressure - inches D. inches B. inches (cm) Required for Installation - Depth with Product - inches E. inches (cm) Required for Installation - lb (kg) Heater rating Electric (W) Gas (BTU/hr) Front loading dryer DVE(G)50M7450* 45.0 (114...
User Manual
Page 46
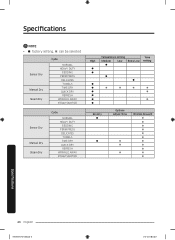
... selected Sensor Dry Manual Dry Steam Dry Cycle NORMAL HEAVY DUTY BEDDING PERM PRESS DELICATES TOWELS TIME DRY QUICK DRY REFRESH WRINKLE AWAY STEAM SANITIZE Sensor Dry Manual Dry Steam Dry Cycle NORMAL HEAVY DUTY BEDDING PERM PRESS DELICATES TOWELS TIME DRY QUICK DRY REFRESH WRINKLE AWAY STEAM SANITIZE High Temperature setting Medium Low Extra Low Time setting Eco Dry Options Adjust Time Wrinkle Prevent Specification...
... selected Sensor Dry Manual Dry Steam Dry Cycle NORMAL HEAVY DUTY BEDDING PERM PRESS DELICATES TOWELS TIME DRY QUICK DRY REFRESH WRINKLE AWAY STEAM SANITIZE Sensor Dry Manual Dry Steam Dry Cycle NORMAL HEAVY DUTY BEDDING PERM PRESS DELICATES TOWELS TIME DRY QUICK DRY REFRESH WRINKLE AWAY STEAM SANITIZE High Temperature setting Medium Low Extra Low Time setting Eco Dry Options Adjust Time Wrinkle Prevent Specification...
User Manual
Page 48
... encountered in normal, noncommercial use of products, equipment, systems, utilities, services, parts, supplies, accessories, applications, installations, repairs, external wiring or connectors not supplied or authorized by pest infestations. This limited warranty does not cover problems resulting from incorrect electric current, voltage or supply, light bulbs, house fuses, house wiring, cost of this product and shall not apply to follow operating instructions, maintenance and environmental instructions that damage this product...
... encountered in normal, noncommercial use of products, equipment, systems, utilities, services, parts, supplies, accessories, applications, installations, repairs, external wiring or connectors not supplied or authorized by pest infestations. This limited warranty does not cover problems resulting from incorrect electric current, voltage or supply, light bulbs, house fuses, house wiring, cost of this product and shall not apply to follow operating instructions, maintenance and environmental instructions that damage this product...

User Manual
Page 51
... to follow operating instructions, maintenance and environmental instructions that are covered and prescribed in service problems; accidents, abuse, neglect, fire, water, lightning, or other acts of nature or God; use of this product was not intended; This limited warranty covers manufacturing defects in materials and workmanship encountered in normal, noncommercial use of products, equipment, systems, utilities, services, parts, supplies, accessories, applications, installations, repairs, external wiring or connectors not supplied...
... to follow operating instructions, maintenance and environmental instructions that are covered and prescribed in service problems; accidents, abuse, neglect, fire, water, lightning, or other acts of nature or God; use of this product was not intended; This limited warranty covers manufacturing defects in materials and workmanship encountered in normal, noncommercial use of products, equipment, systems, utilities, services, parts, supplies, accessories, applications, installations, repairs, external wiring or connectors not supplied...


