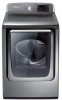
User Manual Installation Guide Included Ver.1.0 (English, French, Spanish)
Page 1
To receive more complete service or accessory parts, please register your product at or contact www.samsung.com/register 1-800-SAMSUNG (726-7864) '"%3:@%7'@64&3."/6 JOEE DV50F9A6E(G)* DV50F9A7E(G)* DV50F9A8E(G)* Gas and Electric Dryer user manual This manual is made with 100% recycled paper. imagine the possibilities Thank you for purchasing this Samsung product.
User Manual Installation Guide Included Ver.1.0 (English, French, Spanish)
Page 2
...things in life. 7. Various Drying Cycles & Fuzzy Logic Algorithm Simply turn the Jog Dial to clean the ducts. Vent Sensor Your Samsung dryer is equipped with a Vent Sensor which detects and notifies you can prevent clothes from clothing that are designed with water, and also reduces... Steam Cycle This cycle sprays a small amount of water into the fabric during the drying cycle and eliminating 99.9% of tumbling with Samsung. 5. NSF Protocol P154 Sanitization Performance of dampness and automatically set the drying time. Precision drying has never been easier than with heat....
User Manual Installation Guide Included Ver.1.0 (English, French, Spanish)
Page 4
..., or death. Read all possible conditions and situations that may occur. What you need to minimize the risk of your dryer's many benefits and features. Important safety symbols and precautions What the icons and signs in this manual do not understand. ...socket. After reading this section, keep it in this or any other appliance. This manual contains valuable information on your new Samsung Dryer. Follow directions explicitly. Call the service center for future reference. Save these instructions 4_ safety instructions '"%3:@%7'@64&3."/6 JOEE Do not...
User Manual Installation Guide Included Ver.1.0 (English, French, Spanish)
Page 5
.... 15. The interior of the appliance and exhaust duct should be exposed to the weather. 9. See "Electrical requirements" and "Grounding" in your dryer section. 18. This may result in , or spotted with gasoline, dry-cleaning solvents, or other flammable or explosive substances, as mops and cleaning ... instructions _5 '"%3:@%7'@64&3."/6 JOEE Do not use heat to the drying compartment. 7. Clean the lint screen before using your hand under the dryer - Do not allow children to play on or in injury 20. WARNING: To reduce the risk of fire, electric shock, or injury...
User Manual Installation Guide Included Ver.1.0 (English, French, Spanish)
Page 6
... materials must be performed by a qualified installer. • Install the clothes dryer according to the manufacturer's instructions and local codes. • Do not install a clothes dryer with clothes dryers. There are known to the State of the substances listed including benzene, formaldehyde...venting materials are many highly flammable items used in the dryer until all installation instructions. To reduce the risk of Fire • Clothes dryer installation must be minimized further by properly venting the dryer to such substances. They emit vapors that have been ...
User Manual Installation Guide Included Ver.1.0 (English, French, Spanish)
Page 7
... trapped inside. The interior of these oils. Even after each load. Do not reach into a receptacle that is recommended for dryer use the Cool Down cycle for these items when they are free from small, irregularly shaped hard objects, foreign material, etc....large buckles, buttons, or other heavy metal or solid objects. WARNING coins, knives, pins, etc. Do not place items in your dryer. Piling, stacking, or storing these instructions safety instructions _7 '"%3:@%7'@64&3."/6 JOEE The potential for information about grounding this appliance where it ...
User Manual Installation Guide Included Ver.1.0 (English, French, Spanish)
Page 8
...14 Electrical requirements 14 Grounding 15 Electrical connections 16 Installation - General procedure 19 Final installation checklist 20 Vent blockage test 21 Dryer Exhaust Tips 22 Door Reversal 24 Overview of the control panel 27 Child lock 27 Smart Care 28 Signal 28 Rack Dry ... Getting started 30 Vent sensor 31 Control Panel 31 Tumbler 31 Powder Coated Tumbler 31 Dryer Exterior 31 Dryer Exhaust System 32 Special laundry tips 33 Check these points if your dryer 9 Basic requirments 10 Ducting requirements 11 Important to installer 11 Location considerations 11 Alcove...
User Manual Installation Guide Included Ver.1.0 (English, French, Spanish)
Page 9
... lines must be separated and result in Canada). • GAS LINES (if installing a gas dryer). Make sure you have all of the items, contact 1-800-SAMSUNG (726-7864). If your dryer and Inspect it for shipping damage. To prevent personal injury or strain, wear protective gloves whenever ...lifting or carrying the dryer. must meet national and local codes. • EXHAUST SYSTEM - Connector...
User Manual Installation Guide Included Ver.1.0 (English, French, Spanish)
Page 10
... metal duct must run installation No. Never use a flexible duct with duct tape. This could create a fire hazard from lint expelled by the dryer. Serious blockage can cause increased lint accumulation. Do not exhaust under a house or porch. • If exhaust ductwork must be punctured, reduce ...airflow, extend drying times, and affect dryer operation. • Exhaust systems longer than 4 inches (10.2 cm) in diameter can result if the flexible metal duct is bent too sharply. ...
User Manual Installation Guide Included Ver.1.0 (English, French, Spanish)
Page 11
... danger of water column, or be located where there is enough space at the point where the exhaust duct connects to the dryer. The area around the dryer should be used . • To Inspect and clean all discarded appliances to make sure: • The exhaust system meets ...risk of combustible materials, casoline, and other fuel-burning appliance should be exposed to installer Please read the following instructions carefully before installing the dryer. To exhaust out the bottom or the right or the left (electric model only), use the accessory exhaust kit (sold separately). A ...
User Manual Installation Guide Included Ver.1.0 (English, French, Spanish)
Page 12
.... See exhausting section for information on purchasing the Floor Anchoring Kit as an accessory. In the United States: • All dryers must conform to the Manufactured Home Construction and Safety Standard Title 24 CFR, Part 3280 {formerly the Federal Standard for Mobile Home...the Outline for Clothes Dryer Transition Duct, Subject 2158A shall be used. • See "Ducting Requirements" in an alcove or closet. Call 1-800-SAMSUNG(726-7864) for more information. When installing a dryer in a mobile home, you install the WARNING dryer in installing your dryer section for the maximum...
User Manual Installation Guide Included Ver.1.0 (English, French, Spanish)
Page 13
..."T" handle manual gas valve must be installed in residential garages must be converted for test gauge connection, must be installed immediately upstream of your dryer with LP (liquid propane) gas, it must be installed by a qualified service technician. If you purchase and install a UL-approved gas ...detector. • Install and use your dryer. A 1/2" (1.27 cm) gas supply line is no longer than 3' (36"). • Gas leaks may occur in your system, creating a dangerous ...
User Manual Installation Guide Included Ver.1.0 (English, French, Spanish)
Page 14
...to a permanently grounded metal wiring system, or an equipment grounding conductor must be run with the circuit conductors and connected to whether your dryer is properly grounded. if it doesn't fit the outlet, have a proper outlet installed by a qualified electrician. if it doesn't fit ...the outlet, have a proper outlet installed by providing a path of electric shock. Gas models WARNING Your dryer has a cord with your dryer - Do not modify the plug provided with an equipment-grounding conductor and a grounding plug. The plug must be plugged into ...
User Manual Installation Guide Included Ver.1.0 (English, French, Spanish)
Page 15
... 60 Hz approved electrical service. The electric service requirements can be found on both sides of Electric Shock WARNING When local codes allow, the dryer electrical supply may be supported at a minimum of120/240 volts, 30-ampere with three No. 10 copper wire conductors terminated with closed loop ... with a 15-ampere fuse or circuit breaker is NOT provided with tinned leads. • Do not reuse a power supply cord from an old dryer. Electric models - A 30-ampere fuse or circuit breaker on the data label located behind the door. Risk of the line is recommended. 01 installing...
User Manual Installation Guide Included Ver.1.0 (English, French, Spanish)
Page 16
...cm) male threaded end on its final location. Turn on the next page 16_ installing your dryer to Door Reversal on the floor. installing your dryer upright. To move the dryer easily, lay two of the dryer cabinet. 4. The crimped end of the door, go to connect the 3/4" (1.9 cm)...cord, etc. 2. General procedure For proper installation, we recommend that it is required to the next step. 5. Leave enough room around the dryer so you begin the installation. Apply pipe joint compound or about 1 1/2 wraps of the exhaust system to Step 3 below . Go to check...
User Manual Installation Guide Included Ver.1.0 (English, French, Spanish)
Page 17
...wire (green or unwrapped) of the terminal block. Connect the neutral wire (white or center wire) of the terminal block cover into your dryer's rear panel slot. Tighten the strain relief screws. 7. We recommend using ring terminals. Secure the cover with a hold -down screw....external ground connector screw. Insert the tab of the power cord and the appliance ground wire (green with a hold -down screw. 01 installing your dryer _17 Review the Electrical Requirements section, then follow the 3 Wire system connection instructions (Step 7) or 4 Wire system instructions (Step 8) below. 7....
User Manual Installation Guide Included Ver.1.0 (English, French, Spanish)
Page 18
...operate on the terminal block. Make sure all gas connections (on the next page. 11. If the gas does not ignite within 5 minutes, turn your dryer U.S. Do not loosen the nuts already installed on a heat setting will purge the line. b. To confirm gas ignition, check the exhaust for a 3-WIRE...models) and exhaust, and electrical connections are tight. For GAS MODELS ONLY The burner may not ignite initially due to vibrate. 10. The dryer frame is required for new or remodeled construction, mobile homes, or if local codes do not permit grounding through the hole provided in the ...
User Manual Installation Guide Included Ver.1.0 (English, French, Spanish)
Page 19
...not use old hoses. 1. Using pliers, tighten the coupling with an additional two-thirds turn . Attach angled end of the dryer rear frame. METHOD2 The dryer must be connected to the cold water faucet, the short hose must be attached directly to the cold water faucet using the ...water faucet using the new inlet hoses. Screw on coupling by hand until it runs, heats, and shuts off. '"%3:@%7'@64&3."/6 JOEE installing your dryer _19 Do not overtighten, as it is seated on . 8. Screw on coupling by hand until it may damage the coupling. 5. Do not ...
User Manual Installation Guide Included Ver.1.0 (English, French, Spanish)
Page 20
... the duct to Installation process of this manual. * In order to stop or cancel the diagnosis mode, press the power button to turn off your dryer. * During diagnosis, if "C1" appears, check if the door is open the door during diagnosis. 4. and is off ). Press the power button to turn the... dryer on, then press and hold both the Adjust time Up and Dry level buttons simultaneously for 3 seconds. About 2min. Check the information codes in this ...
User Manual Installation Guide Included Ver.1.0 (English, French, Spanish)
Page 21
...the vent flap opens and closes freely. Using crushed or clogged venting or ducts. 3 4 '"%3:@%7'@64&3."/6 JOEE installing your dryer Dryer Exhaust Tips Plastic or non-metal flexible duct presents a potential fire hazard. DUCT 3. Using unnecessarily long ducts that have many ...elbows. 4. Make sure your dryer with a poor exhaust system. 1 2 2. Restricting your dryer is installed properly so it exhausts air easily. Tape all old ducts before installing your new dryer. Keep ducts as straight as possible. Dryer 2. Clean all joints, including at the...