
User Manual
Page 2
... Safety information What you need to know about the safety instructions Important safety symbols Important safety precautions Warnings Cautions Installation requirements Key installation requirements Location considerations Ducting requirements Exhausting requirements Gas requirements Electrical requirements Installation What's included Step-by-step installation Vent blockage test Exhaust ducting guide Switching the door position Before you start Sort and load Functional prerequisite Operations Feature panel Simple steps to start Cycle overview Drying guide Special features 2 English DV7700K...
... Safety information What you need to know about the safety instructions Important safety symbols Important safety precautions Warnings Cautions Installation requirements Key installation requirements Location considerations Ducting requirements Exhausting requirements Gas requirements Electrical requirements Installation What's included Step-by-step installation Vent blockage test Exhaust ducting guide Switching the door position Before you start Sort and load Functional prerequisite Operations Feature panel Simple steps to start Cycle overview Drying guide Special features 2 English DV7700K...
User Manual
Page 4
... dryer may result in a safe place for future reference. NOTE Indicates that you have any equipment that may differ slightly from those described in this user manual mean: WARNING Hazards or unsafe practices that uses electricity and moving parts, potential hazards exist. Warnings and Important Safety Instructions in this appliance only for future reference. Because the following operating instructions cover...
... dryer may result in a safe place for future reference. NOTE Indicates that you have any equipment that may differ slightly from those described in this user manual mean: WARNING Hazards or unsafe practices that uses electricity and moving parts, potential hazards exist. Warnings and Important Safety Instructions in this appliance only for future reference. Because the following operating instructions cover...

User Manual
Page 6
Do not reach into the appliance if the drum is used near children. 6. Items contaminated with internal controls. 10.Do not repair or replace any part of the appliance or attempt any service unless specifically recommended in the user-maintenance instructions or in the appliance. Safety information Safety information 5. Close supervision of the appliance and exhaust duct should be exposed to catch fire. 17...
Do not reach into the appliance if the drum is used near children. 6. Items contaminated with internal controls. 10.Do not repair or replace any part of the appliance or attempt any service unless specifically recommended in the user-maintenance instructions or in the appliance. Safety information Safety information 5. Close supervision of the appliance and exhaust duct should be exposed to catch fire. 17...

User Manual
Page 7
..., soaked, or spotted with a cleaning solvent or flammable liquids or solids should not be placed in the dryer until all occupants. • Immediately call the fire department. • Installation and service must not be performed by a qualified installer, service agency, or the gas supplier. What to light any appliance. • Do not turn on a heat setting. Safety information WARNING - coins, knives...
..., soaked, or spotted with a cleaning solvent or flammable liquids or solids should not be placed in the dryer until all occupants. • Immediately call the fire department. • Installation and service must not be performed by a qualified installer, service agency, or the gas supplier. What to light any appliance. • Do not turn on a heat setting. Safety information WARNING - coins, knives...

User Manual
Page 8
... in the user-repair instructions and you purchase and install a UL-approved gas detector. • Install and use by the manufacturer of the fabric softener or product. • Clean the lint screen before or after being washed, these items may not be properly grounded. Even after each load. • Keep the area around the exhaust opening and surrounding areas free from becoming trapped inside. •...
... in the user-repair instructions and you purchase and install a UL-approved gas detector. • Install and use by the manufacturer of the fabric softener or product. • Clean the lint screen before or after being washed, these items may not be properly grounded. Even after each load. • Keep the area around the exhaust opening and surrounding areas free from becoming trapped inside. •...

User Manual
Page 10
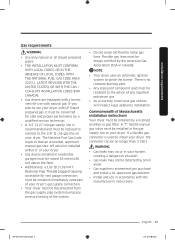
...). • Gas lines (for gas models) that must have two unobstructed air openings for electric dryers (except in the same place as the dryer. WARNING • Make sure to exhaust the dryer outdoors to prevent a child from water and weather. Installation requirements Installation requirements Read through the following instructions before installing the dryer, and keep this manual for ventilation and gas combustion. • Away from suffocating. Service personnel - Key installation requirements • A grounded electrical outlet. • A power cord for...
...). • Gas lines (for gas models) that must have two unobstructed air openings for electric dryers (except in the same place as the dryer. WARNING • Make sure to exhaust the dryer outdoors to prevent a child from water and weather. Installation requirements Installation requirements Read through the following instructions before installing the dryer, and keep this manual for ventilation and gas combustion. • Away from suffocating. Service personnel - Key installation requirements • A grounded electrical outlet. • A power cord for...
User Manual
Page 13
... joint compound used to install your dryer, the connector can be reduced to connect to the action of any pressure testing of Massachusetts installation instructions Your dryer must be raised 18 inches (46 cm) above the floor. • Additionally, a 1/8" (0.3 cm) N.P.T. (National Pipe Thread) plugged tapping, accessible for safe and proper performance by a licensed plumber or gas fitter. Installation requirements Gas requirements WARNING • Use only natural or LP...
... joint compound used to install your dryer, the connector can be reduced to connect to the action of any pressure testing of Massachusetts installation instructions Your dryer must be raised 18 inches (46 cm) above the floor. • Additionally, a 1/8" (0.3 cm) N.P.T. (National Pipe Thread) plugged tapping, accessible for safe and proper performance by a licensed plumber or gas fitter. Installation requirements Gas requirements WARNING • Use only natural or LP...

User Manual
Page 14
... the control panel or rear frame. if it doesn't fit the outlet, have a proper outlet installed by a qualified electrician. • To prevent unnecessary risk of local codes, in accordance with your dryer - It is your responsibility to whether your dryer - if it doesn't't fit the outlet, have a proper outlet installed by a qualified electrician. • Do not connect the ground wire to plastic plumbing lines, gas lines, or hot water...
... the control panel or rear frame. if it doesn't fit the outlet, have a proper outlet installed by a qualified electrician. • To prevent unnecessary risk of local codes, in accordance with your dryer - It is your responsibility to whether your dryer - if it doesn't't fit the outlet, have a proper outlet installed by a qualified electrician. • Do not connect the ground wire to plastic plumbing lines, gas lines, or hot water...

User Manual
Page 15
... dryer. U.S. The electric service requirements can connect the dryer's electrical supply with a new power supply cord kit, marked for a 4 wire receptacle, NEMA type 14-30R.) Electric models - WARNING Risk of Electric Shock When local codes allow, you may not convert a dryer to the equipment grounding terminal or lead on the data label located behind the door. The power cord should be plugged into a 30-ampere receptacle. Gas models - This cord is recommended. Installation requirements • If a power cord is not used , the cord...
... dryer. U.S. The electric service requirements can connect the dryer's electrical supply with a new power supply cord kit, marked for a 4 wire receptacle, NEMA type 14-30R.) Electric models - WARNING Risk of Electric Shock When local codes allow, you may not convert a dryer to the equipment grounding terminal or lead on the data label located behind the door. The power cord should be plugged into a 30-ampere receptacle. Gas models - This cord is recommended. Installation requirements • If a power cord is not used , the cord...
User Manual
Page 18
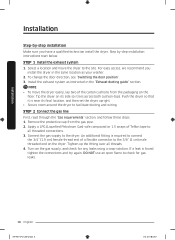
... connections and try again. Installation Installation Step-by step installation instructions start below. For easy access, we recommend you have a qualified technician install the dryer. To change the door direction, see "Switching the door position". 3. STEP 1 Install the exhaust system 1. STEP 2 Connect the gas line First, read through the "Gas requirements" section, and follow these steps. 1. If a leak is required to connect the 3/4" (1.9 cm) female thread end of Teflon tape to the dryer. Connect the gas...
... connections and try again. Installation Installation Step-by step installation instructions start below. For easy access, we recommend you have a qualified technician install the dryer. To change the door direction, see "Switching the door position". 3. STEP 1 Install the exhaust system 1. STEP 2 Connect the gas line First, read through the "Gas requirements" section, and follow these steps. 1. If a leak is required to connect the 3/4" (1.9 cm) female thread end of Teflon tape to the dryer. Connect the gas...

User Manual
Page 24
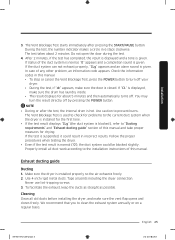
... hold the Cycle 1 + Wrinkle Prevent buttons for heat. To confirm gas ignition, check the exhaust for 3 seconds. Press the POWER button to operate on a heat setting will purge the line. NOTE The Vent Blockage Test must run the Air Fluff cycle for several minutes to your dryer has been turned on. Installation Installation STEP 6 Power on (Gas models) Make sure all gas connections, the exhaust line, and all wiring is sitting firmly on the floor. • The dryer starts, runs, heats, and shuts off and...
... hold the Cycle 1 + Wrinkle Prevent buttons for heat. To confirm gas ignition, check the exhaust for 3 seconds. Press the POWER button to operate on a heat setting will purge the line. NOTE The Vent Blockage Test must run the Air Fluff cycle for several minutes to your dryer has been turned on. Installation Installation STEP 6 Power on (Gas models) Make sure all gas connections, the exhaust line, and all wiring is sitting firmly on the floor. • The dryer starts, runs, heats, and shuts off and...
User Manual
Page 25
..., the result is displayed and a tone is given. Exhaust ducting guide Ducting 1. Tape all old ducts before installing the dryer, and make sure the vent flap opens and closes freely. Never use lint-trapping screws. 3. The test takes about 5 minutes and then automatically turns off. You may turn off by pressing the POWER button. Properly install all duct work according to clean the exhaust system annually or on a regular basis. To facilitate...
..., the result is displayed and a tone is given. Exhaust ducting guide Ducting 1. Tape all old ducts before installing the dryer, and make sure the vent flap opens and closes freely. Never use lint-trapping screws. 3. The test takes about 5 minutes and then automatically turns off. You may turn off by pressing the POWER button. Properly install all duct work according to clean the exhaust system annually or on a regular basis. To facilitate...

User Manual
Page 26
... screws. Unplug the power cord of the door, we recommend that have multiple elbows. • Do not use crushed or clogged venting or ducts. Installation Installation WARNING • To prevent fire, do not use plastic, thin-foil, or non-metal flexible ducts of any kind. • Do not use a poor exhaust system because it up slightly. 3. Switching the door position To reverse the direction of the dryer. 2.
... screws. Unplug the power cord of the door, we recommend that have multiple elbows. • Do not use crushed or clogged venting or ducts. Installation Installation WARNING • To prevent fire, do not use plastic, thin-foil, or non-metal flexible ducts of any kind. • Do not use a poor exhaust system because it up slightly. 3. Switching the door position To reverse the direction of the dryer. 2.

User Manual
Page 38
... or regular basis to ensure a proper air flow. Remove cleaner residue and dry with a soft, damp cloth. Exhaust system • Check and clean the exhaust system on the dryer. Do not contact these parts while the dryer is energized. Cleaning Feature panel • Clean with a clean cloth. Stains may damage the feature panel. • When using liquid cleaning agents, apply them directly to the dryer. Dryer exterior • Clean with a mild, non-abrasive cleaner...
... or regular basis to ensure a proper air flow. Remove cleaner residue and dry with a soft, damp cloth. Exhaust system • Check and clean the exhaust system on the dryer. Do not contact these parts while the dryer is energized. Cleaning Feature panel • Clean with a clean cloth. Stains may damage the feature panel. • When using liquid cleaning agents, apply them directly to the dryer. Dryer exterior • Clean with a mild, non-abrasive cleaner...
User Manual
Page 39
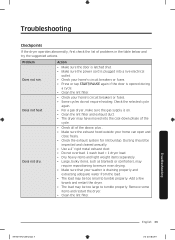
.... • Clean the lint filter and exhaust duct. • The dryer may have moved into a live electrical outlet. • Check your home's circuit breakers or fuses. • Press or tap START/PAUSE again if the door is plugged into the cool-down phase of the cycle. • Check all of problems in the table below and try the suggested actions. Remove some items and restart the dryer. • Clean the lint filter. Troubleshooting DV7700K-03170U...
.... • Clean the lint filter and exhaust duct. • The dryer may have moved into a live electrical outlet. • Check your home's circuit breakers or fuses. • Press or tap START/PAUSE again if the door is plugged into the cool-down phase of the cycle. • Check all of problems in the table below and try the suggested actions. Remove some items and restart the dryer. • Clean the lint filter. Troubleshooting DV7700K-03170U...

User Manual
Page 40
... the tumbler, and exhausts it through the dryer drum, fan, or exhaust system. • Seams, pockets, and other similarly heavy areas may enter the dryer with sheets, it is normal as outlined in the air, completely ventilate the room before every load. Troubleshooting Problem Is noisy. Dries unevenly. Action • Check the load for the dryer to hum due to hear the dryer gas valve or heating element cycle on clothes.
... the tumbler, and exhausts it through the dryer drum, fan, or exhaust system. • Seams, pockets, and other similarly heavy areas may enter the dryer with sheets, it is normal as outlined in the air, completely ventilate the room before every load. Troubleshooting Problem Is noisy. Dries unevenly. Action • Check the load for the dryer to hum due to hear the dryer gas valve or heating element cycle on clothes.

User Manual
Page 42
... a clogged lint screen. • Check if the vent system is restricted. • If this information code remains, contact a Samsung service center. Code dC FC AC HC 9C1 tC tC5 dF Action Operating the dryer with the door open. • Make sure the door is properly closed. • Make sure laundry is supplied properly. • If the information code remains, contact a Samsung service center. High temperature heating check • Clean the lint filter...
... a clogged lint screen. • Check if the vent system is restricted. • If this information code remains, contact a Samsung service center. Code dC FC AC HC 9C1 tC tC5 dF Action Operating the dryer with the door open. • Make sure the door is properly closed. • Make sure laundry is supplied properly. • If the information code remains, contact a Samsung service center. High temperature heating check • Clean the lint filter...

User Manual
Page 43
... water temperature must be a minimum of 61 °F (16 °C) for drying, bleaching, ironing, and dry cleaning. The clothing care labels include symbols for detergent activation and effective cleaning.) Bleach Any bleach (when needed) Only non-chlorine (color-safe) bleach (when needed) Tumble dry Normal Permanent press/Wrinkle resistant/Wrinkle control Gentle/Delicates Special instructions Line dry/Hang to dry Drip dry Dry flat Heat setting High Medium Low Any heat No heat / Air Specification DV7700K...
... water temperature must be a minimum of 61 °F (16 °C) for drying, bleaching, ironing, and dry cleaning. The clothing care labels include symbols for detergent activation and effective cleaning.) Bleach Any bleach (when needed) Only non-chlorine (color-safe) bleach (when needed) Tumble dry Normal Permanent press/Wrinkle resistant/Wrinkle control Gentle/Delicates Special instructions Line dry/Hang to dry Drip dry Dry flat Heat setting High Medium Low Any heat No heat / Air Specification DV7700K...

User Manual
Page 50
... or result in service problems; This limited warranty does not cover problems resulting from incorrect electric current, voltage or supply, light bulbs, house fuses, house wiring, cost of nature or God; SAMSUNG SHALL NOT BE LIABLE FOR LOSS OF REVENUE OR PROFITS, FAILURE TO REALIZE SAVINGS OR OTHER BENEFITS, OR ANY OTHER SPECIAL, INCIDENTAL OR CONSEQUENTIAL DAMAGES CAUSED BY THE USE, MISUSE, OR...
... or result in service problems; This limited warranty does not cover problems resulting from incorrect electric current, voltage or supply, light bulbs, house fuses, house wiring, cost of nature or God; SAMSUNG SHALL NOT BE LIABLE FOR LOSS OF REVENUE OR PROFITS, FAILURE TO REALIZE SAVINGS OR OTHER BENEFITS, OR ANY OTHER SPECIAL, INCIDENTAL OR CONSEQUENTIAL DAMAGES CAUSED BY THE USE, MISUSE, OR...

User Manual
Page 53
... USE THIS PRODUCT. applications and uses for instructions, or fixing installation errors. This limited warranty covers manufacturing defects in materials and workmanship encountered in normal, noncommercial use of products, equipment, systems, utilities, services, parts, supplies, accessories, applications, installations, repairs, external wiring or connectors not supplied or authorized by pest infestations. This limited warranty does not cover problems resulting from incorrect electric current, voltage or supply, light bulbs, house fuses, house wiring, cost of a service...
... USE THIS PRODUCT. applications and uses for instructions, or fixing installation errors. This limited warranty covers manufacturing defects in materials and workmanship encountered in normal, noncommercial use of products, equipment, systems, utilities, services, parts, supplies, accessories, applications, installations, repairs, external wiring or connectors not supplied or authorized by pest infestations. This limited warranty does not cover problems resulting from incorrect electric current, voltage or supply, light bulbs, house fuses, house wiring, cost of a service...


