User Manual (ENGLISH)
Page 1
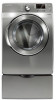
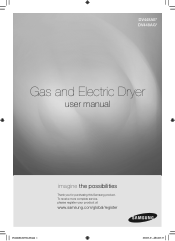
To receive more complete service, please register your product at www.samsung.com/global/register DV448AEG-02555A_EN.indd 1 2008-03-25 ¿ÀÈÄ 6:25:35 DV448AE* DV448AG* Gas and Electric Dryer user manual imagine the possibilities Thank you for purchasing this Samsung product.
To receive more complete service, please register your product at www.samsung.com/global/register DV448AEG-02555A_EN.indd 1 2008-03-25 ¿ÀÈÄ 6:25:35 DV448AE* DV448AG* Gas and Electric Dryer user manual imagine the possibilities Thank you for purchasing this Samsung product.
User Manual (ENGLISH)
Page 2
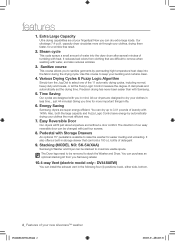
... water, and also reduces wrinkles. 3. just 44 minutes! Also, both the large capacity and Fuzzy Logic Control save energy by permeating high temperature heat deep into the dryer drum after several minutes of laundry with just four screws. 8. Pedestal with Samsung. 5. Stacking (MODEL NO: SK-5A/XAA) Samsung's Washer and Dryer can install the exhaust vent in mind. You can purchase an optional stacking kit from clothing that can dry extra-large loads. Time Saving Our cycles...
... water, and also reduces wrinkles. 3. just 44 minutes! Also, both the large capacity and Fuzzy Logic Control save energy by permeating high temperature heat deep into the dryer drum after several minutes of laundry with just four screws. 8. Pedestal with Samsung. 5. Stacking (MODEL NO: SK-5A/XAA) Samsung's Washer and Dryer can install the exhaust vent in mind. You can purchase an optional stacking kit from clothing that can dry extra-large loads. Time Saving Our cycles...
User Manual (ENGLISH)
Page 3
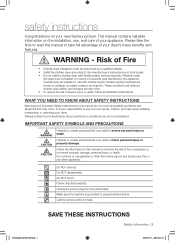
Flexible venting materials are known to the manufacturer's instructions and local codes. • Do not install a clothes dryer with clothes dryers. Follow directions explicity. Make sure the machine is installed, it must be easily crushed, and trap lint. WARNING - Risk of Fire • Clothes dryer installation must be of a specific type identified by a qualified installer. • Install the clothes dryer according to collapse, be performed by the appliance manufacturer as suitable for...
Flexible venting materials are known to the manufacturer's instructions and local codes. • Do not install a clothes dryer with clothes dryers. Follow directions explicity. Make sure the machine is installed, it must be easily crushed, and trap lint. WARNING - Risk of Fire • Clothes dryer installation must be of a specific type identified by a qualified installer. • Install the clothes dryer according to collapse, be performed by the appliance manufacturer as suitable for...
User Manual (ENGLISH)
Page 4
... or products to eliminate static unless recommended for dryer use any part of the appliance unless specifically recommended in contact with a cleaning solvent or flammable liquids or solids should not be performed by a qualified installer, service agency, or the gas supplier. Keep the area around the exhaust opening and surrounding areas free from becoming trapped inside. There are many highly flammable items...
... or products to eliminate static unless recommended for dryer use any part of the appliance unless specifically recommended in contact with a cleaning solvent or flammable liquids or solids should not be performed by a qualified installer, service agency, or the gas supplier. Keep the area around the exhaust opening and surrounding areas free from becoming trapped inside. There are many highly flammable items...
User Manual (ENGLISH)
Page 5
... be cleaned periodically by smell alone. Oxidation creates heat. All washed and unwashed fabrics that have run through the Cool Down cycle. For complete details, see the Installation Instructions packed with local and national codes. These objects could damage your system, resulting in hot water with vegetable oil or cooking oil. Gas suppliers recommend you purchase and install a UL-approved gas detector. Piling, stacking...
... be cleaned periodically by smell alone. Oxidation creates heat. All washed and unwashed fabrics that have run through the Cool Down cycle. For complete details, see the Installation Instructions packed with local and national codes. These objects could damage your system, resulting in hot water with vegetable oil or cooking oil. Gas suppliers recommend you purchase and install a UL-approved gas detector. Piling, stacking...
User Manual (ENGLISH)
Page 6
... See Exhaust Requirements 8 Ducting requirements 9 Important to installer 9 Location considerations 9 Alcove or closet installation 10 Mobile home installation 10 Exhausting 11 Gas requirements 12 Electrical requirements 12 Grounding 13 Electrical connections 14 Connecting the inlet hose 15 Replacement parts and accessories 15 Installation 18 Final installation checklist 19 Dryer Exhaust Tips 20 Door Reversal 21 Overview of the control panel 23 Child lock 24 Drum Light 24 Changing Language 24 My cycle 25 Rack Dry 26 Clean the lint filter 26 Load the dryer properly 26 Getting started 27 Control...
... See Exhaust Requirements 8 Ducting requirements 9 Important to installer 9 Location considerations 9 Alcove or closet installation 10 Mobile home installation 10 Exhausting 11 Gas requirements 12 Electrical requirements 12 Grounding 13 Electrical connections 14 Connecting the inlet hose 15 Replacement parts and accessories 15 Installation 18 Final installation checklist 19 Dryer Exhaust Tips 20 Door Reversal 21 Overview of the control panel 23 Child lock 24 Drum Light 24 Changing Language 24 My cycle 25 Rack Dry 26 Clean the lint filter 26 Load the dryer properly 26 Getting started 27 Control...
User Manual (ENGLISH)
Page 7
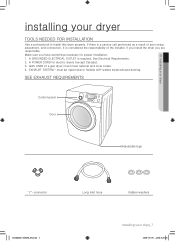
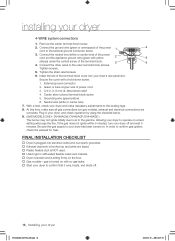
... a service call performed as a result of the installer. A POWER CORD for proper installation. 1. must meet national and local codes. 4. 01 Installing your dryer installing your dryer_7 2008-03-25 ¿ÀÈÄ 6:25:39 See Electrical Requirements. 2. Make sure you are responsible. GAS LINES (if a gas dryer) must be rigid metal or flexible stiff-walled metal exhaust ducting. SEE EXHAUST REQUIREMENTS Control panel Door Adjustable legs "Y"-connector DV448AEG-02555A_EN.indd 7 Long inlet hose Rubber washers Installing...
... a service call performed as a result of the installer. A POWER CORD for proper installation. 1. must meet national and local codes. 4. 01 Installing your dryer installing your dryer_7 2008-03-25 ¿ÀÈÄ 6:25:39 See Electrical Requirements. 2. Make sure you are responsible. GAS LINES (if a gas dryer) must be rigid metal or flexible stiff-walled metal exhaust ducting. SEE EXHAUST REQUIREMENTS Control panel Door Adjustable legs "Y"-connector DV448AEG-02555A_EN.indd 7 Long inlet hose Rubber washers Installing...
User Manual (ENGLISH)
Page 8
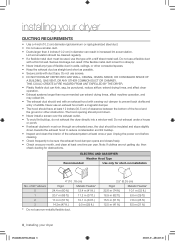
... a year. The hood opening should end with an exhaust hood with duct tape. ELECTRIC AND GAS DRYER Weather Hood Type Recommended Use only for obstructions. Do not use a smaller duct. • Ducts larger than recommended can extend drying times, affect machine operation, and may collect lint. • The exhaust duct should point down. • Never install a screen over the exhaust outlet. • To avoid lint buildup, do not exhaust the dryer directly into a window well...
... a year. The hood opening should end with an exhaust hood with duct tape. ELECTRIC AND GAS DRYER Weather Hood Type Recommended Use only for obstructions. Do not use a smaller duct. • Ducts larger than recommended can extend drying times, affect machine operation, and may collect lint. • The exhaust duct should point down. • Never install a screen over the exhaust outlet. • To avoid lint buildup, do not exhaust the dryer directly into a window well...
User Manual (ENGLISH)
Page 9
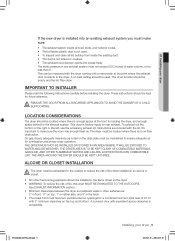
... fresh air. A louvered door with the kit. IMPORTANT TO INSTALLER Please read the following instructions carefully before installing the dryer. ALCOVE OR CLOSET INSTALLATION The dryer must be kept for the exhaust system. REMOVE THE DOOR FROM ALL DISCARDED APPLIANCES TO AVOID THE DANGER OF A CHILD WARNING SUFFOCATING. THE DRYER MUST NOT BE INSTALLED OR STORED IN AN AREA WHERE IT WILL BE EXPOSED TO WATER AND...
... fresh air. A louvered door with the kit. IMPORTANT TO INSTALLER Please read the following instructions carefully before installing the dryer. ALCOVE OR CLOSET INSTALLATION The dryer must be kept for the exhaust system. REMOVE THE DOOR FROM ALL DISCARDED APPLIANCES TO AVOID THE DANGER OF A CHILD WARNING SUFFOCATING. THE DRYER MUST NOT BE INSTALLED OR STORED IN AN AREA WHERE IT WILL BE EXPOSED TO WATER AND...

User Manual (ENGLISH)
Page 10
.... Call 1-800-SAMSUNG for Clothes Dryer Transition Duct, Subject 2158A, shall be used . • All dryers must be assembled with the appliance by the manufacturer and that is non-flammable to the outside . • The required exhaust duct is plastic, non-metal, or combustible, replace it with the exhaust duct termination securely fastened to the outside will not support combustion. If your dryer DV448AEG-02555A_EN.indd...
.... Call 1-800-SAMSUNG for Clothes Dryer Transition Duct, Subject 2158A, shall be used . • All dryers must be assembled with the appliance by the manufacturer and that is non-flammable to the outside . • The required exhaust duct is plastic, non-metal, or combustible, replace it with the exhaust duct termination securely fastened to the outside will not support combustion. If your dryer DV448AEG-02555A_EN.indd...
User Manual (ENGLISH)
Page 11
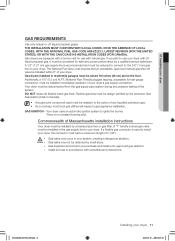
... Gas Code requires that an accessible, approved manual gas shut-off valve be installed within 6" of 3' (36"). - Gas dryers installed in Canada). • Any pipe joint compound used to the action of the system. Your dryer uses an automatic ignition system to the 3/8" (1 cm) gas line on your dryer with a burner vent for test gauge connection, must be installed immediately upstream of Massachusetts installation instructions Your dryer must be resistant to install your dryer, the connector must be installed...
... Gas Code requires that an accessible, approved manual gas shut-off valve be installed within 6" of 3' (36"). - Gas dryers installed in Canada). • Any pipe joint compound used to the action of the system. Your dryer uses an automatic ignition system to the 3/8" (1 cm) gas line on your dryer with a burner vent for test gauge connection, must be installed immediately upstream of Massachusetts installation instructions Your dryer must be resistant to install your dryer, the connector must be installed...

User Manual (ENGLISH)
Page 12
... electrician. NEVER CONNECT GROUND WIRE TO PLASTIC PLUMBING LINES, GAS LINES, OR HOT WATER PIPES. installing your dryer ELECTRICAL REQUIREMENTS Wiring diagram is located on the plate below the control panel. • WARNING • • Improper connection of the equipment grounding conductor can result in doubt as to whether your dryer is properly grounded. To prevent unnecessary risk of electric shock. The plug must be plugged into an appropriate outlet that is...
... electrician. NEVER CONNECT GROUND WIRE TO PLASTIC PLUMBING LINES, GAS LINES, OR HOT WATER PIPES. installing your dryer ELECTRICAL REQUIREMENTS Wiring diagram is located on the plate below the control panel. • WARNING • • Improper connection of the equipment grounding conductor can result in doubt as to whether your dryer is properly grounded. To prevent unnecessary risk of electric shock. The plug must be plugged into an appropriate outlet that is...
User Manual (ENGLISH)
Page 13
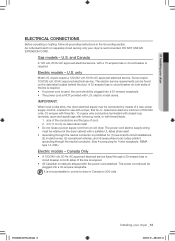
... copper wire conductors terminated with closed loop terminals, open-end spade lugs with turned up ends, or with the power cord attached. only Most U.S. listed and rated at the dryer cabinet with U.S. Electric models - Some require 120/208 volt, 60 Hz approved electrical service. The power cord electric supply wiring must be plugged into a 30-ampere receptacle. 01 Installing your dryer ELECTRICAL CONNECTIONS Before operating or testing, follow all grounding instructions in Canada to 208 volts. dryers require a 120...
... copper wire conductors terminated with closed loop terminals, open-end spade lugs with turned up ends, or with the power cord attached. only Most U.S. listed and rated at the dryer cabinet with U.S. Electric models - Some require 120/208 volt, 60 Hz approved electrical service. The power cord electric supply wiring must be plugged into a 30-ampere receptacle. 01 Installing your dryer ELECTRICAL CONNECTIONS Before operating or testing, follow all grounding instructions in Canada to 208 volts. dryers require a 120...
User Manual (ENGLISH)
Page 18
... it runs, heats, and shuts off and wait 5 minutes. Tighten screws. 5. With a level, check your dryer and make sure all gas connections (on gas models), exhaust and electrical connections are taped. Plastic flexible duct is NOT used. Used rigid or stiff-walled flexible metal vent material. Dryer is leveled and is turned on with no gas leaks. Start your dryer to operate on a heat setting will purge the line. Connect the other wires...
... it runs, heats, and shuts off and wait 5 minutes. Tighten screws. 5. With a level, check your dryer and make sure all gas connections (on gas models), exhaust and electrical connections are taped. Plastic flexible duct is NOT used. Used rigid or stiff-walled flexible metal vent material. Dryer is leveled and is turned on with no gas leaks. Start your dryer to operate on a heat setting will purge the line. Connect the other wires...
User Manual (ENGLISH)
Page 19
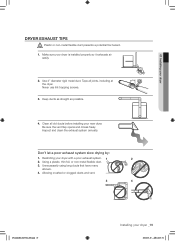
WARNING 1. Never use lint-trapping screws. 3. Keep ducts as straight as possible. 4. Don't let a poor exhaust system slow drying by: 1. Unnecessarily using long ducts that have many elbows. 4. 01 Installing your dryer with a poor exhaust system. 1 2 2. Tape all old ducts before installing your new dryer. Inspect and clean the exhaust system annually. Clean all joints, including at the dryer. Be sure the vent flap opens and closes freely. Restricting your dryer DRYER EXHAUST TIPS Plastic...
WARNING 1. Never use lint-trapping screws. 3. Keep ducts as straight as possible. 4. Don't let a poor exhaust system slow drying by: 1. Unnecessarily using long ducts that have many elbows. 4. 01 Installing your dryer with a poor exhaust system. 1 2 2. Tape all old ducts before installing your new dryer. Inspect and clean the exhaust system annually. Clean all joints, including at the dryer. Be sure the vent flap opens and closes freely. Restricting your dryer DRYER EXHAUST TIPS Plastic...
User Manual (ENGLISH)
Page 21
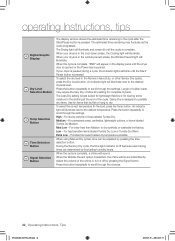
... Sensor Dry cycles. Dry loads such as jeans, corduroys, or work clothes. Air Fluff - The indicator light by providing a longer unheated cool-down period at a low drying temperature. Use this cycle a small amount of water is sprayed into the dryer drum after several minutes of tumbling with heat. Time Dry allows you to four dry items. In this cycle to set the drying time. Turn the Cycle Selector dial to Time Dry, then press the Adjust Time up arrow to dry loads...
... Sensor Dry cycles. Dry loads such as jeans, corduroys, or work clothes. Air Fluff - The indicator light by providing a longer unheated cool-down period at a low drying temperature. Use this cycle a small amount of water is sprayed into the dryer drum after several minutes of tumbling with heat. Time Dry allows you to four dry items. In this cycle to set the drying time. Turn the Cycle Selector dial to Time Dry, then press the Adjust Time up arrow to dry loads...
User Manual (ENGLISH)
Page 22
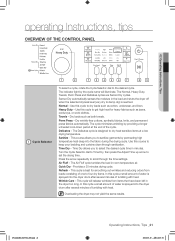
... loads may fluctuate as the cycle progresses. When using Manual Dry cycles, time can be adjusted by pressing the time selection button. The estimated time remaining may require the Very Dry or More Dry setting for the load, press the Temp button. To select the dry level in the display panel until the Start/ Pause button is complete. Low - operating Instructions, tips 2 Digital Graphic Display 3 Dry Level Selection Button 4 Temp Selection Button 5 Time Selection Button 6 Signal Selection Button...
... loads may fluctuate as the cycle progresses. When using Manual Dry cycles, time can be adjusted by pressing the time selection button. The estimated time remaining may require the Very Dry or More Dry setting for the load, press the Temp button. To select the dry level in the display panel until the Start/ Pause button is complete. Low - operating Instructions, tips 2 Digital Graphic Display 3 Dry Level Selection Button 4 Temp Selection Button 5 Time Selection Button 6 Signal Selection Button...

User Manual (ENGLISH)
Page 29
... outlined in the air, ventilate the room completely before using the dryer. may have moved into a live electrical outlet. • Check the home's circuit breaker and fuses. • Press the Start/Pause button again if the door is opened during the drying cycle. • Be sure the dryer is leveled properly as the dryer draws the air from the room, heats it, pulls it through the dryer drum and exhaust system. •...
... outlined in the air, ventilate the room completely before using the dryer. may have moved into a live electrical outlet. • Check the home's circuit breaker and fuses. • Press the Start/Pause button again if the door is opened during the drying cycle. • Be sure the dryer is leveled properly as the dryer draws the air from the room, heats it, pulls it through the dryer drum and exhaust system. •...
User Manual (ENGLISH)
Page 32
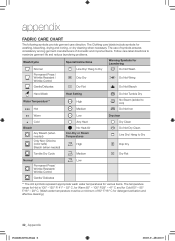
... domestic and imported items. Follow care label directions to maximize garment life and reduce laundering problems. Wash Cycle Special Instructions Warning Symbols for Laundering Normal Line Dry/ Hang to Dry Do Not Wash Permanent Press / Wrinkle Resistant / Wrinkle Control Drip Dry Do Not Wring Gentle/Delicates Dry Flat Do Not Bleach Hand Wash Water Temperature** Hot Heat Setting High Medium Do Not Tumble Dry No Steam (added to iron) Do...
... domestic and imported items. Follow care label directions to maximize garment life and reduce laundering problems. Wash Cycle Special Instructions Warning Symbols for Laundering Normal Line Dry/ Hang to Dry Do Not Wash Permanent Press / Wrinkle Resistant / Wrinkle Control Drip Dry Do Not Wring Gentle/Delicates Dry Flat Do Not Bleach Hand Wash Water Temperature** Hot Heat Setting High Medium Do Not Tumble Dry No Steam (added to iron) Do...
User Manual (ENGLISH)
Page 35
... to and from incorrect electric current, voltage or supply, light bulbs, house fuses, house wiring, cost of sale must contact SAMSUNG for instructions, or fixing installation errors. SAMSUNG will repair, replace, or refund this product was not intended; SAMSUNG will provide in-home service during the limited warranty period specified above. delivery and installation; incorrect electrical line voltage, fluctuations and surges; SAMSUNG does not warrant uninterrupted or error-free operation of nature or God;
... to and from incorrect electric current, voltage or supply, light bulbs, house fuses, house wiring, cost of sale must contact SAMSUNG for instructions, or fixing installation errors. SAMSUNG will repair, replace, or refund this product was not intended; SAMSUNG will provide in-home service during the limited warranty period specified above. delivery and installation; incorrect electrical line voltage, fluctuations and surges; SAMSUNG does not warrant uninterrupted or error-free operation of nature or God;


