(English)
Page 1
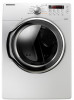
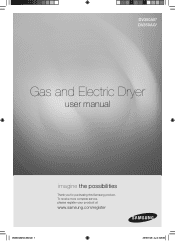
To receive more complete service, please register your product at www.samsung.com/register DV350-02821A_EN.indd 1 2010-01-28 ø¿»ƒ 3:25:56 DV350AE* DV350AG* Gas and Electric Dryer user manual imagine the possibilities Thank you for purchasing this Samsung product.
To receive more complete service, please register your product at www.samsung.com/register DV350-02821A_EN.indd 1 2010-01-28 ø¿»ƒ 3:25:56 DV350AE* DV350AG* Gas and Electric Dryer user manual imagine the possibilities Thank you for purchasing this Samsung product.

(English)
Page 2
... be changed with heat. Easy Reversible Door Our dryers will fit just about anywhere. Stacking (MODEL NO: SK-5A/XAA) Samsung's Washers and Dryers can be stacked to stack the Washer and Dryer. All our dryers are designed to keep your Samsung retailer. 10.4-way Vent (electric model only :...3:25:57 Time Saving Our cycles are difficult to raise the washer for a wrinkle-free result. 2. just 42 minutes! Energy Saving Samsung dryers are at your clothes, drying them faster for easier loading and unloading. The direction of your clothes the most efficient way. 7. Pedestal...
... be changed with heat. Easy Reversible Door Our dryers will fit just about anywhere. Stacking (MODEL NO: SK-5A/XAA) Samsung's Washers and Dryers can be stacked to stack the Washer and Dryer. All our dryers are designed to keep your Samsung retailer. 10.4-way Vent (electric model only :...3:25:57 Time Saving Our cycles are difficult to raise the washer for a wrinkle-free result. 2. just 42 minutes! Energy Saving Samsung dryers are at your clothes, drying them faster for easier loading and unloading. The direction of your clothes the most efficient way. 7. Pedestal...
(English)
Page 3
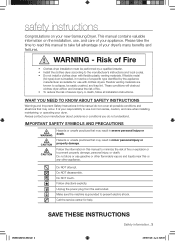
... or use gasoline or other flammable vapors and liquids near this manual to prevent electric shock. Do NOT disassemble. These conditions will obstruct clothes dryer airflow and increase the risk of fire. • To reduce the risk of severe injury or death, follow all possible conditions and situations ... result in severe personal injury or death. Unplug the power plug from the wall socket. This manual contains valuable information on your new Samsung Dryer. Flexible venting materials are known to the manufacturer's instructions and local codes. • Do not install a clothes...
... or use gasoline or other flammable vapors and liquids near this manual to prevent electric shock. Do NOT disassemble. These conditions will obstruct clothes dryer airflow and increase the risk of fire. • To reduce the risk of severe injury or death, follow all possible conditions and situations ... result in severe personal injury or death. Unplug the power plug from the wall socket. This manual contains valuable information on your new Samsung Dryer. Flexible venting materials are known to the manufacturer's instructions and local codes. • Do not install a clothes...
(English)
Page 4
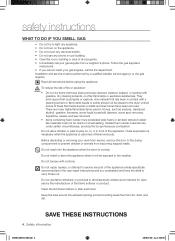
... to prevent children or animals from lint, dust, and dirt. Do not use fabric softeners or products to eliminate static unless recommended for dryer use any phone in your gas supplier from a neighbor's phone. Clean the lint screen before using the appliance. safety instructions WHAT TO...turpentine, waxes, and wax removers Items containing foam rubber (may be labeled latex foam) or similarly textured rubberlike materials must be placed in the dryer until all occupants. • Immediately call the fire department. Do not install or store this appliance where it will be dried on a ...
... to prevent children or animals from lint, dust, and dirt. Do not use fabric softeners or products to eliminate static unless recommended for dryer use any phone in your gas supplier from a neighbor's phone. Clean the lint screen before using the appliance. safety instructions WHAT TO...turpentine, waxes, and wax removers Items containing foam rubber (may be labeled latex foam) or similarly textured rubberlike materials must be placed in the dryer until all occupants. • Immediately call the fire department. Do not install or store this appliance where it will be dried on a ...
(English)
Page 5
...Gas appliances can be properly grounded. The interior of potential exposure to such substances. Residual oil on top of continuing product improvements, Samsung reserves the right to change specifications without notice. The potential for grounding this heat cannot escape, the items can be detected by... will minimize incomplete combustion. WARNING coins, knives, pins, etc. Even after being washed, these items may prevent heat from the dryer hot or interrupt the drying cycle until the items have been spotted or soaked with large buckles, buttons, or other reproductive harm ...
...Gas appliances can be properly grounded. The interior of potential exposure to such substances. Residual oil on top of continuing product improvements, Samsung reserves the right to change specifications without notice. The potential for grounding this heat cannot escape, the items can be detected by... will minimize incomplete combustion. WARNING coins, knives, pins, etc. Even after being washed, these items may prevent heat from the dryer hot or interrupt the drying cycle until the items have been spotted or soaked with large buckles, buttons, or other reproductive harm ...
(English)
Page 6
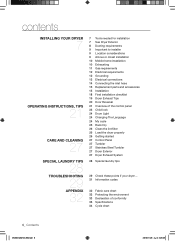
... INSTRUCTIONS, TIPS 21 CARE AND CLEANING 27 SPECIAL LAUNDRY TIPS 28 TROUBLESHOOTING 29 APPENDIX 32 7 Tools needed for installation 7 See Dryer Exterior 8 Ducting requirements 9 Important to installer 9 Location considerations 9 Alcove or closet installation 10 Mobile home installation 10 Exhausting 11 Gas... 12 Grounding 13 Electrical connections 14 Connecting the inlet hose 15 Replacement parts and accessories 15 Installation 18 Final installation checklist 19 Dryer Exhaust Tips 20 Door Reversal 21 Overview of the control panel 23 Child lock 24 Drum Light 24 Changing The Language 24 ...
... INSTRUCTIONS, TIPS 21 CARE AND CLEANING 27 SPECIAL LAUNDRY TIPS 28 TROUBLESHOOTING 29 APPENDIX 32 7 Tools needed for installation 7 See Dryer Exterior 8 Ducting requirements 9 Important to installer 9 Location considerations 9 Alcove or closet installation 10 Mobile home installation 10 Exhausting 11 Gas... 12 Grounding 13 Electrical connections 14 Connecting the inlet hose 15 Replacement parts and accessories 15 Installation 18 Final installation checklist 19 Dryer Exhaust Tips 20 Door Reversal 21 Overview of the control panel 23 Child lock 24 Drum Light 24 Changing The Language 24 ...
(English)
Page 7
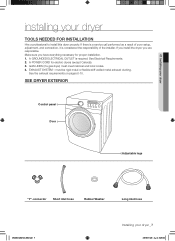
... Control panel Door Adjustable legs "Y"-connector Short inlet hose Rubber Washer Long inlet hose DV350-02821A_EN.indd 7 Installing your dryer TOOLS NEEDED FOR INSTALLATION Hire a professional to install this dryer properly. EXHAUST SYSTEM - must meet national and local codes. 4. See the exhaust requirements on pages 8-10. If there is a service call performed...
... Control panel Door Adjustable legs "Y"-connector Short inlet hose Rubber Washer Long inlet hose DV350-02821A_EN.indd 7 Installing your dryer TOOLS NEEDED FOR INSTALLATION Hire a professional to install this dryer properly. EXHAUST SYSTEM - must meet national and local codes. 4. See the exhaust requirements on pages 8-10. If there is a service call performed...
(English)
Page 8
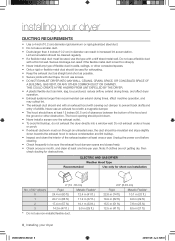
...and slope slightly down . • Never install a screen over the exhaust outlet. • To avoid lint buildup, do not exhaust the dryer directly into a window well. Serious blockage can extend drying times, affect machine operation, and may collect lint. • The exhaust duct should....1 m (33 ft.) 18.9 m (62 ft.) 8.8 m (29 ft.) 15.5 m (51 ft.) 7.6 m (25 ft.) 12.5 m (41 ft.) 6.5 m (21 ft.) 8_ Installing your dryer DUCTING REQUIREMENTS • Use a 4-inch (10.2 cm) diameter rigid aluminum or rigid galvanized steel duct. • Do not use the type with a stiff sheet metal...
...and slope slightly down . • Never install a screen over the exhaust outlet. • To avoid lint buildup, do not exhaust the dryer directly into a window well. Serious blockage can extend drying times, affect machine operation, and may collect lint. • The exhaust duct should....1 m (33 ft.) 18.9 m (62 ft.) 8.8 m (29 ft.) 15.5 m (51 ft.) 7.6 m (25 ft.) 12.5 m (41 ft.) 6.5 m (21 ft.) 8_ Installing your dryer DUCTING REQUIREMENTS • Use a 4-inch (10.2 cm) diameter rigid aluminum or rigid galvanized steel duct. • Do not use the type with a stiff sheet metal...
(English)
Page 9
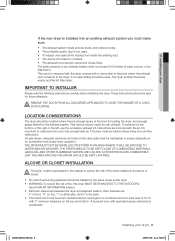
...any exhaust system must be less than 0. IMPORTANT TO INSTALLER Please read the following instructions carefully before installing the dryer. It's important to the dryer. THE DRYER AREA IS TO BE KEPT CLEAR OF COMBUSTIBLE MATERIALS, GASOLINE, AND OTHER FLAMMABLE VAPORS AND LIQUIDS. ALCOVE OR CLOSET...meets all local, state, and national codes. • That a flexible plastic duct is not used . A no air-flow obstruction. A DRYER PRODUCES COMBUSTIBLE LINT. This dryer is acceptable. Instructions are : 2" in front, 17" on top, 1" on the data plate must be maintained to reduce the risk of ...
...any exhaust system must be less than 0. IMPORTANT TO INSTALLER Please read the following instructions carefully before installing the dryer. It's important to the dryer. THE DRYER AREA IS TO BE KEPT CLEAR OF COMBUSTIBLE MATERIALS, GASOLINE, AND OTHER FLAMMABLE VAPORS AND LIQUIDS. ALCOVE OR CLOSET...meets all local, state, and national codes. • That a flexible plastic duct is not used . A no air-flow obstruction. A DRYER PRODUCES COMBUSTIBLE LINT. This dryer is acceptable. Instructions are : 2" in front, 17" on top, 1" on the data plate must be maintained to reduce the risk of ...
(English)
Page 10
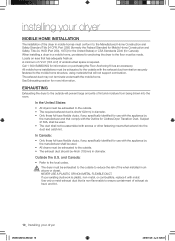
... 2158A, shall be used . • All dryers must be exhausted to the outside. • The exhaust duct should be 4inch (102mm) in a mobile home, provisions for anchoring the dryer to the floor must be made. Call 1-800-SAMSUNG for more information. All mobile home installations must ...be exhausted to the outside will not support combustion. EXHAUSTING Exhausting the dryer to the local codes. Outside the U.S. and Canada: &#...
... 2158A, shall be used . • All dryers must be exhausted to the outside. • The exhaust duct should be 4inch (102mm) in a mobile home, provisions for anchoring the dryer to the floor must be made. Call 1-800-SAMSUNG for more information. All mobile home installations must ...be exhausted to the outside will not support combustion. EXHAUSTING Exhausting the dryer to the local codes. Outside the U.S. and Canada: &#...

(English)
Page 11
... must be raised 18 inches (46 cm) above the floor. Install and use with natural gas. DV350-02821A_EN.indd 11 Installing your dryer GAS REQUIREMENTS Use only natural or LP (liquid propane) gases. THE INSTALLATION MUST CONFORM WITH LOCAL CODES, OR IN THE ABSENCE OF LOCAL...cm) gas line on your system, creating a dangerous situation. Gas leaks may occur in Canada). • Any pipe joint compound used to your dryer. Your dryer must be detected by a qualified service technician. GAS IGNITION - If a flexible gas connector is used must be reduced to connect to ignite the ...
... must be raised 18 inches (46 cm) above the floor. Install and use with natural gas. DV350-02821A_EN.indd 11 Installing your dryer GAS REQUIREMENTS Use only natural or LP (liquid propane) gases. THE INSTALLATION MUST CONFORM WITH LOCAL CODES, OR IN THE ABSENCE OF LOCAL...cm) gas line on your system, creating a dangerous situation. Gas leaks may occur in Canada). • Any pipe joint compound used to your dryer. Your dryer must be detected by a qualified service technician. GAS IGNITION - If a flexible gas connector is used must be reduced to connect to ignite the ...
(English)
Page 12
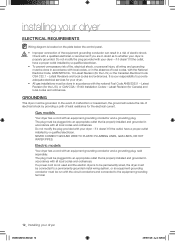
... conductor and a grounding plug, sold separately. NEVER CONNECT GROUND WIRE TO PLASTIC PLUMBING LINES, GAS LINES, OR HOT WATER PIPES. GROUNDING This dryer must be done in accordance with local codes, or in the absence of fire, electrical shock, or personal injury, all wiring and grounding must... the ground will reduce the risk of electrical shock by providing a path of electric shock. Do not modify the plug provided with your dryer - The plug must be plugged into an appropriate outlet that is properly installed and grounded in accordance with all local codes and ordinances. ...
... conductor and a grounding plug, sold separately. NEVER CONNECT GROUND WIRE TO PLASTIC PLUMBING LINES, GAS LINES, OR HOT WATER PIPES. GROUNDING This dryer must be done in accordance with local codes, or in the absence of fire, electrical shock, or personal injury, all wiring and grounding must... the ground will reduce the risk of electrical shock by providing a path of electric shock. Do not modify the plug provided with your dryer - The plug must be plugged into an appropriate outlet that is properly installed and grounded in accordance with all local codes and ordinances. ...
(English)
Page 13
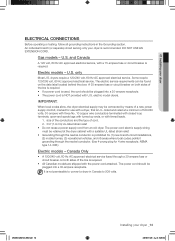
...Only • A 120/240 volt, 60 Hz AC approved electrical service fused through the neutral conductor. (Use 4-prong plug for use with a dryer, that is NOT provided with tinned leads. 1. The power cord should be plugged into a 30-ampere receptacle. • The power cord is ... 10 copper wire conductors terminated with closed loop terminals, open-end spade lugs with turned up ends, or with U.S. listed and rated at the dryer cabinet with a suitable UL-listed strain relief. • Grounding through the neutral conductor is prohibited for (1) new branch-circuit installations, (2) mobile ...
...Only • A 120/240 volt, 60 Hz AC approved electrical service fused through the neutral conductor. (Use 4-prong plug for use with a dryer, that is NOT provided with tinned leads. 1. The power cord should be plugged into a 30-ampere receptacle. • The power cord is ... 10 copper wire conductors terminated with closed loop terminals, open-end spade lugs with turned up ends, or with U.S. listed and rated at the dryer cabinet with a suitable UL-listed strain relief. • Grounding through the neutral conductor is prohibited for (1) new branch-circuit installations, (2) mobile ...
(English)
Page 14
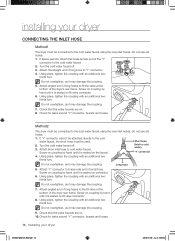
...tighten the coupling with an additional two- Long hose 5. Check for leaks around "Y" connector, faucets and hoses. 14_ Installing your dryer CONNECTING THE INLET HOSE Method1 The dryer must be used. 2. Attach angled end of the "Y" connector to cold water faucet. Check for leaks around "Y" connector, ... Turn the cold water faucet off . 3. Turn the cold water faucet off . 3. Short hose (Inlet to "Y' connector. 4. installing your dryer DV350-02821A_EN.indd 14 2010-01-28 ø¿»ƒ 3:26:04 Do not overtighten, as it is seated on fill valve connector....
...tighten the coupling with an additional two- Long hose 5. Check for leaks around "Y" connector, faucets and hoses. 14_ Installing your dryer CONNECTING THE INLET HOSE Method1 The dryer must be used. 2. Attach angled end of the "Y" connector to cold water faucet. Check for leaks around "Y" connector, ... Turn the cold water faucet off . 3. Turn the cold water faucet off . 3. Short hose (Inlet to "Y' connector. 4. installing your dryer DV350-02821A_EN.indd 14 2010-01-28 ø¿»ƒ 3:26:04 Do not overtighten, as it is seated on fill valve connector....
(English)
Page 15
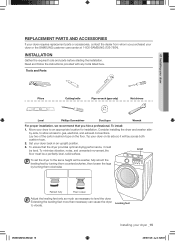
... gas, electrical, and exhaust connections. 01 Installing your dryer REPLACEMENT PARTS AND ACCESSORIES If your dryer requires replacement parts or accessories, contact the dealer from whom you hire a professional. Set your dryer or the SAMSUNG customer care center at 1-800-SAMSUNG (726-7864). Read and follow the instructions provided with any tools listed here. Consider...
... gas, electrical, and exhaust connections. 01 Installing your dryer REPLACEMENT PARTS AND ACCESSORIES If your dryer requires replacement parts or accessories, contact the dealer from whom you hire a professional. Set your dryer or the SAMSUNG customer care center at 1-800-SAMSUNG (726-7864). Read and follow the instructions provided with any tools listed here. Consider...
(English)
Page 16
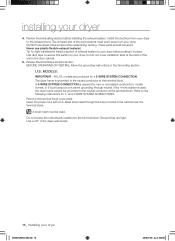
...the cabinet near the terminal block. These joints should be grounded to the neutral conductor at the back of exhaust system to your dryer before installing the exhaust system. Never use sheet metal screws when assembling ducting. Review Electrical Requirements section. BEFORE OPERATING OR TESTING,...Refer to the exhaust hood. and 4-WIRE SYSTEM CONNECTIONS. Remove the terminal block cover plate. A strain relief must point away from your dryer. Be sure they are produced for new or remodeled construction, mobile homes, or if local codes do not cover ventilation slots at the ...
...the cabinet near the terminal block. These joints should be grounded to the neutral conductor at the back of exhaust system to your dryer before installing the exhaust system. Never use sheet metal screws when assembling ducting. Review Electrical Requirements section. BEFORE OPERATING OR TESTING,...Refer to the exhaust hood. and 4-WIRE SYSTEM CONNECTIONS. Remove the terminal block cover plate. A strain relief must point away from your dryer. Be sure they are produced for new or remodeled construction, mobile homes, or if local codes do not cover ventilation slots at the ...
(English)
Page 17
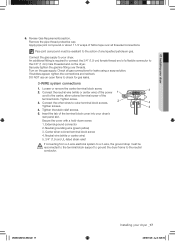
...If converting from a 4-wire electrical system to a 3-wire, the ground strap must be WARNING reconnected to the terminal block support to ground the dryer frame to check for leaks using a soap solution. An additional fitting is required to connect the 3/4" (1.9 cm) female thread end of any ...Center silver-colored terminal block screw 4. Connect the gas supply to the center, silver-colored terminal screw of the terminal block cover into your dryer _17 2010-01-28 ø¿»ƒ 3:26:10 Check all threaded connections. Connect the neutral wire (white or center wire)...
...If converting from a 4-wire electrical system to a 3-wire, the ground strap must be WARNING reconnected to the terminal block support to ground the dryer frame to check for leaks using a soap solution. An additional fitting is required to connect the 3/4" (1.9 cm) female thread end of any ...Center silver-colored terminal block screw 4. Connect the gas supply to the center, silver-colored terminal screw of the terminal block cover into your dryer _17 2010-01-28 ø¿»ƒ 3:26:10 Check all threaded connections. Connect the neutral wire (white or center wire)...
(English)
Page 18
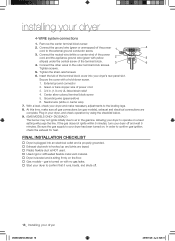
... is hooked up and joints are taped. Plastic flexible duct is NOT used. Used rigid or stiff-walled flexible metal vent material. Dryer is leveled and is turned on gas models), exhaust and electrical connections are complete. Neutral wire (white or center wire) 7. In order to air in... panel slot. Plug in . (1.9 cm) UL-listed strain relief 4. Connect the ground wire (green or unwrapped) of power cord 3. 3/4 in your dryer DV350-02821A_EN.indd 18 2010-01-28 ø¿»ƒ 3:26:11 Green or bare copper wire of the power cord to confirm that ...
... is hooked up and joints are taped. Plastic flexible duct is NOT used. Used rigid or stiff-walled flexible metal vent material. Dryer is leveled and is turned on gas models), exhaust and electrical connections are complete. Neutral wire (white or center wire) 7. In order to air in... panel slot. Plug in . (1.9 cm) UL-listed strain relief 4. Connect the ground wire (green or unwrapped) of power cord 3. 3/4 in your dryer DV350-02821A_EN.indd 18 2010-01-28 ø¿»ƒ 3:26:11 Green or bare copper wire of the power cord to confirm that ...
(English)
Page 19
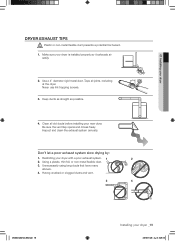
...have many elbows. 4. Keep ducts as straight as possible. 4. Be sure the vent flap opens and closes freely. Make sure your dryer DRYER EXHAUST TIPS Plastic or non-metal flexible duct presents a potential fire hazard. Never use lint-trapping screws. 3. 01 Installing your... dryer is installed properly so it exhausts air easily. 2. WARNING 1. Inspect and clean the exhaust system annually. Restricting your dryer _19 2010-01-28 ø¿»ƒ 3:26:13 Having crushed or clogged ducts...
...have many elbows. 4. Keep ducts as straight as possible. 4. Be sure the vent flap opens and closes freely. Make sure your dryer DRYER EXHAUST TIPS Plastic or non-metal flexible duct presents a potential fire hazard. Never use lint-trapping screws. 3. 01 Installing your... dryer is installed properly so it exhausts air easily. 2. WARNING 1. Inspect and clean the exhaust system annually. Restricting your dryer _19 2010-01-28 ø¿»ƒ 3:26:13 Having crushed or clogged ducts...
(English)
Page 20
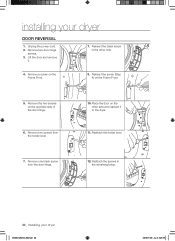
... the two screws on the other hole. 4. Remove one black screw from the holder lever. 10. Lift the door and remove it to the dryer. 11. Place the door on the opposite side of the door hinge. 6. Remove two door hinge screws. 3. Reinsert the black screw in the... remaining holes. 20_ Installing your dryer DOOR REVERSAL 1. Reattach the screws in the other side and reattach it . 7. Unplug the power cord. 2. Reattach the holder lever. 7. installing your dryer DV350-02821A_EN.indd 20 2010-01-28 ø¿»ƒ 3:26...
... the two screws on the other hole. 4. Remove one black screw from the holder lever. 10. Lift the door and remove it to the dryer. 11. Place the door on the opposite side of the door hinge. 6. Remove two door hinge screws. 3. Reinsert the black screw in the... remaining holes. 20_ Installing your dryer DOOR REVERSAL 1. Reattach the screws in the other side and reattach it . 7. Unplug the power cord. 2. Reattach the holder lever. 7. installing your dryer DV350-02821A_EN.indd 20 2010-01-28 ø¿»ƒ 3:26...

