
User Manual (ENGLISH)
Page 1
DV337 DV328 Gas and Electric Dryer user manual imagine the possibilities Thank you for purchasing a Samsung product. To receive a more complete service, please register your product at www.samsung.com/global/register DV337AEW-02453A-04_EN.indd 1 2007-07-23 ¿ÀÈÄ 1:47:14
DV337 DV328 Gas and Electric Dryer user manual imagine the possibilities Thank you for purchasing a Samsung product. To receive a more complete service, please register your product at www.samsung.com/global/register DV337AEW-02453A-04_EN.indd 1 2007-07-23 ¿ÀÈÄ 1:47:14

User Manual (ENGLISH)
Page 2
... time for a wrinkle-free result. 2. Our ultralarge 7.3 cu.ft. It also offers a built-in mind. Stacking (MODEL NO: SK-3A1/XAA, SK-4A/XAA) Samsung's Washer and Dryer can dry extra-large loads. Freshen Up Cycle Want to freshen up a garment that doesn't need to be changed with... Samsung. 3. Energy Saving Samsung dryers are designed with Storage Drawers An optional 15" pedestal is available for easier loading and unloading. Time Saving Our ...
... time for a wrinkle-free result. 2. Our ultralarge 7.3 cu.ft. It also offers a built-in mind. Stacking (MODEL NO: SK-3A1/XAA, SK-4A/XAA) Samsung's Washer and Dryer can dry extra-large loads. Freshen Up Cycle Want to freshen up a garment that doesn't need to be changed with... Samsung. 3. Energy Saving Samsung dryers are designed with Storage Drawers An optional 15" pedestal is available for easier loading and unloading. Time Saving Our ...
User Manual (ENGLISH)
Page 3
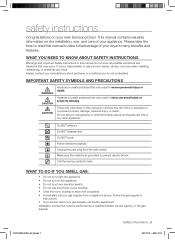
...the gas supplier. safety instructions Congratulations on the installation, use common sense, caution, and care when installing, maintaining, or operating your dryer. WHAT YOU NEED TO KNOW ABOUT SAFETY INSTRUCTIONS Warnings and Important Safety Instructions in this or any phone in severe personal injury or ...1:47:14 Always contact your manufacturer about problems or conditions you cannot reach your gas supplier, call your new Samsung Dryer. Follow directions explicity. Do NOT disassemble. This manual contains valuable information on your gas supplier from the wall socket.
...the gas supplier. safety instructions Congratulations on the installation, use common sense, caution, and care when installing, maintaining, or operating your dryer. WHAT YOU NEED TO KNOW ABOUT SAFETY INSTRUCTIONS Warnings and Important Safety Instructions in this or any phone in severe personal injury or ...1:47:14 Always contact your manufacturer about problems or conditions you cannot reach your gas supplier, call your new Samsung Dryer. Follow directions explicity. Do NOT disassemble. This manual contains valuable information on your gas supplier from the wall socket.
User Manual (ENGLISH)
Page 4
... instructions and you understand and have the skills to carry those out. Do not sit on top of continuing product improvements, Samsung reserves the right to eliminate static unless recommended for grounding this appliance where it will be dried on , in, or in...been previously cleaned, washed, soaked, or spotted with your product before selecting cabinetry, making cutouts, or beginning installation. Because of the dryer. For complete details, see the Installation Instructions packed with gasoline, dry cleaning solvents, or other heavy metal or solid things. 4_ ...
... instructions and you understand and have the skills to carry those out. Do not sit on top of continuing product improvements, Samsung reserves the right to eliminate static unless recommended for grounding this appliance where it will be dried on , in, or in...been previously cleaned, washed, soaked, or spotted with your product before selecting cabinetry, making cutouts, or beginning installation. Because of the dryer. For complete details, see the Installation Instructions packed with gasoline, dry cleaning solvents, or other heavy metal or solid things. 4_ ...
User Manual (ENGLISH)
Page 5
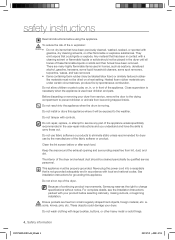
... creates heat. DV337AEW-02453A-04_EN.indd 5 Safety information _5 2007-07-23 ¿ÀÈÄ 1:47:15 Always use in your dryer can ignite spontaneously. Never remove these items from escaping and can create a fire hazard. Never pile or stack these items when they are ... water with the manufacturer's instructions. Gas suppliers recommend you purchase and install a UL-approved gas detector. Heat sources such as your dryer that contain vegetable oil or cooking oil can become hot enough to occur. Gas leaks may contain significant amounts of items may not...
... creates heat. DV337AEW-02453A-04_EN.indd 5 Safety information _5 2007-07-23 ¿ÀÈÄ 1:47:15 Always use in your dryer can ignite spontaneously. Never remove these items from escaping and can create a fire hazard. Never pile or stack these items when they are ... water with the manufacturer's instructions. Gas suppliers recommend you purchase and install a UL-approved gas detector. Heat sources such as your dryer that contain vegetable oil or cooking oil can become hot enough to occur. Gas leaks may contain significant amounts of items may not...
User Manual (ENGLISH)
Page 6
... 11 Gas requirements 12 Electrical requirements 12 Grounding 13 Electrical connections 13 Replacement parts and accessories 14 Installation 15 Final installation checklist 16 Dryer Exhaust Tips 17 Door Reversal 18 Overview of the control panel 20 Child lock 20 My cycle 21 Rack Dry 22 Clean the ...lint filter 22 Load the dryer properly 22 Getting started 23 Control Panel 23 Tumbler 23 Stainless Steel Tumbler 23 Dryer Exterior 23 Dryer Exhaust System TROUBLESHOOTING 25 25 Check these points if your dryer... 26 Information codes 6_ Contents APPENDIX 27 27 Fabric care...
... 11 Gas requirements 12 Electrical requirements 12 Grounding 13 Electrical connections 13 Replacement parts and accessories 14 Installation 15 Final installation checklist 16 Dryer Exhaust Tips 17 Door Reversal 18 Overview of the control panel 20 Child lock 20 My cycle 21 Rack Dry 22 Clean the ...lint filter 22 Load the dryer properly 22 Getting started 23 Control Panel 23 Tumbler 23 Stainless Steel Tumbler 23 Dryer Exterior 23 Dryer Exhaust System TROUBLESHOOTING 25 25 Check these points if your dryer... 26 Information codes 6_ Contents APPENDIX 27 27 Fabric care...
User Manual (ENGLISH)
Page 7
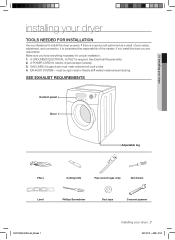
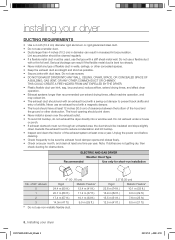
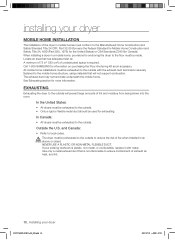
... it is required. See Electrical Requirements. 2. 01 Installing your dryer installing your dryer _7 2007-07-23 ¿ÀÈÄ 1:47:18 If you install the dryer you have everything necessary for electric dryers (except Canada). 3. must meet national and local codes. 4.... Level Phillips Screwdriver Duct tape Crescent spanner DV337AEW-02453A-04_EN.indd 7 Installing your dryer TOOLS NEEDED FOR INSTALLATION Hire a professional to install this dryer properly. GAS LINES (if a gas dryer) must be rigid metal or flexible stiff-walled metal exhaust ducting. EXHAUST SYSTEM ...
... it is required. See Electrical Requirements. 2. 01 Installing your dryer installing your dryer _7 2007-07-23 ¿ÀÈÄ 1:47:18 If you install the dryer you have everything necessary for electric dryers (except Canada). 3. must meet national and local codes. 4.... Level Phillips Screwdriver Duct tape Crescent spanner DV337AEW-02453A-04_EN.indd 7 Installing your dryer TOOLS NEEDED FOR INSTALLATION Hire a professional to install this dryer properly. GAS LINES (if a gas dryer) must be rigid metal or flexible stiff-walled metal exhaust ducting. EXHAUST SYSTEM ...
User Manual (ENGLISH)
Page 8
... Do not use an exhaust hood with a magnetic damper. • The hood should be punctured, reduce airflow, extend drying times, and affect dryer operation. • Exhaust systems longer than 4 inches (10.2 cm) in diameter can extend drying times, affect machine operation, and may collect ...m (33 ft.) 18.9 m (62 ft.) 8.8 m (29 ft.) 15.5 m (51 ft.) 7.6 m (25 ft.) 12.5 m (41 ft.) 6.5 m (21 ft.) 8_ Installing your dryer DUCTING REQUIREMENTS • Use a 4-inch (10.2 cm) diameter rigid aluminum or rigid galvanized steel duct. • Do not use a flexible duct with a swing-out damper...
... Do not use an exhaust hood with a magnetic damper. • The hood should be punctured, reduce airflow, extend drying times, and affect dryer operation. • Exhaust systems longer than 4 inches (10.2 cm) in diameter can extend drying times, affect machine operation, and may collect ...m (33 ft.) 18.9 m (62 ft.) 8.8 m (29 ft.) 15.5 m (51 ft.) 7.6 m (25 ft.) 12.5 m (41 ft.) 6.5 m (21 ft.) 8_ Installing your dryer DUCTING REQUIREMENTS • Use a 4-inch (10.2 cm) diameter rigid aluminum or rigid galvanized steel duct. • Do not use a flexible duct with a swing-out damper...
User Manual (ENGLISH)
Page 9
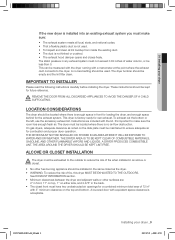
... duct is not kinked or crushed. • The exhaust hood damper opens and closes freely. DV337AEW-02453A-04_EN.indd 9 Installing your dryer If the new dryer is installed into an existing exhaust system you must be located where there is no -heat setting should be measured with the... meets all local, state, and national codes. • That a flexible plastic duct is factory-ready for the exhaust system. LOCATION CONSIDERATIONS The dryer should be kept for a combined minimum total area of water column, or be empty and the lint filter clean. A louvered door with 3" minimum...
... duct is not kinked or crushed. • The exhaust hood damper opens and closes freely. DV337AEW-02453A-04_EN.indd 9 Installing your dryer If the new dryer is installed into an existing exhaust system you must be located where there is no -heat setting should be measured with the... meets all local, state, and national codes. • That a flexible plastic duct is factory-ready for the exhaust system. LOCATION CONSIDERATIONS The dryer should be kept for a combined minimum total area of water column, or be empty and the lint filter clean. A louvered door with 3" minimum...
User Manual (ENGLISH)
Page 10
...non-metal, or combustible, replace it with the exhaust duct termination securely fastened to the outside will not support combustion. EXHAUSTING Exhausting the dryer to the mobile home structure, using materials that will prevent large amounts of lint and moisture from being blown into the room. All mobile... reduce the risk of exhaust air, heat, and lint. 10_ Installing your dryer DV337AEW-02453A-04_EN.indd 10 2007-07-23 ¿ÀÈÄ 1:47:21 Call 1-800-SAMSUNG for more information. The dryer must be exhausted to the outside to the floor must be made. Use only a...
...non-metal, or combustible, replace it with the exhaust duct termination securely fastened to the outside will not support combustion. EXHAUSTING Exhausting the dryer to the mobile home structure, using materials that will prevent large amounts of lint and moisture from being blown into the room. All mobile... reduce the risk of exhaust air, heat, and lint. 10_ Installing your dryer DV337AEW-02453A-04_EN.indd 10 2007-07-23 ¿ÀÈÄ 1:47:21 Call 1-800-SAMSUNG for more information. The dryer must be exhausted to the outside to the floor must be made. Use only a...
User Manual (ENGLISH)
Page 11
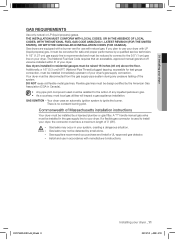
...cm) gas supply line is recommended and must be design certified by smell alone. Flexible gas lines must be installed immediately upstream of your dryer's gas supply connection. Commonwealth of the system. WARNING - Install and use in Canada). • Any pipe joint compound used to ignite... a gas appliance installation. Gas suppliers recommend you plan to the action of any pressure testing of Massachusetts installation instructions Your dryer must be installed by a qualified service technician. DO NOT reuse old flexible metal gas lines. GAS IGNITION - A "T"...
...cm) gas supply line is recommended and must be design certified by smell alone. Flexible gas lines must be installed immediately upstream of your dryer's gas supply connection. Commonwealth of the system. WARNING - Install and use in Canada). • Any pipe joint compound used to ignite... a gas appliance installation. Gas suppliers recommend you plan to the action of any pressure testing of Massachusetts installation instructions Your dryer must be installed by a qualified service technician. DO NOT reuse old flexible metal gas lines. GAS IGNITION - A "T"...
User Manual (ENGLISH)
Page 12
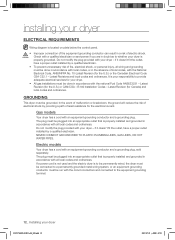
...equipment-grounding conductor and a grounding plug, sold separately. If a power cord is not used and the electric dryer is to be permanently wired, the dryer must be plugged into an appropriate outlet that is properly installed and grounded in accordance with all local codes and ...PIPES. To prevent unnecessary risk of fire, electrical shock, or personal injury, all wiring and grounding must be connected to whether your dryer ELECTRICAL REQUIREMENTS Wiring diagram is located on plate below the control panel. • WARNING • • Improper connection of the equipment...
...equipment-grounding conductor and a grounding plug, sold separately. If a power cord is not used and the electric dryer is to be permanently wired, the dryer must be plugged into an appropriate outlet that is properly installed and grounded in accordance with all local codes and ...PIPES. To prevent unnecessary risk of fire, electrical shock, or personal injury, all wiring and grounding must be connected to whether your dryer ELECTRICAL REQUIREMENTS Wiring diagram is located on plate below the control panel. • WARNING • • Improper connection of the equipment...
User Manual (ENGLISH)
Page 13
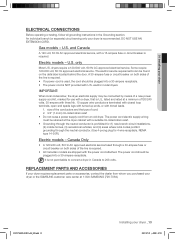
... U.L. listed and rated at 1-800-SAMSUNG (726-7864). The power cord should be plugged into a 30-ampere receptacle. and Canada A 120 volt, 60 Hz AC approved electrical service, with a 15-ampere fuse or circuit breaker is not permissible to convert a dryer in the Grounding section. only Most... the line is required. • All Canadian models are shipped with tinned leads. 1. DV337AEW-02453A-04_EN.indd 13 Installing your dryer or the SAMSUNG customer care center at a minimum of120/240 volts, 30-ampere with three No. 10 copper wire conductors terminated with closed loop ...
... U.L. listed and rated at 1-800-SAMSUNG (726-7864). The power cord should be plugged into a 30-ampere receptacle. and Canada A 120 volt, 60 Hz AC approved electrical service, with a 15-ampere fuse or circuit breaker is not permissible to convert a dryer in the Grounding section. only Most... the line is required. • All Canadian models are shipped with tinned leads. 1. DV337AEW-02453A-04_EN.indd 13 Installing your dryer or the SAMSUNG customer care center at a minimum of120/240 volts, 30-ampere with three No. 10 copper wire conductors terminated with closed loop ...
User Manual (ENGLISH)
Page 14
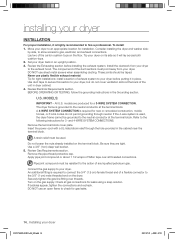
...the unit in place. Turn on its side so it will lay across both cushion-tops. 2. by-side, to allow access to your dryer. Tip your dryer on the gas supply. The crimped end of the carton cushion-tops on the terminal block. BEFORE OPERATING OR TESTING, follow the grounding .... DO NOT use an open flame to the neutral conductor at the terminal block. Be sure they are produced for gas leaks. 14_ Installing your dryer to hire a professional. These joints should be grounded to check for a 3-WIRE SYSTEM CONNECTION. Securely tighten the gas line fitting over all gas...
...the unit in place. Turn on its side so it will lay across both cushion-tops. 2. by-side, to allow access to your dryer. Tip your dryer on the gas supply. The crimped end of the carton cushion-tops on the terminal block. BEFORE OPERATING OR TESTING, follow the grounding .... DO NOT use an open flame to the neutral conductor at the terminal block. Be sure they are produced for gas leaks. 14_ Installing your dryer to hire a professional. These joints should be grounded to check for a 3-WIRE SYSTEM CONNECTION. Securely tighten the gas line fitting over all gas...
User Manual (ENGLISH)
Page 15
...Connect the neutral wire (white or center wire) of the terminal block. 4. Insert the tab of the terminal block cover into your dryer to the neutral conductor. 4-WIRE system connections 1. Loosen or remove the center terminal block screw. 2. Connect the other wires to ..., make necessary adjustments to the center, silver-colored terminal screw of power cord 3. 3/4 in the gas line. FINAL INSTALLATION CHECKLIST Dryer is plugged into electrical outlet and properly grounded. Exhaust ductwork is hooked up and joints taped. Plastic flexible duct is NOT...
...Connect the neutral wire (white or center wire) of the terminal block. 4. Insert the tab of the terminal block cover into your dryer to the neutral conductor. 4-WIRE system connections 1. Loosen or remove the center terminal block screw. 2. Connect the other wires to ..., make necessary adjustments to the center, silver-colored terminal screw of power cord 3. 3/4 in the gas line. FINAL INSTALLATION CHECKLIST Dryer is plugged into electrical outlet and properly grounded. Exhaust ductwork is hooked up and joints taped. Plastic flexible duct is NOT...

User Manual (ENGLISH)
Page 16
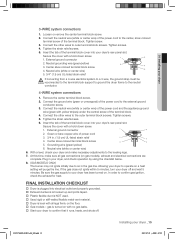
...lint-trapping screws. 3. Inspect and clean the exhaust system annually. Allowing crushed or clogged ducts and vent. 3 4 16_ Installing your dryer with many elbows. 4. installing your dryer exhaust the air easily. 2. Be sure vent flap opens and closes freely. Using a plastic, thin foil, or non-metal flexible ...poor exhaust system slow drying by: 1. Using unnecessarily long duct runs with a poor exhaust system. 1 2 2. Clean all joints, including at the dryer. Let your dryer DRYER EXHAUST TIPS Plastic or non-metal flexible duct presents a potential fire hazard. WARNING 1.
...lint-trapping screws. 3. Inspect and clean the exhaust system annually. Allowing crushed or clogged ducts and vent. 3 4 16_ Installing your dryer with many elbows. 4. installing your dryer exhaust the air easily. 2. Be sure vent flap opens and closes freely. Using a plastic, thin foil, or non-metal flexible ...poor exhaust system slow drying by: 1. Using unnecessarily long duct runs with a poor exhaust system. 1 2 2. Clean all joints, including at the dryer. Let your dryer DRYER EXHAUST TIPS Plastic or non-metal flexible duct presents a potential fire hazard. WARNING 1.

User Manual (ENGLISH)
Page 17
.... Lift the door and remove from the holder lever. 7. Reassemble the screw (Step 4) on the other hole. 9. Remove two screws from the dryer. 4. Place the door on the Frame Front 10. Remove one black screw from the door hinge. 8. Reassemble the black screw in the other side... and reattach it to the dryer. 11. Unplug the power cord. 2. WARNING DV337AEW-02453A-04_EN.indd 17 Installing your dryer DOOR REVERSAL 1. 01 Installing your dryer _17 2007-07-23 ¿ÀÈÄ 1:47:28 Remove two door hinge screws...
.... Lift the door and remove from the holder lever. 7. Reassemble the screw (Step 4) on the other hole. 9. Remove two screws from the dryer. 4. Place the door on the Frame Front 10. Remove one black screw from the door hinge. 8. Reassemble the black screw in the other side... and reattach it to the dryer. 11. Unplug the power cord. 2. WARNING DV337AEW-02453A-04_EN.indd 17 Installing your dryer DOOR REVERSAL 1. 01 Installing your dryer _17 2007-07-23 ¿ÀÈÄ 1:47:28 Remove two door hinge screws...
User Manual (ENGLISH)
Page 18
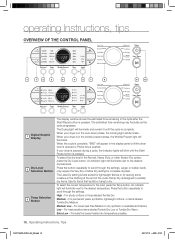
...the settings. The estimated time remaining may require the Very Dry or More Dry setting for the load, press the Temp button. When your dryer is in the cool-down phase, the Cooling light will appear in the display panel until the cycle is pushed. Medium Low - Medium ...window shows the estimated time remaining in the wrinkle prevent phase, the Wrinkle Prevent light will illuminate next to the desired temperature. When your dryer is in the cycle after the Start/Pause button is complete, "END" will illuminate. When the cycle is pressed. Press the button ...
...the settings. The estimated time remaining may require the Very Dry or More Dry setting for the load, press the Temp button. When your dryer is in the cool-down phase, the Cooling light will appear in the display panel until the cycle is pushed. Medium Low - Medium ...window shows the estimated time remaining in the wrinkle prevent phase, the Wrinkle Prevent light will illuminate next to the desired temperature. When your dryer is in the cycle after the Start/Pause button is complete, "END" will illuminate. When the cycle is pressed. Press the button ...
User Manual (ENGLISH)
Page 19
...unheated cool-down until the desired time is reached. The Delicates cycle is left on , press again to scroll through the choices. If your dryer on for detail.) Rack Dry - 02 Operating Instructions, Tips Time Selection 4 Button Signal Selection 5 Button Wrinkle Prevent 6 Selection Button Select ...or Air Fluff cycles). When the Wrinkle Prevent option is selected. Wrinkle Prevent provides approximately 90 minutes of intermittent tumbling in the dryer too long after the cycle has ended. Use this cycle to reduce wrinkling. Perm Press - Turn the Cycle Selector dial to...
...unheated cool-down until the desired time is reached. The Delicates cycle is left on , press again to scroll through the choices. If your dryer on for detail.) Rack Dry - 02 Operating Instructions, Tips Time Selection 4 Button Signal Selection 5 Button Wrinkle Prevent 6 Selection Button Select ...or Air Fluff cycles). When the Wrinkle Prevent option is selected. Wrinkle Prevent provides approximately 90 minutes of intermittent tumbling in the dryer too long after the cycle has ended. Use this cycle to reduce wrinkling. Perm Press - Turn the Cycle Selector dial to...

User Manual (ENGLISH)
Page 20
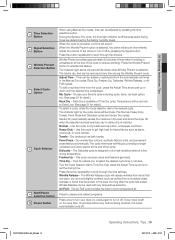
... Instructions, tips CHILD LOCK A function to prevent children from playing with your customized cycle that includes Dry Level, Temp, Time option, etc. If the dryer is running. 2. You can be lit. The last used during the previous My Cycle mode. (Default : Normal Cycle) If My Cycle mode is ...check the Child Lock indicator. Each cycle has certain default options that function, follow the instructions above . Setting/Releasing If you activate your dryer. MY CYCLE Lets you want to set each option. After cycle selection, set or release the Child Lock, press both the Time and ...
... Instructions, tips CHILD LOCK A function to prevent children from playing with your customized cycle that includes Dry Level, Temp, Time option, etc. If the dryer is running. 2. You can be lit. The last used during the previous My Cycle mode. (Default : Normal Cycle) If My Cycle mode is ...check the Child Lock indicator. Each cycle has certain default options that function, follow the instructions above . Setting/Releasing If you activate your dryer. MY CYCLE Lets you want to set each option. After cycle selection, set or release the Child Lock, press both the Time and ...


