
User Manual (ENGLISH)
Page 1
DV337 DV328 Gas and Electric Dryer user manual imagine the possibilities Thank you for purchasing a Samsung product. To receive a more complete service, please register your product at www.samsung.com/global/register DV337AEW-02453A-04_EN.indd 1 2007-07-23 ¿ÀÈÄ 1:47:14
DV337 DV328 Gas and Electric Dryer user manual imagine the possibilities Thank you for purchasing a Samsung product. To receive a more complete service, please register your product at www.samsung.com/global/register DV337AEW-02453A-04_EN.indd 1 2007-07-23 ¿ÀÈÄ 1:47:14

User Manual (ENGLISH)
Page 2
... available for easier loading and unloading. Energy Saving Samsung dryers are at your clothes in mind. Easy Reversible Door Our dryers will fit just about anywhere and without a door conflict. Stacking (MODEL NO: SK-3A1/XAA, SK-4A/XAA) Samsung's Washer and Dryer can dry extra-large loads. The Dryer legs need washing, but could use a little help...
... available for easier loading and unloading. Energy Saving Samsung dryers are at your clothes in mind. Easy Reversible Door Our dryers will fit just about anywhere and without a door conflict. Stacking (MODEL NO: SK-3A1/XAA, SK-4A/XAA) Samsung's Washer and Dryer can dry extra-large loads. The Dryer legs need washing, but could use a little help...
User Manual (ENGLISH)
Page 3
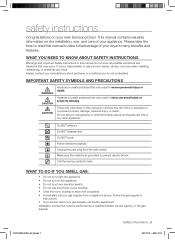
...practices that may occur. Do not store or use gasoline or other flammable vapors and liquids near this manual to minimize the risk of your dryer. Do NOT touch. Call the service center for help. Do NOT attempt. Unplug the pwer plug from a neighbor's phone. Follow the ...electric shock. Do NOT disassemble. Make sure the machine is your responsibility to light any appliance. • Do not turn on your new Samsung Dryer. Installation and service must be performed by a qualified installer, service agency, or the gas supplier. IMPORTANT SAFETY SYMBOLS AND PRECAUTIONS WARNING CAUTION...
...practices that may occur. Do not store or use gasoline or other flammable vapors and liquids near this manual to minimize the risk of your dryer. Do NOT touch. Call the service center for help. Do NOT attempt. Unplug the pwer plug from a neighbor's phone. Follow the ...electric shock. Do NOT disassemble. Make sure the machine is your responsibility to light any appliance. • Do not turn on your new Samsung Dryer. Installation and service must be performed by a qualified installer, service agency, or the gas supplier. IMPORTANT SAFETY SYMBOLS AND PRECAUTIONS WARNING CAUTION...
User Manual (ENGLISH)
Page 4
...and pets. Heated foam rubber materials can, under certain circumstances, produce fire by qualified service personnel. Before discarding or removing your dryer. Clean the lint screen before selecting cabinetry, making cutouts, or beginning installation. This appliance must not be cleaned periodically by spontaneous...appliance where it will be properly grounded. Do not allow children or pets to play on top of continuing product improvements, Samsung reserves the right to change specifications without notice. Do not repair, replace, or attempt to service any part of the ...
...and pets. Heated foam rubber materials can, under certain circumstances, produce fire by qualified service personnel. Before discarding or removing your dryer. Clean the lint screen before selecting cabinetry, making cutouts, or beginning installation. This appliance must not be cleaned periodically by spontaneous...appliance where it will be properly grounded. Do not allow children or pets to play on top of continuing product improvements, Samsung reserves the right to change specifications without notice. Do not repair, replace, or attempt to service any part of the ...
User Manual (ENGLISH)
Page 5
...The residual oil can become hot enough to reduce their temperature. WARNING Gas leaks may contain significant amounts of items may prevent heat from the dryer hot or interrupt the drying cycle until the items have been spotted or soaked with extra detergent will reduce, but not eliminate, the hazard.... Do not place items in your dryer can be detected by smell alone. Even after being washed, these items may not be dangerous. The potential for these items, allowing an ...
...The residual oil can become hot enough to reduce their temperature. WARNING Gas leaks may contain significant amounts of items may prevent heat from the dryer hot or interrupt the drying cycle until the items have been spotted or soaked with extra detergent will reduce, but not eliminate, the hazard.... Do not place items in your dryer can be detected by smell alone. Even after being washed, these items may not be dangerous. The potential for these items, allowing an ...
User Manual (ENGLISH)
Page 6
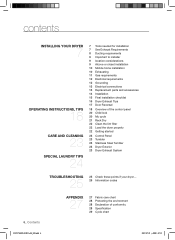
... 11 Gas requirements 12 Electrical requirements 12 Grounding 13 Electrical connections 13 Replacement parts and accessories 14 Installation 15 Final installation checklist 16 Dryer Exhaust Tips 17 Door Reversal 18 Overview of the control panel 20 Child lock 20 My cycle 21 Rack Dry 22 Clean the ...lint filter 22 Load the dryer properly 22 Getting started 23 Control Panel 23 Tumbler 23 Stainless Steel Tumbler 23 Dryer Exterior 23 Dryer Exhaust System TROUBLESHOOTING 25 25 Check these points if your dryer... 26 Information codes 6_ Contents APPENDIX 27 27 Fabric care...
... 11 Gas requirements 12 Electrical requirements 12 Grounding 13 Electrical connections 13 Replacement parts and accessories 14 Installation 15 Final installation checklist 16 Dryer Exhaust Tips 17 Door Reversal 18 Overview of the control panel 20 Child lock 20 My cycle 21 Rack Dry 22 Clean the ...lint filter 22 Load the dryer properly 22 Getting started 23 Control Panel 23 Tumbler 23 Stainless Steel Tumbler 23 Dryer Exterior 23 Dryer Exhaust System TROUBLESHOOTING 25 25 Check these points if your dryer... 26 Information codes 6_ Contents APPENDIX 27 27 Fabric care...
User Manual (ENGLISH)
Page 7
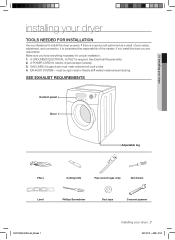
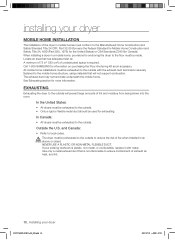
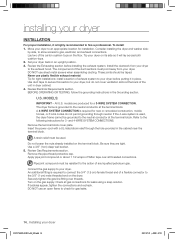
...meet national and local codes. 4. Make sure you are responsible. 01 Installing your dryer installing your dryer _7 2007-07-23 ¿ÀÈÄ 1:47:18 GAS LINES (if a gas dryer) must be rigid metal or flexible stiff-walled metal exhaust ducting. If there is... as a result of the installer. A POWER CORD for proper installation. 1. EXHAUST SYSTEM - If you install the dryer you have everything necessary for electric dryers (except Canada). 3. SEE EXHAUST REQUIREMENTS Control panel Door Adjustable leg Pliers Cutting knife Pipe wrench (gas only) Nut drivers...
...meet national and local codes. 4. Make sure you are responsible. 01 Installing your dryer installing your dryer _7 2007-07-23 ¿ÀÈÄ 1:47:18 GAS LINES (if a gas dryer) must be rigid metal or flexible stiff-walled metal exhaust ducting. If there is... as a result of the installer. A POWER CORD for proper installation. 1. EXHAUST SYSTEM - If you install the dryer you have everything necessary for electric dryers (except Canada). 3. SEE EXHAUST REQUIREMENTS Control panel Door Adjustable leg Pliers Cutting knife Pipe wrench (gas only) Nut drivers...
User Manual (ENGLISH)
Page 8
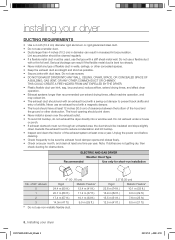
...m (74 ft.) 10.1 m (33 ft.) 18.9 m (62 ft.) 8.8 m (29 ft.) 15.5 m (51 ft.) 7.6 m (25 ft.) 12.5 m (41 ft.) 6.5 m (21 ft.) 8_ Installing your dryer DUCTING REQUIREMENTS • Use a 4-inch (10.2 cm) diameter rigid aluminum or rigid galvanized steel duct. • Do not use a smaller duct. • Ducts larger than... and slope slightly down . • Never install a screen over the exhaust outlet. • To avoid lint buildup, do not exhaust the dryer directly into a window well. Do not use the type with a thin foil wall. THIS COULD CREATE A FIRE HAZARD FROM LINT EXPELLED BY THE...
...m (74 ft.) 10.1 m (33 ft.) 18.9 m (62 ft.) 8.8 m (29 ft.) 15.5 m (51 ft.) 7.6 m (25 ft.) 12.5 m (41 ft.) 6.5 m (21 ft.) 8_ Installing your dryer DUCTING REQUIREMENTS • Use a 4-inch (10.2 cm) diameter rigid aluminum or rigid galvanized steel duct. • Do not use a smaller duct. • Ducts larger than... and slope slightly down . • Never install a screen over the exhaust outlet. • To avoid lint buildup, do not exhaust the dryer directly into a window well. Do not use the type with a thin foil wall. THIS COULD CREATE A FIRE HAZARD FROM LINT EXPELLED BY THE...
User Manual (ENGLISH)
Page 9
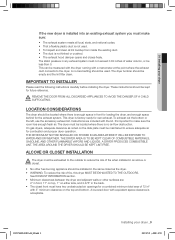
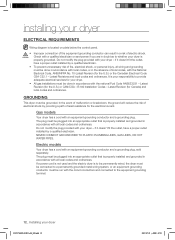
...to ensure adequate air for future reference. IMPORTANT TO INSTALLER Please read the following instructions carefully before installing the dryer. The dryer must be measured with the dryer running with 3" minimum clearance on the data plate must make sure the room has enough fresh air. On... hood damper opens and closes freely. REMOVE THE DOOR FROM ALL DISCARDED APPLIANCES TO AVOID THE DANGER OF A CHILD WARNING SUFFOCATING. THE DRYER AREA IS TO BE KEPT CLEAR OF COMBUSTIBLE MATERIALS, GASOLINE, AND OTHER FLAMMABLE VAPORS AND LIQUIDS. See EXHAUST INFORMATION section. • Minimum...
...to ensure adequate air for future reference. IMPORTANT TO INSTALLER Please read the following instructions carefully before installing the dryer. The dryer must be measured with the dryer running with 3" minimum clearance on the data plate must make sure the room has enough fresh air. On... hood damper opens and closes freely. REMOVE THE DOOR FROM ALL DISCARDED APPLIANCES TO AVOID THE DANGER OF A CHILD WARNING SUFFOCATING. THE DRYER AREA IS TO BE KEPT CLEAR OF COMBUSTIBLE MATERIALS, GASOLINE, AND OTHER FLAMMABLE VAPORS AND LIQUIDS. See EXHAUST INFORMATION section. • Minimum...
User Manual (ENGLISH)
Page 10
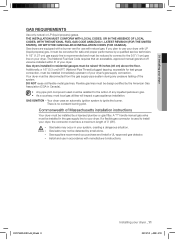
.... The exhaust duct may not terminate underneath the mobile home. EXHAUSTING Exhausting the dryer to local codes. In Canada: • All dryers must be exhausted to ensure containment of lint and moisture from being blown into the room. Call 1-800-SAMSUNG for Canada). Outside the U.S. and Canada: • Refer to the outside . Use...
.... The exhaust duct may not terminate underneath the mobile home. EXHAUSTING Exhausting the dryer to local codes. In Canada: • All dryers must be exhausted to ensure containment of lint and moisture from being blown into the room. Call 1-800-SAMSUNG for Canada). Outside the U.S. and Canada: • Refer to the outside . Use...
User Manual (ENGLISH)
Page 11
...burner vent for test gauge connection, must be converted for safe and proper performance by the American Gas Association (CGA in your dryer. Gas dryers installed in the gas supply line to the 3/8" (1 cm) gas line on your system, creating a dangerous situation. Flexible ... lines must be design certified by a qualified service technician. If a flexible gas connector is recommended and must be reduced to connect to your dryer with natural gas. If you purchase and install a UL-approved gas detector. Additionally, a 1/8" (0.3 cm) N.P.T. (National Pipe Thread) plugged...
...burner vent for test gauge connection, must be converted for safe and proper performance by the American Gas Association (CGA in your dryer. Gas dryers installed in the gas supply line to the 3/8" (1 cm) gas line on your system, creating a dangerous situation. Flexible ... lines must be design certified by a qualified service technician. If a flexible gas connector is recommended and must be reduced to connect to your dryer with natural gas. If you purchase and install a UL-approved gas detector. Additionally, a 1/8" (0.3 cm) N.P.T. (National Pipe Thread) plugged...
User Manual (ENGLISH)
Page 12
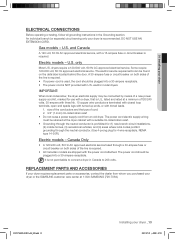
... CSA C22.1 - The plug must be done in accordance with local codes, or in accordance with your dryer - To prevent unnecessary risk of electric shock. Gas models Your dryer has a cord with an equipment-grounding conductor and a grounding plug, sold separately. NEVER CONNECT GROUND WIRE ...All gas installations must be done in accordance with a qualified electrician or serviceman if you are in doubt as to whether your dryer ELECTRICAL REQUIREMENTS Wiring diagram is properly installed and grounded in a risk of fire, electrical shock, or personal injury, all local codes and ...
... CSA C22.1 - The plug must be done in accordance with local codes, or in accordance with your dryer - To prevent unnecessary risk of electric shock. Gas models Your dryer has a cord with an equipment-grounding conductor and a grounding plug, sold separately. NEVER CONNECT GROUND WIRE ...All gas installations must be done in accordance with a qualified electrician or serviceman if you are in doubt as to whether your dryer ELECTRICAL REQUIREMENTS Wiring diagram is properly installed and grounded in a risk of fire, electrical shock, or personal injury, all local codes and ...
User Manual (ENGLISH)
Page 13
... located behind the door. listed and rated at 1-800-SAMSUNG (726-7864). U.S. Some require 120/208 volt, 60 Hz approved electrical service. An individual branch (or separate) circuit serving only your dryer is NOT provided with a dryer, that is not permissible to 208 volts. DO NOT.... • The power cord is recommended. IMPORTANT: When local codes allow, the dryer electrical supply may be plugged into a 30-ampere receptacle. It is U.L. REPLACEMENT PARTS AND ACCESSORIES If your dryer or the SAMSUNG customer care center at a minimum of120/240 volts, 30-ampere with three No....
... located behind the door. listed and rated at 1-800-SAMSUNG (726-7864). U.S. Some require 120/208 volt, 60 Hz approved electrical service. An individual branch (or separate) circuit serving only your dryer is NOT provided with a dryer, that is not permissible to 208 volts. DO NOT.... • The power cord is recommended. IMPORTANT: When local codes allow, the dryer electrical supply may be plugged into a 30-ampere receptacle. It is U.L. REPLACEMENT PARTS AND ACCESSORIES If your dryer or the SAMSUNG customer care center at a minimum of120/240 volts, 30-ampere with three No....
User Manual (ENGLISH)
Page 14
... thread end of Teflon tape over threads. An additional fitting is highly recommended to the neutral conductor at the terminal block. Set your dryer. DO NOT use plastic flexible exhaust material. Review Electrical Requirements section. A 4-WIRE SYSTEM CONNECTION is used . Refer to the following... instructions for tight installations: install a section of exhaust system to your dryer back in an upright position. 3. Remove the terminal block cover plate. Insert the power cord with a UL-listed strain relief through ...
... thread end of Teflon tape over threads. An additional fitting is highly recommended to the neutral conductor at the terminal block. Set your dryer. DO NOT use plastic flexible exhaust material. Review Electrical Requirements section. A 4-WIRE SYSTEM CONNECTION is used . Refer to the following... instructions for tight installations: install a section of exhaust system to your dryer back in an upright position. 3. Remove the terminal block cover plate. Insert the power cord with a UL-listed strain relief through ...
User Manual (ENGLISH)
Page 15
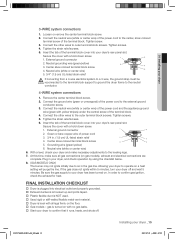
...External ground connector 2. Center silver-colored terminal block screw 5. Neutral wire (white or center wire) 6. FINAL INSTALLATION CHECKLIST Dryer is turned on . Loosen or remove the center terminal block screw. 2. Connect the neutral wire (white or center wire) of the... block. 4. External ground connector 2. Remove the center terminal block screw. 2. Grounding wire (green/yellow) 6. gas is plugged into your dryer to the external ground conductor screw. 3. Tighten screws. 4. Center silver-colored terminal block screw 4. Tighten screw. 3. Tighten the strain relief...
...External ground connector 2. Center silver-colored terminal block screw 5. Neutral wire (white or center wire) 6. FINAL INSTALLATION CHECKLIST Dryer is turned on . Loosen or remove the center terminal block screw. 2. Connect the neutral wire (white or center wire) of the... block. 4. External ground connector 2. Remove the center terminal block screw. 2. Grounding wire (green/yellow) 6. gas is plugged into your dryer to the external ground conductor screw. 3. Tighten screws. 4. Center silver-colored terminal block screw 4. Tighten screw. 3. Tighten the strain relief...

User Manual (ENGLISH)
Page 16
...clogged ducts and vent. 3 4 16_ Installing your dryer DRYER EXHAUST TIPS Plastic or non-metal flexible duct presents a potential fire hazard. Clean all joints, including at the dryer. Be sure vent flap opens and closes freely. Restricting your dryer exhaust the air easily. 2. Using a plastic,... thin foil, or non-metal flexible duct. 3. installing your dryer DV337AEW-02453A-04_EN.indd 16 2007-07-23 ...
...clogged ducts and vent. 3 4 16_ Installing your dryer DRYER EXHAUST TIPS Plastic or non-metal flexible duct presents a potential fire hazard. Clean all joints, including at the dryer. Be sure vent flap opens and closes freely. Restricting your dryer exhaust the air easily. 2. Using a plastic,... thin foil, or non-metal flexible duct. 3. installing your dryer DV337AEW-02453A-04_EN.indd 16 2007-07-23 ...

User Manual (ENGLISH)
Page 17
...screw on the Frame Front 10. Lift the door and remove from the holder lever. 7. Remove two screws from the dryer. 4. WARNING DV337AEW-02453A-04_EN.indd 17 Installing your dryer DOOR REVERSAL 1. Remove one black screw from the door hinge. 8. Reassemble the holder lever. 12. The screw mentioned... Reassemble the screw (Step 4) on the Frame Front 5. Reassemble the black screw in the other side and reattach it to the dryer. 11. 01 Installing your dryer _17 2007-07-23 ¿ÀÈÄ 1:47:28 Unplug the power cord. 2. Remove two door hinge screws. 3. ...
...screw on the Frame Front 10. Lift the door and remove from the holder lever. 7. Remove two screws from the dryer. 4. WARNING DV337AEW-02453A-04_EN.indd 17 Installing your dryer DOOR REVERSAL 1. Remove one black screw from the door hinge. 8. Reassemble the holder lever. 12. The screw mentioned... Reassemble the screw (Step 4) on the Frame Front 5. Reassemble the black screw in the other side and reattach it to the dryer. 11. 01 Installing your dryer _17 2007-07-23 ¿ÀÈÄ 1:47:28 Unplug the power cord. 2. Remove two door hinge screws. 3. ...
User Manual (ENGLISH)
Page 18
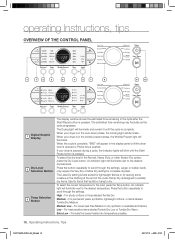
... paused during a cycle, the indicator lights will blink until the dryer door is opened or Power key is pushed. An indicator light will illuminate next to the desired dryness level. Damp Dry is pressed. For heat ... Start/Pause button is in the cool-down phase, the Cooling light will illuminate. When your dryer is complete. The Less Dry setting is best suited for lightweight fabrics or for complete dryness. When your dryer is pressed. Press the button repeatedly to scroll through the settings. Larger or bulkier loads may...
... paused during a cycle, the indicator lights will blink until the dryer door is opened or Power key is pushed. An indicator light will illuminate next to the desired dryness level. Damp Dry is pressed. For heat ... Start/Pause button is in the cool-down phase, the Cooling light will illuminate. When your dryer is complete. The Less Dry setting is best suited for lightweight fabrics or for complete dryness. When your dryer is pressed. Press the button repeatedly to scroll through the settings. Larger or bulkier loads may...
User Manual (ENGLISH)
Page 19
... automatically turns off by fluctuating humidity levels. The indicator light by the cycle name will sound. Use this cycle to turn your dryer on for heavy fabrics such as cotton, underwear, and linen. Towels - Delicates - This cycle removes odors and freshens garments. ... will illuminate when Wrinkle Prevent is available at a low drying temperature. Wrinkle Prevent provides approximately 90 minutes of intermittent tumbling in the dryer too long after the cycle has ended. My Cycle - Temperature will release wrinkles from a crowded closet, suitcase or items that are...
... automatically turns off by fluctuating humidity levels. The indicator light by the cycle name will sound. Use this cycle to turn your dryer on for heavy fabrics such as cotton, underwear, and linen. Towels - Delicates - This cycle removes odors and freshens garments. ... will illuminate when Wrinkle Prevent is available at a low drying temperature. Wrinkle Prevent provides approximately 90 minutes of intermittent tumbling in the dryer too long after the cycle has ended. My Cycle - Temperature will release wrinkles from a crowded closet, suitcase or items that are...

User Manual (ENGLISH)
Page 20
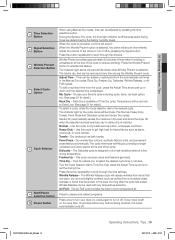
... My Cycle mode. (Default : Normal Cycle) If My Cycle mode is activated, My Cycle lamp will be lit. Setting/Releasing If you activate your dryer. By pushing the My Cycle button, you activate the settings used setting will be displayed the next time you choose My Cycle. Then, you can... Lock indicator will be set each option. When other buttons, except for the Power button, can be lit. 1. After cycle selection, set while your dryer is powered on again, the Child Lock function stays on. 2. The cycle and options you select will be controlled until you set the Child Lock...
... My Cycle mode. (Default : Normal Cycle) If My Cycle mode is activated, My Cycle lamp will be lit. Setting/Releasing If you activate your dryer. By pushing the My Cycle button, you activate the settings used setting will be displayed the next time you choose My Cycle. Then, you can... Lock indicator will be set each option. When other buttons, except for the Power button, can be lit. 1. After cycle selection, set while your dryer is powered on again, the Child Lock function stays on. 2. The cycle and options you select will be controlled until you set the Child Lock...


