
User Manual (ENGLISH)
Page 6
... 11 Gas requirements 12 Electrical requirements 12 Grounding 13 Electrical connections 13 Replacement parts and accessories 14 Installation 15 Final installation checklist 16 Dryer Exhaust Tips 17 Door Reversal 18 Overview of the control panel 20 Child lock 20 My cycle 21 Rack Dry 22 Clean the... lint filter 22 Load the dryer properly 22 Getting started 23 Control Panel 23 Tumbler 23 Stainless Steel Tumbler 23 Dryer Exterior 23 Dryer Exhaust System TROUBLESHOOTING 25 25 Check these points if your dryer... 26 Information codes 6_ Contents APPENDIX 27 27 Fabric care ...
... 11 Gas requirements 12 Electrical requirements 12 Grounding 13 Electrical connections 13 Replacement parts and accessories 14 Installation 15 Final installation checklist 16 Dryer Exhaust Tips 17 Door Reversal 18 Overview of the control panel 20 Child lock 20 My cycle 21 Rack Dry 22 Clean the... lint filter 22 Load the dryer properly 22 Getting started 23 Control Panel 23 Tumbler 23 Stainless Steel Tumbler 23 Dryer Exterior 23 Dryer Exhaust System TROUBLESHOOTING 25 25 Check these points if your dryer... 26 Information codes 6_ Contents APPENDIX 27 27 Fabric care ...
User Manual (ENGLISH)
Page 15
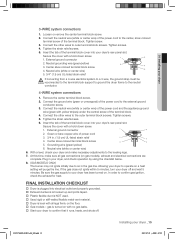
...) UL-listed strain relief 4. Neutral grounding wire (green/yellow) 3. Connect the ground wire (green or unwrapped) of the terminal block cover into your dryer to the neutral conductor. 4-WIRE system connections 1. Tighten the strain relief screws. 6. Plug in the gas line. gas is level with all gas connections... (white or center wire) of the power cord and the appliance ground wire (green with no gas leaks. Start your dryer to air in your dryer and make sure all legs firmly on gas models), exhaust and electrical connections are complete. With a level, check your...
...) UL-listed strain relief 4. Neutral grounding wire (green/yellow) 3. Connect the ground wire (green or unwrapped) of the terminal block cover into your dryer to the neutral conductor. 4-WIRE system connections 1. Tighten the strain relief screws. 6. Plug in the gas line. gas is level with all gas connections... (white or center wire) of the power cord and the appliance ground wire (green with no gas leaks. Start your dryer to air in your dryer and make sure all legs firmly on gas models), exhaust and electrical connections are complete. With a level, check your...
User Manual (ENGLISH)
Page 18
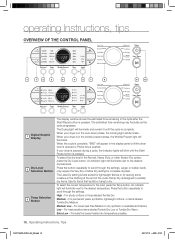
...Tips DV337AEW-02453A-04_EN.indd 18 2007-07-23 ¿ÀÈÄ 1:47:29 When your dryer is paused during a cycle, the indicator lights will blink until the Start/ Pause button is in the wrinkle prevent phase, the Wrinkle Prevent light will illuminate. Medium - ...7 8 9 10 1 Digital Graphic Display Dry Level 2 Selection Button Temp Selection 3 Button The display window shows the estimated time remaining in the cycle after the Start/Pause button is in the cool-down phase, the Cooling light will illuminate. The Drying light will appear in the display panel until the cycle...
...Tips DV337AEW-02453A-04_EN.indd 18 2007-07-23 ¿ÀÈÄ 1:47:29 When your dryer is paused during a cycle, the indicator lights will blink until the Start/ Pause button is in the wrinkle prevent phase, the Wrinkle Prevent light will illuminate. Medium - ...7 8 9 10 1 Digital Graphic Display Dry Level 2 Selection Button Temp Selection 3 Button The display window shows the estimated time remaining in the cycle after the Start/Pause button is in the cool-down phase, the Cooling light will illuminate. The Drying light will appear in the display panel until the cycle...
User Manual (ENGLISH)
Page 19
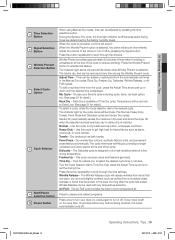
...Selection 5 Button Wrinkle Prevent 6 Selection Button Select Cycle 7 Option 8 Cycle Selector Start/Pause 9 selection button 10 Power button When using Manual Dry cycles, time can be removed at Time Dry cycle. Choose your dryer is selected. Normal - This cycle removes odors and freshens garments. Turn the ... cycle, press the Adjust Time arrow pad up arrow to scroll through the choices. Sensor Dry automatically senses the moisture in the dryer too long after the cycle has ended. The Wrinkle Release cycle will illuminate. Rack Dry is dry, and can be adjusted by...
...Selection 5 Button Wrinkle Prevent 6 Selection Button Select Cycle 7 Option 8 Cycle Selector Start/Pause 9 selection button 10 Power button When using Manual Dry cycles, time can be removed at Time Dry cycle. Choose your dryer is selected. Normal - This cycle removes odors and freshens garments. Turn the ... cycle, press the Adjust Time arrow pad up arrow to scroll through the choices. Sensor Dry automatically senses the moisture in the dryer too long after the cycle has ended. The Wrinkle Release cycle will illuminate. Rack Dry is dry, and can be adjusted by...

User Manual (ENGLISH)
Page 20
... CYCLE Lets you want to set while your dryer is powered on again, the Child Lock function stays on. 2. You can change the My Cycle settings by pushing the Start/Pause button in My Cycle mode as follows. 1. To see these default options, go to Set: 1. operating Instructions, tips CHILD LOCK A function...
... CYCLE Lets you want to set while your dryer is powered on again, the Child Lock function stays on. 2. You can change the My Cycle settings by pushing the Start/Pause button in My Cycle mode as follows. 1. To see these default options, go to Set: 1. operating Instructions, tips CHILD LOCK A function...
User Manual (ENGLISH)
Page 21
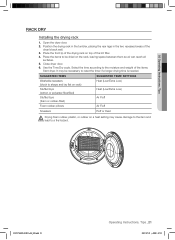
...a fire hazard. It may cause damage to the item and WARNING lead to the moisture and weight of the lint filter. 4. Open the dryer door. 2. Place the items to reset the timer if a longer drying time is needed. DV337AEW-02453A-04_EN.indd 21 Operating Instructions, Tips _21... a heat setting may be necessary to be dried on top of the items. Start dryer. Position the drying rack in the tumbler, placing the rear legs in the two recessed areas of the dryer's back wall. 3. Close dryer door. 6. 02 Operating Instructions, Tips RACK DRY Installing the drying rack 1. SUGGESTED...
...a fire hazard. It may cause damage to the item and WARNING lead to the moisture and weight of the lint filter. 4. Open the dryer door. 2. Place the items to reset the timer if a longer drying time is needed. DV337AEW-02453A-04_EN.indd 21 Operating Instructions, Tips _21... a heat setting may be necessary to be dried on top of the items. Start dryer. Position the drying rack in the tumbler, placing the rear legs in the two recessed areas of the dryer's back wall. 3. Close dryer door. 6. 02 Operating Instructions, Tips RACK DRY Installing the drying rack 1. SUGGESTED...

User Manual (ENGLISH)
Page 22
... Drying, Cooling, and Wrinkle Prevent indicator lights will illuminate. 6. LOAD THE DRYER PROPERLY • Place only one or two articles need drying. Load your dryer without the lint filter in place. DO NOT overload. 2. Do not operate your dryer loosely - GETTING STARTED 1. This improves the tumbling action and drying efficiency. • Overloading restricts tumbling...
... Drying, Cooling, and Wrinkle Prevent indicator lights will illuminate. 6. LOAD THE DRYER PROPERLY • Place only one or two articles need drying. Load your dryer without the lint filter in place. DO NOT overload. 2. Do not operate your dryer loosely - GETTING STARTED 1. This improves the tumbling action and drying efficiency. • Overloading restricts tumbling...
User Manual (ENGLISH)
Page 25
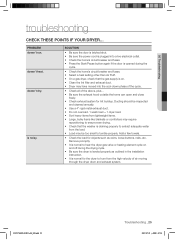
...'t dry. Ducting should be inspected and cleaned annually. • Use a 4" rigid metal exhaust duct. • Do not overload. 1 wash load = 1 dryer load. • Sort heavy items from lightweight items. • Large, bulky items like blankets or comforters may have moved into a live electrical outlet. •... Check the home's circuit breaker and fuses. • Press the Start/Pause button again if the door is opened during the cycle. • Check the home's circuit breaker and fuses. • Select a heat...
...'t dry. Ducting should be inspected and cleaned annually. • Use a 4" rigid metal exhaust duct. • Do not overload. 1 wash load = 1 dryer load. • Sort heavy items from lightweight items. • Large, bulky items like blankets or comforters may have moved into a live electrical outlet. •... Check the home's circuit breaker and fuses. • Press the Start/Pause button again if the door is opened during the cycle. • Check the home's circuit breaker and fuses. • Select a heat...


