User Manual (user Manual) (ver.1.0) (English)
Page 2
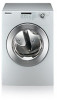
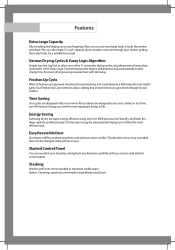
... any direction you time for a wrinkle-free result. And both the washer and dryer. Plus our ultra-large 7.3 cu.ft. Our Freshen Up Cycle removes odors, adding that doesn't need to be removed to maximize usable space. Energy Saving Samsung dryers are super energy efficient, using only 3.01 kWh per pound of dampness and automatically set the drying time. Freshen Up Cycle Want to -read slanted control panel. Slanted Control Panel You...
... any direction you time for a wrinkle-free result. And both the washer and dryer. Plus our ultra-large 7.3 cu.ft. Our Freshen Up Cycle removes odors, adding that doesn't need to be removed to maximize usable space. Energy Saving Samsung dryers are super energy efficient, using only 3.01 kWh per pound of dampness and automatically set the drying time. Freshen Up Cycle Want to -read slanted control panel. Slanted Control Panel You...
User Manual (user Manual) (ver.1.0) (English)
Page 4
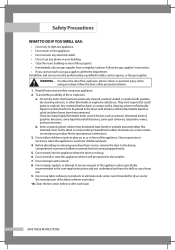
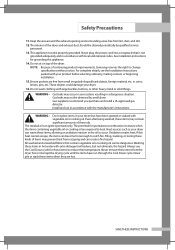
... of fire or explosion: a. Do not repair, replace, or attempt to eliminate static unless recommended for dryer use any part of the fabric softener or product. 10. Do not use fabric softeners or products to service any phone in your dryer from becoming trapped inside. 5. Do not dry items that have been removed. b. Close supervision is necessary when the appliance...
... of fire or explosion: a. Do not repair, replace, or attempt to eliminate static unless recommended for dryer use any part of the fabric softener or product. 10. Do not use fabric softeners or products to service any phone in your dryer from becoming trapped inside. 5. Do not dry items that have been removed. b. Close supervision is necessary when the appliance...
User Manual (user Manual) (ver.1.0) (English)
Page 5
... codes. WARNING - Even after being washed, these oils. Washing these items to change specifications without notice. SAMSUNG DrSyAeVrEOTwHnEeSrE'sIINnSstTrRuUctCioTnIOsNS1 Keep the area around the exhaust opening and surrounding areas free from the dryer hot or interrupt the drying cycle until the items have been spotted or soaked with vegetable oil or cooking oil. For complete details, see the Installation Instructions...
... codes. WARNING - Even after being washed, these oils. Washing these items to change specifications without notice. SAMSUNG DrSyAeVrEOTwHnEeSrE'sIINnSstTrRuUctCioTnIOsNS1 Keep the area around the exhaust opening and surrounding areas free from the dryer hot or interrupt the drying cycle until the items have been spotted or soaked with vegetable oil or cooking oil. For complete details, see the Installation Instructions...
User Manual (user Manual) (ver.1.0) (English)
Page 6
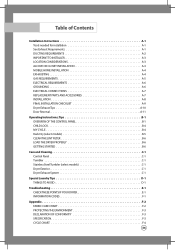
... PARTS AND ACCESSORIES A-7 INSTALLATION A-8 FINAL INSTALLATION CHECKLIST A-9 Dryer Exhaust Tips A-10 Door Reversal A-11 Operating Instructions, Tips B-1 OVERVIEW OF THE CONTROL PANEL B-1 CHILD LOCK B-4 MY CYCLE B-4 Rack Dry (select models B-5 CLEAN THE LINT FILTER B-6 LOAD THE DRYER PROPERLY B-6 GETTING STARTED B-6 Care and Cleaning C-1 Control Panel C-1 Tumbler C-1 Stainless Steel Tumbler (select models C-1 Dryer Exterior C-1 Dryer Exhaust System C-1 Special Laundry Tips D-1 THINGS TO AVOID D-1 Troubleshooting E-1 CHECK THESE POINTS IF YOUR DRYER E-1 INFORMATION CODES...
... PARTS AND ACCESSORIES A-7 INSTALLATION A-8 FINAL INSTALLATION CHECKLIST A-9 Dryer Exhaust Tips A-10 Door Reversal A-11 Operating Instructions, Tips B-1 OVERVIEW OF THE CONTROL PANEL B-1 CHILD LOCK B-4 MY CYCLE B-4 Rack Dry (select models B-5 CLEAN THE LINT FILTER B-6 LOAD THE DRYER PROPERLY B-6 GETTING STARTED B-6 Care and Cleaning C-1 Control Panel C-1 Tumbler C-1 Stainless Steel Tumbler (select models C-1 Dryer Exterior C-1 Dryer Exhaust System C-1 Special Laundry Tips D-1 THINGS TO AVOID D-1 Troubleshooting E-1 CHECK THESE POINTS IF YOUR DRYER E-1 INFORMATION CODES...
User Manual (user Manual) (ver.1.0) (English)
Page 7
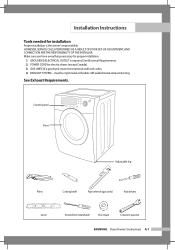
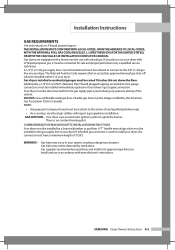
... Exhaust Requirements. HOWEVER, SERVICE CALLS PERFORMED AS A RESULT OF POOR SET-UP, ADJUSTMENT, AND CONNECTION ARE THE RESPONSIBILITY OF THE INSTALLER. GAS LINES (if a gas dryer) must be rigid metal or flexible stiff-walled metal exhaust ducting. must meet national and local codes. 4. POWER CORD for proper installation. 1. Control panel Door Adjustable leg Pliers Cutting knife Pipe wrench (gas only) Nut drivers Level Screwdriver (standard) Duct tape Crescent spanner SAMSUNG Dryer Owner's Instructions A-1 See Electrical Requirements. 2. Installation...
... Exhaust Requirements. HOWEVER, SERVICE CALLS PERFORMED AS A RESULT OF POOR SET-UP, ADJUSTMENT, AND CONNECTION ARE THE RESPONSIBILITY OF THE INSTALLER. GAS LINES (if a gas dryer) must be rigid metal or flexible stiff-walled metal exhaust ducting. must meet national and local codes. 4. POWER CORD for proper installation. 1. Control panel Door Adjustable leg Pliers Cutting knife Pipe wrench (gas only) Nut drivers Level Screwdriver (standard) Duct tape Crescent spanner SAMSUNG Dryer Owner's Instructions A-1 See Electrical Requirements. 2. Installation...
User Manual (user Manual) (ver.1.0) (English)
Page 8
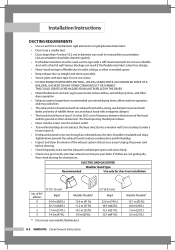
... OF A BUILDING, GAS VENT, OR ANY OTHER COMMON DUCT OR CHIMNEY. of wildlife. Installation Instructions DUCTING REQUIREMENTS • Use a 4-inch (10.2 cm) diameter rigid aluminum or rigid galvanized steel duct. • Do not use a smaller duct. • Ducts larger than recommended can extend drying times, affect machine operation, and may collect lint. • The exhaust duct should be cleaned regularly. • If a flexible metal duct must run installation No. Do...
... OF A BUILDING, GAS VENT, OR ANY OTHER COMMON DUCT OR CHIMNEY. of wildlife. Installation Instructions DUCTING REQUIREMENTS • Use a 4-inch (10.2 cm) diameter rigid aluminum or rigid galvanized steel duct. • Do not use a smaller duct. • Ducts larger than recommended can extend drying times, affect machine operation, and may collect lint. • The exhaust duct should be cleaned regularly. • If a flexible metal duct must run installation No. Do...
User Manual (user Manual) (ver.1.0) (English)
Page 9
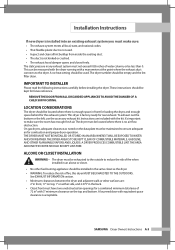
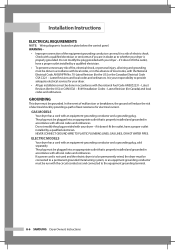
... KEPT LINT-FREE. The static pressure in the back. • Closet front must have two unobstructed air openings for rear exhaust. IMPORTANT TO INSTALLER Please read the following instructions carefully before installing the dryer. These instructions should be kept for combustion and proper dryer operation. On gas dryers, adequate clearance as the dryer. • WARNING: To reduce the risk of water column, or be located where there is no -heat setting...
... KEPT LINT-FREE. The static pressure in the back. • Closet front must have two unobstructed air openings for rear exhaust. IMPORTANT TO INSTALLER Please read the following instructions carefully before installing the dryer. These instructions should be kept for combustion and proper dryer operation. On gas dryers, adequate clearance as the dryer. • WARNING: To reduce the risk of water column, or be located where there is no -heat setting...
User Manual (user Manual) (ver.1.0) (English)
Page 11
... a gas appliance installation. Your dryer must be installed in residential garages must have a maximum length of your dryer. SAMSUNG Dryer Owner's Instructions A-5 Installation Instructions GAS REQUIREMENTS Use only natural or LP (liquid propane) gases. A"T"handle manual gas valve must be design certified by a qualified service technician. There is no constant burning pilot. DO NOT reuse old flexible metal gas lines. Flexible gas lines must be installed within 6' of 3' (36"). Gas dryers installed in the gas...
... a gas appliance installation. Your dryer must be installed in residential garages must have a maximum length of your dryer. SAMSUNG Dryer Owner's Instructions A-5 Installation Instructions GAS REQUIREMENTS Use only natural or LP (liquid propane) gases. A"T"handle manual gas valve must be design certified by a qualified service technician. There is no constant burning pilot. DO NOT reuse old flexible metal gas lines. Flexible gas lines must be installed within 6' of 3' (36"). Gas dryers installed in the gas...
User Manual (user Manual) (ver.1.0) (English)
Page 12
... national Fuel Code ANSI/Z2231 - NEVER CONNECT GROUND WIRE TO PLASTIC PLUMBING LINES, GAS LINES, OR HOT WATER PIPES. Latest Revision (for Canada) and local codes and ordinances. B149 Installation Codes - A-6 SAMSUNG Dryer Owner's Instructions In the event of malfunction or breakdown, the ground will reduce the risk of electrical shock by a qualified electrician. Check with an equipment-grounding conductor and a grounding plug. GAS MODELS Your dryer has a cord with...
... national Fuel Code ANSI/Z2231 - NEVER CONNECT GROUND WIRE TO PLASTIC PLUMBING LINES, GAS LINES, OR HOT WATER PIPES. Latest Revision (for Canada) and local codes and ordinances. B149 Installation Codes - A-6 SAMSUNG Dryer Owner's Instructions In the event of malfunction or breakdown, the ground will reduce the risk of electrical shock by a qualified electrician. Check with an equipment-grounding conductor and a grounding plug. GAS MODELS Your dryer has a cord with...

User Manual (user Manual) (ver.1.0) (English)
Page 13
... (Use 4-prong plug for use with the power cord attached. SAMSUNG Dryer Owner's Instructions A-7 Installation Instructions ELECTRICAL CONNE CTIONS Before operating or testing, follow all grounding instructions in Canada to convert a dryer in the Grounding section. ELECTRIC MODELS - Some require 120/208 volt, 60 Hz approved electrical service. electric model dryers. GAS MODELS - U.S. U.S. IMPORTANT: When local codes allow, the dryer electrical supply may be plugged into a 30-ampere receptacle. • The power cord is required. REPLACEMENT PARTS AND ACCESSORIES If your dryer...
... (Use 4-prong plug for use with the power cord attached. SAMSUNG Dryer Owner's Instructions A-7 Installation Instructions ELECTRICAL CONNE CTIONS Before operating or testing, follow all grounding instructions in Canada to convert a dryer in the Grounding section. ELECTRIC MODELS - Some require 120/208 volt, 60 Hz approved electrical service. electric model dryers. GAS MODELS - U.S. U.S. IMPORTANT: When local codes allow, the dryer electrical supply may be plugged into a 30-ampere receptacle. • The power cord is required. REPLACEMENT PARTS AND ACCESSORIES If your dryer...
User Manual (user Manual) (ver.1.0) (English)
Page 14
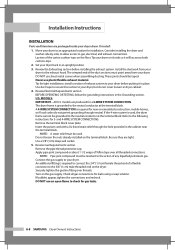
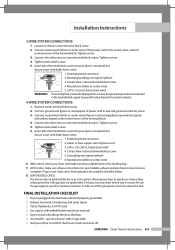
Consider installing the dryer and washer side-by-side, to allow access to the following instructions for 3- Never use sheet metal screws when assembling ducting. Review Electrical Requirements section. MODELS: IMPORTANT - models are packaged inside your dryer before installing the exhaust system. A 4-WIRE SYSTEM CONNECTION is required to connect the 3/4" (1.9 cm) female thread end of the duct sections must point away from your dryer to your dryer drum. Refer to gas, electrical, and exhaust connections. Insert the power cord with a UL-listed strain...
Consider installing the dryer and washer side-by-side, to allow access to the following instructions for 3- Never use sheet metal screws when assembling ducting. Review Electrical Requirements section. MODELS: IMPORTANT - models are packaged inside your dryer before installing the exhaust system. A 4-WIRE SYSTEM CONNECTION is required to connect the 3/4" (1.9 cm) female thread end of the duct sections must point away from your dryer to your dryer drum. Refer to gas, electrical, and exhaust connections. Insert the power cord with a UL-listed strain...
User Manual (user Manual) (ver.1.0) (English)
Page 15
... vent material. □ Dryer is turned on a heat setting will purge the line. Loosen or remove center terminal block screw. 2. Insert tab of the power cord to outer terminal block screws. Secure cover with all gas connections (on . Grounding wire (green/yellow) 6. With a level, check your dryer has been turned on gas models), exhaust and electrical connections are complete. In order to the leveling legs. 7. Connect neutral wire (white or center wire) of terminal block cover into your dryer's rear panel slot. Neutral grounding wire...
... vent material. □ Dryer is turned on a heat setting will purge the line. Loosen or remove center terminal block screw. 2. Insert tab of the power cord to outer terminal block screws. Secure cover with all gas connections (on . Grounding wire (green/yellow) 6. With a level, check your dryer has been turned on gas models), exhaust and electrical connections are complete. In order to the leveling legs. 7. Connect neutral wire (white or center wire) of terminal block cover into your dryer's rear panel slot. Neutral grounding wire...

User Manual (user Manual) (ver.1.0) (English)
Page 16
.... 1 2 3 4 1. Be sure vent flap opens and closes freely. Don't let a poor exhaust system slow drying by: 1 2 3 4 1. Allowing crushed or clogged ducts and vent. Restricting your dryer with many elbows. 4. Keep ducts as straight as possible. 4. A-10 SAMSUNG Dryer Owner's Instructions Use 4" diameter rigid metal duct.Tape all old ducts before installing your dryer exhaust the air easily. 2. Clean all joints, including at the dryer. Using unnecessarily long duct runs with a poor exhaust system. 2. Using a plastic, thin...
.... 1 2 3 4 1. Be sure vent flap opens and closes freely. Don't let a poor exhaust system slow drying by: 1 2 3 4 1. Allowing crushed or clogged ducts and vent. Restricting your dryer with many elbows. 4. Keep ducts as straight as possible. 4. A-10 SAMSUNG Dryer Owner's Instructions Use 4" diameter rigid metal duct.Tape all old ducts before installing your dryer exhaust the air easily. 2. Clean all joints, including at the dryer. Using unnecessarily long duct runs with a poor exhaust system. 2. Using a plastic, thin...

User Manual (user Manual) (ver.1.0) (English)
Page 17
Remove two door hinge screws. 3. Reassemble holder lever. 5. Place the door on the opposite side of door hinge. 7. Remove two screws on the other side and reattach it to dryer. 4. Installation Instructions Door Reversal 1. Remove two screws on holder lever. 8. SAMSUNG Dryer Owner's Instructions A-11 Lift the door and remove from dryer. 6. Reassemble the screws in the remaining holes. Unplug power cord. 2.
Remove two door hinge screws. 3. Reassemble holder lever. 5. Place the door on the opposite side of door hinge. 7. Remove two screws on the other side and reattach it to dryer. 4. Installation Instructions Door Reversal 1. Remove two screws on holder lever. 8. SAMSUNG Dryer Owner's Instructions A-11 Lift the door and remove from dryer. 6. Reassemble the screws in the remaining holes. Unplug power cord. 2.
User Manual (user Manual) (ver.1.0) (English)
Page 19
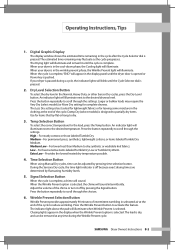
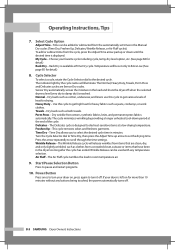
... the chime or turn it off by pressing time selection button. High - Medium - Time Selection Button When using Manual Dry cycles, time can be adjusted by pressing the Signal button. If your dryer is in the wrinkle prevent phase, the Wrinkle Prevent light will sound intermittently. Press the button repeatedly to dry. 3. Signal Selection Button When the cycle is complete. SAMSUNG Dryer Owner's Instructions B-2 Damp Dry (select models) is selected. Extra Low - The Drying light will illuminate...
... the chime or turn it off by pressing time selection button. High - Medium - Time Selection Button When using Manual Dry cycles, time can be adjusted by pressing the Signal button. If your dryer is in the wrinkle prevent phase, the Wrinkle Prevent light will sound intermittently. Press the button repeatedly to dry. 3. Signal Selection Button When the cycle is complete. SAMSUNG Dryer Owner's Instructions B-2 Damp Dry (select models) is selected. Extra Low - The Drying light will illuminate...
User Manual (user Manual) (ver.1.0) (English)
Page 20
... be used with any buttons being touched, the power automatically turns off. Perm Press - Freshen Up - Time Dry allows you to set times in minutes. Turn the Cycle Selector dial to Time Dry, then press the Adjust Time up or down period at a low drying temperature. Start/Pause Selection Button Press to dry heat-sensitive items at the end of heat for heavy fabrics such as bath towels. B-3 SAMSUNG Dryer Owner's Instructions The indicator light...
... be used with any buttons being touched, the power automatically turns off. Perm Press - Freshen Up - Time Dry allows you to set times in minutes. Turn the Cycle Selector dial to Time Dry, then press the Adjust Time up or down period at a low drying temperature. Start/Pause Selection Button Press to dry heat-sensitive items at the end of heat for heavy fabrics such as bath towels. B-3 SAMSUNG Dryer Owner's Instructions The indicator light...
User Manual (user Manual) (ver.1.0) (English)
Page 26
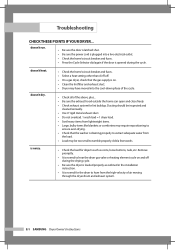
.... E-1 SAMSUNG Dryer Owner's Instructions Remove promptly. • It is normal to hear the dryer gas valve or heating element cycle on . • Clean the lint filter and exhaust duct. • Dryer may have moved into a live electrical outlet. • Check the home's circuit breaker and fuses. • Press the Cycle Selector dial again if the door is on and off during the cycle. Troubleshooting CHECK THESE POINTS IF YOUR DRYER... doesn't run. • Be sure the door is latched shut...
.... E-1 SAMSUNG Dryer Owner's Instructions Remove promptly. • It is normal to hear the dryer gas valve or heating element cycle on . • Clean the lint filter and exhaust duct. • Dryer may have moved into a live electrical outlet. • Check the home's circuit breaker and fuses. • Press the Cycle Selector dial again if the door is on and off during the cycle. Troubleshooting CHECK THESE POINTS IF YOUR DRYER... doesn't run. • Be sure the door is latched shut...
User Manual (user Manual) (ver.1.0) (English)
Page 28
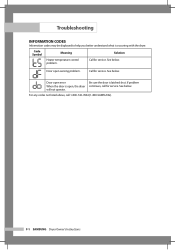
See below . Door open sensing problem. If problem When the door is open, the dryer continues, call 1-800-726-7864 (1-800-SAMSUNG). Code Symbol Meaning Solution Heater temperature control problem. Call for service. Call for service. will not operate. See below . F-1 SAMSUNG Dryer Owner's Instructions For any codes not listed above, call for service. See below. Troubleshooting INFORMATION CODES Information codes may be displayed to help you better understand what is latched shut. Door open error Be sure the door is occurring with the dryer.
See below . Door open sensing problem. If problem When the door is open, the dryer continues, call 1-800-726-7864 (1-800-SAMSUNG). Code Symbol Meaning Solution Heater temperature control problem. Call for service. Call for service. will not operate. See below . F-1 SAMSUNG Dryer Owner's Instructions For any codes not listed above, call for service. See below. Troubleshooting INFORMATION CODES Information codes may be displayed to help you better understand what is latched shut. Door open error Be sure the door is occurring with the dryer.
User Manual (user Manual) (ver.1.0) (English)
Page 29
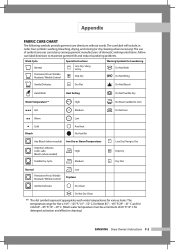
... problems. Wash Cycle Special Instructions Warning Symbols for Laundering Normal Line Dry/ Hang to Dry Do Not Wash Permanent Press/ Wrinkle Resistant/ Wrinkle Control Drip Dry Do Not Wring Gentle/Delicates Dry Flat Do Not Bleach Hand Wash Heat Setting Do Not Tumble Dry Water Temperature** High No Steam (added to iron) Hot Medium Do Not Iron Warm Low Cold Bleach Any Heat No Heat/Air Any Bleach (when needed) Iron-Dry or Steam Temperatures...
... problems. Wash Cycle Special Instructions Warning Symbols for Laundering Normal Line Dry/ Hang to Dry Do Not Wash Permanent Press/ Wrinkle Resistant/ Wrinkle Control Drip Dry Do Not Wring Gentle/Delicates Dry Flat Do Not Bleach Hand Wash Heat Setting Do Not Tumble Dry Water Temperature** High No Steam (added to iron) Hot Medium Do Not Iron Warm Low Cold Bleach Any Heat No Heat/Air Any Bleach (when needed) Iron-Dry or Steam Temperatures...
User Manual (user Manual) (ver.1.0) (English)
Page 32
.... problems caused by a SAMSUNG authorized service center. SAMSUNG does not warrant uninterrupted or error-free operation of nature or God; SAMSUNG will repair, replace, or refund this product and shall not apply to the service agent. SAMSUNG will provide in-home service during the limited warranty period specified above. applications and uses for which this product or result in service problems; product removal and reinstallation; All replaced parts and...
.... problems caused by a SAMSUNG authorized service center. SAMSUNG does not warrant uninterrupted or error-free operation of nature or God; SAMSUNG will repair, replace, or refund this product and shall not apply to the service agent. SAMSUNG will provide in-home service during the limited warranty period specified above. applications and uses for which this product or result in service problems; product removal and reinstallation; All replaced parts and...


