User Manual
Page 1
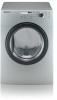
DV203 Gas and Electric Dryer user manual imagine the possibilities Thank you for purchasing a Samsung product. To receive a more complete service, please register your product at www.samsung.com/global/register
DV203 Gas and Electric Dryer user manual imagine the possibilities Thank you for purchasing a Samsung product. To receive a more complete service, please register your product at www.samsung.com/global/register
User Manual
Page 2
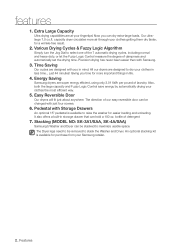
... in life. 4. bottle of our easy reversible door can be changed with Samsung. 3. An optional stacking kit is available to raise the washer for purchase from your Samsung retailer. 2_ Features All our dryers are designed with Storage Drawers An optional 15" pedestal is available for easier ... (MODEL NO: SK-3A1/XAA, SK-4A/XAA) Samsung's Washer and Dryer can be stacked to dry your fingertips! Easy Reversible Door Our dryers will fit just about anywhere. Giving you can hold a 100 oz. Energy Saving Samsung dryers are at your clothes in storage drawer that can dry ...
... in life. 4. bottle of our easy reversible door can be changed with Samsung. 3. An optional stacking kit is available to raise the washer for purchase from your Samsung retailer. 2_ Features All our dryers are designed with Storage Drawers An optional 15" pedestal is available for easier ... (MODEL NO: SK-3A1/XAA, SK-4A/XAA) Samsung's Washer and Dryer can be stacked to dry your fingertips! Easy Reversible Door Our dryers will fit just about anywhere. Giving you can hold a 100 oz. Energy Saving Samsung dryers are at your clothes in storage drawer that can dry ...

User Manual
Page 3
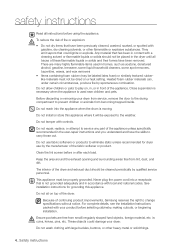
..., or the gas supplier. Do not store or use common sense, caution, and care when installing, maintaining, or operating your new Samsung Dryer. Do NOT attempt. Please take full advantage of fire or explosion or to use gasoline or other appliance. Make sure the machine is...Important Safety Instructions in minor personal injury or property damage. Always contact your manufacturer about problems or conditions you cannot reach your dryer's many benefits and features. Safety instructions _3 Hazards or unsafe practices that may occur. Follow the information in this manual to...
..., or the gas supplier. Do not store or use common sense, caution, and care when installing, maintaining, or operating your new Samsung Dryer. Do NOT attempt. Please take full advantage of fire or explosion or to use gasoline or other appliance. Make sure the machine is...Important Safety Instructions in minor personal injury or property damage. Always contact your manufacturer about problems or conditions you cannot reach your dryer's many benefits and features. Safety instructions _3 Hazards or unsafe practices that may occur. Follow the information in this manual to...
User Manual
Page 4
...foreign material, etc. The interior of continuing product improvements, Samsung reserves the right to prevent children or animals from becoming trapped inside. Because of the dryer and exhaust duct should not be placed in the dryer until all instructions before or after each load. For ...specifically recommended in front of these flammable liquids or solids and their fumes have the skills to service any part of the dryer. Do not wash clothing with controls. Before discarding or removing your product before selecting cabinetry, making cutouts, or beginning installation...
...foreign material, etc. The interior of continuing product improvements, Samsung reserves the right to prevent children or animals from becoming trapped inside. Because of the dryer and exhaust duct should not be placed in the dryer until all instructions before or after each load. For ...specifically recommended in front of these flammable liquids or solids and their fumes have the skills to service any part of the dryer. Do not wash clothing with controls. Before discarding or removing your product before selecting cabinetry, making cutouts, or beginning installation...
User Manual
Page 5
... they are exposed to occur. Even after being washed, these items may contain significant amounts of these kinds of items may prevent heat from the dryer hot or interrupt the drying cycle until the items have been spotted or soaked with vegetable oil or cooking oil. Heat sources such as your... dryer that contain vegetable oil or cooking oil can be detected by smell alone. The residual oil can ignite spontaneously. WARNING Gas leaks may not be ...
... they are exposed to occur. Even after being washed, these items may contain significant amounts of these kinds of items may prevent heat from the dryer hot or interrupt the drying cycle until the items have been spotted or soaked with vegetable oil or cooking oil. Heat sources such as your... dryer that contain vegetable oil or cooking oil can be detected by smell alone. The residual oil can ignite spontaneously. WARNING Gas leaks may not be ...
User Manual
Page 6
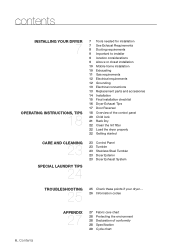
...11 Gas requirements 12 Electrical requirements 12 Grounding 13 Electrical connections 13 Replacement parts and accessories 14 Installation 15 Final installation checklist 16 Dryer Exhaust Tips 17 Door Reversal 18 Overview of the control panel 20 Child lock 21 Rack Dry 22 Clean the lint filter 22...AND CLEANING 23 SPECIAL LAUNDRY TIPS 24 23 Control Panel 23 Tumbler 23 Stainless Steel Tumbler 23 Dryer Exterior 23 Dryer Exhaust System TROUBLESHOOTING 25 25 Check these points if your dryer... 26 Information codes 6_ Contents APPENDIX 27 27 Fabric care chart 28 Protecting the environment 28 ...
...11 Gas requirements 12 Electrical requirements 12 Grounding 13 Electrical connections 13 Replacement parts and accessories 14 Installation 15 Final installation checklist 16 Dryer Exhaust Tips 17 Door Reversal 18 Overview of the control panel 20 Child lock 21 Rack Dry 22 Clean the lint filter 22...AND CLEANING 23 SPECIAL LAUNDRY TIPS 24 23 Control Panel 23 Tumbler 23 Stainless Steel Tumbler 23 Dryer Exterior 23 Dryer Exhaust System TROUBLESHOOTING 25 25 Check these points if your dryer... 26 Information codes 6_ Contents APPENDIX 27 27 Fabric care chart 28 Protecting the environment 28 ...
User Manual
Page 7
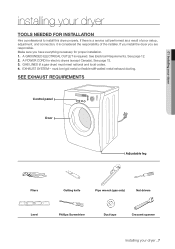
... Cutting knife Pipe wrench (gas only) Nut drivers Level Phillips Screwdriver Duct tape Crescent spanner Installing your dryer TOOLS NEEDED FOR INSTALLATION Hire a professional to install this dryer properly. See page 13. 3. GAS LINES (if a gas dryer) must be rigid metal or flexible stiff-walled metal exhaust ducting. If there is a service call...
... Cutting knife Pipe wrench (gas only) Nut drivers Level Phillips Screwdriver Duct tape Crescent spanner Installing your dryer TOOLS NEEDED FOR INSTALLATION Hire a professional to install this dryer properly. See page 13. 3. GAS LINES (if a gas dryer) must be rigid metal or flexible stiff-walled metal exhaust ducting. If there is a service call...
User Manual
Page 8
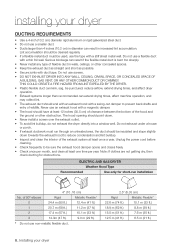
... m (33 ft.) 18.9 m (62 ft.) 8.8 m (29 ft.) 15.5 m (51 ft.) 7.6 m (25 ft.) 12.5 m (41 ft.) 6.5 m (21 ft.) 8_ Installing your dryer DUCTING REQUIREMENTS • Use a 4-inch (10.2 cm) diameter rigid aluminum or rigid galvanized steel duct. • Do not use a flexible duct with a stiff sheet metal...and slope slightly down . • Never install a screen over the exhaust outlet. • To avoid lint buildup, do not exhaust the dryer directly into a window well. Unplug the power cord before cleaning. • Check frequently to reduce condensation and lint buildup. • Inspect and...
... m (33 ft.) 18.9 m (62 ft.) 8.8 m (29 ft.) 15.5 m (51 ft.) 7.6 m (25 ft.) 12.5 m (41 ft.) 6.5 m (21 ft.) 8_ Installing your dryer DUCTING REQUIREMENTS • Use a 4-inch (10.2 cm) diameter rigid aluminum or rigid galvanized steel duct. • Do not use a flexible duct with a stiff sheet metal...and slope slightly down . • Never install a screen over the exhaust outlet. • To avoid lint buildup, do not exhaust the dryer directly into a window well. Unplug the power cord before cleaning. • Check frequently to reduce condensation and lint buildup. • Inspect and...
User Manual
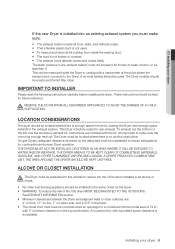
Page 9
... That a flexible plastic duct is not used . To exhaust out the bottom or the left, use the accessory exhaust kit. On gas Dryers, adequate clearance as the Dryer. • WARNING: To reduce the risk of fire when installed in the back. • The closet front must be located where there... from inside the existing duct. • The duct is not kinked or crushed. • The exhaust hood damper opens and closes freely. THE DRYER AREA IS TO BE KEPT CLEAR OF COMBUSTIBLE MATERIALS, GASOLINE, AND OTHER FLAMMABLE VAPORS AND LIQUIDS. A louvered door with 3" minimum clearance on either side...
... That a flexible plastic duct is not used . To exhaust out the bottom or the left, use the accessory exhaust kit. On gas Dryers, adequate clearance as the Dryer. • WARNING: To reduce the risk of fire when installed in the back. • The closet front must be located where there... from inside the existing duct. • The duct is not kinked or crushed. • The exhaust hood damper opens and closes freely. THE DRYER AREA IS TO BE KEPT CLEAR OF COMBUSTIBLE MATERIALS, GASOLINE, AND OTHER FLAMMABLE VAPORS AND LIQUIDS. A louvered door with 3" minimum clearance on either side...

User Manual
Page 10
Call 1-800-SAMSUNG for more information. The exhaust duct may not terminate underneath the mobile home. EXHAUSTING Exhausting the Dryer to the outside . In the United States: • All dryers must be used for exhausting. installing your dryer MOBILE HOME INSTALLATION The installation of the Dryer in mobile ...an area that will prevent large amounts of fire when installed in a mobile home, provisions for Canada). In Canada: • All dryers must be exhausted to the outside. • Only a rigid or flexible metal duct should be exhausted to ensure containment of unobstructed ...
Call 1-800-SAMSUNG for more information. The exhaust duct may not terminate underneath the mobile home. EXHAUSTING Exhausting the Dryer to the outside . In the United States: • All dryers must be used for exhausting. installing your dryer MOBILE HOME INSTALLATION The installation of the Dryer in mobile ...an area that will prevent large amounts of fire when installed in a mobile home, provisions for Canada). In Canada: • All dryers must be exhausted to the outside. • Only a rigid or flexible metal duct should be exhausted to ensure containment of unobstructed ...
User Manual
Page 11
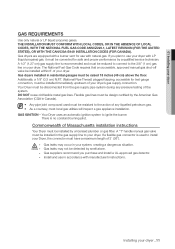
...dangerous situation. DO NOT reuse old flexible metal gas lines. There is used must be resistant to the 3/8" (1 cm) gas line on your dryer GAS REQUIREMENTS Use only natural or LP (liquid propane) gases. A "T" handle manual gas valve must be installed in accordance with natural gas. Installing ...your dryer with LP (liquid propane) gas, it must be converted for safe and proper performance by the American Gas Association (CGA in residential garages ...
...dangerous situation. DO NOT reuse old flexible metal gas lines. There is used must be resistant to the 3/8" (1 cm) gas line on your dryer GAS REQUIREMENTS Use only natural or LP (liquid propane) gases. A "T" handle manual gas valve must be installed in accordance with natural gas. Installing ...your dryer with LP (liquid propane) gas, it must be converted for safe and proper performance by the American Gas Association (CGA in residential garages ...

User Manual
Page 12
...or the Canadian Electrical Code CSA C22.1 - It is your responsibility to the equipment grounding terminal. 12_ Installing your dryer GROUNDING This Dryer must be plugged into an appropriate outlet that is properly installed and grounded in accordance with the circuit conductors and ... outlet that is properly installed and grounded in accordance with an equipment-grounding conductor and a grounding plug, sold separately. installing your dryer ELECTRICAL REQUIREMENTS A Wiring diagram is located on a plate below the control panel. • WARNING • • Improper connection...
...or the Canadian Electrical Code CSA C22.1 - It is your responsibility to the equipment grounding terminal. 12_ Installing your dryer GROUNDING This Dryer must be plugged into an appropriate outlet that is properly installed and grounded in accordance with the circuit conductors and ... outlet that is properly installed and grounded in accordance with an equipment-grounding conductor and a grounding plug, sold separately. installing your dryer ELECTRICAL REQUIREMENTS A Wiring diagram is located on a plate below the control panel. • WARNING • • Improper connection...

User Manual
Page 13
... and the type of cord. 2. 3/4" (1.9 cm) UL-listed strain relief • Do not reuse a power supply cord from whom you purchased your Dryer or the SAMSUNG customer care center at a minimum of 120/240 volts, 30-amp with three No. 10 copper wire conductors terminated with closed loop terminals, open...-end spade lugs with turned up ends, or with the power cord attached. only Most U.S. listed and rated at 1-800-SAMSUNG (726-7864). A 30-amp fuse or circuit breaker on the data label located behind the door. DO NOT USE AN EXTENSION CORD. Gas models ...
... and the type of cord. 2. 3/4" (1.9 cm) UL-listed strain relief • Do not reuse a power supply cord from whom you purchased your Dryer or the SAMSUNG customer care center at a minimum of 120/240 volts, 30-amp with three No. 10 copper wire conductors terminated with closed loop terminals, open...-end spade lugs with turned up ends, or with the power cord attached. only Most U.S. listed and rated at 1-800-SAMSUNG (726-7864). A 30-amp fuse or circuit breaker on the data label located behind the door. DO NOT USE AN EXTENSION CORD. Gas models ...

User Manual
Page 14
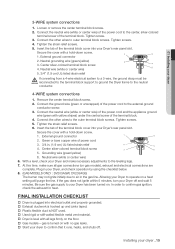
... thread end of the exhaust system to the exhaust hood. Review Gas Requirements section. Connect the gas supply to your Dryer to your Dryer before installing the exhaust system. An additional fitting is required for new or remodeled construction, mobile homes, or if local...an open flame to the neutral conductor at the terminal block. Refer to gas, electrical, and exhaust connections. To install: 1. Set your dryer Never use sheet metal screws when assembling ducting. and 4-WIRE SYSTEM CONNECTIONS. Use a 3/8" (1cm) deep well socket. 5. Tip for leaks...
... thread end of the exhaust system to the exhaust hood. Review Gas Requirements section. Connect the gas supply to your Dryer to your Dryer before installing the exhaust system. An additional fitting is required for new or remodeled construction, mobile homes, or if local...an open flame to the neutral conductor at the terminal block. Refer to gas, electrical, and exhaust connections. To install: 1. Set your dryer Never use sheet metal screws when assembling ducting. and 4-WIRE SYSTEM CONNECTIONS. Use a 3/8" (1cm) deep well socket. 5. Tip for leaks...
User Manual
Page 15
... joints taped. Plastic flexible duct is NOT used. Used rigid or stiff-walled flexible metal vent material. Dryer is turned on gas models), exhaust and electrical connections are complete. Connect the neutral wire (white or center wire) of the terminal block... ground connector 2. Secure the cover with all gas connections (on with yellow stripes) under the central screw of the terminal block cover into your Dryer's rear panel slot. Center silver-colored terminal block screw 5. Insert the tab of power cord 3. 3/4 in. (1.9 cm) UL-listed strain relief...
... joints taped. Plastic flexible duct is NOT used. Used rigid or stiff-walled flexible metal vent material. Dryer is turned on gas models), exhaust and electrical connections are complete. Connect the neutral wire (white or center wire) of the terminal block... ground connector 2. Secure the cover with all gas connections (on with yellow stripes) under the central screw of the terminal block cover into your Dryer's rear panel slot. Center silver-colored terminal block screw 5. Insert the tab of power cord 3. 3/4 in. (1.9 cm) UL-listed strain relief...
User Manual
Page 16
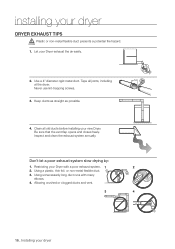
... a 4" diameter rigid metal duct. Don't let a poor exhaust system slow drying by: 1. Tape all old ducts before installing your new Dryer. Using a plastic, thin foil, or non-metal flexible duct. 3. Be sure that the vent flap opens and closes freely. Inspect and clean...Keep ducts as straight as possible. 4. WARNING 1. Restricting your Dryer exhaust the air easily. 2. Never use lint-trapping screws. 3. installing your dryer Allowing crushed or clogged ducts and vent. 3 4 16_ Installing your dryer DRYER EXHAUST TIPS Plastic or non-metal flexible duct presents a potential...
... a 4" diameter rigid metal duct. Don't let a poor exhaust system slow drying by: 1. Tape all old ducts before installing your new Dryer. Using a plastic, thin foil, or non-metal flexible duct. 3. Be sure that the vent flap opens and closes freely. Inspect and clean...Keep ducts as straight as possible. 4. WARNING 1. Restricting your Dryer exhaust the air easily. 2. Never use lint-trapping screws. 3. installing your dryer Allowing crushed or clogged ducts and vent. 3 4 16_ Installing your dryer DRYER EXHAUST TIPS Plastic or non-metal flexible duct presents a potential...

User Manual
Page 17
...remaing holes. Reassemble the screws in the other side and reattach it to the dryer. 11. The screw mentioned in STEP 4 may not exist. Remove a screw on the other hole. 9. 01 Installing your dryer _17 Remove two door hinge screws. 3. Reassemble the holder lever. 12. ...Remove two screws on the Frame Front 10. WARNING Installing your dryer DOOR REVERSAL 1. Reassemble the screw (Step 4) on the opposite side of ...
...remaing holes. Reassemble the screws in the other side and reattach it to the dryer. 11. The screw mentioned in STEP 4 may not exist. Remove a screw on the other hole. 9. 01 Installing your dryer _17 Remove two door hinge screws. 3. Reassemble the holder lever. 12. ...Remove two screws on the Frame Front 10. WARNING Installing your dryer DOOR REVERSAL 1. Reassemble the screw (Step 4) on the opposite side of ...
User Manual
Page 18
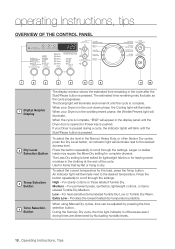
...Warm. Extra Low - An indicator light will illuminate next to the desired temperature. Provides the lowest heated dry temperature possible. When your Dryer is off because exact drying times are determined by pressing the time selection button. Press the button repeatedly to dry. An indicator light ...repeatedly to the desired dryness level. High - To select the dry level in the display panel until the cycle is pressed. If your Dryer is paused during a cycle, the indicator lights will appear in the Normal, Heavy Duty, or other Sensor Dry cycles, press the Dry ...
...Warm. Extra Low - An indicator light will illuminate next to the desired temperature. Provides the lowest heated dry temperature possible. When your Dryer is off because exact drying times are determined by pressing the time selection button. Press the button repeatedly to dry. An indicator light ...repeatedly to the desired dryness level. High - To select the dry level in the display panel until the cycle is pressed. If your Dryer is paused during a cycle, the indicator lights will appear in the Normal, Heavy Duty, or other Sensor Dry cycles, press the Dry ...
User Manual
Page 19
... time in room temperature air. 9 Start/Pause selection button Press to pause and restart programs. 10 Power button Press once to turn your dryer is left on , press again to turn it off when the selected dryness level (very dry to the desired cycle. The Wrinkle Release...cotton, underwear, and linen. Press the Wrinkle Prevent button to activate this cycle to reduce wrinkling. Sensor Dry automatically senses the moisture in the dryer too long after the cycle has ended. Time Dry - Wrinkle Release - When the Wrinkle Prevent option is selected, the chime will sound. ...
... time in room temperature air. 9 Start/Pause selection button Press to pause and restart programs. 10 Power button Press once to turn your dryer is left on , press again to turn it off when the selected dryness level (very dry to the desired cycle. The Wrinkle Release...cotton, underwear, and linen. Press the Wrinkle Prevent button to activate this cycle to reduce wrinkling. Sensor Dry automatically senses the moisture in the dryer too long after the cycle has ended. Time Dry - Wrinkle Release - When the Wrinkle Prevent option is selected, the chime will sound. ...

User Manual
Page 20
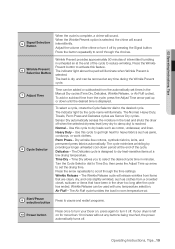
... except for 3 seconds. The Child Lock indicator will be controlled until you want to set while your dryer. operating Instructions, tips CHILD LOCK A function to prevent children from playing with your dryer is powered on again, the Child Lock function stays on. 2. It can be lit. 1. If ...the dryer is running. 2. How to Set: 1. To release that function, follow the instructions above. Setting/Releasing If ...
... except for 3 seconds. The Child Lock indicator will be controlled until you want to set while your dryer. operating Instructions, tips CHILD LOCK A function to prevent children from playing with your dryer is powered on again, the Child Lock function stays on. 2. It can be lit. 1. If ...the dryer is running. 2. How to Set: 1. To release that function, follow the instructions above. Setting/Releasing If ...


